26.QT-模型视图之自定义委托
在上一章学习 25.QT-模型视图 后,本章接着学习视图委托
视图委托(Delegate)简介
由于模型负责组织数据,而视图负责显示数据,所以当用户想修改显示的数据时,就要通过视图中的委托来完成
视图委托类似于传统的MVC设计模式里的Controller(控制器)角色
- Model(模型) - 负责数据组织
- View(视图) - 负责数据显示
- Controller(控制器) - 负责用户输入,如何展示数据、并如何处理数据
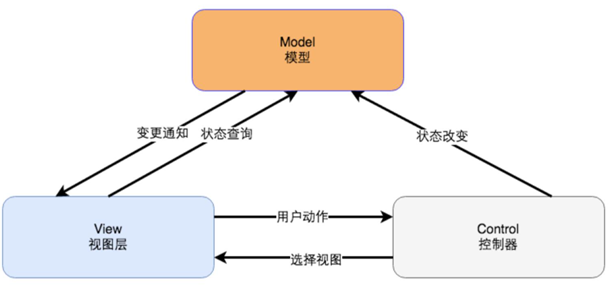
只不过在Qt中,(控制器)角色变成了delegate了
初探自定义委托类
- 委托属于视图的子功能
- 视图主要负责组织具体数据项的显示方式(是列表方式,还是树形方式,还是表格方式)
- 委托主要负责具体数据项的显示和编辑,比如用户需要编辑某个数据时,则需要弹出编辑框
- 视图可以通过 itemDelegate() ,setItemDelegate ( )成员函数来 获得/设置当前委托对象
- QAbstractItemDelegate类是所有委托的父类,用来 负责提供通用接口
- 在模型视图中,会默认提供一个QStyledItemDelegate类,供用户编辑数据
- 也可以通过继承QItemDelegate父类,实现自定义委托功能
QAbstractItemDelegate类中的关键虚函数
QWidget * createEditor( QWidget * parent, QStyleOptionViewItem & option, QModelIndex & index ) ;
//创建编辑器,并返回该编辑器, option包含了该数据项的具体信息(比如:数据项窗口大小,字体格式,对齐方式,图标位于字体的哪个位置等)、index 包含了该数据项的内容(比如:text信息,背景色等)

void updateEditorGeometry ( QWidget * editor, QStyleOptionViewItem & option, QModelIndex &index );
//该函数里,可以通过editor->setGeometry()更新编辑组件大小,保证editor显示的位置及大小
//大小可以通过option.rect获取数据项窗口大小

void setEditorData ( QWidget * editor, const QModelIndex & index );
//通过索引值,将模型里的数据提取到编辑器内容里

void  setModelData ( QWidget * editor, QAbstractItemModel * model, QModelIndex & index );
//通过索引值, 根据editor 的数据更新model的数据。

void paint ( QPainter * painter, const QStyleOptionViewItem & option, const QModelIndex & index ) ;
//复制绘画数据项的显示和编辑
QAbstractItemDelegate类中的关键信号
void  closeEditor ( QWidget * editor, QAbstractItemDelegate::EndEditHint hint = NoHint );
//当用户关闭编辑器后,就会发出这个信号。
// hint 参数用来指定当用户完成编辑后,应该显示什么标记,用来提示用户已完成编辑

void   commitData ( QWidget * editor ) ;
//当完成编辑数据后,发送该信号,表示有新数据提交到模型中
我们以编辑某个数据项为例:
- 视图首先会调用createEditor()函数生成编辑器
- 调用updateEditorGeometry()函数设置编辑器组件大小
- 调用setEditorData()函数,将模型里的数据提取到编辑器中
- 等待用户编辑... ...
- 当用户编辑完成后, 系统将会发送commitData信号函数
- 然后调用setModelData()函数,设置模型数据,以及setEditorData()函数,更新编辑器
- 视图最后发送closeEditor()信号函数,表示已关闭编辑器
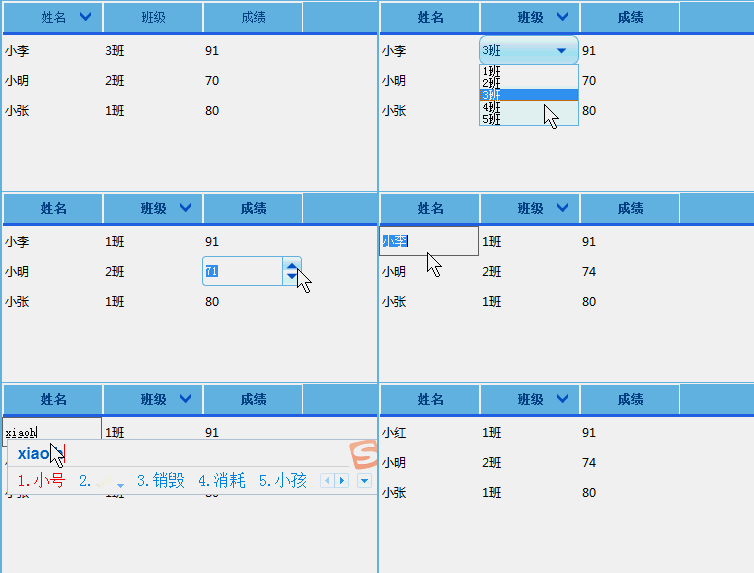
接下来,我们重写上面函数,来自定义一个QCostomizedDelegate委托类
效果如下
QCustomizedDelegate.h:
#ifndef QCUSTOMIZEDDELEGATE_H

#define QCUSTOMIZEDDELEGATE_H

#include <QItemDelegate>

#include <QtGui>

class QCustomizedDelegate : public QItemDelegate

{

    Q_OBJECT

public:

    explicit QCustomizedDelegate(QObject *parent = 0);

    QWidget *  createEditor( QWidget * parent, const QStyleOptionViewItem & option, const QModelIndex & index ) const ;

     void      setEditorData( QWidget * editor, const QModelIndex & index ) const;

    void       setModelData( QWidget * editor, QAbstractItemModel * model, const QModelIndex & index ) const;

    void       updateEditorGeometry( QWidget * editor, const QStyleOptionViewItem & option, const QModelIndex & index ) const;


};

#endif // QCUSTOMIZEDDELEGATE_H
QCustomizedDelegate.cpp:
#include "QCustomizedDelegate.h"

QCustomizedDelegate::QCustomizedDelegate(QObject *parent) :
    QItemDelegate(parent)
{
}

QWidget* QCustomizedDelegate::createEditor(QWidget *parent, const QStyleOptionViewItem &option, const QModelIndex &index) const
{
    if(index.column()==1)           //第1列 班级
    {
        QComboBox   *Cbox = new QComboBox(parent);
        Cbox->addItems(QStringList()<<"1班"<<"2班"<<"3班"<<"4班"<<"5班");
        return Cbox;
    }
    else if(index.column()==2)           //第2列 分数
    {
        QSpinBox    *Sbox = new QSpinBox(parent);
        Sbox->setRange(0,150);
        return Sbox;
    }

    return QItemDelegate::createEditor(parent, option, index);      //第0列,则选择默认编辑器
}

void QCustomizedDelegate::setEditorData ( QWidget * editor, const QModelIndex & index ) const
{
    if(index.column()==1)           //第1列 班级
    {
        QComboBox   *Cbox = dynamic_cast<QComboBox*>(editor);
        Cbox->setCurrentIndex(Cbox->findText( index.data(Qt::DisplayRole).toString()));
    }
    else if(index.column()==2)           //第2列 分数
    {
        QSpinBox    *Sbox = dynamic_cast<QSpinBox*>(editor);
        Sbox->setValue(index.data(Qt::DisplayRole).toInt());
    }
    else
     QItemDelegate::setEditorData(editor,  index);
}

void QCustomizedDelegate::setModelData ( QWidget * editor, QAbstractItemModel * model, const QModelIndex & index ) const
{
    if(index.column()==1)           //第1列 班级
    {
        QComboBox   *Cbox = dynamic_cast<QComboBox*>(editor);
        model->setData(index,Cbox->currentText(),Qt::DisplayRole);
    }
    else if(index.column()==2)           //第2列 分数
    {
        QSpinBox    *Sbox = dynamic_cast<QSpinBox*>(editor);
        model->setData(index,Sbox->value(),Qt::DisplayRole);
    }
    else
        QItemDelegate::setModelData(editor, model, index);
}

void QCustomizedDelegate::updateEditorGeometry ( QWidget * editor, const QStyleOptionViewItem & option, const QModelIndex & index ) const
{
    editor->setGeometry(option.rect);
}
然后,再通过视图的setItemDelegate(QAbstractItemDelegate * delegate )成员函数设置我们自定义的委托类对象即可
深入自定义委托类
之前我们写的自定义委托,每次都需要双击某个数据项,才能弹出编辑器
那如何让委托一直呈现在视图显示上呢?
步骤如下:
- 重写委托类的paint成员函数
- 在paint()中,通过QApplication::style()->drawControl()来自定义数据显示方式,比如绘制按钮
- 重写委托类的editorEvent成员函数
- 在editorEvent中处理交互事件,比如判断鼠标是否双击,以及更改模型数据等
其中QApplication::style()->drawControl()函数参数如下所示:
QApplication::style()->drawControl (ControlElement element,
                       constQStyleOption * option,
                      QPainter *painter, const QWidget * widget = 0 ) ;

//绘画组件
// element: 元素,用来指定控件样式,比如: QStyle::CE_CheckBox 表示绘画的widget是一个text文本的复选框

// option:选项,用来绘制控件所需的所有参数比如option.rect(设置组件大小位置), option.state(设置组件状态)

//其中option. state成员值常见的有:
  QStyle::State_Enabled                 //表示该组件是激活的,可以被用户操作
  QStyle::State_On                         //表示该组件样式是被选上的
  QStyle::State_Off                         //表示该组件样式是未被选中的
  QStyle::State_MouseOver            //表示表示该组件样式是:鼠标停留在组件上面的样子
  QStyle::State_Sunken                      //表示该组件样式是:鼠标按压下的组件样子
  QStyle::State_HasEditFocus          //表示该组件是否有编辑焦点

// painter:谁来绘画

// widget = 0:如果该widget为0,则表示使用QT自带的风格
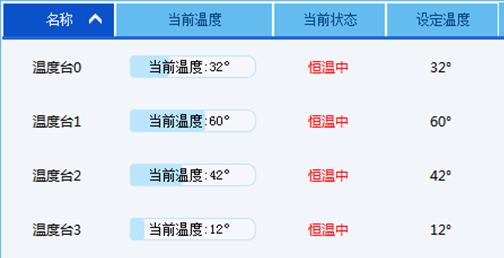
示例-自定义一个QCostomizedDelegate委托类
效果如下
代码如下
QCustomizedDelegate.h:
#ifndef QCUSTOMIZEDDELEGATE_H
#define QCUSTOMIZEDDELEGATE_H

#include <QItemDelegate>
#include <QtGui>
#include "ProgressBar.h"

class QCustomizedDelegate : public QItemDelegate
{
    Q_OBJECT
    //m_bar:温度台的当前温度进度条
    QScopedPointer<QProgressBar>  m_bar ;

public:
    explicit QCustomizedDelegate(QObject *parent = 0);
    void       paint ( QPainter * painter, const QStyleOptionViewItem & option, const QModelIndex & index ) const;
    bool       editorEvent ( QEvent * event, QAbstractItemModel * model, const QStyleOptionViewItem & option, const QModelIndex & index );

};

#endif // QCUSTOMIZEDDELEGATE_H
QCustomizedDelegate.cpp:
#include "QCustomizedDelegate.h"
#include "ProgressBar.h"

QCustomizedDelegate::QCustomizedDelegate(QObject *parent) :
    QItemDelegate(parent),
    m_bar(new QProgressBar())
{
     m_bar->setStyleSheet(qApp->styleSheet());       //设置风格
}

void  QCustomizedDelegate::paint( QPainter * painter, const QStyleOptionViewItem & option, const QModelIndex & index ) const
{
    if(index.column()==1 && index.data().type() == QVariant::Int)     //判断列数,并判断索引值是否int型(温度是通过int型值表示的)
    {
        int radio=14;
        int top = option.rect.top() + radio;
        int left = option.rect.left() + radio;
        int width = option.rect.width() - 2 * radio;
        int height = option.rect.height() - 2 * radio;

        QStyleOptionProgressBar bar;                   //设置参数
        bar.rect.setRect(left, top, width, height);
        bar.state  = QStyle::State_Enabled;
        bar.progress = index.data().toInt();
        bar.maximum = 100;
        bar.minimum = 0;
        bar.textVisible = true;
        bar.text    =   QString("当前温度:%1°").arg(bar.progress);
        bar.textAlignment = Qt::AlignCenter;

        QApplication::style()->drawControl(QStyle::CE_ProgressBar,&bar,painter, m_bar.data());
    }
    else
    {
        QItemDelegate::paint(painter,option,index);
    }
}

bool    QCustomizedDelegate::editorEvent ( QEvent * event, QAbstractItemModel * model, const QStyleOptionViewItem & option, const QModelIndex & index )
{
    if(event->type() == QEvent::MouseButtonDblClick)     //禁止双击编辑
    {
            return true;
    }
    return QItemDelegate::editorEvent(event,model,option,index);
}
官方例程参考demo
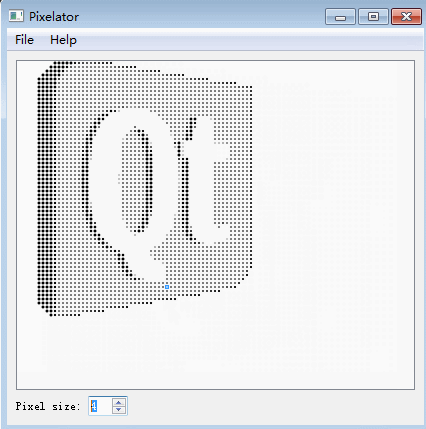
pixelDelegate:通过委托,将一个图片每个像素转为灰度值,值越小,绘制的黑点就越大.
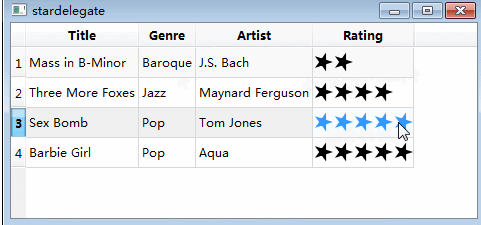
starDelegate : 通过委托对音乐进行评分星级,并支持星级编辑读写。
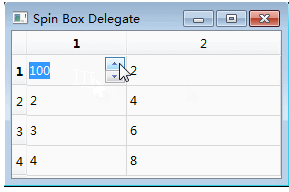
SpinboxDelegate: 通过委托,只允许用户输入[0, 100]之间的整数
人间有真情,人间有真爱。


【推荐】编程新体验,更懂你的AI,立即体验豆包MarsCode编程助手
【推荐】凌霞软件回馈社区,博客园 & 1Panel & Halo 联合会员上线
【推荐】抖音旗下AI助手豆包,你的智能百科全书,全免费不限次数
【推荐】轻量又高性能的 SSH 工具 IShell:AI 加持,快人一步
· 深入理解 Mybatis 分库分表执行原理
· 如何打造一个高并发系统?
· .NET Core GC压缩(compact_phase)底层原理浅谈
· 现代计算机视觉入门之:什么是图片特征编码
· .NET 9 new features-C#13新的锁类型和语义
· Spring AI + Ollama 实现 deepseek-r1 的API服务和调用
· 《HelloGitHub》第 106 期
· 数据库服务器 SQL Server 版本升级公告
· 深入理解Mybatis分库分表执行原理
· 使用 Dify + LLM 构建精确任务处理应用
2017-06-15 建立uboot,内核的SI工程(1)