[PHP]利用XAMPP搭建本地服务器, 然后利用iOS客户端上传数据到本地服务器中(四. iOS端代码实现)
一.安装XAMPP http://www.cnblogs.com/lidongxu/p/5256330.html
二. 配置MySql http://www.cnblogs.com/lidongxu/p/5256515.html
三. PHP端代码编写 http://www.cnblogs.com/lidongxu/p/5267727.html
然后, 那么我们来看看iOS端代码如何实现.
1. ViewContrller.m (主要类) 可能里面用到了自己定义的类LoginView 请去GitHub https://github.com/lidongxuwork/iOS-to-PHP 上下载源代码(顺路给个星哈, 谢谢!!!)
//
//  ViewController.m
//  php
//
//  Created by 李东旭 on 16/2/25.
//  Copyright © 2016年 李东旭. All rights reserved.
//

#import "ViewController.h"
#import "MainViewController.h"
#import "Define.h"

@interface ViewController () <LoginRegisterDelegate>
@property (nonatomic, strong) LoginView *loginR;
@end

@implementation ViewController

- (void)viewDidLoad {
    [super viewDidLoad];

#warning 1. 创建登录注册页面
    // 登录注册类调用
    self.loginR = [[LoginView alloc] initWithFrame:self.view.frame];
#warning 2. 签代理 代理方法可以拿到登录信息和注册信息
    _loginR.delegate = self;
    [self.view addSubview:_loginR];

}

#pragma mark - LoginView delegate
#warning 3. 根据不同的后台给的字段 代表的意思 以及值进行不同处理
- (void)getLoginName:(NSString *)name pass:(NSString *)pass
{
    // 调用登录验证接口 (这里用get网络请求的方式, 和post网络请求的方式)
    NSString *url = @"http://127.0.0.1/loginGet.php";
    // 后台规定登录用户名的字段必须是name密码的pass
    NSDictionary *dic = @{@"name":name, @"pass":pass};
    // 网络请求有点特殊 点进去看
    [LDXNetWork GetThePHPWithURL:url par:dic success:^(id responseObject) {
        // 后台返回的字典里 如果success对应的value是1代表登录成功
        if ([responseObject[@"success"] isEqualToString:@"1"]) {
            MainViewController *mainVC = [[MainViewController alloc] init];
            mainVC.dic = responseObject;
            [self presentViewController:mainVC animated:YES completion:nil];
        }
        else {
            [self showTheAlertView:self andAfterDissmiss:1.0 title:@"账号或密码错误" message:@""];
        }


    } error:^(NSError *error) {
        NSLog(@"%@", error);
    }];


}

- (void)getRegisterName:(NSString *)name pass:(NSString *)pass age:(NSString *)age telephone:(NSString *)telephone image:(UIImage *)image
{

    NSString *url = @"http://127.0.0.1/register.php";
    NSDictionary *dic = @{@"name2":name, @"pass2":pass, @"age2":age, @"telephone2":telephone};
    // 网络请求有点特殊点进去看 (@"uploadimageFile" 后台给的字段)
    [LDXNetWork PostThePHPWithURL:url par:dic image:image uploadName:@"uploadimageFile" success:^(id response) {

        NSString *success = response[@"success"];
        if ([success isEqualToString:@"1"]) {
            // 代表注册成功
            [self showTheAlertView:self andAfterDissmiss:1.5 title:@"注册成功" message:@""];
            // 跳转回到登录界面
            [_loginR goToLoginView];

        }
        else if([success isEqualToString:@"-1"]){
            [self showTheAlertView:self andAfterDissmiss:1.5 title:@"账号已经被注册了" message:@""];
        }

    } error:^(NSError *error) {
        NSLog(@"%@", error);
    }];
}


- (void)didReceiveMemoryWarning {
    [super didReceiveMemoryWarning];
    // Dispose of any resources that can be recreated.
}

@end
2. MainViewController.h 登录到的界面
//
//  MainViewController.h
//  php
//
//  Created by 李东旭 on 16/3/11.
//  Copyright © 2016年 李东旭. All rights reserved.
//

#import <UIKit/UIKit.h>

@interface MainViewController : UIViewController

@property (nonatomic, strong) NSDictionary *dic;


@end
2.1 MainViewController.m
//
//  MainViewController.m
//  php
//
//  Created by 李东旭 on 16/3/11.
//  Copyright © 2016年 李东旭. All rights reserved.
//

#import "MainViewController.h"

@interface MainViewController ()

@end

@implementation MainViewController

- (void)viewDidLoad {
    [super viewDidLoad];
    self.view.backgroundColor = [UIColor whiteColor];

    UIImageView *imageV = [[UIImageView alloc] initWithFrame:CGRectMake(50, 100, 200, 200)];
    imageV.backgroundColor = [UIColor greenColor];

    // 取出用户名对应的头部图片
    NSString *imageValue = self.dic[@"name"];

#warning 5. 直接在这里进行网址路径拼接, 因为不同用户要取不同的头像图片, 图片都保存在服务器的一个叫download2文件夹, 里面图片是根据用户名加.jpg来获取的
    NSString *url = [NSString stringWithFormat:@"%@/%@.jpg", @"http://127.0.0.1/download2", imageValue];

    // 同步加载图片
    NSData *data = [NSData dataWithContentsOfURL:[NSURL URLWithString:url]];
    UIImage *image = [UIImage imageWithData:data];
    [imageV setImage:image];
    [self.view addSubview:imageV];

    // 循环创建label, 从请求下来传过来的字典里, 拿出指定的字段的value值显示
    NSArray *arr = @[@"name", @"age", @"telephone"];
    for (int i = 0; i < 3; i++) {
        CGFloat offY = 320;
        UILabel *label = [[UILabel alloc] initWithFrame:CGRectMake(50, 320 + i * 50, 250, 40)];
        [self.view addSubview:label];
        NSString *s = arr[i];
        NSString *value = self.dic[s];
        label.text = [NSString stringWithFormat:@"%@: %@", s, value];

    }


}

- (void)didReceiveMemoryWarning {
    [super didReceiveMemoryWarning];
    // Dispose of any resources that can be recreated.
}

/*
#pragma mark - Navigation

// In a storyboard-based application, you will often want to do a little preparation before navigation
- (void)prepareForSegue:(UIStoryboardSegue *)segue sender:(id)sender {
    // Get the new view controller using [segue destinationViewController].
    // Pass the selected object to the new view controller.
}
*/

@end
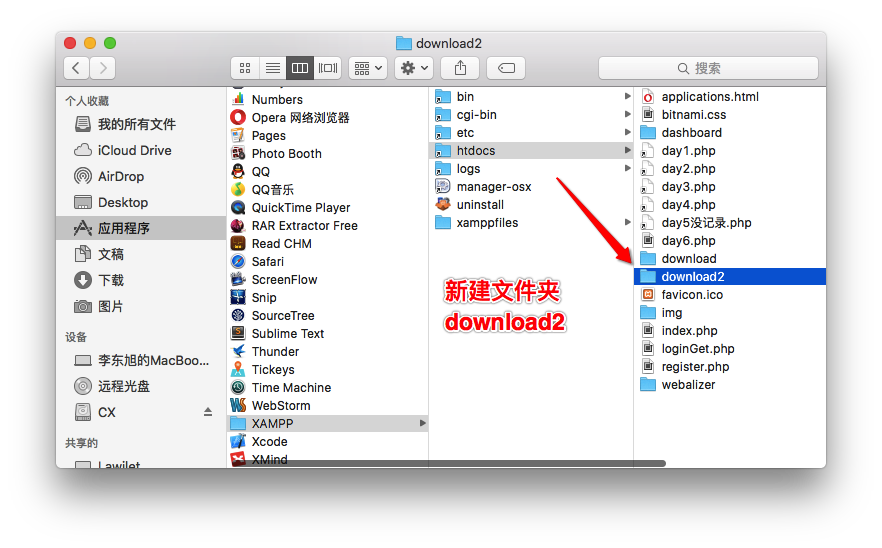
注意: 你可能运行的时候, 遇到这个问题 failed to open stream: No such file or directory
1. 
解决方法: 在本地服务器路径文件夹下建立文件夹 download2

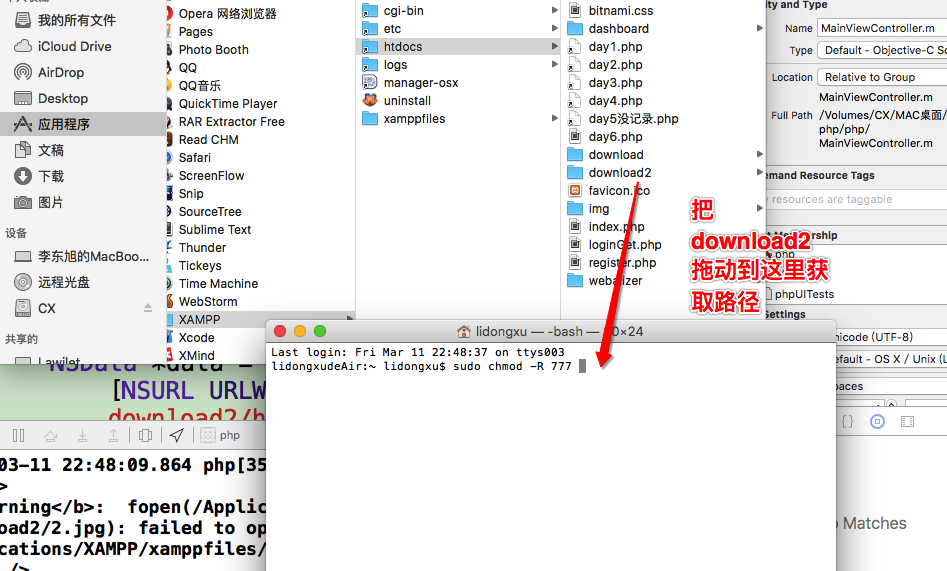
错误2:

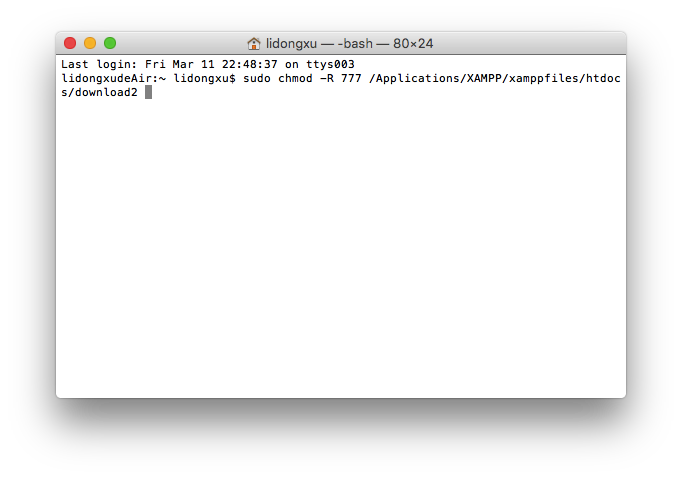
没有权限 我们就给权限被 哈哈哈哈


然后回车 就可以啦. 然后回到Xcode 重新运行应该就没问题啦!!
努力做一名,让再菜的菜鸟都能看明白,学明白的博客的制造者


