01-单体架构案例分析实现
一、使用Springboot开发 WebAPI
1、Maven使用
(1)packaging的使用
通常的做法是先指定一个pom文件,做一个整体的框架,然后在pom中添加不同的子项目。
那么在父工程的pom文件中就需要指定packaging为pom
    <groupId>com.lcl.galaxy</groupId>
    <artifactId>custemsystem-basic</artifactId>
    <version>0.0.1-SNAPSHOT</version>
    <packaging>pom</packaging>
    <name>customersystem-project</name>
(2)relativePath标签的使用
在子项目pom文件中,需要在parent中写父工程,这里需要提一下relativePath这个标签,可以不写、可以写成<relativePath>../pom.xml</relativePath>,也可以写成</relativePath>,如果我们创建Springboot项目,默认是</relativePath>。
relativePath:指定查找该父项目pom.xml的(相对)路径。默认顺序:relativePath > 本地仓库 > 远程仓库
没有relativePath标签等同…/pom.xml,即默认从当前pom文件的上一级目录找
</relativePath>表示不从relativePath找, 直接从本地仓库找,找不到再从远程仓库找
如果定义了<relativePath>../pom.xml</relativePath>表示可以从父dependencyManagement中定义的版本
(3)$的应用
${}可以用作占位符,那么就可以在很多地方使用,这样修改一个地方就会同步修改所有涉及的地方,例如pom文件中的name和artifactId,一般情况下,我们会让name和artifactId爆出一直,那么就可以写<name>${project.artifactId}</name>。
<parent>
    <groupId>com.lcl.galaxy</groupId>
    <artifactId>custemsystem-basic</artifactId>
    <version>0.0.1-SNAPSHOT</version>
    <relativePath>../pom.xml</relativePath>
</parent>
<groupId>com.lcl.galaxy</groupId>
<artifactId>customer-system</artifactId>
<version>0.0.1-SNAPSHOT</version>
<name>${project.artifactId}</name>
(4)排除依赖
使用exclusions标签排除依赖,例如在使用Springboot2.2之后,其Junit框架从4.0升级到了5.0,那么我们在引入Springtest工程的时候,就需要把之前的Junit4的测试引擎排除掉。
(5)归类依赖
如果依赖关系很多,可以做一些归类,例如我们用到很多依赖项都是需要设置Springcloud Alibaba的相关依赖,那么可以使用<properties>标签进行归类管理。
<properties>
        <spring.cloud.alibaba.version>2021.0.1.0</spring.cloud.alibaba.version>
</properties>
(6)优化依赖
pom文件写了很多依赖包之后,有的是重复的,有的是不对的,可以使用mvn dependency命令来做优化,这时系统会提示需要排除掉哪些依赖。
(7)依赖范围
使用scope标签来设置依赖的范围:
compile:默认值 他表示被依赖项目需要参与当前项目的编译,还有后续的测试,运行周期也参与其中,是一个比较强的依赖。打包的时候通常需要包含进去。
test:依赖项目仅仅参与测试相关的工作,包括测试代码的编译和执行,不会被打包,例如:junit。
runtime:表示被依赖项目无需参与项目的编译,不过后期的测试和运行周期需要其参与。与compile相比,跳过了编译而已。例如JDBC驱动,适用运行和测试阶段。
provided:打包的时候可以不用包进去,别的设施会提供。事实上该依赖理论上可以参与编译,测试,运行等周期。相当于compile,但是打包阶段做了exclude操作。
system:从参与度来说,和provided相同,不过被依赖项不会从maven仓库下载,而是从本地文件系统拿。需要添加systemPath的属性来定义路径。
import(导入):仅仅支持在<dependencyManagement>标签内使用生效,且仅用于type=pom的dependency。表示将依赖··全部引入到当前工程的dependencyManagement中
<dependency>
    <groupId>com.alibaba.cloud</groupId>
    <artifactId>spring-cloud-alibaba-dependencies</artifactId>
    <version>${spring.cloud.alibaba.version}</version>
    <type>pom</type>
    <scope>import</scope>
</dependency>
(8)Maven最佳实践一:依赖管理专用代码工程
最好单独创建一个依赖代码工程,该工程什么都不做,专门做依赖管理,该项目只有一个pom文件,其他的项目都是用该项目依赖版本,这样各个项目的依赖就统一了,不会出现每个项目的依赖版本不一致的情况,同时如果出现漏洞,需要升级依赖版本,只需要调整该依赖项目的依赖版本即可。
(9)Maven最佳实践二:灵活运用多属性变量
首先使用maven设置不同的环境变量
    <profiles>
        <profile>
            <id>local</id>
            <spring.cloud.nacos.config.server-addr>
                http://127.0.0.1
            </spring.cloud.nacos.config.server-addr>
        </profile>
    </profiles>
然后在配置文件中可以使用@@来动态填充变量值,这就给动态打包提供了扩展手段。
spring:
  profiles:
    active: @spring.profiles.active@
  cloud:
    nacos:
      config:
        server-addr: @spring.cloud.nacos.config.server-addr@
        file-extension: yml
(10)Maven最佳实践三:不同环境
使用profile来区分不同的环境,一个环境对应一个profile,同时可以在profile中使用activation的activeBDefault标签,来设置默认的profile。
    <profiles>
        <profile>
            <id>local</id>
            <spring.cloud.nacos.config.server-addr>
                ...
            </spring.cloud.nacos.config.server-addr>
            <activation>
                <activeByDefault>true</activeByDefault>
            </activation>
        </profile>
        <profile>
            <id>remote</id>
            <spring.cloud.nacos.config.server-addr>
                ...
            </spring.cloud.nacos.config.server-addr>
        </profile>
    </profiles>
2、开发约定
(1)项目结构
cs-dependency:统一依赖管理工程
cs-infrastructure-utility:基础设施工具类工程
customer-system:客服系统单体工程
outsouring-system 各个外包客服系统工程
(2)代码包结构
controller:前后端访问入口,不能叫 api,否则后续的远程调用名字没法起
converter:对象转换
entity:与数据库对应的实体类
mapper:数据库访问层
service:逻辑处理层
(3)经典三层矿建输入输出
web层:输入和输出都是 VO
service层:输入是 VO,输出是 Entity
数据访问层:输入是具体参数,输出是 Entity
(4)Entity开发约定
数据结构定义:引入Lombok(@Data、@ToString、@Accessors(chain = true)、@NoArgsConstructor/@AllArgsConstructor)
(5)Service开发约定
输入是 VO,输出是 Entity
面向接口编程,因此 Service 必须有定义接口
面向切面编程,可以使用切面增强
(5)Spring AOP
AOP + 日志框架:Slf4j的MDC(Mapped Diagnostic Contexts)映射诊断上下文,主要用在做日志链路跟踪时,动态配置用户自定义的一些信息,比如tranceId、requestId、sessionId等,因为单体项目不太会引入分布式链路追踪的技术,直接使用Sl4j的MDC即可。
(6)Controller开发约定
RESTFul风格
VO对象:Request对象、Response对象、Result对象
Converter:引入mapstruct框架(VO和Entity相互转换)
定义Converter接口
import org.mapstruct.Mapper;
import org.mapstruct.factory.Mappers;

@Mapper
public interface CustomerStaffConverter {
    CustomerStaffConverter INSTANCE = Mappers.getMapper(CustomerStaffConverter.class);

    // VO -> Entity
    CustomerStaff convertCreateReq(AddCustomerStaffReqVO addCustomerStaffReqVO);
    CustomerStaff convertUpdateReq(UpdateCustomerStaffReqVO updateCustomerStaffReqVO);

    // Entity -> VO
    CustomerStaffRespVO convertResp(CustomerStaff entity);
    List<CustomerStaffRespVO> convertListResp(List<CustomerStaff> entities);
}
使用Converter接口
//数据转换
CustomerStaff customerStaff = CustomerStaffConverter.INSTANCE.convertCreateReq(addCustomerStaffReqVO);
CustomerStaffRespVO customerStaffRespVO = CustomerStaffConverter.INSTANCE.convertResp(customerStaff);
(7)使用idea自带的http测试工具
选中package ---> new ---> HTTP Request
二、Web API 性能优化
Web API是一个系统最常见的访问入口,我们需要确保它能够尽快得到响应。
1、Spring AOP代理性能对比
(1)JDK动态代理实现
原理是实现了InvocationHandler接口,在invoke方法中写增强逻辑,然后调用method.invoke(target, args)执行原始逻辑;
获取代理使用jdk自带的反射Proxy.newProxyInstance方法进行获取。
public class MyInvocationHandler implements InvocationHandler {

    private Object target;

    public MyInvocationHandler(Object target){
        this.target = target;
    }

    @Override
    public Object invoke(Object proxy, Method method, Object[] args) throws Throwable {
        System.out.println("MyInvocationHandler.invoke");
        Object obj = method.invoke(target, args);
        return obj;
    }
}
AccountService service = new AccountServiceImpl();
AccountService proxy = (AccountService) Proxy.newProxyInstance(
        service.getClass().getClassLoader(),
        new Class[] {AccountService.class},
        new MyInvocationHandler(service));
// 调用业务方法
proxy.doAccountTransaction(account1, account2, 100);
(2)Cglib动态代理
原理是实现了MethodInterceptor接口,在intercept方法中写增强逻辑,然后调用methodProxy.invokeSuper执行原始逻辑;
获取代理使用enhancer.create()方法进行获取,不过需要设置Superclass和Callback属性,Superclass为原始类,Callback为增强上面的增强类。
public class MyMethodIntercepor implements MethodInterceptor {
    @Override
    public Object intercept(Object o, Method method, Object[] objects, MethodProxy methodProxy) throws Throwable {
        System.out.println("MyMethodIntercepor.intercept");
        Object obj = methodProxy.invokeSuper(o, objects);
        return obj;
    }
}
Enhancer enhancer = new Enhancer();
AccountService service = new AccountServiceImpl();
enhancer.setSuperclass(service.getClass());
enhancer.setCallback(new MyMethodIntercepor());
AccountService proxy = (AccountService)enhancer.create();
// 调用业务方法
proxy.doAccountTransaction(account1, account2, 100);
(3)性能对比
Spring默认使用 JDK 动态代理,那么到底性能怎么样,不能人云亦云,需要验证下,首先写两个配置类,然后将生成的代理类放入Spring容器中,使用@Scope注解的proxyMode设置动态代理的实现方式。ScopedProxyMode有四种枚举值,DEFAULT(默认值,为NO)、NO(不使用动态代理)、INTERFACES(使用 JDK动态代理)、TARGET_CLASS(使用Cglib动态代理)
@Configuration
@EnableAspectJAutoProxy
public class CglibProxyAppConfig {
    @Bean
    @Scope(proxyMode = ScopedProxyMode.TARGET_CLASS)
    public AccountService getProxy(){
        return new AccountServiceImpl();
    }
}
@Configuration
@EnableAspectJAutoProxy
public class JDKProxyAppConfig {
    @Bean
    @Scope(proxyMode = ScopedProxyMode.INTERFACES)
    public AccountService getProxy(){
        return new AccountServiceImpl();
    }
}
测试:
分别使用不适用代理、JDK动态代理、Cglib动态代理各生成500个对象,循环这500个对象调用业务方法(业务方法没有实现逻辑,纯粹验证调用耗时)。
这里面用到了AnnotationConfigApplicationContext(JDKProxyAppConfig.class),这是spring中设置使用一个config类进行启动然后获取spring容器的方法。
public class TestProxyPerformance {
    public static void main(String[] args) {
        int countOfObjects = 500;
        // 不用代理
        AccountService[] unProxy = new AccountService[countOfObjects];
        for (int i=0; i<countOfObjects; i++){
            unProxy[i] = new AccountServiceImpl();
        }

        // 使用 cglib
        AccountService[] cglibProxy = new AccountService[countOfObjects];
        for (int i=0; i<countOfObjects; i++){
            cglibProxy[i] = new AnnotationConfigApplicationContext(CglibProxyAppConfig.class).getBean(AccountService.class);
        }

        // 使用 jdk
        AccountService[] jdkProxy = new AccountService[countOfObjects];
        for (int i=0; i<countOfObjects; i++){
            AccountService accountService = new AnnotationConfigApplicationContext(JDKProxyAppConfig.class).getBean(AccountService.class);
            try {
                jdkProxy[i] = accountService;
            }catch (Exception e){
                e.printStackTrace();
                throw e;
            }

        }

        long useTime = invokeTargetObjects(unProxy);
        System.out.println("noProxy:" + useTime);
        useTime = invokeTargetObjects(jdkProxy);
        System.out.println("jdkProxy:" + useTime);
        useTime = invokeTargetObjects(cglibProxy);
        System.out.println("cglibProxy:" + useTime);
    }

    private static long invokeTargetObjects(AccountService[] accountServices){
        long start = System.nanoTime();
        Account source = new Account(123, "zhangsan");
        Account dest = new Account(345, "lisi");
        for(int i=0; i<accountServices.length; i++){
            accountServices[i].doAccountTransaction(source, dest, 100);
        }
        return System.nanoTime() - start;
    }
执行结果:
可以发现jdk动态代理比cglib动态代理的性能要好得多。
noProxy:56
jdkProxy:5865
cglibProxy:12126
以上是一个简单问题的验证方式,这里主要是想说明,所有的性能好坏等评判,都应该有具体的数据作为支撑,那么就需要做相关数据的验证,最后以输出一个数字化的结论。
2、Spring Web异步处理机制
SpringMVC底层使用的是Servlet技术,Servlet是同步阻塞 IO,所以WebMVC建立在阻塞I/O之上 。
提高性能可以使用异步 IO,异步 IO 主要有异步请求处理、即发即弃处理、大数据量请求处理
异步请求:线程一调用异步线程气动执行、线程二异步线程通知执行结果给线程一
即发即弃:线程一即发即弃,不需要处理线程二的执行结果
大数据量请求:线程一异步调用线程二执行,线程二执行完成保存结果,线程三异步获取线程二处理的结果
同步转异步实现方案:
基于代理机制实现同步操作异步化(集成JDK动态代理机制、集成JDK执行器服务),即前端调用后端仍然是同步,但是后端将同步转为异步处理。
同步转异步的整体架构是目标方法调用代理类、在代理类中将同步转为异步,同时将任务提交到异步线程出,异步线程池执行完毕后再调用目标方法。
同步转异步的关键是Future接口:
public interface Future<V> {
    //取消任务的执行
    boolean cancel(boolean mayInterruptIfRunning);
    //判断任务是否已经取消
    boolean isCancelled();
    //判断任务是否已经完成
    boolean isDone();
    //等待任务执行结束并获取结果
    V get();
    //在一定时间内等待任务执行结束并获取结果
    V get(long timeout, TimeUnit unit);
}
(1)在每个类中单独写
简单的写法
private static final ExecutorService executorService;
static {
  executorService = new ThreadPoolExecutor(corePoolSize, maximumPoolSize,
      keepAliveTime, unit, workQueue, threadFactory, handler);
      log.info("并行任务处理线程池:corePoolSize={},maximumPoolSize={},keepAliveTime={},unit={}",
                corePoolSize, maximumPoolSize, keepAliveTime, unit);
}
Future<Order> demoServiceFuture = executorService.submit(() ->
                demoService.getOrder(orderId));
Order order = demoServiceFuture.get();
(2)自定义通用组件
a、首先定义三个接口,分别表示异步执行器、异步代理、异步结果
异步执行器直接集成自ExecutorService即可,表示是一个线程池
public interface AsyncExecutor extends ExecutorService {}
异步代理获取一个代理类即可
public interface AsyncProxy {
    Object getProxy();
}
异步结果提供一个获取结果的方法即可,
public interface AsyncResult<T> extends Future<T> {
    Object getResult();
}
b、设计对于上面三个接口的实现
结果类的实现,首先写一个抽象类实现,主要实现获取结果对象的方法,其调用Future接口的超时get方法
public abstract class AbstractAsyncResult<T> implements AsyncResult<T> {

    @Override
    public boolean cancel(boolean mayInterruptIfRunning) {
        return false;
    }

    @Override
    public boolean isCancelled() {
        return false;
    }

    @Override
    public boolean isDone() {
        return false;
    }

    @Override
    public T get() throws InterruptedException, ExecutionException {
        try {
            return this.get(10*1000, TimeUnit.SECONDS);
        } catch (TimeoutException e) {
            throw new RuntimeException(e);
        }
    }

}
编写最终的结果对象FutureBasedAsyncResult,重写获取结果集方法getResult,最终从future中调用get方法异步获取,如果获取到数据后,在获取value。
public class FutureBasedAsyncResult<T> extends AbstractAsyncResult<T>{

    private Future<T> future;

    private Object value;


    @Override
    public Object getResult() {
        if(future == null){
            return this.value;
        }
        try {
            T t = future.get();
            return t;
        } catch (InterruptedException | ExecutionException e) {
            e.printStackTrace();
        }
        return null;
    }

    @Override
    public T get(long timeout, TimeUnit unit) throws Exception {
        return null;
    }

    public Object getValue() {
        return this.value;
    }

    public void setValue(Object value) {
        this.value = value;
    }

    public void setFuture(Future<T> future) {
        this.future = future;
    }

}
异步执行器:提供了构造函数、线程池初始化方法等,最主要的是提供一个提交任务的方法,在该方法中创建一个使用反射调用的任务提交到线程池,异步获取一个Future,并将future放入返回结果对象FutureBasedAsyncResult中,返回FutureBasedAsyncResult结果。
public class ThreadPoolBasedAsyncExecutor extends ThreadPoolExecutor implements AsyncExecutor {

    private static volatile boolean isInit = false;

    private static volatile boolean isDestroy = false;

    private static ExecutorService executorService = null;

    public ThreadPoolBasedAsyncExecutor(int corePoolSize, int maximumPoolSize, long keepAliveTime, TimeUnit unit, BlockingQueue<Runnable> workQueue) {
        super(corePoolSize, maximumPoolSize, keepAliveTime, unit, workQueue);
    }

    public ThreadPoolBasedAsyncExecutor(int corePoolSize, int maximumPoolSize, long keepAliveTime, TimeUnit unit, BlockingQueue<Runnable> workQueue, ThreadFactory threadFactory) {
        super(corePoolSize, maximumPoolSize, keepAliveTime, unit, workQueue, threadFactory);
    }

    public ThreadPoolBasedAsyncExecutor(int corePoolSize, int maximumPoolSize, long keepAliveTime, TimeUnit unit, BlockingQueue<Runnable> workQueue, RejectedExecutionHandler handler) {
        super(corePoolSize, maximumPoolSize, keepAliveTime, unit, workQueue, handler);
    }

    public ThreadPoolBasedAsyncExecutor(int corePoolSize, int maximumPoolSize, long keepAliveTime, TimeUnit unit, BlockingQueue<Runnable> workQueue, ThreadFactory threadFactory, RejectedExecutionHandler handler) {
        super(corePoolSize, maximumPoolSize, keepAliveTime, unit, workQueue, threadFactory, handler);
    }

    @SuppressWarnings("all")
    public static <T> AsyncResult<T> submit(Object target, Method method, Object[] objs){
        if(!isInit){
            init();
        }
        Future future = executorService.submit(new Runnable() {
            @Override
            public void run() {
                try{
                    method.invoke(target, objs);
                } catch (IllegalAccessException e) {
                    e.printStackTrace();
                } catch (IllegalArgumentException e) {
                    e.printStackTrace();
                } catch (InvocationTargetException e) {
                    e.printStackTrace();
                }
            }
        });
        FutureBasedAsyncResult<T> asyncResult = new FutureBasedAsyncResult<>();
        asyncResult.setFuture(future);
        return asyncResult;
    }

    private static synchronized void init(){
        if(isInit){
            return;
        }
        executorService = Executors.newFixedThreadPool(10);
        updateExecutorStatus(true);
    }

    private static synchronized void destory(){
        if(isDestroy){
            return;
        }
        executorService = null;
        updateExecutorStatus(false);
    }

    private static void updateExecutorStatus(final boolean initStatus) {
        isInit = initStatus;
        isDestroy = !isInit;
    }
}
代理类的实现:代理类实现上面的AsyncProxy接口和InvocationHandler,通过构造函数注入要被代理的类,然后该类有获取代理和invoke的方法,在获取代理方法中,使用 jdk 的反射生成代理类;在invoke方法中将任务提交到异步线程池中。
public class DynamicProxy implements InvocationHandler, AsyncProxy {

    //被代理的对象
    private final Object target;

    public DynamicProxy(Object target){
        this.target = target;
    }

    @Override
    public Object getProxy() {
        InvocationHandler handler = new DynamicProxy(target);
        Object result = Proxy.newProxyInstance(handler.getClass().getClassLoader(), target.getClass().getInterfaces(), handler);
        return result;
    }

    @Override
    public Object invoke(Object proxy, Method method, Object[] args) throws Throwable {
        //提交到Executor并返回结果
        return (FutureBasedAsyncResult)ThreadPoolBasedAsyncExecutor.submit(target, method, args).getResult();
    }
}
(3)Spring Web异步处理
Spring Web的异步处理机制实现原理和前面的一致,只不过做了更好的封装,让我们使用起来更简单
其提供了一个 @Aync 的注解,加上注解后,就会异步执行,实现方式也是使用代理机制,生成代理类,将任务提交到线程池中。
针对于web请求,Spring 提供了WebAsyncTask组件,其提供异步回调、超时处理、异常处理等。
@GetMapping("/async/{staffId}")
public WebAsyncTask<CustomerStaffRespVO> asyncFindCustomerStaffById(@PathVariable("staffId") Long staffId) {

    System.out.println("main thread: " + Thread.currentThread().getName());

    WebAsyncTask<CustomerStaffRespVO> task = new WebAsyncTask<>(5*1000L, ()->{
        CustomerStaff customerStaff = customerStaffService.findCustomerStaffById(staffId);
        CustomerStaffRespVO customerStaffRespVO = CustomerStaffConverter.INSTANCE.convertResp(customerStaff);
        return customerStaffRespVO;
    });

    // 超时
    task.onTimeout(() -> {
        System.out.println(Thread.currentThread().getName() + ": timeOut");
        return new CustomerStaffRespVO();
    });

    // 异常
    task.onError(() -> {
        System.out.println(Thread.currentThread().getName() + ": error");
        return new CustomerStaffRespVO();
    });

    // 完成
    task.onCompletion(() -> {
        System.out.println(Thread.currentThread().getName() + ": ok");
    });

    // 继续执行
    System.out.println(Thread.currentThread().getName() + ": continue");

    return task;
}
对于对性能要求比较高的场景,可以使用这种方式,但是如果对于性能要求没有那么高,使用传统的方式即可。
(4)使用CompletableFuture
Future只能使用get进行获取,不能主动回调,而CompletableFuture就提供了回调机制,其提供了runAsync方法和supplyAsync方法,runAsync方法适用于不需要返回值的处理流程,supplyAsync方法适用于异步执行任务完成之后有返回值。
// todo
3、Web容器优化技巧
(1)使用Undertow替换Tomcat
Undertow是基于非阻塞IO的容器,虽然新版本的tomcat性能已经很不错了,但是对比于Undertow,还是Undertow会好一些
pom文件修改
<dependency>
    <groupId>org.springframework.boot</groupId>
    <artifactId>spring-boot-starter-web</artifactId>
    <exclusions>
        <exclusion>
            <groupId>org.springframework.boot</groupId>
            <artifactId>spring-boot-starter-tomcat</artifactId>
        </exclusion>
    </exclusions>
</dependency>
<dependency>
    <groupId>org.springframework.boot</groupId>
    <artifactId>spring-boot-starter-undertow</artifactId>
</dependency>
配置
server:
  port: 8081
  servlet:
    context-path: /
  undertow:
    io-threads: 4 #设置IO线程数
    worker-threads: 20 #设置工作线程数
    buffer-size: 1024 #设置buffer大小
    direct-buffers: true # 是否分配的直接内存
(2)tomcat优化
最立竿见影的是定制化TomcatConnectorCustomizer,将协议由Nio1改为Nio2
@Component
public class MyTomcatConnectorCustomizer implements WebServerFactoryCustomizer<ConfigurableServletWebServerFactory> {
    @Override
    public void customize(ConfigurableServletWebServerFactory factory) {
        ((TomcatServletWebServerFactory)factory) .setProtocol("org.apache.coyote.http11.Http11Nio2Protocol");
    }
}
参数配置
超时时间:最长等待时间,用来保障连接数不容易被压垮。这个可以设置的稍微长一点,因为确实存在网络因素导致不断重试。
最小线程数:初始化线程数,默认10,适当增大一些,以便应对突然增长的访问量
最大线程数:用来保证系统的稳定性,默认200,操作系统线程切换调度是有系统开销的,不是越多越好
最大连接数:同一时间Tomcat能够接受的最大连接数,一般这个值要大于(max-threads)+(accept-count)
最大等待队列长度:用作缓冲,默认100,等待队列放满之后会拒绝新的请求
server:
  tomcat:
    uri-encoding: UTF-8
    #超时时间
    connection-timeout: 60000ms
    #最小线程数
    min-spare-threads: 100
    #最大线程数
    max-threads: 800
    #最大连接数
    max-connections: 10000
    #最大等待队列长度
    accept-count: 500
三、基于Spring JDBC实现数据访
1、数据持久化和JDBC规范
数据持久化开发最核心的是JDBC(关系型数据库规范),然后有类似Spring JDBC基础框架,还有Spring Data/Mybatis等ORM框架。
JDBC 原生 API 提供了DataSource、Connection、Statement、ResultSet四个核心的接口供调用处理。
代码如下所示,非常的繁琐,且重复代码特别多。
public List<BeijingCustomerStaff> findCustomerStaff() {

    List<BeijingCustomerStaff> staffs = new ArrayList<>();

    Connection connection = null;
    PreparedStatement statement = null;
    ResultSet resultSet = null;
    try {
        connection = dataSource.getConnection();
        statement = connection.prepareStatement("select * from `beijing_customer_staff`");
        resultSet = statement.executeQuery();
        while (resultSet.next()) {
            staffs.add(convertStaff(resultSet));
        }
        return staffs;
    } catch (SQLException e) {
        System.out.print(e);
    } finally {
        if (resultSet != null) {
            try {
                resultSet.close();
            } catch (SQLException e) {
            }
        }
        if (statement != null) {
            try {
                statement.close();
            } catch (SQLException e) {
            }
        }
        if (connection != null) {
            try {
                connection.close();
            } catch (SQLException e) {
            }
        }
    }
    return staffs;
}

@Override
public List<BeijingCustomerStaff> findCustomerStaffByUpdatedTime(Long updatedTime) {

    List<BeijingCustomerStaff> staffs = new ArrayList<>();

    Connection connection = null;
    PreparedStatement statement = null;
    ResultSet resultSet = null;
    try {
        connection = dataSource.getConnection();
        statement = connection.prepareStatement("select * from `beijing_customer_staff` where updated_at > ?");
        statement.setTimestamp(1, new java.sql.Timestamp(updatedTime));
        resultSet = statement.executeQuery();
        while (resultSet.next()) {
            staffs.add(convertStaff(resultSet));
        }
        return staffs;
    } catch (SQLException e) {
        System.out.print(e);
    } finally {
        if (resultSet != null) {
            try {
                resultSet.close();
            } catch (SQLException e) {
            }
        }
        if (statement != null) {
            try {
                statement.close();
            } catch (SQLException e) {
            }
        }
        if (connection != null) {
            try {
                connection.close();
            } catch (SQLException e) {
            }
        }
    }
    return staffs;
}
2、Spring JDBC组件
Spring JDBC 是基于JDBC规范的一组工具类,包括JdbcTemplate和SimpleJdbcInsert,其中JdbcTemplate主要是查询操作,SimpleJdbcInsert主要是新增操作,其是在 SpringJDBC 之上做的一层封装。
(1)jdbcTemplate
jdbcTemplate提供了三组方法execute、query、update,每一组都有大量的重构方法,其中execute方法是一个综合的方法,可以执行query和update,另外两个就见名知意了。
public <T> T execute(StatementCallback<T> action)
public <T> List<T> query(String sql, RowMapper<T> rowMapper)
public int update(final String sql)
项目中使用 JdbcTemplate,首先是注入,然后可以写一个公共的数据转换方法
    private JdbcTemplate jdbcTemplate;

    @Autowired
    public ShanghaiCustomerStaffRepositoryImpl(JdbcTemplate jdbcTemplate) {
        this.jdbcTemplate = jdbcTemplate;
    }

    private ShanghaiCustomerStaff mapRowToStaff(ResultSet resultSet, int i) throws SQLException{
        ShanghaiCustomerStaff staff = new ShanghaiCustomerStaff();
        staff.setId(resultSet.getLong("id"));
        staff.setNickname(resultSet.getString("nickname"));
        staff.setGender(resultSet.getString("gender"));
        staff.setPhone(resultSet.getString("phone"));
        staff.setAvatar(resultSet.getString("avatar"));
        staff.setGoodAt(resultSet.getString("good_at"));
        staff.setRemark(resultSet.getString("remark"));
        return staff;
    }
查询:查询比较简单,直接使用jdbcTemplate.query即可,然后传入查询sql和对象转换方法
@Override
public List<ShanghaiCustomerStaff> findCustomerStaff() {
    return jdbcTemplate.query("select * from `shanghai_customer_staff`", this::mapRowToStaff);
}
新增:新增比较复杂,需要创建一个PreparedStatementCreator,在里面使用Connection的prepareStatement方法生成一个PreparedStatement,然后设置其属性值,最终调用jdbcTemplate.update方法。同时Spring提供了一个KeyHolder专门用于返回主键。
@Override
public Long createCustomerStaff(ShanghaiCustomerStaff customerStaff) {
    PreparedStatementCreator psc = new PreparedStatementCreator() {
        @Override
        public PreparedStatement createPreparedStatement(Connection con) throws SQLException {
            PreparedStatement ps = con.prepareStatement("insert into `shanghai_customer_staff` (nickname, gender) values (?, ?)",
                    Statement.RETURN_GENERATED_KEYS);
            ps.setString(1,customerStaff.getNickname());
            ps.setString(2,customerStaff.getGender());

            return ps;
        }
    };

    KeyHolder keyHolder = new GeneratedKeyHolder();
    jdbcTemplate.update(psc, keyHolder);

    return keyHolder.getKey().longValue();
}
(2)SimpleJdbcInsert
jdbcTemplate的插入操作还是比较复杂的,因此Spring又提供了一个SimpleJdbcInsert来做插入操作
SimpleJdbcInsert 本质上是在JdbcTemplate的基础上添加了一层封装,专门应对插入操作,也提供了三组方法:execute方法组(执行)、executeAndReturnKey方法组(执行并拿到返回值)、executeBatch方法组(批量操作)。
首先需要一个SimpleJdbcInsert属性,并且需要对属性赋值,但是SimpleJdbcInsert并不像JdbcTemplate一样通过入参传入,其是使用JdbcTemplate创建出来了,这就验证了上面提到的SimpleJdbcInsert 本质上是在JdbcTemplate的基础上添加了一层封装。创建SimpleJdbcInsert时需要设置其要处理的表名和主键名称。
private JdbcTemplate jdbcTemplate;

private SimpleJdbcInsert staffInserter;

@Autowired
public ShanghaiCustomerStaffRepositoryImpl(JdbcTemplate jdbcTemplate) {
    this.jdbcTemplate = jdbcTemplate;

    this.staffInserter = new SimpleJdbcInsert(jdbcTemplate).withTableName("`shanghai_customer_staff` ").usingGeneratedKeyColumns("id");
}
插入处理:插入只需要调用simpleJdbcInsert.executeAndReturnKey方法即可,但是入参是一个map,因此需要创建一个map,将入参对象的属性一一放入map中,map的key为属性名称。
这里需要也别注意一点,由于使用原生的jdbcTemplate时用的是原生的sql,因此对于表中 not null 但是有默认值的列不会有问题,其直接会赋上默认值,但是SimpleJdbcInsert做了一层封装,对于这种情况,必须要在map中设置其默认值。
    public Long createCustomerStaff(ShanghaiCustomerStaff customerStaff) {
        Map<String, Object> values = new HashMap<>();
        values.put("nickname", customerStaff.getNickname());
        values.put("gender", customerStaff.getGender());
        values.put("is_deleted", 0);
        values.put("created_at", new Date());
        values.put("updated_at", new Date());

        return staffInserter.executeAndReturnKey(values).longValue();
    }
四、JdbcTemplate实现原理剖析
1、模板方法和回调机制
JdbcTemplate 的本质是为了降低代码复杂度和冗余性,以及降低业务代码和数据访问的耦合度,降低代码复杂度、冗余性使用模板方法模式进行处理,降低业务代码和数据访问的耦合度其使用回调机制解决。
(1)模板方法
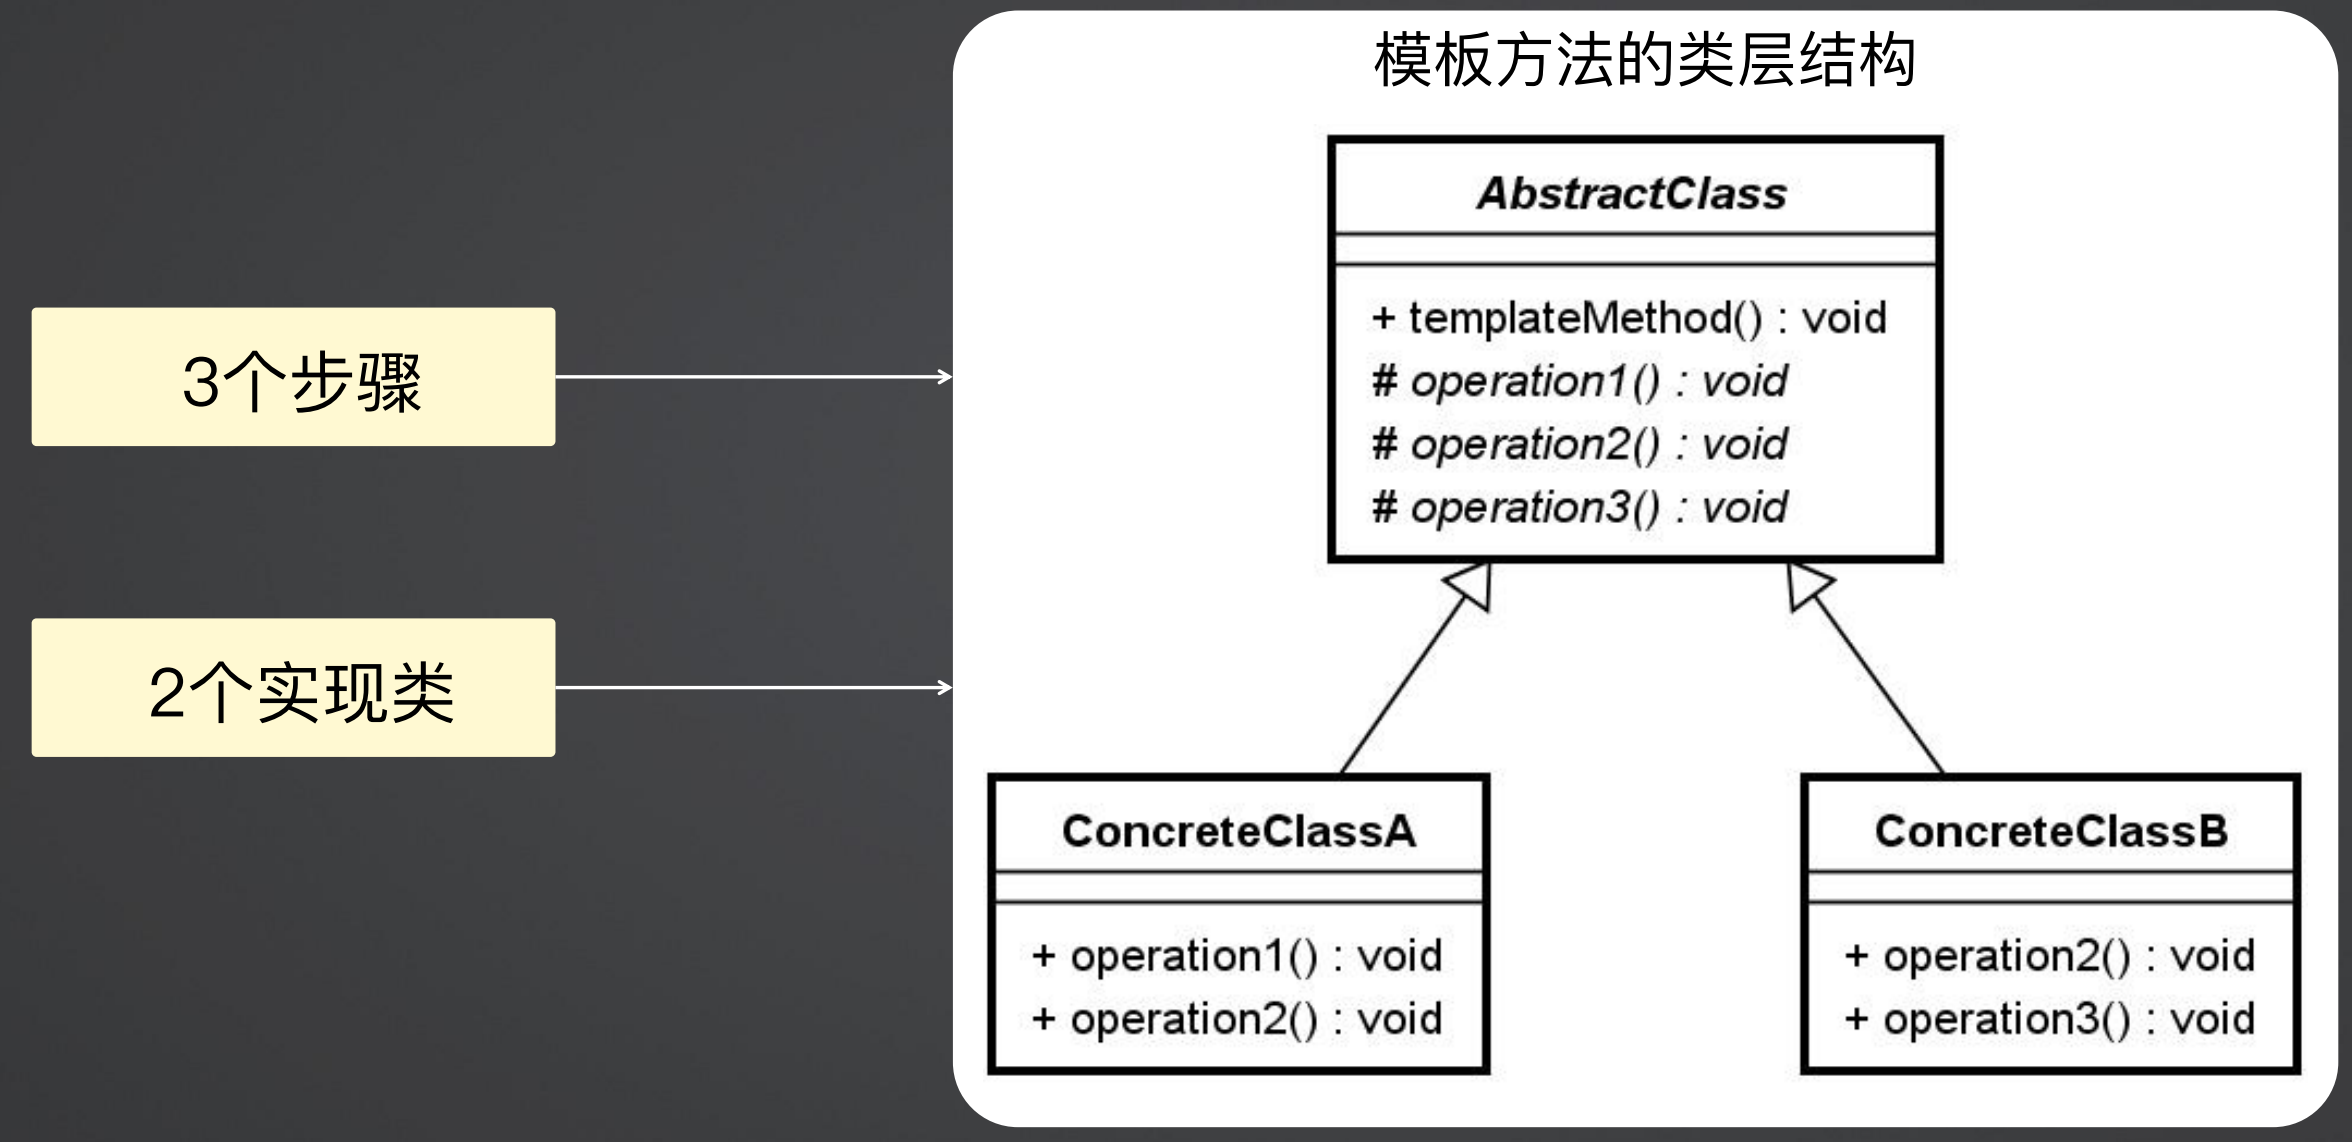
为了完成整个业务流程,实现过程上可以分成几个步骤,这些步骤构成了业务流程的执行框架。但是, 同一个业务流程可能会应用到不同的业务场景中,而不同业务场景下的具体步骤可能是不一样的。
如下图所示,模板设计模式其实就是一个抽象类和多个实现,在抽象类中,有多个抽象方法,但是有一个用以定义抽象方法执行顺序的方法templateMethod。而各个子类只需要实现自己想要的几个步骤的抽象方法即可。(在UML类图中,非抽象方法使用+号表示,抽象方法使用#表示)
(2)回调机制
如下图所示,ClassA的operation1()方法调用ClassB的operation2()方法,然后ClassB的operation2()方法执行完 毕后再主动调用ClassA的callback()方法。这就是回调,体现的是一种双向的调用方式。
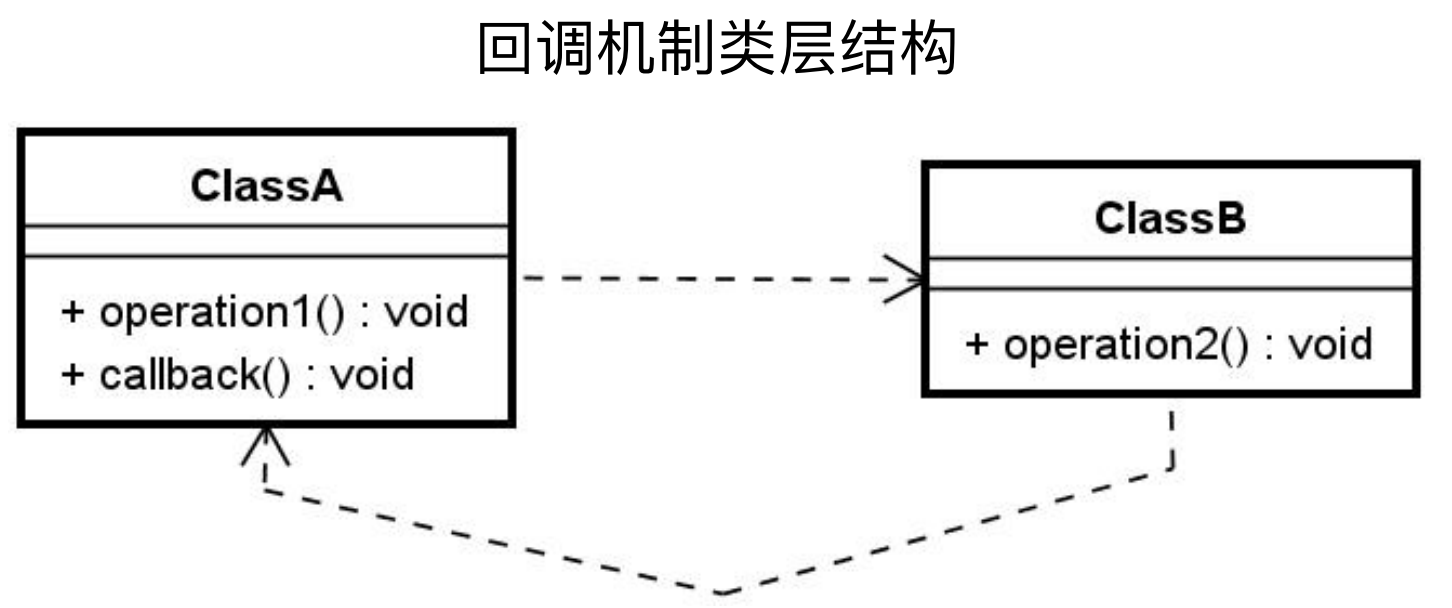
回调机制的特点:回调在任务执行过程中不会造成任何的阻塞,异步执行效果;回调是实现扩展性的一种简单而直接的模式,组件动态跳转。
2、从JDBC API到JdbcTemplate的演变
JDBC API的代码重复性:
JDBC API的执行流程:创建DataSource、获取Connection、创建Statement、执行SQL语句、处理ResultSet、关闭资源对象。
整个过程中只有处理ResultSet是需要定制化的,那么就可以使用模板方法,每个业务场景只需要实现处理ResultSet的流程即可。
(1)在JDBC API中添加模板方法模式
创建模板类:使用模板方法需要创建一个抽象类,在JdbcTemplate中叫AbstractJdbcTemplate,然后需要定义一个模板方法execute,在该方法中执行创建DataSource、获取Connection、创建Statement、执行SQL语句、处理ResultSet、关闭资源对象这些步骤,除了处理ResultSet外,别的流程内容都一致,可以直接在AbstractJdbcTemplate中定义非抽象方法直接实现,而处理ResultSet则定义一个抽象方法handleResultSet方法进行处理。
public abstract class AbstractJdbcTemplate {
   public final Object execute(String sql) {
      ...
      Object object = handleResultSet(resultSet);
   }

   protected abstract Object handleResultSet(ResultSet rs) throws SQLException;
}
模板方法的实现:每一个具体的业务实现就需要集成AbstractJdbcTemplate,并重写抽象方法handleResultSet,在handleResultSet方法中编写处理ResultSet逻辑。
public class AccountJdbcTemplate extends AbstractJdbcTemplate {
   @Override protected Object handleResultSet(ResultSet rs) throws SQLException {
      List<Account> accounts = new ArrayList<Account>();
      ...
      return accounts;
   }
}
应用:直接new一个AccountJdbcTemplate,然后调用其execute方法即。
AbstractJdbcTemplate jdbcTemplate = new AccountJdbcTemplate();
List<Account> account = (List<Account>) jdbcTemplate.execute("select * from Account");
模板方法的问题:
抽象类的本质是需要根据AbstractJdbcTemplate创建不同的类似AccountJdbcTemplate的子类,如果有多个抽象方法,那么都需要实现,尽管有些方法可能根本没用到。
要想解决这个问题,可以使用回调来替换抽象方法,从而提高系统扩展性
(2)在JDBC API中添加回调机制
创建一个回调模板方法,实现与上面的模板方法类似,仍然是有一个模板方法,在模板方法中按顺序调用,但是在上面的抽象模板中,调用的处理ResultSet方法是一个抽象方法,而回调模板方法中处理ResultSet调用的是回调接口的回调方法。
StatementCallback接口(回调接口)
public interface StatementCallback {
   Object handleStatement(Statement statement) throws SQLException;
}
CallbackJdbcTemplate(回调模板方法)
public class CallbackJdbcTemplate {
   public final Object execute(StatementCallback callback) {
      ...
      Object object = callback.handleStatement(statement);
   }
}
在JDBC API中添加回调机制:使用匿名类实现回调机制实现StatementCallback
public Object queryAccount(final String sql) {
   CallbackJdbcTemplate jdbcTemplate = new CallbackJdbcTemplate();
   return jdbcTemplate.execute(new StatementCallback() {
      public Object handleStatement(Statement statement) throws SQLException {
         ResultSet rs = statement.executeQuery(sql);
         List<Account> accounts = new ArrayList<Account>();
            ...
         return accounts;
      }
   });
}
这就是对于业务和框架的一个解耦,业务代码只做和自己业务相关的处理,跟业务无关的处理都放在jdbcTemplate中处理。
3、JdbcTemplate源码解析
其也是定义了一个StatementCallback毁掉接口
public interface StatementCallback<T> {
   T doInStatement(Statement stmt) throws SQLException, DataAccessException;
}
模板方法execute
public <T> T execute(StatementCallback<T> action) throws DataAccessException {
   Connection con = DataSourceUtils.getConnection(obtainDataSource());
   Statement stmt = null;
   try {
      stmt = con.createStatement();
      applyStatementSettings(stmt);
      T result = action.doInStatement(stmt);
      handleWarnings(stmt);
      return result;
   }catch (SQLException ex) {
      ...
   }finally {
      ...
   }
}
使用方式:内部类,和上面分析的匿名类一样的处理。
public void execute(final String sql) throws DataAccessException {
   class ExecuteStatementCallback implements StatementCallback<Object>, SqlProvider {
      @Override
      @Nullable
      public Object doInStatement(Statement stmt) throws SQLException {
         stmt.execute(sql);
         return null;
      }
      @Override
      public String getSql() {
         return sql;
      }
   }
   execute(new ExecuteStatementCallback());
}
五、基于MyBatis实现数据访问
1、MyBatis整体架构和核心组件
Mybatis是代表性ORM框架,支持自定义 SQL、存储过程以及高级映射,免除了几乎所有的 JDBC 代码以及设置参数和获取结果集的工作,通过XML/注解映射原始类型、接口和 Java POJO为数据库记录。
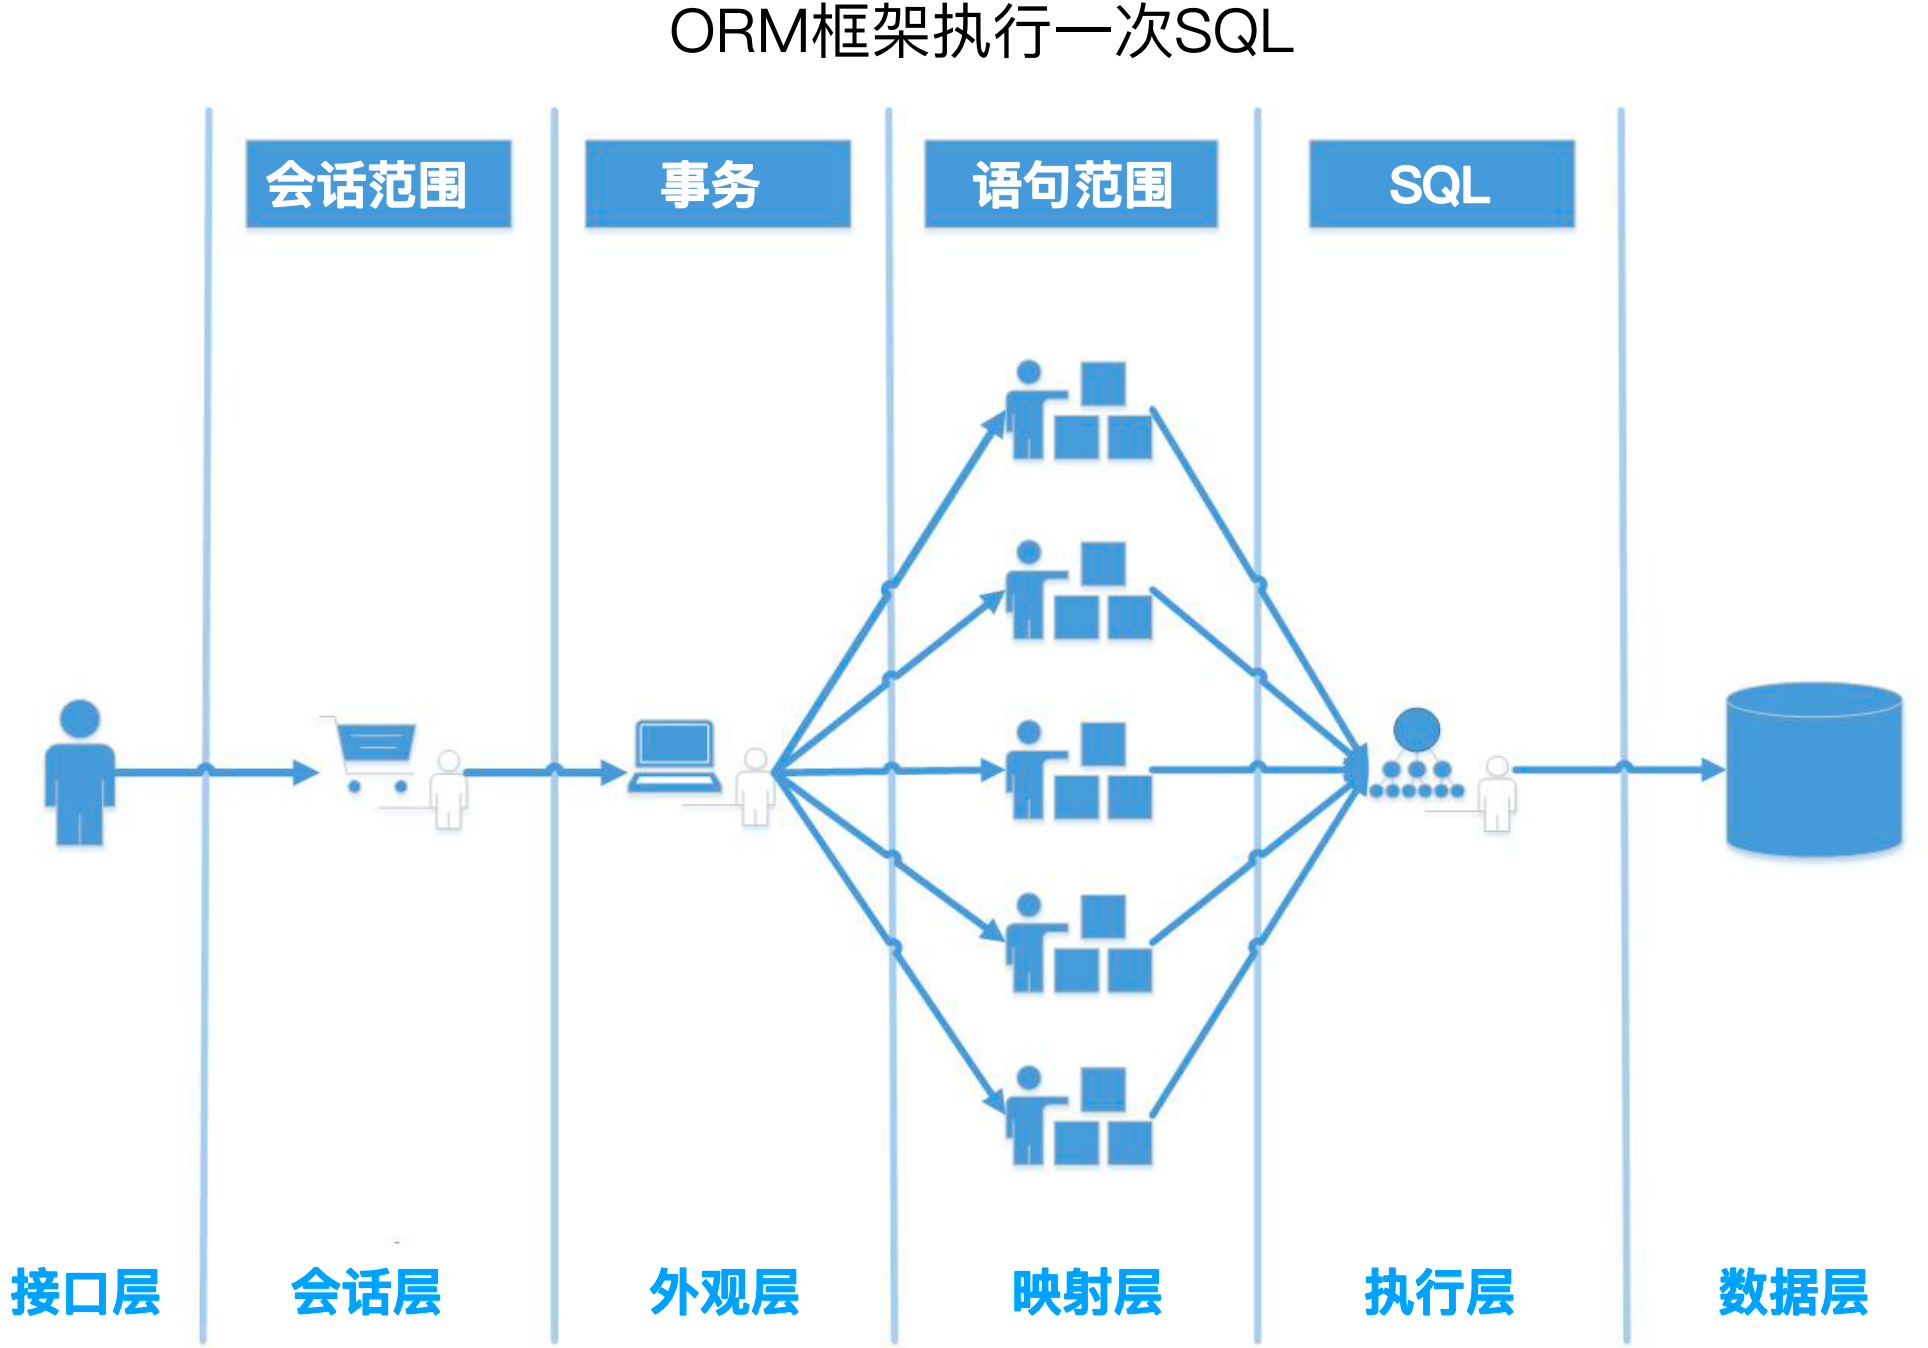
ORM框架的执行流程:
无论是哪一款ORM框架,其执行流程都差不多,首先是有接口层让用户调用,有数据层做数据访问,然后有会话层(针对于Session会话的处理,例如一个会话一个连接等),外观层(使用门面模式,让使用者不需要关心后面的具体逻辑,例如事务的处理一般都在外观层),映射层(做入参和出参的参数映射),执行层(具体执行sql)
Mybatis设计思想
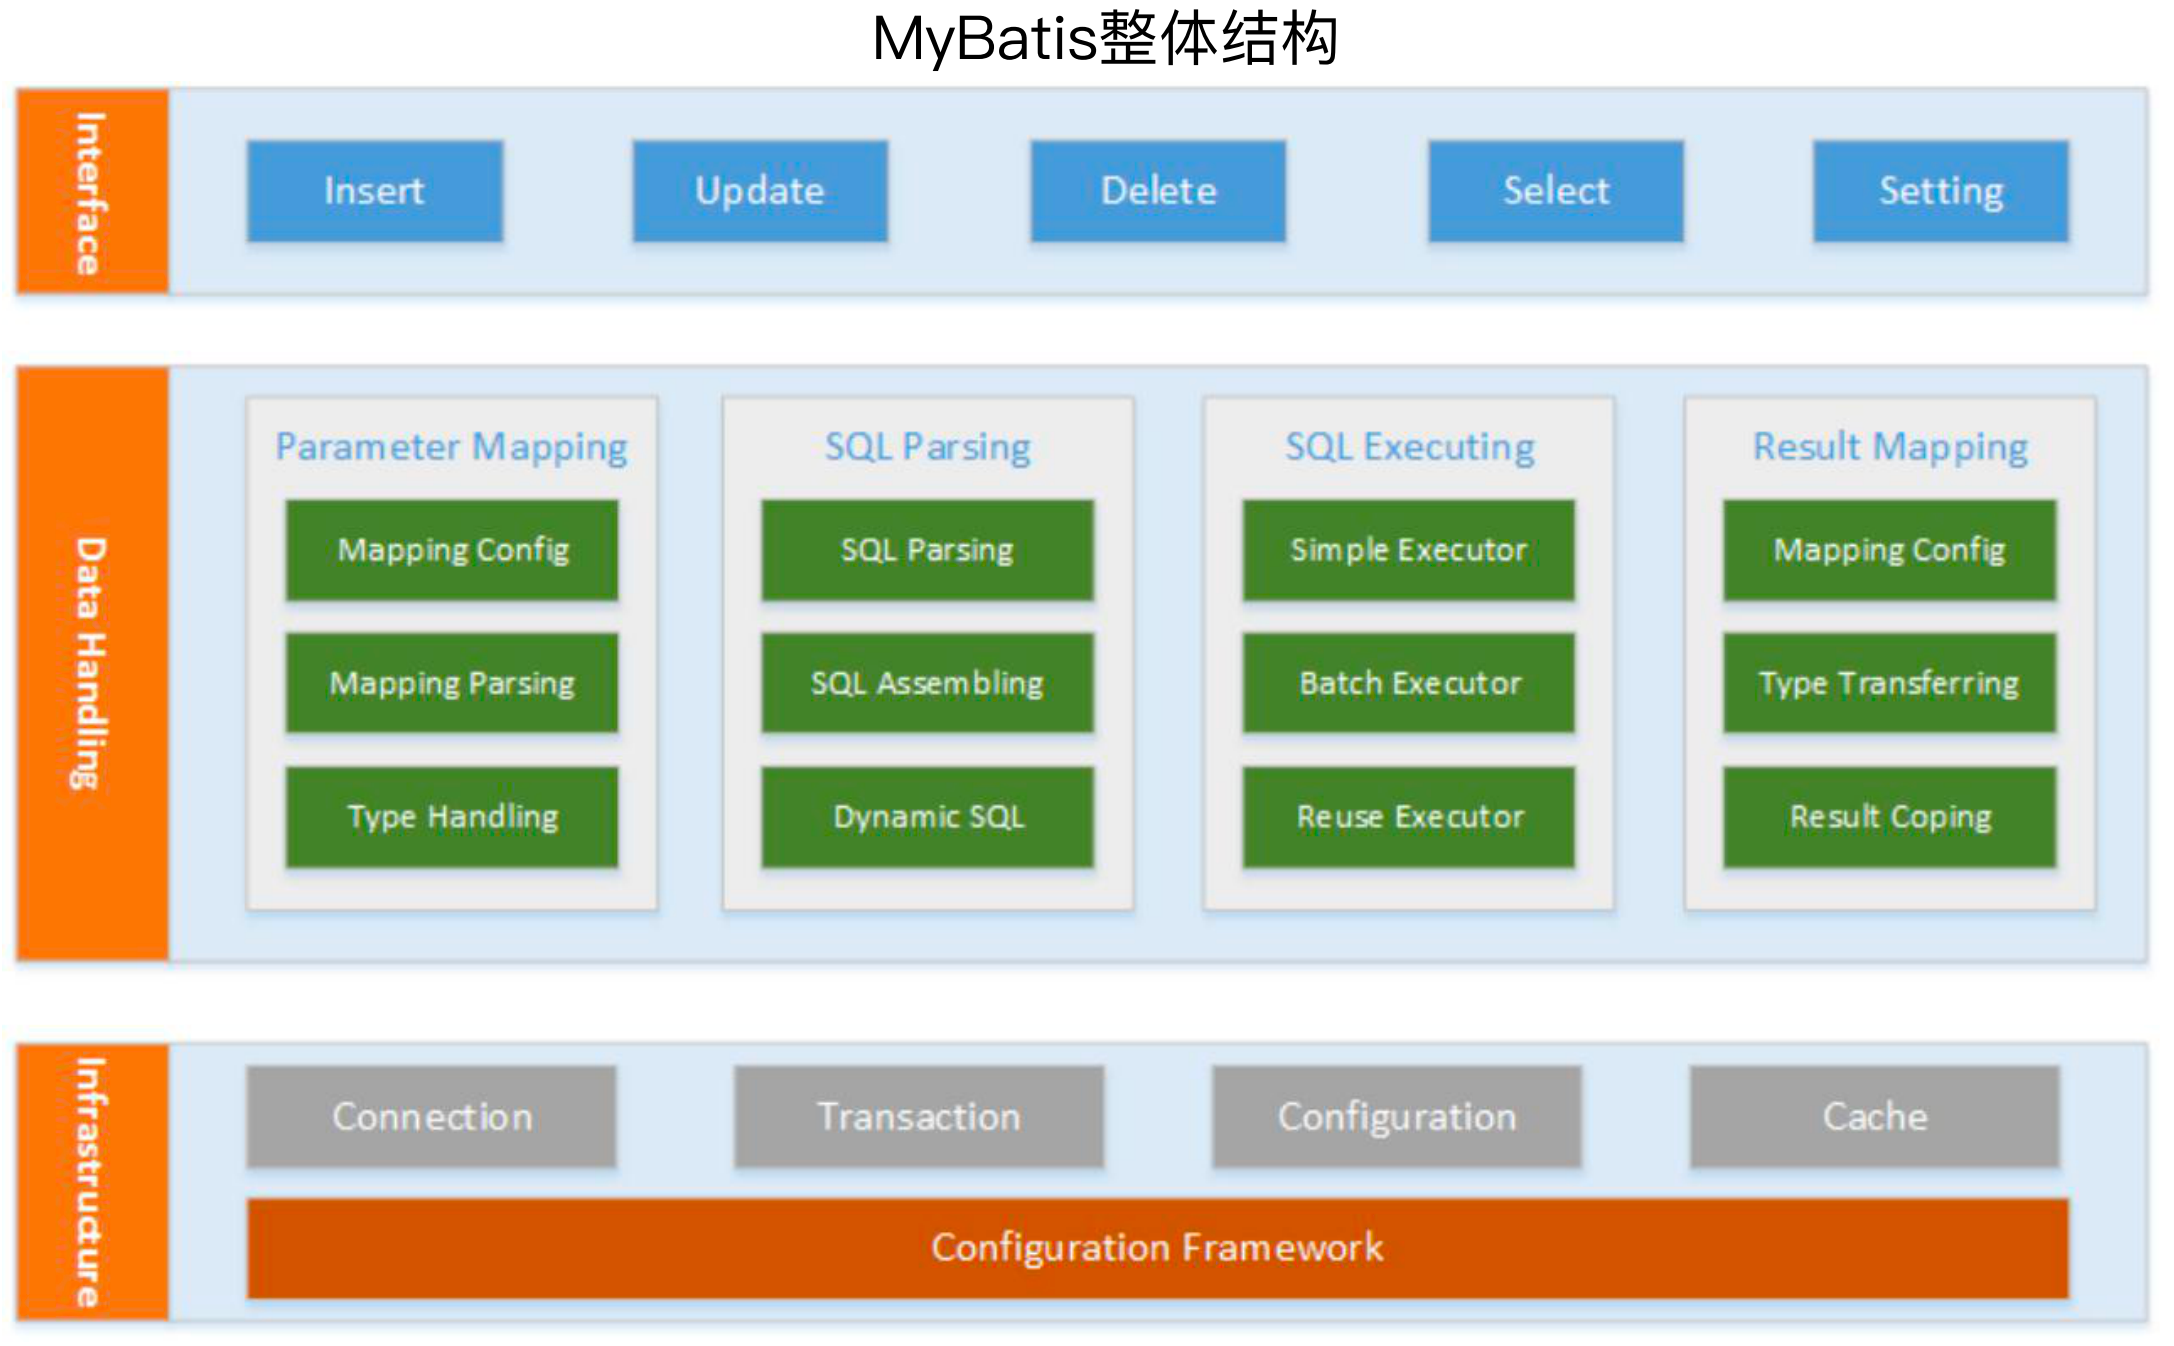
在Mybatis中,将其分为了三层:接口层、数据处理层、基础服务层,其中接口层提供了增删改查以及设置的一些接口,数据处理层提供了参数映射、sql解析(例如动态sql解析等)、sql执行、结果集映射等,基础服务层提供了获取连接、事务处理、配置处理、一二级缓存等
MyBatis使用方式
//获取MyBatis配置文件
InputStream is = Resource.getResourceAsStream("mybatis_config.xml");
//构建SqlSessionFactory
SqlSessionFactory sqlSessionFactory = new SqlSessionFactoryBuilder().build(is);
//创建SqlSession
SqlSession sqlSession = sqlSessionFactory.openSession();
//获取Mapper
TestMapper testMapper = sqlSession.getMapper(TestMapper.class);
//获取和使用目标对象
TestObject testObject = testMapper.getObject("testCode1");
System.out.println(testObject.getCode());
MyBatis核心对象 - 运行范围和生命周期:
SqlSessionFactory是一个工厂类,属于应用程序级别,所以是个单例
SqlSession是请求级别的,同时也是线程不安全的
Mapper:方法级别, 即用即弃
原生的MyBatis过于底层,一般都是和Spring结合起来一起使用
2、MyBatis和Spring整合方式
mybatis和spring的整合使用了Mybatis-spring框架
(1)首先配置dataSource,然后配置sqlSessionFactory,这个sqlSessionFactory不是mybatis的,而是mybatis-spring的,其对应的是org.mybatis.spring.SqlSessionFactoryBean。
<bean id="dataSource" class="org.apache.commons.dbcp.BasicDataSource">
    <property name="driverClassName" value="com.mysql.jdbc.Driver"/>
    <property name="url" value="jdbc:mysql://******:3306/demo"/>
    <property name="username" value="*******"/>
    <property name="password" value="*******"/>
</bean>
<bean id="sqlSessionFactory" class="org.mybatis.spring.SqlSessionFactoryBean">
    <property name="dataSource" ref="dataSource"/>
    <property name="typeAliases" value="com.lcl.galaxy.spring.demo.domain.UserDo"/>
    <property name="typeAliasesPackage" value="com.lcl.galaxy.spring.demo.domain"/>
    <property name="typeHandlers" value="com.lcl.galaxy.spring.demo.typehandlers.PhoneTypeHandler"/>
    <property name="typeHandlersPackage" value="com.lcl.galaxy.spring.demo.typehandlers"/>
    <property name="mapperLocations" value="classpath*:com/lcl/galaxy/spring/demo/**/*.xml"/>
    <property name="configLocation" value="WEB-INF/mybatisconfig.xml"/>
</bean>
有了sqlSessionFactory之后就可以拿到sqlSession,就可以做select、insert、update、delete、commit、rollback、close等操作。同时在Spring里面还提供了SqlSessionTemplate和SqlSessionDaoSupport来简化操作。
(2)mapper配置
mapper的配置有两种方式,一种是对于单一一个Mapper的配置,其对应的是org.mybatis.spring.mapper.MapperFactoryBean,其可以将Mapper接口转换为一个实体类进行调用,再或者使用MapperScannerConfigurer对整个mappers目录进行扫描。
<bean id="userServiceMapper" class="org.mybatis.spring.mapper.MapperFactoryBean">
    <property name="mapperInterface" value="om.lcl.galaxy.spring.mappers.UserMapper"/>
    <property name="sqlSessionFactory" ref="sqlSessionFactory"/>
</bean>

<bean class="org.mybatis.spring.mapper.MapperScannerConfigurer">
    <property name="basePackage" value="com.lcl.galaxy.spring.mappers"/>
</bean>
springBoot集成:使用简单的注解就可以使用
@Mapper
public interface UserMapper {
   @Select("select * from users where id=#{id}")
   public UserEntity getUserById(@Param("id") int id);
   @Insert("insert into users(userName, passWord, user_sex, nick_name) values(#{userName}, #{passWord}, #{userSex}, #{nickName})")
   @Options(useGeneratedKeys = true, keyProperty = "id")
   public void insertUser(UserEntity user);
   @Select("select * from users")
   public List<UserEntity> getAll();
   @Update("update users set userName=#{userName},nick_name=#{nickName} where id = #{id}")
   void update(UserEntity user);
   @Delete("delete from users where id = #{id}")
   void deleteUserById(int id);
}
3、Spring Boot配置体系
(1)配置文件
约定优于配置(Convention over Configuration)
组织方式:label(配置信息版本)、profile(配置信息运行环境)
配置格式:.properties(传统配置组织形式)、.yml(适合复杂数据结构)
(2)配置体系 -- profile
多配置文件体系:/{application}-{profile}.yml
当前激活的profile:
使用配置:
spring:
  profiles:
    active: test
使用启动命令
java –jar XXX.jar --spring.profiles.active=test
六、MyBatis和Spring集成原理剖析
1、Spring启动扩展点
在spring框架整个其他框架后,就可以像使用spring自己的bean一样使用这些三方框架的bean,这个就是靠Spring的扩展点来实现的。
Spring有很多扩展点,用的最多的是如下四个扩展点,如果要使用spring去集成一个三方框架,或多或少都会用到如下四个扩展点。
InitalizingBean:初始化Bean
FactoryBean:获取Bean,使用了工厂模式
ApplicationListener:事件处理机制,使用了监听模式
Aware:获取容器对象,其是一组扩展点,不是一个
(1)InitalizingBean
InitalizingBean在Spring中是一个接口,只有一个方法afterPropertiesSet,见名知意,该方法是发生在Spring容器属性设置之后,因此InitalizingBean在执行时肯定有个时间顺序。
public interface InitializingBean {
    void afterPropertiesSet() throws Exception;
}
InitializingBean作用于属性被设置之后,也就是说,该方法的初始化会晚于属性的初始化。Spring初始化的执行顺序:Constructor→@PostConstruct→InitializingBean→init-method
在Spring容器Applicationcontext中有一个initializeBean方法,在该方法中:
首先调用invokeAwareMethods方法,创建bean
调用applyBeanPostProcessorsBeforeInitialization方法,PostProcessor方法会在初始化方法前执行
调用invokeInitMethods进行初始化
最后调用applyBeanPostProcessorsAfterInitialization方法,执行PostProcessor
protected Object initializeBean(final String beanName, final Object bean, RootBeanDefinition mbd) {
    //执行Aware方法
    invokeAwareMethods(beanName, bean);
    Object wrappedBean = bean;
    //在初始化之前执行PostProcessor方法
    wrappedBean = applyBeanPostProcessorsBeforeInitialization(wrappedBean, beanName);
    //执行初始化方法
    invokeInitMethods(beanName, wrappedBean, mbd);
    //在初始化之后执行PostProcessor方法
    wrappedBean = applyBeanPostProcessorsAfterInitialization(wrappedBean, beanName);
    return wrappedBean;
}
在invokeInitMethods方法中,先执行InitializingBean,再执行InitMethod。
首先判断bean是否实现了InitializingBean接口,如果实现类,调用其afterPropertiesSet方法,这时候扩展点生效;调用之后,再通过反射机制找到自定义init-method方法并执行。
protected void invokeInitMethods(String beanName, final Object bean, RootBeanDefinition mbd) throws Throwable {
    //判断是否实现InitializingBean接口
    boolean isInitializingBean = (bean instanceof InitializingBean);
    if (isInitializingBean && (mbd == null || !mbd.isExternallyManagedInitMethod("afterPropertiesSet"))) {
        //直接调用afterPropertiesSet方法
        ((InitializingBean) bean).afterPropertiesSet();
    }

    if (mbd != null) {
        //通过反射机制找到自定义init-method方法并执行
        String initMethodName = mbd.getInitMethodName();
        if (initMethodName != null
                && !(isInitializingBean && "afterPropertiesSet".equals(initMethodName))
                &&!mbd.isExternallyManagedInitMethod(initMethodName)) {
            invokeCustomInitMethod(beanName, bean, mbd);
        }
    }
}
通过上面演示的方法回调,就可以在该回调的方法中做很多初始化过程要做的事情,无论是dubbo还是mybatis再或者其他框架,当代码初始化的时候就会执行到这个流程,如果不执行系统就没法启动,或者就没法初始化这些三方框架,因此就可以依赖Spring的扩展点,将自己的启动逻辑放到Spring的扩展点里面,那么Spring在容器启动的一瞬间,就通过这里的执行顺序,把初始化给执行掉,那么三方框架的环境就被构建出来了,那么相关的Bean也都被注入到容器中了,那么就可以像使用Spring的bean一样使用这些三方的bean。
(2)Aware
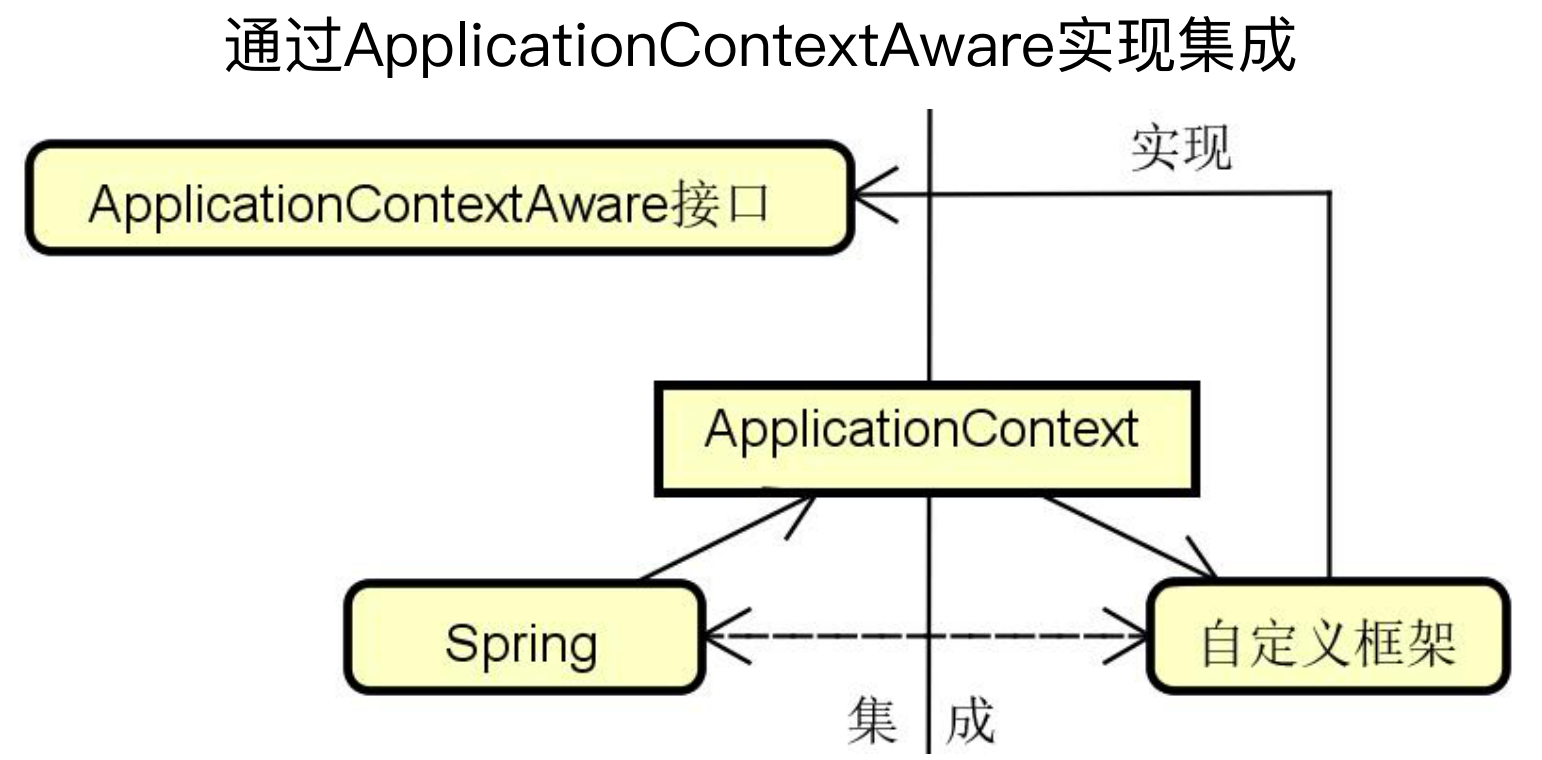
public interface ApplicationContextAware extends Aware {
    void setApplicationContext(ApplicationContext applicationContext) throws BeansException;
}
可以借助于ApplicationContextAware的setApplicationContext方法把Spring ApplicationContext暂存起来使用。通过这种方法,我们就可以获取ApplicationContext,进而获取所有的JavaBean。
如下图所示,三方框架只要实现ApplicationContextAware接口,就可以通过setApplicationContext方法来获取ApplicationContext容器,然后三方框架就可以和Spring共用同一个容器。
 类似的,Spring还存在其他很多Aware,例如BeanNameAware、ApplicationEventPublisherAware等Aware机制。各种Aware接口中都只有一个类似setApplicationContext的set方法。
如果一个Bean想要获取并使用Spring容器中的相关对象,我们就不需要再次执行重复的启动过程,而是可以通过Aware接口所提供的这些方法直接引入相关对象即可。
public interface BeanNameAware extends Aware {
    void setBeanName(String name);
}

public interface ApplicationEventPublisherAware extends Aware {
    void setApplicationEventPublisher(ApplicationEventPublisher applicationEventPublisher);
}
(3)FactoryBean
FactoryBean作为一个工厂负责创建对象,这个创建出来的对象会直接放在Spring容器中管理,尤其是Spring与第三方框架集成时,便于使用IoC注入JavaBean。
本来bean创建后就会被放入容器,为什么会使用FactoryBean来创建bean对象呢,这就要看FactoryBean的使用场景了。
适合时机:
创建对象需要依赖其他接口和数据,并包含处理逻辑,比较复杂,这样就抽一个FactoryBean,使用getObject用来创建Bean,这样代码就很清晰;
创建的对象并不是无状态的,创建对象依赖Spring的某个生命周期或时间节点,这时就不能直接创建,那么就可以借助FactoryBean来进行管理。
public interface FactoryBean<T> {
    String OBJECT_TYPE_ATTRIBUTE = "factoryBeanObjectType";

    @Nullable T getObject() throws Exception;

    @Nullable Class<?> getObjectType();

    default boolean isSingleton() {
        return true;
    }
}
(4)ApplicationListener
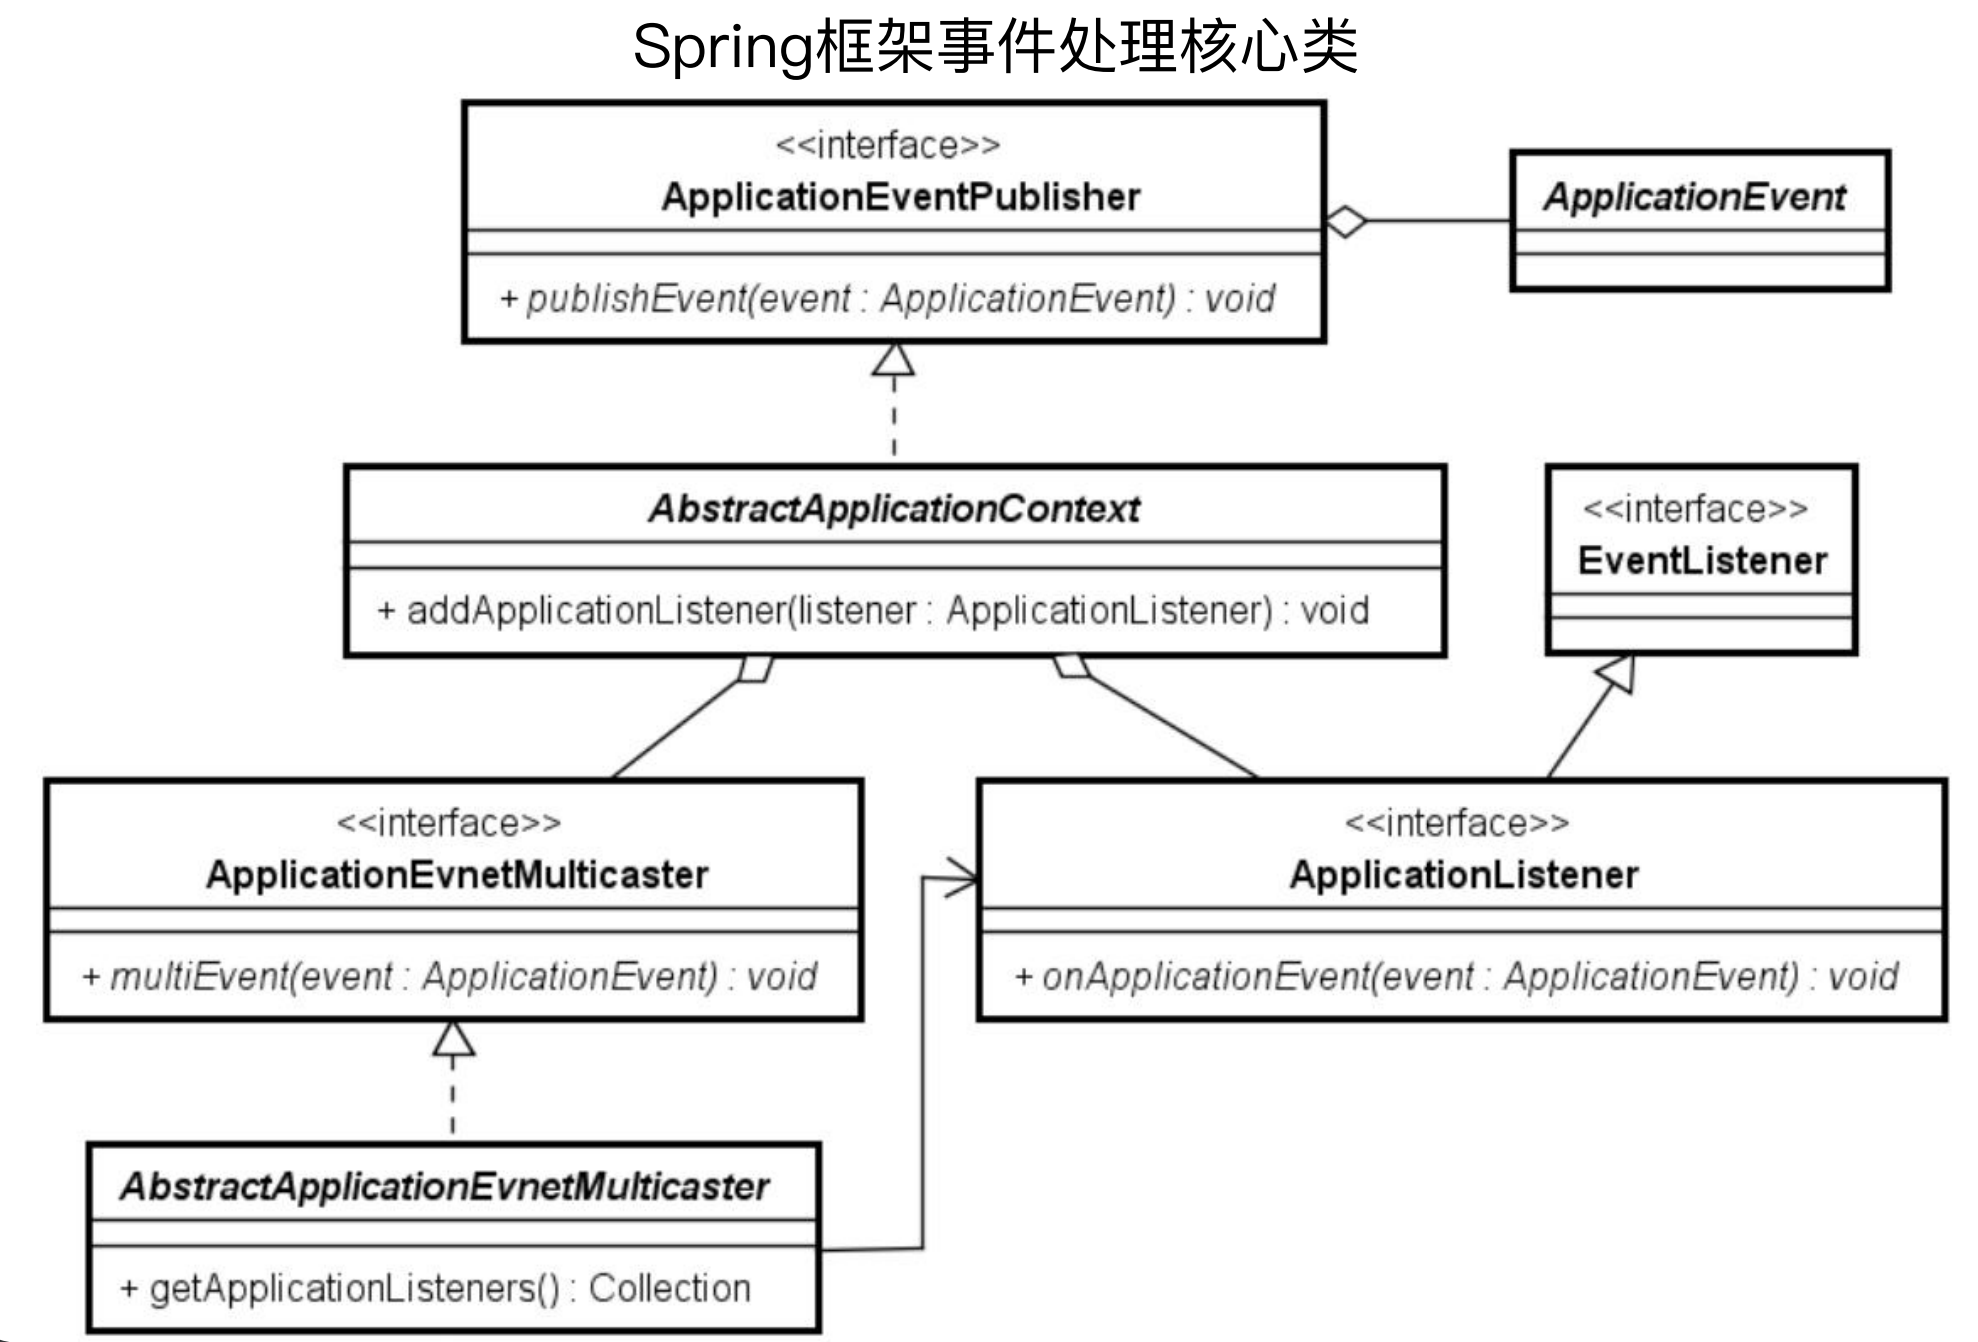
在ApplicationContext的整个生命周期中,每一个阶段或操作都可以通过ApplicationListener发布一种事件,通过ApplicationEvent类和ApplicationListener接口,可以实现对各种事件的处理。
public abstract class ApplicationEvent extends EventObject {
    private final long timestamp;
    ...
}

public interface ApplicationListener<E extends ApplicationEvent> extends EventListener {
    void onApplicationEvent(E event);
    ...
}

public interface ApplicationEventPublisher {
    void publishEvent(ApplicationEvent event);
    ...
}
2、MyBatis-Spring集成过程
(1)SqlSessionFactoryBean
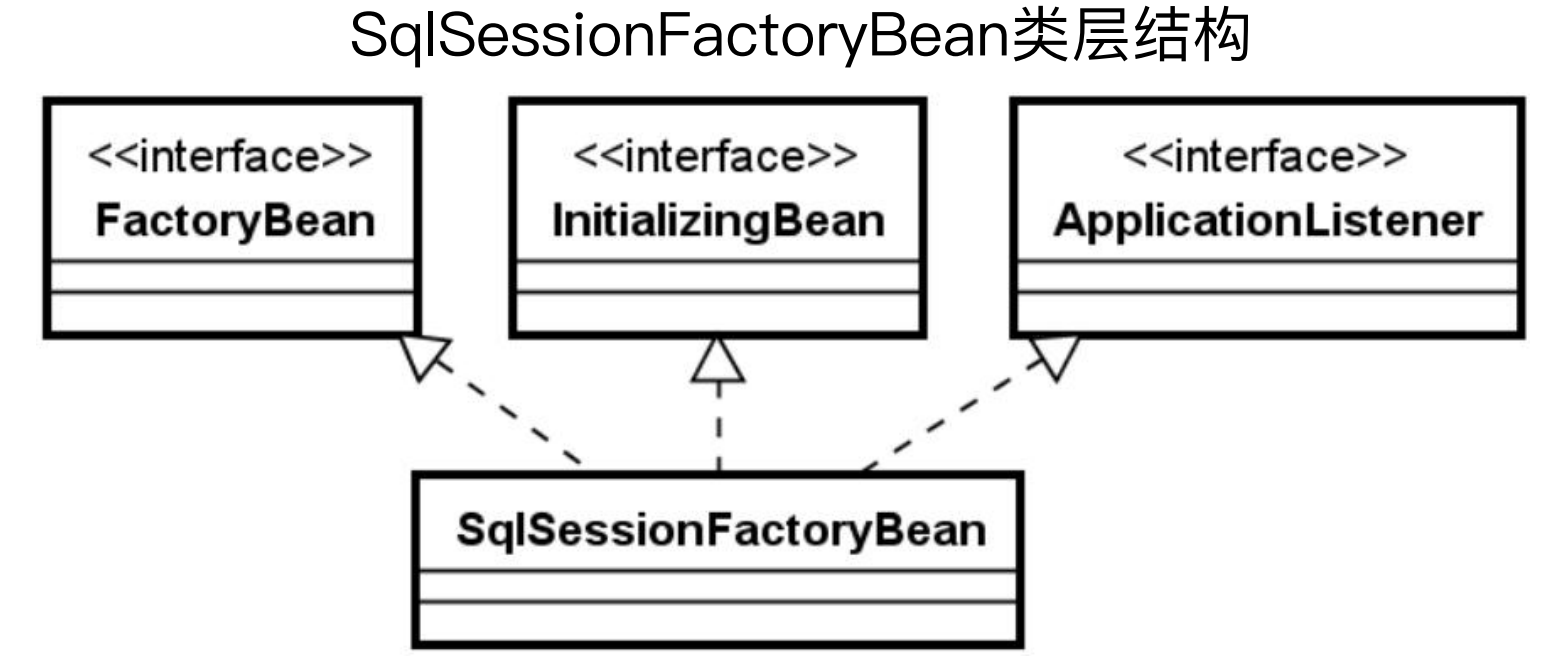
SqlSessionFactoryBean实现了上面提到的三个接口FactoryBean、InitializingBean、ApplicationListener。
 ```java
public class SqlSessionFactoryBean implements FactoryBean
 SqlSessionFactoryBean的目的就是为了获取SqlSession,那么就需要看Spring框架初始化的时候,怎样用这些扩展点来初始化Mybatis框架。
InitializingBean:当实现InitializingBean接口时,在其afterPropertiesSet方法中会调用mybatis的buildSqlSessionFactory方法来创建SqlSessionFactory。
@Override
public void afterPropertiesSet() throws Exception {
    ...
    this.sqlSessionFactory = buildSqlSessionFactory();
}
FactoryBean:当实现FactoryBean接口时,在其getObject方法中,获取SqlSessionFactory。
@Override
public SqlSessionFactory getObject() throws Exception {
    if (this.sqlSessionFactory == null) {
        afterPropertiesSet();
    }
    return this.sqlSessionFactory;
}
ApplicationListener:当实现ApplicationListener接口时,在其onApplicationEvent方法中判断,如果是上下文刷新事件(ContextRefreshedEvent),则根据配置获取所有的MappedStatement。也就是说此时会做一次刷新,将所有的MappedStatement做一次load。
@Override
public void onApplicationEvent(ApplicationEvent event) {
    if (failFast && event instanceof ContextRefreshedEvent) {
        this.sqlSessionFactory.getConfiguration().getMappedStatementNames();
    }
}
(2)MapperFactoryBean
MapperFactoryBean实现了FactoryBean接口,然后继承了SqlSessionDaoSupport
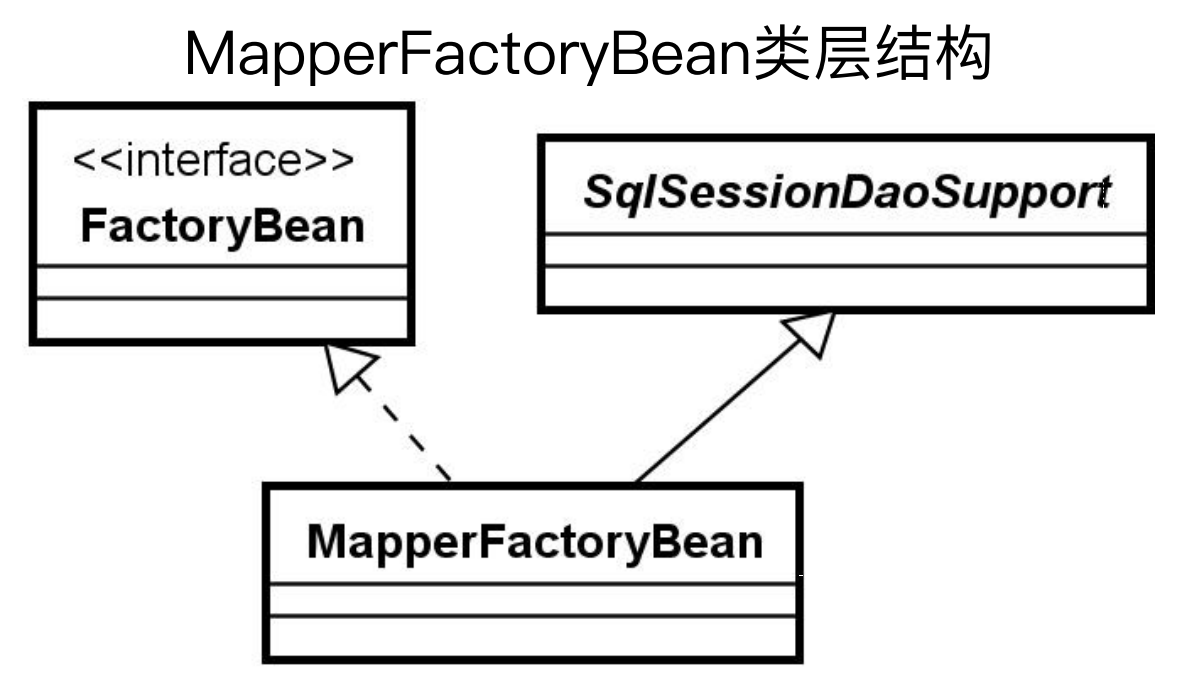
public class MapperFactoryBean<T> extends SqlSessionDaoSupport implements FactoryBean<T> {
    private Class<T> mapperInterface;
    ...
}
对于FactoryBean的实现方法getObject唯一的目的就是为了获取Mapper对象
@Override
public T getObject() throws Exception {
    return getSqlSession().getMapper(this.mapperInterface);
}
MapperFactoryBean还继承了SqlSessionDaoSupport工具类,该工具类是来做数据访问的。
SqlSessionDaoSupport主要的作用是创建并返回一个sqlSession,但是这个sqlSession并非是mybatis的sqlSession,而是SqlSessionTemplate,也就是所其将SqlSession 转换为 SqlSessionTemplate
public abstract class SqlSessionDaoSupport extends DaoSupport {
    private SqlSession sqlSession;
    private boolean externalSqlSession;
    public void setSqlSessionFactory(SqlSessionFactory sqlSessionFactory) {
        if (!this.externalSqlSession) {
            //注意,这个构建SqlSession是一个SqlSessionTemplate对象
            this.sqlSession = new SqlSessionTemplate(sqlSessionFactory);
        }
    }

    public void setSqlSessionTemplate(SqlSessionTemplate sqlSessionTemplate) {
        this.sqlSession = sqlSessionTemplate;
        this.externalSqlSession = true;
    }

    public SqlSession getSqlSession() {
        return this.sqlSession;
    }

    ...
}
那么就有个问题:既然Mybatis已经提供了DefaultSqlSession,为什么Spring还要构建一个SqlSessionTemplate呢?这是因为Spring要保证SqlSession访问过程是线程安全的。
3、SqlSessionTemplate线程安全性
SqlSession是线程不安全的,Spring为了保证其线程安全,就使用了SqlSessionTemplate来保证其线程安全。
(1)SqlSessionTemplate的定位
DefaultSqlSession本身是线程不安全的,所以每当我们想要使用SqlSession时,常规做法就是从 SqlSessionFactory中获取一个新的SqlSession。但这种做法显然效率低下,造成资源的浪费(因为为了保证非线程安全的对象是线程安全的,就需要在每个线程来的时候创建一个该对象,从而保证每个线程都单独持有一个该对象的实例,这样就解决了线程安全的问题)。
更好的实现方法应该是全局存在一个唯一的SqlSession实例来完成DefaultSqlSession的工作。 那么Spring就提供了SqlSessionTemplate,web请求到达后,使用SqlSessionTemplate作为全局共享且线程安全的操作类,来操作SqlSession。
(2)SqlSessionTemplate的初始化
通过构造函数对SqlSessionTemplate进行初始化,在构造函数中使用动态代理初始化SqlSession。
public class SqlSessionTemplate implements SqlSession, DisposableBean {
    private final SqlSessionFactory sqlSessionFactory;
    private final ExecutorType executorType;
    private final SqlSession sqlSessionProxy;
    private final PersistenceExceptionTranslator exceptionTranslator;

    public SqlSessionTemplate(SqlSessionFactory sqlSessionFactory, ExecutorType executorType, PersistenceExceptionTranslator exceptionTranslator) {
        this.sqlSessionFactory = sqlSessionFactory;
        this.executorType = executorType;
        this.exceptionTranslator = exceptionTranslator;
        // 动态代理
        this.sqlSessionProxy = (SqlSession) newProxyInstance(SqlSessionFactory.class.getClassLoader(), new Class[] {SqlSession.class }, new SqlSessionInterceptor());
    }
    ...
}
(3)SqlSessionInterceptor和动态代理
SqlSessionInterceptor实现了InvocationHandler,也就是代理类的实现逻辑,在invoke方法中,调用getSqlSession方法来获取线程安全的SqlSession,然后在调用原始的方法时,将SqlSession传入进去。
private class SqlSessionInterceptor implements InvocationHandler {
    @Override public Object invoke(Object proxy, Method method, Object[] args) throws Throwable {
        //获取SqlSession实例,该实例是线程安全的(线程安全转换)
        SqlSession sqlSession = getSqlSession( SqlSessionTemplate.this.sqlSessionFactory, SqlSessionTemplate.this.executorType, SqlSessionTemplate.this.exceptionTranslator);
        try {
            //调用真实SqlSession的方法
            Object result = method.invoke(sqlSession, args);
            ...
            return result;
        } catch (Throwable t) {
            //省略异常处理
        } finally {
            if (sqlSession != null) {
                //关闭sqlSession
                closeSqlSession(sqlSession, SqlSessionTemplate.this.sqlSessionFactory);
            }
        }
    }
}
(4)SqlSessionHolder
在getSqlSession,首先通过事务同步管理器TransactionSynchronizationManager获取一个SqlSessionHolder,然后从SqlSessionHolder中获取sqlSession实例,获取到则直接返回,如果获取不到sqlSession实例,则根据executorType创建一个新的,然后将sessionFactory和session注册到SqlSessionHolder。
SqlSessionHolder实际上就是一个线程安全的Map容器,在Spring中,一旦看到以Holder结尾的类,都是线程安全的容器。
public static SqlSession getSqlSession(SqlSessionFactory sessionFactory, ExecutorType executorType, PersistenceExceptionTranslator exceptionTranslator) {
    //根据sqlSessionFactory从当前线程对应的资源Map中获取SqlSessionHolder(存储SessionHolder)
    SqlSessionHolder holder = (SqlSessionHolder) TransactionSynchronizationManager.getResource(sessionFactory);
    //从SqlSessionHolder中获取sqlSession实例
    SqlSession session = sessionHolder(executorType, holder);
    if (session != null) {
        return session;
    }
    //如果获取不到sqlSession实例,则根据executorType创建一个新的
    sqlSession session = sessionFactory.openSession(executorType);
    //将sessionFactory和session注册到线程安全的资源Map
    registerSessionHolder(sessionFactory, executorType, exceptionTranslator, session);
    return session;
}
(5)TransactionSynchronizationManager
其使用了ThreadLocal保证了线程安全。
SessionHolder holder = new SqlSessionHolder(session, executorType, exceptionTranslator);
// 绑定SqlSession资源
TransactionSynchronizationManager.bindResource(sessionFactory, holder);
TransactionSynchronizationManager.registerSynchronization(new SqlSessionSynchronization(holder, sessionFactory));

// ThreadLocal线程安全
private static final ThreadLocal<Set<TransactionSynchronization>> synchronizations = new NamedThreadLocal<Set<TransactionSynchronization>>("Transaction synchronizations");
-----------------------------------------------------------
---------------------------------------------
朦胧的夜 留笔~~


【推荐】国内首个AI IDE,深度理解中文开发场景,立即下载体验Trae
【推荐】编程新体验,更懂你的AI,立即体验豆包MarsCode编程助手
【推荐】抖音旗下AI助手豆包,你的智能百科全书,全免费不限次数
【推荐】轻量又高性能的 SSH 工具 IShell:AI 加持,快人一步
· 没有Manus邀请码?试试免邀请码的MGX或者开源的OpenManus吧
· 无需6万激活码!GitHub神秘组织3小时极速复刻Manus,手把手教你使用OpenManus搭建本
· C#/.NET/.NET Core优秀项目和框架2025年2月简报
· DeepSeek在M芯片Mac上本地化部署
· 葡萄城 AI 搜索升级:DeepSeek 加持,客户体验更智能
2021-03-11 Nginx性能调优