只需一篇文章搞定Spring Cloud整套搭建(Netflix)
一、准备阶段
先搭建两个项目,provider-01-8081和consumer-01-8080,其中provider-01-8081用于提供服务,并操作数据库,consumer-01-8080用于消费服务,使用 http + ip + 端口的方式进行调用,代码比较简单,并且和Spring Cloud没有关系,就直接上代码。
provider-01-8081的相关代码如下:
@RestController
@RequestMapping("/depart")
@Slf4j
public class DepartController {

    @Autowired
    private DepartService departService;

    @PostMapping("/save")
    public boolean save(@RequestBody Depart depart){
        return departService.save(depart);
    }

    @PostMapping("/del")
    public boolean del(int id){
        return departService.del(id);
    }

    @PostMapping("/update")
    public boolean update(@RequestBody Depart depart){
        return departService.update(depart);
    }

    @GetMapping("/find/{id}")
    public Depart query(@PathVariable int id){
        return departService.find(id);
    }

    @GetMapping("/findAll")
    public List<Depart> findAll(){
        return departService.findAll();
    }

}
public interface DepartService {
    boolean save(Depart depart);

    boolean del(int id);

    boolean update(Depart depart);

    Depart find(int id);

    List<Depart> findAll();
}
@Service
public class DepartServiceImpl implements DepartService {

    @Autowired
    private DepartRepository departRepository;

    @Override
    public boolean save(Depart depart) {
        Depart d = departRepository.save(depart);
        if(d != null){
            return true;
        }
        return false;
    }

    @Override
    public boolean del(int id) {
        //如果id不存在,删除会报错
        if(departRepository.existsById(id)){
            departRepository.deleteById(id);
        }
        return true;
    }

    @Override
    public boolean update(Depart depart) {
        //这里save时,如果id为空,则新增;id不为空且id存在,则更新;id不为空且id不存在,仍然为新增,且id仍自动生成。
        Depart d = departRepository.save(depart);
        return d == null ? true:false;
    }

    @Override
    public Depart find(int id) {
        if(departRepository.existsById(id)){
            return departRepository.getOne(id);
        }
        return null;
    }

    @Override
    public List<Depart> findAll() {
        return departRepository.findAll();
    }
}
@Data
@Table
@Entity //使用自动建表
@JsonIgnoreProperties({"hibernateLazyInitializer","handler","fieldHandler"}) //使用懒加载
public class Depart {

    @Id //设置主键
    @GeneratedValue(strategy = GenerationType.IDENTITY) //设置主键自增长
    private Integer id;
    private String name;
}
public interface DepartRepository extends JpaRepository<Depart, Integer> {
}
server:
  port: 8081

# 配置spring-data-jpa
spring:
  jpa:
    # 设置重启时是否更新表结构
    hibernate:
      ddl-auto: none
    # 设置是否在容器启动时创建表,默认为false
    generate-ddl: true
    # 设置是否显示sql,默认为false
    show-sql: true

  datasource:
    type: com.alibaba.druid.pool.DruidDataSource
    driver-class-name: com.mysql.jdbc.Driver
    url: jdbc:mysql://8.131.245.53:3306/lcltest?useUnicode=true&characterEncoding=utf8&serverTimezone=Asia/Shanghai&zeroDateTimeBehavior=convertToNull
    username: root
    password: root
  application:
    # 当前服务名称
    name: provider-depart

# 配置日志
logging:
  pattern:
    console: level-%level %msg%n
  level:
    root: info
    # hibernate输出日志级别
    org.hibernate: info
    # 在show-sql为true时,显示sql中的动态值
    org.hibernate.type.descriptor.sql.BasicBinder: trace
    # 在show-sql为true时,显示查询结果
    org.hibernate.hql.internal.ast.exec.BasicExecutor: trace
    # 设置自己代码的日志级别
    com.lcl.springcloud: debug
consumer-01-8080代码如下:
@Data
public class Depart {
    private Integer id;
    private String name;
}
@RestController
@RequestMapping("/depart")
public class DepertApi {

    @Autowired
    private RestTemplate restTemplate;

    private static final String provider_url = "http://localhost:8081";

    @PostMapping("/save")
    public boolean save(@RequestBody Depart depart){
        String url = provider_url + "/depart/save";
        return restTemplate.postForObject(url, depart, Boolean.class);
    }

    @PostMapping("/del")
    public boolean del(int id){
        String url = provider_url + "/depart/del";
        return restTemplate.postForObject(url, id, Boolean.class);
    }

    @PostMapping("/update")
    public boolean update(@RequestBody Depart depart){
        String url = provider_url + "/depart/update";
        return restTemplate.postForObject(url, depart, Boolean.class);
    }

    @GetMapping("/find/{id}")
    public Depart query(@PathVariable int id){
        String url = provider_url + "/depart/find/id";
        return restTemplate.getForObject(url, Depart.class);
    }

    @GetMapping("/findAll")
    public List<Depart> findAll(){
        String url = provider_url + "/depart/findAll";
        return restTemplate.getForObject(url, List.class);
    }
}
二、Eureka
(一)Eureka单机搭建
首先说一下SpringCloud和SpringBoot的版本对应关系,如果不对应,会产生异常。
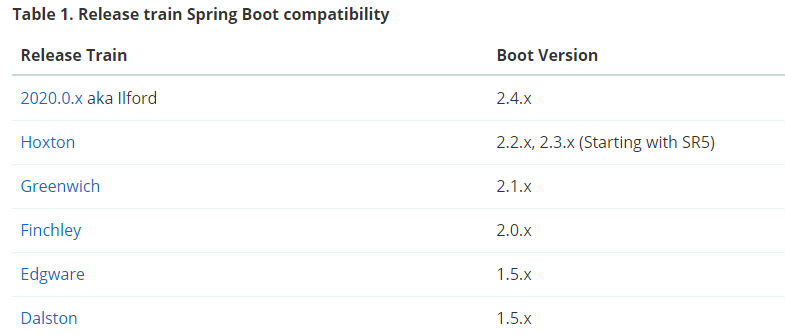
Eureka单机搭建非常简单,就是在启动类上增加@EnableEurekaServer注解,其他的就是配置文件的一些配置
@SpringBootApplication
@EnableEurekaServer
public class Eureka018000Application {
    public static void main(String[] args) {
        SpringApplication.run(Eureka018000Application.class, args);
    }
}
配置文件内容如下,都已经做了注释,就不再多描述。
server:
  port: 8000

eureka:
  instance:
  # 指定eureka主机
    hostname: localhost
  client:
    # 是否向eureka注册自己
    register-with-eureka: false
    # 指定客户端是否能够获取eureka注册信息
    fetch-registry: false
    # 暴露服务中心地址
    server-url:
      # 服务中心地址,写法等同于:http:localhost:8080/eureka
      defualtZone: http://${eureka.instance.hostname}:${server.port}/eureka
  server:
    # 关闭自我保护,不建议关闭
    enable-self-preservation: false
    # eureka server 剔除不可用服务的时间窗
    eviction-interval-timer-in-ms: 4000
    # 设置心跳保护开启的阈值
    #renewal-percent-threshold: 0.75

# 指定服务名称
spring:
  application:
    name: eureka-server
<properties>
        <java.version>1.8</java.version>
        <spring-cloud.version>2020.0.2</spring-cloud.version>
    </properties>
    <dependencies>
        <dependency>
            <groupId>org.springframework.cloud</groupId>
            <artifactId>spring-cloud-starter-netflix-eureka-server</artifactId>
        </dependency>

        <dependency>
            <groupId>org.springframework.boot</groupId>
            <artifactId>spring-boot-starter-test</artifactId>
            <scope>test</scope>
        </dependency>
    </dependencies>
    <dependencyManagement>
        <dependencies>
            <dependency>
                <groupId>org.springframework.cloud</groupId>
                <artifactId>spring-cloud-dependencies</artifactId>
                <version>${spring-cloud.version}</version>
                <type>pom</type>
                <scope>import</scope>
            </dependency>
        </dependencies>
    </dependencyManagement>
consumer需要开启服务发现及Eureka客户端注册,然后就可以使用RestTemplate进行调用
@SpringBootApplication
@EnableDiscoveryClient //开启服务发现客户端
@EnableEurekaClient
public class Consumer018080Application {
    public static void main(String[] args) {
        SpringApplication.run(Consumer018080Application.class, args);
    }
}
@Configuration
public class DepartCodeConfig {
    @Bean
    @LoadBalanced   //开启客户端负载均衡功能
    public RestTemplate restTemplate(){
        return  new RestTemplate();
    }
}
    private static final String provider_url = "http://provider-depart";

    @PostMapping("/save")
    public boolean save(@RequestBody Depart depart){
        String url = provider_url + "/depart/save";
        return restTemplate.postForObject(url, depart, Boolean.class);
    }
(二)服务发现
使用DiscoveryClient的getInstances方法获取实例集合,然后再获取实例中的相关信息。
@RestController
@RequestMapping("/depart")
@Slf4j
public class DepartController {
    @Autowired
    private DepartService departService;
    @Autowired  //声明服务发现客户端
    private DiscoveryClient client;

    ......

    @GetMapping("/services")
    public void getServices(){
        List list = new ArrayList();
        List<String> services = client.getServices();
        for (String serviceNanme: services) {
            List<ServiceInstance> instances = client.getInstances(serviceNanme);
            for (ServiceInstance instance : instances) {
                log.info("instance.getHost()==================={}", instance.getHost());
                log.info("instance.getInstanceId()==================={}", instance.getInstanceId());
                log.info("instance.getServiceId()==================={}", instance.getServiceId());
                log.info("instance.getUri()==================={}", instance.getUri());
                log.info("instance.getMetadata()==================={}", instance.getMetadata());
                log.info("instance.getPort()==================={}", instance.getPort());
                log.info("instance.getScheme()==================={}", instance.getScheme());
            }
        }
    }
}
(三)Eureka自我保护机制
Eureka控制台可以看到如下图所示的红色字体描述,表示Eureka进入了自我保护模式。

默认情况下,Eureka Server在90秒呢没有检测到服务列表中的某服务,就会将该服务从服务列表中剔除。
但是大多数情况下,Eureka Server检测不到心跳是因为网络抖动的问题,如果在短时间内网络恢复正常,则可以正常对外提供服务,但是由于Eureka Server的服务列表中已不存在该服务,因此就无法对外提供服务。
基于以上的情况,如果在短时间内,Eureka Server丢失较多的微服务,即收到的心跳数量小于阈值,为了保证系统的可用性(AP),给由于网络抖动造成服务不可用的服务以恢复机会,因此就会开启Eureka的自我保护机制,当Eureka Server收到的心跳数恢复到阈值以上,则会关闭自我保护机制。
自我保护机制默认是开启的,默认的阈值因子是0.85,可以通过如下配置进行调整,但是不建议调整。
eureka:
  server:
    # 关闭自我保护,不建议关闭
    enable-self-preservation: false
    # eureka server 剔除不可用服务的时间窗
    eviction-interval-timer-in-ms: 4000
    # 设置心跳保护开启的阈值
    renewal-percent-threshold: 0.75
现面截图中Renews threshold和Renews (last min)就是用来计算是否需要开启自我保护的。

(四)服务下架及平滑上下线
为Eureka添加actuator监控模块及添加配置文件,这一块是SpringBoot的内容。
info:
  app.version: 1.0
  app.auth: lcl
  app.name: provider-depart

management:
  endpoint:
    shutdown:
      # 开启shutdown功能
      enabled: true

  endpoints:
    web:
      exposure:
        # 开启所有监控终端
        include: "*"
        <!--actuator 依赖-->
        <dependency>
            <groupId>org.springframework.boot</groupId>
            <artifactId>spring-boot-starter-actuator</artifactId>
        </dependency>
可以使用http://localhost:8081/actuator来查看开放的安全检查端点,可以使用http://localhost:8081/actuator/info查看在配置文件中配置的info信息,可以使用http://localhost:8081/actuator/shutdown手动停止服务。
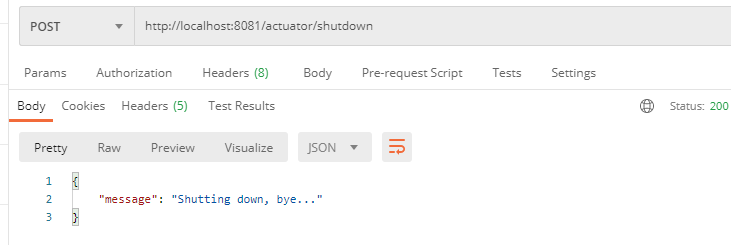
可以使用POST请求调用http://localhost:8081/actuator/serviceregistry(这里不同的版本不太一样,有的版本为serviceregistry,有的版本为service-registry),传参为{"status":"DOWN"}或{"status":"UP"}对服务做平滑上下线操作。下线时,并非服务不可用,而是通过Eureka标记服务为DOWN状态,使consumer不可调用。


三、Eureka集群
(一)Eureka集群搭建
对于集群的搭建,主要就是配置文件的不一样,配置如下,三个实例除了端口号和eureka.instance.hostname不一致外,其他配置项一致。
server:
  port: 8100

eureka:
  instance:
    hostname: eureka8100
  client:
    register-with-eureka: false
    fetch-registry: false
    service-url:
      defaultZone: http://eureka8100:8100, http://eureka8200:8200, http://eureka8300:8300
#      defaultZone: http://localhost:8100/eureka, http://localhost:8200/eureka, http://localhost:8300/eureka

spring:
  application:
    name: eureka-server
对于Eureka8100、Eureka8200、Eureka8300需要设置Host
127.0.0.1 eureka8100
127.0.0.1 eureka8200
127.0.0.1 eureka8300
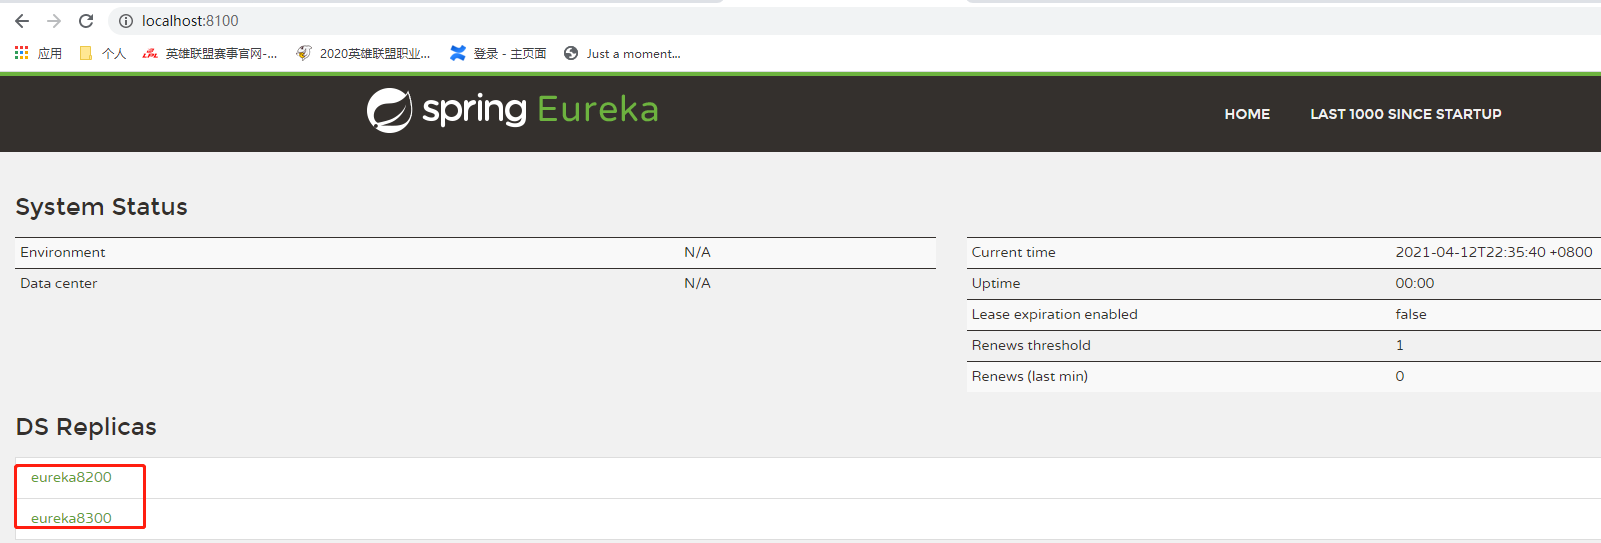
为什么不使用真实IP呢,因为在同一台机器上模拟Eureka集群,都是使用localhost,那么IP重复,就不会出现其他实例的DS Replicas。
(二)Eureka的异地多活
Eureka中有Region和Availability Zone的概念,各个Region之间内网不通,但是在同一Region中的Zone内网是通的,只要是为了同城容灾。拿阿里云举例,其有杭州、北京、上海、东南亚等Region。
以下面图片为例,搭建Eureka的异地多活集群

1、首先配置Region为bj1的Eureka集群,三个实例的配置参数一致,除了端口号。
server:
  port: 8001

eureka:
  instance:
    metadata-map:
      zone: bj1
  client:
    region: beijing
    register-with-eureka: false
    fetch-registry: false
    availability-zones:
      beijing: bj1,bj2
    service-url:
      bj1: http://eureka8001:8001, http://eureka8002:8002, http://eureka8003:8003
      bj2: http://eureka8004:8004, http://eureka8005:8005, http://eureka8006:8006
2、然后配置Region为bj2的Eureka集群,三个实例的配置参数一致,除了端口号。
server:
  port: 8004

eureka:
  instance:
    metadata-map:
      zone: bj2
  client:
    region: beijing
    register-with-eureka: false
    fetch-registry: false
    availability-zones:
      beijing: bj1,bj2
    service-url:
      bj1: http://eureka8001:8001, http://eureka8002:8002, http://eureka8003:8003
      bj2: http://eureka8004:8004, http://eureka8005:8005, http://eureka8006:8006
3、配置各个Eureka的Host
127.0.0.1 eureka8001
127.0.0.1 eureka8002
127.0.0.1 eureka8003
127.0.0.1 eureka8004
127.0.0.1 eureka8005
127.0.0.1 eureka8006
4、服务提供者配置参数
eureka:
  client:
    # 指定区域名称
    region: beijing
    # 指定区域中所包含的地带zoned
    availability-zones:
      beijing: bj1,bj2
    # 指定各个地带zone中所包含的eureka server地址
    service-url:
      bj1: http://eureka8001:8001/eureka, http://eureka8002:8002/eureka, http://eureka8003:8003/eureka
      bj2: http://eureka8004:8004/eureka, http://eureka8005:8005/eureka, http://eureka8006:8006/eureka
    # 指定要连的注册中心
    fetch-remote-regions-registry: beijing
  instance:
    # 服务提供者id
    instance-id: provider-depart-01-8081
    # 设置当前cleit每1秒向server发送一次心跳
    lease-renewal-interval-in-seconds: 1
    # 设置超过3秒即认为失效
    lease-expiration-duration-in-seconds: 3
    metadata-map:
      zone: bj1
四、OpenFeign
OpenFeign可以将提供者提供的Restful服务伪装成接口调用,消费者只需要使用“feign接口 + 注解”的方式即可调用提供者提供的Restful服务,而无需再使用RestTemplate。
Feign和OpenFeign:在Spring Cloud D之前的版本使用的是feign,而该项目现在已更新为OpenFeign,所以后续的依赖也发生了变化。
(一)OpenFeign使用
与原来使用RestTemplate项目的差异:
1、pom依赖
        <!--feign 依赖-->
        <dependency>
            <groupId>org.springframework.cloud</groupId>
            <artifactId>spring-cloud-starter-openfeign</artifactId>
        </dependency>
2、不再配置RestTemplate
/*
@Configuration
public class DepartCodeConfig {

    @Bean
    @LoadBalanced   //开启客户端负载均衡功能
    public RestTemplate restTemplate(){
        return  new RestTemplate();
    }
}
*/
3、创建一个接口
该接口的参数与请求地址要是服务提供者保持一致,同时使用@FeignClient标记接口为Feign客户端,参数为服务提供者的服务名称(spring.application.name),使用@RequestMapping标记请求服务提供者的url
@FeignClient("provider-depart")
@RequestMapping("/provider/depart")
public interface DepartService {
    @PostMapping("/save")
    boolean save(Depart depart);

    @PostMapping("/del")
    boolean del(int id);

    @PostMapping("/update")
    boolean update(Depart depart);

    @GetMapping("/find/{id}")
    Depart query(int id);

    @GetMapping("/findAll")
    List<Depart> findAll();

}
4、启动类上使用@EnableFeignClients开启Feign客户端,并指定Service所在的包
@SpringBootApplication
@EnableEurekaClient
@EnableFeignClients("com.lcl.springcloud.consumer01.service")
public class ConsumerFeign018080Application {
    public static void main(String[] args) {
        SpringApplication.run(ConsumerFeign018080Application.class, args);
    }
}
5、调整调用,不再使用RestTemplate,直接调用新增的Feign客户端接口
@RestController
@RequestMapping("/depart")
public class DepertApi {
    @Autowired
    private DepartService departService;

    @PostMapping("/save")
    public boolean save(@RequestBody Depart depart){
        return departService.save(depart);
    }

    @PostMapping("/del")
    public boolean del(int id){
        return departService.del(id);
    }

    @PostMapping("/update")
    public boolean update(@RequestBody Depart depart){
        return departService.update(depart);
    }

    @GetMapping("/find/{id}")
    public Depart query(@PathVariable int id){
        return departService.query(id);
    }

    @GetMapping("/findAll")
    public List<Depart> findAll(){
        return departService.findAll();
    }
}
说明:
消费者和服务者的调用url不能完全一致,否则会出现方法已存在的异常(There is already xxx bean method)。
示例:
@FeignClient("provider-depart")
@RequestMapping("/depart")
public interface DepartService {
    @PostMapping("/save")
    boolean save(Depart depart);
@RestController
@RequestMapping("/depart")
public class DepertApi {
    @Autowired
    private DepartService departService;

    @PostMapping("/save")
    public boolean save(@RequestBody Depart depart){
        return departService.save(depart);
    }
Caused by: java.lang.IllegalStateException: Ambiguous mapping. Cannot map 'com.lcl.springcloud.consumer01.service.DepartService' method
com.sun.proxy.$Proxy101#save(Depart)
to {POST [/depart/update]}: There is already 'depertApi' bean method
(二)超时与压缩配置
Feign连接提供者和对于提供者的调用均可设置超时时间限制,同时也可以配置压缩信息。
feign:
  client:
    config:
      default:
        connectTimeout: 5000 # 指定feign连接提供者的超时时间
        readTimeout: 5000 # 指定feign从请求到获取响应的超时时间
  compression:
    request:
      enabled: true # 开启对请求的压缩
      # 指定对哪些文件类型进行压缩
      mime-types: ["text/xml","application/xml","application/json"]
      # 开启压缩的文件大小
      min-request-size: 2048
    response:
      enabled: true
五、负载均衡Ribbon
这里首先说明一下,上面的Spring Cloud版本是2020.0.2,其对应的Spring Boot版本是2.4.X,因此我们使用了2.4.4,但是由于在2020.X.X之后的版本,Spring Cloud移除了Ribbon、Hystrix、Zuul,后续的演示Ribbon、Hystrix、Zuul,就需要将Spring Boot的版本改为Hoxton.SR6,那么对应的Spring Boot版本也需要改为对应的2.3.X,因此我们这里使用了2.3.1.RELEASE。
(一)Ribbon配置
Ribbon内置的负载均衡策略有如下七种。
| 负载均衡策略 | 策略名称 | 描述 |
| RoundRobinRule | 轮询策略 | Ribbon默认的策略,如果经过一轮轮询都没有找到可用的provider,最多轮询10次,如果最终还是没有可用的provider,则返回null |
| RandomRule | 随机策略 | 从所有可用的provider中随机选择一个 |
| RetryRule | 重试策略 | 先采用RoundRobinRule进行获取provider,如果获取provider失败,则在一定时间内进行重试。默认时间为500ms。 |
| BestAvailableRule | 最可用策略 | 选择并发最小的provider,即选择连接数最小的provider |
| AvailabilityFilteringRule | 可用过滤算法策略 |
1、先采用轮询策略选择一个provider,然后判断其是否处于熔断状态或超过最大连接数,如果不超过,则返回该provider,如果超过,则再轮询下一个,最大可轮询10 2、若10次轮询仍没有找到可用的provider,则将所有的provider都做一次判断,挑选出未熔断且未超过连接限制的provider,然后在采用轮询的方式选择一个,如果没有未熔断且未超过链接限制的provider,则返回null |
| ZoneAvoidancerRule | 回避策略 | 根据provider所在zone及provider的可用性,对provider进行选择 |
| WeightedResponseTimeRule | 权重响应时间 | 根据provider的平均响应时间选择,相应时间越小,被选中的概率就越大。在服务器刚启动时,是以哦那个轮询策略,后面可以使用权重。 |
如果想要修改Ribbon的轮询策略,可以使用配置文件和配置类两种方式。
1、导包
<?xml version="1.0" encoding="UTF-8"?>
<project xmlns="http://maven.apache.org/POM/4.0.0" xmlns:xsi="http://www.w3.org/2001/XMLSchema-instance"
         xsi:schemaLocation="http://maven.apache.org/POM/4.0.0 https://maven.apache.org/xsd/maven-4.0.0.xsd">
    <modelVersion>4.0.0</modelVersion>
    <parent>
        <groupId>org.springframework.boot</groupId>
        <artifactId>spring-boot-starter-parent</artifactId>
        <version>2.3.1.RELEASE</version>
        <relativePath/>
    </parent>
    <groupId>com.lcl.springcloud</groupId>
    <artifactId>consumer-Hystrix-01-8080</artifactId>
    <version>0.0.1-SNAPSHOT</version>
    <name>consumer-Hystrix-01-8080</name>
    <description>Demo project for Spring Boot</description>
    <properties>
        <java.version>1.8</java.version>
        <spring-cloud.version>Hoxton.SR6</spring-cloud.version>
    </properties>
    <dependencies>
        .......

        <dependency>
            <groupId>com.netflix.ribbon</groupId>
            <artifactId>ribbon</artifactId>
            <version>2.7.18</version>
            <scope>runtime</scope>
        </dependency>

        <dependency>
            <groupId>org.springframework.cloud</groupId>
            <artifactId>spring-cloud-starter-netflix-ribbon</artifactId>
        </dependency>
    </dependencies>
    ......
2、配置文件方式:
# 负载均衡策略
consumer-depart:
  ribbon:
    NFLoadBalancerRuleClassName: com.netflix.loadbalancer.RandomRule
3、配置类方式
@Configuration
public class DepartCodeConfig {

    /*@Bean
    @LoadBalanced   //开启客户端负载均衡功能
    public RestTemplate restTemplate(){
        return  new RestTemplate();
    }*/

    @Bean
    public IRule loadBalanceRule(){
        return new RandomRule();
    }
}
(二)自定义Ribbon
实现自定义Ribbon主要分为两步,第一步就是写出自己对于IRule的实现类,第二步就是配置自己的IRule实现,由于编码量的问题,先说第二步,例如我写的IRule实现类为MyRule,因此需要配置MyRule,配置方式就是上面说的使用配置类或者配置文件。
@Configuration
public class DepartCodeConfig {
    @Bean
    public IRule loadBalanceRule(){
        return new MyRule();
    }
}
然后就是写MyRule,其需要实现IRule接口,同时需要实现接口的获取ILoadBalancer的get、set方法,为了简化,直接使用了@Data注解,然后还需要实现choose方法,这里就是具体的如何选择Server的方法。
@NoArgsConstructor
@AllArgsConstructor
@Data
public class MyRule implements IRule {

    private ILoadBalancer loadBalancer;
    private List<Integer> excludePorts;


    @Override
    public Server choose(Object o) {
        //获取所有provider
        List<Server> serverList = loadBalancer.getAllServers();
        //排除指定provider
        List<Server> availableServer = getAvailableServer(serverList);
        //从剩余的provider中选择
        return getAvailableRandomServer(availableServer);
    }

    private Server getAvailableRandomServer(List<Server> availableServer) {
        int index = new Random().nextInt(availableServer.size());
        return availableServer.get(index);
    }

    private List<Server> getAvailableServer(List<Server> serverList) {
        if(this.excludePorts == null || this.excludePorts.size() == 0){
            return serverList;
        }
        List<Server> availableServer = new ArrayList();
        for (Server server : serverList) {
            if(!this.excludePorts.contains(server.getPort())){
                availableServer.add(server);
            }
        }
        return availableServer;
    }
}
六、Hystrix服务熔断与服务降级
使用Hystrix主要就是用来做服务熔断和服务降级的。
其中服务熔断主要是对于服务雪崩的一个有效解决方案,常见的熔断方案有 预熔断 和 即时熔断 两种。
而服务降级则是请求发生异常时,对用户体验的一种增强。
其是一种开关装置,在消费端安装一个Hystix熔断器,当Hystrix监控到某个服务发生故障后,就会将服务访问链路断开,不过Hystix并不会将服务的消费者阻塞或抛出异常,而是向消费者返回一个符合逾期的备选响应方案。
通过Hystrix的熔断和降级功能,避免了服务雪崩的发生,同时也考虑了用户体验,因此Hystrix是系统的一种防御机制。
(一)fallbackMethod服务降级
1、导包
        <dependency>
            <groupId>org.springframework.cloud</groupId>
            <artifactId>spring-cloud-starter-netflix-hystrix</artifactId>
            <version>2.2.7.RELEASE</version>
        </dependency>
2、开启断路器
开启断路器使用@EnableCircuitBreaker注解,但是由于该服务是SpringBoot的消费者,同时需要配置SpringBoot启动配置注解@SpringBootApplication、服务注册与发现注解@EnableDiscoveryClient、断路器注解@EnableCircuitBreaker,比较麻烦,因此Spring提供了一个三合一的注解@SpringCloudApplication
//@SpringBootApplication
//@EnableCircuitBreaker
//@EnableDiscoveryClient
@EnableFeignClients("com.lcl.springcloud.consumer01.service")
@SpringCloudApplication
public class ConsumerHystrix018080Application {
    public static void main(String[] args) {
        SpringApplication.run(ConsumerHystrix018080Application.class, args);
    }
}
3、修改处理器
主要就是在调用方法上添加@HystriCommand注解,并在注解中添加服务降级方法fallBackMethod
@RestController
@RequestMapping("/hystrix/depart")
public class DepertApi {
    @Autowired
    private DepartService departService;

    @HystrixCommand(fallbackMethod = "failMethod")
    @GetMapping("/findAll")
    public List<Depart> findAll(){
        return departService.findAll();
    }

    public List<Depart> failMethod(){
        Depart arrays[] = {Depart.builder().id(123).name("abc").build(), Depart.builder().id(456).name("def").build()};
        return Arrays.asList(arrays);
    }
}
(二)fallBackFactory服务降级
1、创建一个FallBackFactory实现类,泛型使用feign客户端,然后重新其中的方法
@Component
@Slf4j
public class DepartFallBackFactory implements FallbackFactory<DepartService> {
    @Override
    public DepartService create(Throwable throwable) {
        return new DepartService() {
            @Override
            public boolean save(Depart depart) {
                log.info("=========执行保存异常服务降级处理========");
                return false;
            }

            @Override
            public List<Depart> findAll() {
                log.info("=========执行查询异常服务降级处理========");
                Depart arrays[] = {Depart.builder().id(0001).name("demo").build(), Depart.builder().id(0002).name("kkk").build()};
                return Arrays.asList(arrays);
            }
        };
    }
}
2、修改feign客户端
修改feign客户端,使用fallbackFactory参数指定降级工厂
@FeignClient(value="pd", fallbackFactory= DepartFallBackFactory.class)
@RequestMapping("/provider/depart")
public interface DepartService {
    @PostMapping("/save")
    boolean save(Depart depart);

    @GetMapping("/findAll")
    List<Depart> findAll();
}
3、开启feign对于Hystrix的支持
这里踩了一个大坑,一直演示不出来使用feign调用最终降级的效果,最后才发现没有配置该参数,该参数默认为false。
feign:
  hystrix:
    enabled: true
这里说明一点,如果同时存在fallbackFactory和fallbackMethod的情况,fallbackFactory会失效。
(三)fallback服务降级
1、feign客户端的降级实现类
@Component
@Slf4j
@RequestMapping("/fallback")
public class DepartFallBack implements DepartService {

    @Override
    public boolean save(Depart depart) {
        log.info("=========执行保存异常服务降级处理========");
        return false;
    }

    @Override
    public List<Depart> findAll() {
        Depart arrays[] = {Depart.builder().id(20000).name("DepartFallBack").build(), Depart.builder().id(20001).name("DepartFallBack").build()};
        return Arrays.asList(arrays);
    }
}
2、修改feign客户端,使用fallback引用上面的降级实现类
@FeignClient(name="pd", fallback= DepartFallBack.class)
@RequestMapping("/provider/depart")
@Service
public interface DepartService {
    @PostMapping("/save")
    boolean save(Depart depart);

    @RequestMapping(value = "/findAll", method = RequestMethod.GET)
    List<Depart> findAll();
}
3、调用
这里说一点,由于第一步中使用了@Component注解,因此Spring会主动加载类,同时,第二步中的feign客户端也会被Spring加载,如果不加@Service注解,idea就会在@Autowired修饰的departService显示错误信息:有相同的两个类,但是这并不影响系统运行,不影响的原因,可以自己看一下Spring的原理,这里就不再多说。
为了好看,就在第二步中加了@Service注解,让Depert3Api中不显示错误信息
@RestController
@RequestMapping("/v3/hystrix/depart")
public class Depert3Api {
    @Autowired
    private DepartService departService;

    @GetMapping("/findAll")
    public List<Depart> findAll(){
        return departService.findAll();
    }

}
(四)Hystrix高级属性配置
1、执行隔离策略
对依赖的请求数量进行限制即被称为执行隔离,执行隔离有两大作用,即防止服务熔断和防止服务雪崩。
隔离请求的方式有两种,分别是线程隔离和信号量隔离。
线程隔离:线程隔离是Hystrix的默认隔离策略,系统会创建一个依赖线程池,为每个依赖请求分配一个独立的线程,而每个依赖所拥有的线程数量是有上限的,当对该依赖的调用请求数量达到上限后,如果再有请求,则该请求会被阻塞。所以对某依赖的并发量取决于该依赖所分配的线程数量。
信号量隔离:对依赖的调用所使用的线程仍为请求线程,即不会为依赖请求再创建新的线程,但系统会为每种依赖分配一定数量的信号量,而每个依赖请求分配一个信号号,当对该依赖的调用请求数量达到上限后,如果再有请求,则该请求会被阻塞。所以对某依赖的并发量取决于为该依赖所分配的信号数量。
同样,配置隔离策略也是有配置文件和直接代码设置
配置文件:
hystrix:
  command:
    default:
      execution:
        isolation:
          # 值可以设置为:thread、semaphore
          strategy: thread
代码
    @HystrixCommand(fallbackMethod = "failMethod", commandProperties = {@HystrixProperty(name="execution.isolation.strategy",value="SEMAPHORE")})
    @GetMapping("/findAll")
    public List<Depart> findAll(){
        return departService.findAll();
    }
2、执行隔离其他属性
线程执行超时时限:在默认的线程执行隔离策略中,关于线程的执行时间,可以为其设置超时时间。在设置超时时间前,需要先开启超时时间,该属性默认是开启的。
超时中断:当线程执行超时时是否终端线程的执行,默认为true,即超时终端。
取消中断:在线程执行过程中,若请求取消了,当前执行线程是否会结束,默认为false。
信号量数量:采用信号量隔离策略,则可以通过以下属性修改信号量的数量,即对某一依赖所允许的请求的最高并发量。
相关配置内容如下代码所示:
hystrix:
  command:
    default:
      execution:
        timeout:
          # 开启超时控制 默认为true
          enabled: true
        isolation:
          # 设置隔离策略:值可以设置为:thread、semaphore
          strategy: thread
          thread:
            # 设置超时时间,默认为1000ms
            timeoutInMilliseconds: 1000
            # 开启超时终端,默认为true
            interruptOnTimeout: true
            # 取消中断 默认为false
            interruptOnCancel: true
          semaphore:
            # 设置信号量数量
            maxConcurrentRequests: 20
3、服务熔断属性
熔断功能开关:设置当前应用是否开启熔断器功能
熔断器开启阈值:当在时间窗内收到的请求数量超过该设置的阈值后,将开启熔断器,默认值为20.如果开启熔断器,则拒绝所有请求。
熔断时间窗:当熔断器开启开启该属性设置的时长后,会尝试关闭熔断器,以恢复被熔断的服务,默认值为5000ms
熔断开启错误率:当请求的错误率高于该百分比时,开启熔断器,默认为50,即50%
强制开启断路器:设置熔断器无条件开启,拒绝所有请求,默认为false
强制关闭熔断器:设置熔断器无条件关闭,通过所有请求,默认为false
hystrix:
  command:
    default:
      circuitBreaker:
        # 设置熔断器开关,默认为true
        enabled: true
        # 设置熔断器开启阈值,默认为20
        requestVolumeThread: 20
        # 熔断时间窗,默认为5000ms
        sleepWindowInMilliseconds: 5000
        # 熔断器开启错误率
        errorThresholdPercentage: 50
        # 强制开启熔断器,默认为false
        forceOpen: false
        # 强制关闭熔断器,默认为false
        forceClose: false
(五)Hystrix仪表盘
1、添加监控依赖和Hystrix仪表盘依赖
        <!--actuator 依赖-->
        <dependency>
            <groupId>org.springframework.boot</groupId>
            <artifactId>spring-boot-starter-actuator</artifactId>
        </dependency>

        <!-- hystrix-dashboard 依赖 -->
        <dependency>
            <groupId>org.springframework.cloud</groupId>
            <artifactId>spring-cloud-starter-netflix-hystrix-dashboard</artifactId>
            <version>2.2.7.RELEASE</version>
        </dependency>
2、开启actuator的所有web终端
management:
  endpoint:
    web:
      exposure:
        include: "*"
3、启动类开启仪表盘
@SpringCloudApplication
@EnableHystrixDashboard
@EnableHystrix
public class ConsumerHystrixDashbord9000Application {
    public static void main(String[] args) {
        SpringApplication.run(ConsumerHystrixDashbord9000Application.class, args);
    }
    @Bean
    public ServletRegistrationBean getServlet(){
        HystrixMetricsStreamServlet streamServlet = new HystrixMetricsStreamServlet();
        ServletRegistrationBean registrationBean = new ServletRegistrationBean(streamServlet);
        registrationBean.setLoadOnStartup(1);
        registrationBean.addUrlMappings("/actuator/hystrix.stream");
        registrationBean.setName("HystrixMetricsStreamServlet");
        return registrationBean;
    }
}
4、监控简述
启动项目,访问http://localhost:9000/hystrix即可
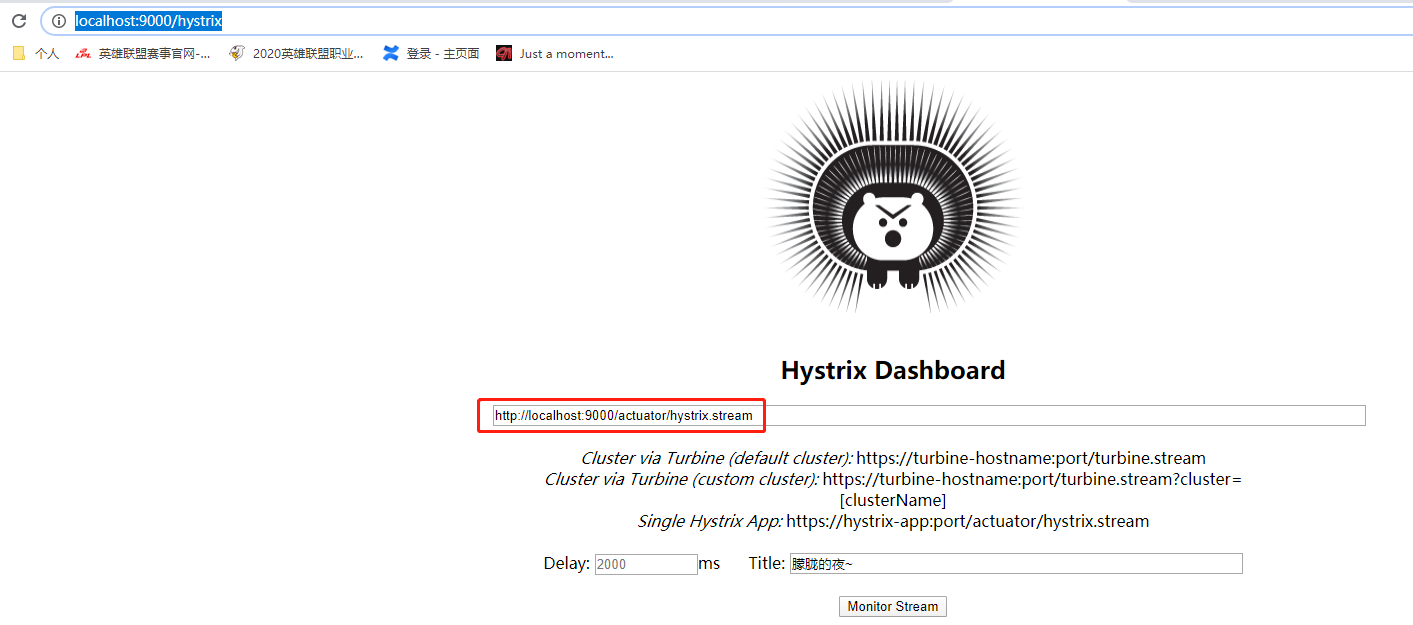
然后填上http://localhost:9000/actuator/hystrix.stream即可监控,如果监控一直处于loading状态,可以参照https://www.cnblogs.com/liconglong/p/14698763.html进行解决。关于监控信息,描述如下 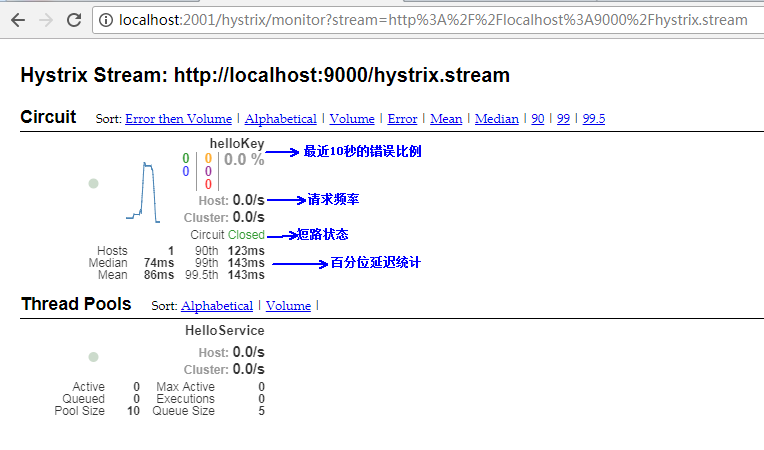
5、Turbine
上面说的都是对于单体应用的监控,我们也可以对集群进行整体监控,此时就需要使用Turbine技术了。Turbine能够汇集监控信息,并将聚合的信息提供给Hystrix Dashboard来集中展示和监控。
使用Turbine对集群进行监控的实现步骤很简单,只有三步:
(1)导入Turbine依赖
(2)在配置文件中配置Turbine
(3)在启动类上添加@EnableTurbine注解
(六)服务降级预警
服务降级要尽快的通知相应人员去解决问题,那么这里就应用redis去进行响应的预警操作。
1、导入redis包
        <dependency>
            <groupId>org.springframework.boot</groupId>
            <artifactId>spring-boot-starter-data-redis</artifactId>
        </dependency>
2、配置redis
spring:
  redis:
    host: 8.131.245.53
    port: 6388
    password:
3、写一个预警实现类
@Slf4j
@Component
public class HystrixAlarm {

    private final String keySuffix = "_getDepart_fallback";
    @Autowired
    private StringRedisTemplate template;
    private ForkJoinPool forkJoinPool = new ForkJoinPool(5);

    public Depart getHystrixHandle(HttpServletRequest request, int id){
        String ip = request.getLocalAddr();
        String key = ip +keySuffix;
        alarm(key);
        return Depart.builder().id(id).name("错误").build();
    }

    private void alarm(String key){
        BoundValueOperations<String, String> ops = template.boundValueOps(key);
        String value = ops.get();
        if(value == null){
            synchronized (this){
                value = ops.get();
                if(value == null){
                    sendMsgOrMail(key);
                    value = "已发生服务降级";
                    ops.set(value, 10, TimeUnit.SECONDS);
                }
            }
        }
    }

    private void sendMsgOrMail(String key){
        forkJoinPool.submit(()->{
            log.info("发送服务异常告警短信或邮件===={}", key);
        });
    }
}
4、在降级方法中调用该方法
    @HystrixCommand(fallbackMethod = "failMethod2", commandProperties = {@HystrixProperty(name="execution.isolation.strategy",value="SEMAPHORE")})
    @GetMapping("/find/{id}")
    public Depart find(HttpServletRequest request, @PathVariable int id){
        return departService.query(id);
    }

    public Depart failMethod2(HttpServletRequest request, int id){
        return hystrixAlarm.getHystrixHandle(request, id);
    }
这里可以使用自定义注解、拦截器、切面等方式去统一处理。
七、微服务网关Zuul
Zuul主要提供了对请求的路由和过滤功能。
路由:将外部请求转发到具体的微服务上,是外部访问微服务的统一入口。
过滤:对请求的处理过程进行干预,对请求进行校验、鉴权等处理
官方给出的图片如下:
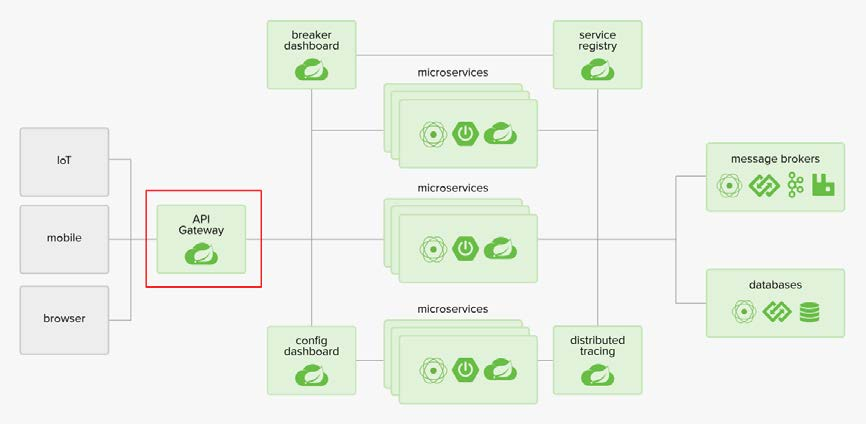
对上面的图进行进一步抽象:

(一)项目搭建
这里需要四个项目来演示,一个Eureka Server、两个服务提供者、一个Zuul,其中Eureka就直接使用前面的项目,而两个服务提供者就直接复制原来的项目,就是一个简单的单体服务,提供了一个 /hystrix/depart/findAll的路径方法,获取到对应的数据;对于配置,有以下几点说明一下(跟zuul没太大关系,主要是为了下面演示)
eureka:
  client:
    service-url:
      defaultZone: http://localhost:8000/eureka
  instance:
    instance-id: c-8080
server:
  port: 8080
eureka:
  client:
    service-url:
      defaultZone: http://localhost:8000/eureka
  instance:
    instance-id: c-8090
server:
  port: 8090
然后就是搭建Zuul:
1、pom依赖,主要依赖Eureka和Zuul即可(由于在2020.X版本的SpringCloud中,已经砍掉了Zuul,所以这里的版本仍然沿用上面Ribbon中的版本)
    <dependencies>
        <dependency>
            <groupId>org.springframework.cloud</groupId>
            <artifactId>spring-cloud-starter-netflix-eureka-server</artifactId>
        </dependency>
        <dependency>
            <groupId>org.springframework.cloud</groupId>
            <artifactId>spring-cloud-starter-netflix-zuul</artifactId>
        </dependency>
    </dependencies>
2、开启Zuul代理模式
@SpringCloudApplication
@EnableZuulProxy
public class Zuul011000Application {
    public static void main(String[] args) {
        SpringApplication.run(Zuul011000Application.class, args);
    }
}
3、配置文件
eureka:
  client:
    service-url:
      defaultZone: http://localhost:8000/eureka

spring:
  application:
    name: zuul-01-1000

server:
  port: 1000
到这里,基本环境已经搭建完毕,可以进行验证,首先访问原项目的接口,http://localhost:8080/hystrix/depart/findAll 或者 http://localhost:8090/hystrix/depart/findAll,都可以正常访问,说明原项目没有问题
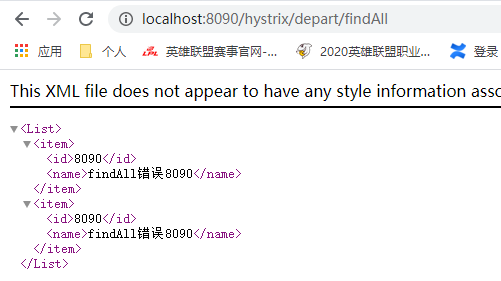
那么,我们就可以验证zuul了。如果没有配置路由策略,则默认使用注册到Eureka中的服务名进行路由,首先从上面两个服务提供者配置的服务名分别为c-8080和c-8090,那么分别访问http://localhost:1000/c-8090/hystrix/depart/findAll 和 http://localhost:1000/c-8080/hystrix/depart/findAll (这里服务名中大小写有区分,要严格按照配置文件中配置的进行访问),均可正常访问,此时,基本环境验证完毕。
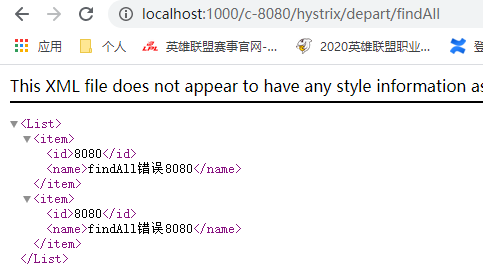
(二)项目路由
1、路由策略配置
其实上面已经是做了基本的项目路由了,因为在我们不配置路由规则时,Zuul就是默认以微服务名称进行路由的。这样直接将服务名称暴露,会有安全问题,所以我们要自己设定路由规则,如下代码所示,就是将微服务名称映射为指定的访问路径,那么访问路径就可以由原来的 http://localhost:1000/c-8090/hystrix/depart/findAll 变为 http://localhost:1000/v2/hystrix/depart/findAll
zuul:
  routes:
    c-8080: /v1/**
    c-8090: /v2/**
2、路由前缀
在配置路由策略时,可以为路由路径配置一个统一的前缀,以便请求归类。
如下代码所示,就可以由上面的 http://localhost:1000/v2/hystrix/depart/findAll 改为 http://localhost:1000/zuulpre/v2/hystrix/depart/findAll 进行调用了。
这里特别说明一点:路由前缀不能是/zuul,如果设置为/zuul,则会导致不能路由的问题,至于为什么不能设置为/zuul,后面有时间可以写一下其源码分析。
zuul:
  routes:
    c-8080: /v1/**
    c-8090: /v2/**
  prefix: /zuulpre
3、服务名屏蔽
上面的配置中,虽然可以使用自己设置的路由规则进行访问,但是其仍然可以使用默认的微服务名称访问,为了防止服务侵入,可以将服务名称屏蔽。
可以使用 * 屏蔽所有微服务名称,也可以屏蔽指定微服务名称。
zuul:
  # 路由规则
  routes:
    c-8080: /v1/**
    c-8090: /v2/**
  # 路由前缀
  prefix: /zuulpre
  # 屏蔽微服务名称
  ignored-services: "*"
4、屏蔽路径
可以指定屏蔽掉的路径url,即只要用户请求中包含指定的url路径,那么该请求将午发访问到指定的服务。
通过该方式可以限制用户的权限。
以下配置,如果路径中包含list,则不能被访问
zuul:
  # 路由规则
  routes:
    c-8080: /v1/**
    c-8090: /v2/**
  # 路由前缀
  prefix: /zuulpre
  # 屏蔽微服务名称
  ignored-services: "*"
  # 屏蔽指定url
  ignored-patterns: /**/list/**
5、敏感请求头屏蔽
默认情况下,像Cookie、Set-Cookie等敏感请求头信息会被Zuul屏蔽掉,我们可以将这些默认屏蔽去掉,同时也可以添加要屏蔽的请求头。
在Zuul要调用的项目中,增加对于请求头中内容的输出,这里与敏感请求头屏蔽没有关系,主要是为了验证
    @GetMapping("/findAll2")
    public List<Depart> findAll(HttpServletRequest request){
        log.info("request.getHeader(\"Token\")========={}", request.getHeader("Token"));
        log.info("request.getHeader(\"Set-Cookie\")========={}", request.getHeader("Set-Cookie"));
        log.info("request.getHeader(\"aaa\")========={}", request.getHeader("aaa"));
        log.info("request.getHeader(\"bbb\")========={}", request.getHeader("bbb"));
        return departService.findAll();
    }
调整Zuul的配置文件
zuul:
  # 路由规则
  routes:
    c-8080: /v1/**
    c-8090: /v2/**
  # 路由前缀
  prefix: /zuulpre
  # 屏蔽微服务名称
  ignored-services: "*"
  # 屏蔽指定url
  ignored-patterns: /**/list/**
  # 指定屏蔽请求头中信息
  sensitive-headers: Token,aaa
调用方法输出结果如下:
2021-04-28 00:28:15.868  INFO 2456 --- [nio-8091-exec-3] c.l.s.consumer01.api.DepertApi           : request.getHeader("Token")=========null
2021-04-28 00:28:15.868  INFO 2456 --- [nio-8091-exec-3] c.l.s.consumer01.api.DepertApi           : request.getHeader("Set-Cookie")=========Set-Cookie123
2021-04-28 00:28:15.868  INFO 2456 --- [nio-8091-exec-3] c.l.s.consumer01.api.DepertApi           : request.getHeader("aaa")=========null
2021-04-28 00:28:15.868  INFO 2456 --- [nio-8091-exec-3] c.l.s.consumer01.api.DepertApi           : request.getHeader("bbb")=========bbb123
6、负载均衡
例如同时搭建两个微服务,微服务名称一样(这里要注意,实例名称如果设置的话,一定不能一样,否则Eureka会使用后启动的服务将先启动的服务覆盖掉)
eureka:
  client:
    service-url:
      defaultZone: http://localhost:8000/eureka
  instance:
    instance-id: c-8090

spring:
  application:
    name: c-8090
server:
  port: 8090
eureka:
  client:
    service-url:
      defaultZone: http://localhost:8000/eureka
  instance:
    instance-id: c-8091

spring:
  application:
    name: c-8090
server:
  port: 8091
Zuul的配置文件仍然和之前配置一样
zuul:
  # 路由规则
  routes:
    c-8080: /v1/**
    c-8090: /v2/**
  # 路由前缀
  prefix: /zuulpre
  # 屏蔽微服务名称
  ignored-services: "*"
  # 屏蔽指定url
  ignored-patterns: /**/list/**
  # 指定屏蔽请求头中信息
  sensitive-headers: Token,aaa
然后就可以了,此处默认使用轮询负载均衡算法,也可以设置不同的负载均衡算法,设置方式可以参考Ribbon的设置,一摸一样。
7、服务降级
当消费者调用服务提供者时由于各种原因出现午发调用的情况时,消费者可以进行服务降级,同样的,通过网关调用消费者无法调用时,也是可以设置降级的。
主要就是配置服务降级的实现类,需要实现FallbackProvider接口,同时需要将该实现类注册到Spring中。其中getRoute是设置降级的服务,可以设置具体的服务名,也可以设置为 * ,如果设置为 * ,则表示所有的服务都按该降级处理类处理(除了已经有单独配置的服务,也就是说,单独配置和 * 同时存在,以单独配置的为主),然后ClientHttpResponse 中主要是配置该降级方案返回的状态码,描述等内容
@Component
public class ConsumerFallback implements FallbackProvider {
    @Override
    public String getRoute() {
        return "c-8090";
    }
    @Override
    public ClientHttpResponse fallbackResponse(String route, Throwable cause) {
        return new ClientHttpResponse() {
            @Override
            public HttpStatus getStatusCode() throws IOException {
                // 返回状态常量 503
                return HttpStatus.SERVICE_UNAVAILABLE;
            }
            @Override
            public int getRawStatusCode() throws IOException {
                // 返回状态常量 503
                return HttpStatus.SERVICE_UNAVAILABLE.value();
            }
            @Override
            public String getStatusText() throws IOException {
                //返回状态码对应短语
                return HttpStatus.SERVICE_UNAVAILABLE.getReasonPhrase();
            }
            @Override
            public void close() {
            }
            @Override
            public InputStream getBody() throws IOException {
                //设置降级信息
                String msg = "发生降级:" + ConsumerFallback.this.getRoute();
                return new ByteArrayInputStream(msg.getBytes());
            }
            @Override
            public HttpHeaders getHeaders() {
                HttpHeaders headers = new HttpHeaders();
                headers.setContentType(MediaType.APPLICATION_JSON);
                return headers;
            }
        };
    }
}
(三)请求过滤
在服务路由的前、中、后都可以对请求进行过滤,使其只能访问他应该访问的资源,从而增强安全性。此时需要通过ZuulFilter过滤器来实现对外服务的安全控制。
例如,对于指定服务的调用,必须有user信息,且user已登录才可访问,下面的代码主要演示对于c-9090服务的调用必须要有user信息,否则不通过,其他服务不校验。
这个写法比较简单,就是需要定义一个RouteFilter类,并继承ZuulFilter类,重写其中的方法,方法包括过滤执行位置、过滤执行顺序、过滤成功需要处理的逻辑、过滤的逻辑。
@Component
@Slf4j
public class RouteFilter extends ZuulFilter {
    @Override
    public String filterType() {
        //路由执行位置:指定路由之前执行
        return FilterConstants.PRE_TYPE;
    }

    @Override
    public int filterOrder() {
        // 路由执行顺序:系统最小值为-3,设置-5说明在所有的系统执行前执行
        return -5;
    }

    //对请求进行过滤的核心逻辑
    @Override
    public boolean shouldFilter() {
        //获取请求上下文
        RequestContext currentContext = RequestContext.getCurrentContext();
        //获取请求
        HttpServletRequest request = currentContext.getRequest();
        //获取请求路径和user信息
        String requestURI = request.getRequestURI();
        String user = request.getParameter("user");
        //校验逻辑
        if(requestURI.contains("/v2") && StringUtils.isBlank(user)){
            log.warn("访问/v2时用户不能为空");
            //指定当前请求未通过Zuul过滤,默认值为true
            RequestContext.getCurrentContext().setSendZuulResponse(false);
            //设置返回状态码
            RequestContext.getCurrentContext().setResponseStatusCode(HttpStatus.SC_UNAUTHORIZED);
            return false;
        }
        return true;
    }

    //校验通过的执行逻辑
    @Override
    public Object run() throws ZuulException {
        log.info("=====校验通过=====");
        return null;
    }
}
(四)令牌桶限流
令牌桶算法就是使用一个令牌桶给请求方法令牌,只有拿到令牌时,请求才可以通过,否则请求就不能通过,那么令牌桶限流就是控制令牌的产生数量和频率,从而进行限流,最终是为了避免系统遭受雪崩之灾。
令牌桶算法中控制令牌的方式有多种,可以使用redis对每分钟请求的次数做计算,从而进行限流,我们这里使用Guava的RateLimiter来进行限流。
代码就直接在上面的过滤类中写了,只增加对限流的处理即可。
    //每秒生成2个令牌
    private static final RateLimiter RATE_LIMITER = RateLimiter.create(2);//对请求进行过滤的核心逻辑
    @Override
    public boolean shouldFilter() {
        .....if(!RATE_LIMITER.tryAcquire()){
            log.warn("请求超载,每秒只可访问{}次", RATE_LIMITER.getRate());
            RequestContext.getCurrentContext().setSendZuulResponse(false);
            RequestContext.getCurrentContext().setResponseStatusCode(HttpStatus.SC_CONFLICT);
            return false;
        }
        .....
    }
(五)多维请求限流
使用令牌桶的限流粒度比较大,我们可以使用spring-cloud-zuul-ratelimit提供更细粒度的限流策略。
首先,复制上面的项目,在新的项目中首先需要删除RouteFilter。
然后添加依赖
        <!-- spring-cloud-zuul-ratelimit 依赖 -->
        <dependency>
            <groupId>com.marcosbarbero.cloud</groupId>
            <artifactId>spring-cloud-zuul-ratelimit</artifactId>
            <version>2.0.5.RELEASE</version>
        </dependency>
修改配置文件,配置信息都是做什么的,下面代码中的注释已经写的很清楚了
zuul:
  # 路由规则
  routes:
    c-8080: /v1/**
    c-8090: /v2/**

  # 对限流策略进行配置
  ratelimit:
    # 开启限流
    enabled: true
    # 设置限流策略
    default-policy:
      # 限流单位时间窗口
      refresh-interval: 3
      # 在指定单位窗口内启动限流的限定值
      limit: 3
      # 指定限流的时间窗口数量
      quota: 1
      # 指定限流检查对象类型
      # user:针对用户的限流,对单位时间窗内经过该网关的用户数量进行限制
      # origin:针对客户端IP的限流,对单位时间窗内经过该网关的IP数量进行限制
      # url:针对请求URL的限流,对单位时间窗内经过该网关的URL数量进行限制
      type: user,origin,url
如果想要展示错误页面,可以在resources目录下创建public.error目录,然后在里面创建429.html文件,这些路径和名称都是必须如此命名的,因为zuul限流成功后默认返回的状态码就是429.

(六)灰度发布
介绍:
在一般情况下,升级服务器端应用,需要将应用源码或程序包上传到服务器,然后停止掉老版本服务,再启动新版本。但是这种简单的发布方式存在两个问题,一方面,在新版本升级过程中,服务是暂时中断的,另一方面,如果新版本有BUG,升级失败,回滚起来也非常麻烦,容易造成更长时间的服务不可用。
为了解决这些问题,人们研究出了多种发布策略。
首先是蓝绿发布,所谓蓝绿部署,是指同时运行两个版本的应用,如上图所示,蓝绿部署的时候,并不停止掉老版本,而是直接部署一套新版本,等新版本运行起来后,再将流量切换到新版本上。但是蓝绿部署要求在升级过程中,同时运行两套程序,对硬件的要求就是日常所需的二倍,比如日常运行时,需要10台服务器支撑业务,那么使用蓝绿部署,你就需要购置二十台服务器。
然后是滚动发布,所谓滚动升级,就是在升级过程中,并不一下子启动所有新版本,是先启动一台新版本,再停止一台老版本,然后再启动一台新版本,再停止一台老版本,直到升级完成,这样的话,如果日常需要10台服务器,那么升级过程中也就只需要11台就行了。
滚动发布能够解决掉蓝绿部署时对硬件要求增倍的问题,但是滚动升级有一个问题,在开始滚动升级后,流量会直接流向已经启动起来的新版本,但是这个时候,新版本是不一定可用的,比如需要进一步的测试才能确认。那么在滚动升级期间,整个系统就处于非常不稳定的状态,如果发现了问题,也比较难以确定是新版本还是老版本造成的问题。
为了解决这个问题,就出现了灰度发布,灰度发布也叫金丝雀发布,起源是,矿井工人发现,金丝雀对瓦斯气体很敏感,矿工会在下井之前,先放一只金丝雀到井中,如果金丝雀不叫了,就代表瓦斯浓度高。
在灰度发布开始后,先启动一个新版本应用,但是并不直接将流量切过来,而是测试人员对新版本进行线上测试,启动的这个新版本应用,就是我们的金丝雀。如果没有问题,那么可以将少量的用户流量导入到新版本上,然后再对新版本做运行状态观察,收集各种运行时数据,如果此时对新旧版本做各种数据对比,就是所谓的A/B测试。
当确认新版本运行良好后,再逐步将更多的流量导入到新版本上,在此期间,还可以不断地调整新旧两个版本的运行的服务器副本数量,以使得新版本能够承受越来越大的流量压力。直到将100%的流量都切换到新版本上,最后关闭剩下的老版本服务,完成灰度发布。
如果在灰度发布过程中(灰度期)发现了新版本有问题,就应该立即将流量切回老版本上,这样,就会将负面影响控制在最小范围内。
使用:
生产环境中,可以实现灰度发布的技术很多,我们这里要讲的是 zuul 对于灰度发布的实现。而其实现是基于 Eureka 元数据的。Eureka 元数据是指,Eureka 客户端向 Eureka Server 中注册时的描述信息。有两种类型的元数据,分别是标准元数据和自定义元数据。
首先,在两个consumer上进行配置元数据
eureka:
  client:
    service-url:
      defaultZone: http://localhost:8000/eureka
  instance:
    instance-id: c-8090
    metadata-map:
      gray-test: gray
......
server:
  port: 8090
eureka:
  client:
    service-url:
      defaultZone: http://localhost:8000/eureka
  instance:
    instance-id: c-8091
    metadata-map:
      gray-test: running
......
server:
  port: 8091
然后在zuul中配置依赖
        <dependency>
            <groupId>io.jmnarloch</groupId>
            <artifactId>ribbon-discovery-filter-spring-cloud-starter</artifactId>
            <version>2.1.0</version>
        </dependency>
修改过滤器
@Component
@Slf4j
public class RouteFilter extends ZuulFilter {
  ......//对请求进行过滤的核心逻辑
    @Override
    public boolean shouldFilter() {
        //获取请求上下文
        RequestContext currentContext = RequestContext.getCurrentContext();
        //获取请求
        HttpServletRequest request = currentContext.getRequest();
     ......
        //如果前端传的test为Y,则认为是测试路径,请求到gray-test为gray的服务上
        String test = request.getHeader("test");
        if(StringUtils.isNotBlank(test) && "Y".equals(test)){
            RibbonFilterContextHolder.getCurrentContext().add("gray-test","gray");
        }
     ......
        return true;
    }
  ......
}
可以看到,只是获取了请求头中的test值,如果为Y,则请求元数据gray-test的值为gray的服务。
上面的这种写法是测试时调用到指定的服务上,也可以在测试时修改负载策略,例如下面的代码,就可以有小流量进度灰度发布的服务,而大流量仍然进入原服务
@Component
@Slf4j
public class RouteFilter extends ZuulFilter {
  ......//校验通过的执行逻辑
    @Override
    public Object run() throws ZuulException {
        String test = RequestContext.getCurrentContext().getRequest().getHeader("test");
        if(StringUtils.isNotBlank(test) && "Y".equals(test)){
            int send = (int) (Math.random() * 100);
            log.info("send==================={}", send);
            if (send >= 0 && send < 10) {
                //也就是百分之10的请求转发到gray-test=gray的服务上去
                RibbonFilterContextHolder.getCurrentContext().add("gray-test","gray");
            } else {
                //百分之90的请求转发到gray-test=running的服务上去
                RibbonFilterContextHolder.getCurrentContext().add("gray-test","running");
            }
        }
        return null;
    }
}
八、分布式配置管理 Spring Cloud Config
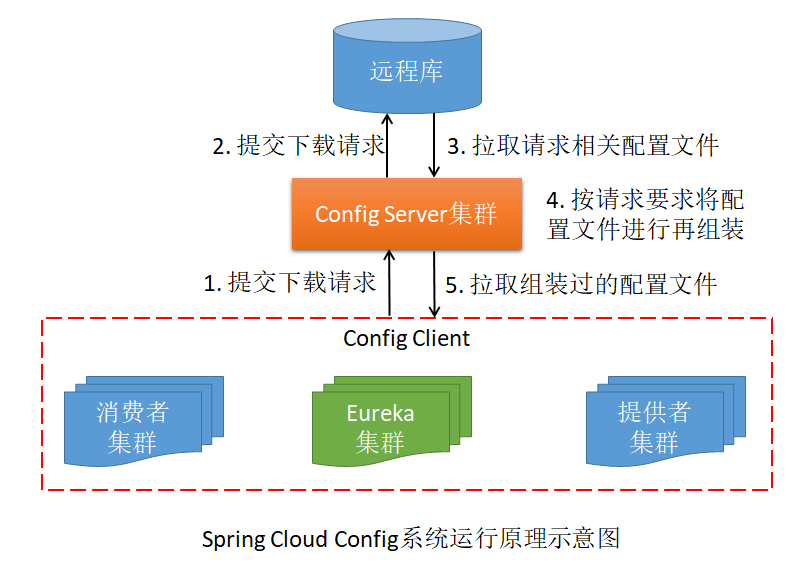
Spring Cloud Config 就是对微服务的配置文件进行统一管理的。其工作原理是,我们首 先需要将各个微服务公共的配置信息推送到 GitHub 远程版本库。然后我们再定义一个 Spring Cloud Config Server,其会连接上这个 GitHub 远程库。这样我们就可以定义 Config 版的 Eureka Server、提供者与消费者了,它们都将作为 Spring Cloud Config Client 出现,它们都会通过连 接 Spring Cloud Config Server 连接上 GitHub 上的远程库,以读取到指定配置文件中的内容。
原理图如下所示:
(一)环境搭建
1、创建Config Server
pom文件引入依赖
        <dependency>
            <groupId>org.springframework.cloud</groupId>
            <artifactId>spring-cloud-config-server</artifactId>
        </dependency>
配置文件:主要需要设置git仓库地址、文件存放路径、文件分支等信息
server:
  port: 9999

spring:
  cloud:
    config:
      server:
        git:
          # 设置git仓库地址
          uri: git@github.com:menglongdeye/lcl-springcloud.git
          search-paths: zzz-configfile
          # git连接超时时间
          timeout: 5
          # git分支
          default-label: main
启动类添加@EnableConfigServer注解
@SpringBootApplication
@EnableConfigServer
public class ConfigServer019999Application {
    public static void main(String[] args) {
        SpringApplication.run(ConfigServer019999Application.class, args);
    }
}
2、配置host
127.0.0.1 configserver.com
3、创建Config Client
pom文件引入依赖,这里需要说明一点,springcloud2020 版本,Bootstrap被默认禁用,因此需要将org.springframework.cloud:spring-cloud-starter-bootstrap依赖引入到工程中,如果时springcloud2020之前的版本,就不需要引入spring-cloud-starter-bootstrap。
        <dependency>
            <groupId>org.springframework.cloud</groupId>
            <artifactId>spring-cloud-starter-config</artifactId>
            <version>3.0.2</version>
        </dependency>

        <!-- https://mvnrepository.com/artifact/org.springframework.cloud/spring-cloud-starter-bootstrap -->
        <dependency>
            <groupId>org.springframework.cloud</groupId>
            <artifactId>spring-cloud-starter-bootstrap</artifactId>
            <version>3.0.2</version>
        </dependency>
新建bootstrap.yml文件,主要配置对应configserver的地址、分支、名称、环境等信息
spring:
  application:
    name: application-provider-config
  profiles:
    active: dev
  cloud:
    config:
      uri: http://configserver.com:9999
      label: main
      name: ${spring.application.name}
      profile: ${spring.profiles.active}
创建API文件,用以验证配置文件变化
@RestController
@RequestMapping("/depart")
public class DepartController {
    @Value("${test.config}")
    private String testconfig;
    @GetMapping("/findAll")
    public String findAll() throws Exception {
        return testconfig;
    }
}
4、创建配置文件
在config server配置的git项目地址和目录中配置相关配置文件。
在config server中配置的uri:为git@github.com:menglongdeye/lcl-springcloud.git,目录为search-paths: zzz-configfile;在config client中配置的文件名称是name:application-provider-config,环境是profile:dev,因此在zzz-configfile文件夹中配置application-provider-config-dev.yml配置文件,文件内容:
test:
  config: provider
5、验证
验证config server:http://localhost:9999/application-provider-config-dev.yml,输出结果为provider,说明config server搭建完成。
验证config server:http://localhost:8081/depart/findAll,输出结果为provider,说明config client搭建完成。
6、刷新配置文件
上面的config自动配置有一个问题,就是如果更新了application-provider-config-dev.yml配置文件,只有config server会更新,但是config client不会更新,例如,将test.config的值修改为provider1,http://localhost:9999/application-provider-config-dev.yml,输出结果为provider1;http://localhost:8081/depart/findAll,输出结果为provider。
客户端需要在引用配置文件的类上添加@RefreshScope注解,表示可以刷新配置
@RestController
@RequestMapping("/depart")
@Slf4j
@RefreshScope
public class DepartController {
    @Value("${test.config}")
    private String testconfig;
    @GetMapping("/findAll")
    public String findAll() throws Exception {
        return testconfig;
    }
}
暴露刷新端口
management:
   # springboot 1.x配置
  security:
    enabled: false
 # springboot 2.x配置
  endpoints:
    web:
      exposure:
        include: refresh
使用post请求config client,刷新配置:http://localhost:8081/actuator/refresh,然后客户端配置即更新
(二)Webhooks自动更新
上面的配置有个问题,就是如果更新了配置文件,需要一个个的访问config client进行刷新,并没有自动更新,GitHub提供了Webhooks的方式,可以实现自动更新。具体配置内容如下图所示:
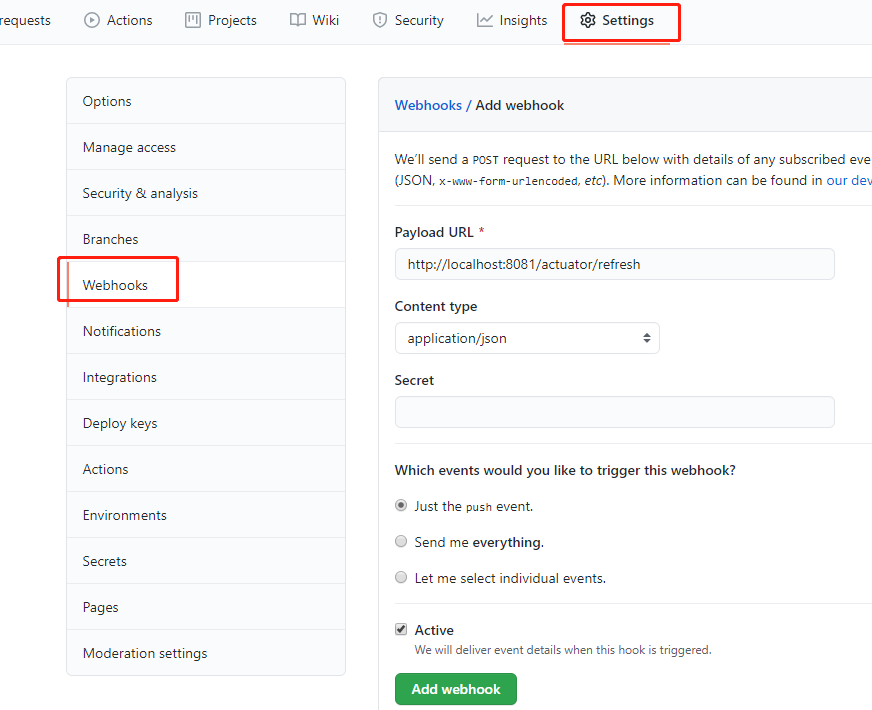
对于配置项说明如下:
Payload URL :触发后回调的URL,即config client项目的刷新地址
Content type :数据格式,两种一般使用json
Secret :用作给POST的body加密的字符串。采用HMAC算法
events :触发的事件列表。
events事件类型描述:
push 仓库有push时触发。默认事件
create 当有分支或标签被创建时触发
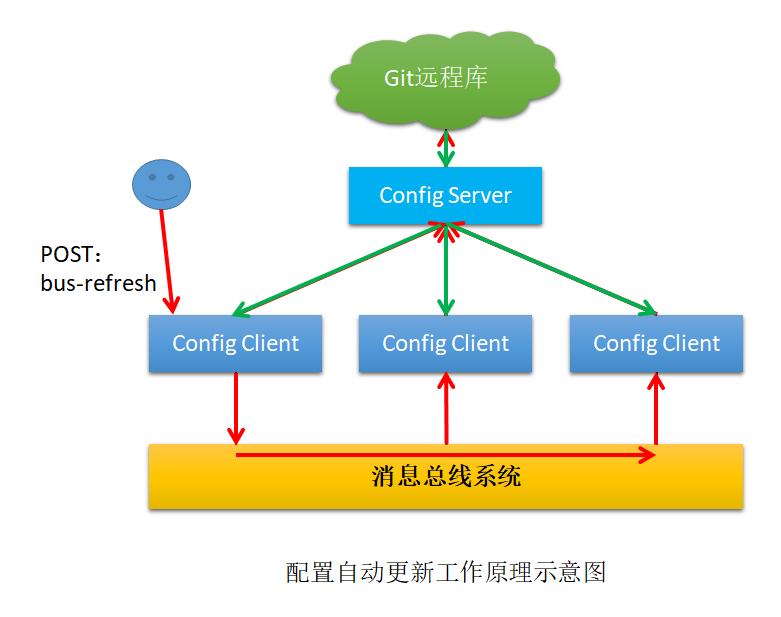
这样我们就可以利用hook的机制去触发客户端的更新,但是当客户端越来越多的时候hook支持的已经不够优雅,另外每次增加客户端都需要改动hook也是不现实的。其实Spring Cloud给了我们更好解决方案,就是使用Spring Cloud Bus来解决。
九、Spring Cloud Bus消息总线
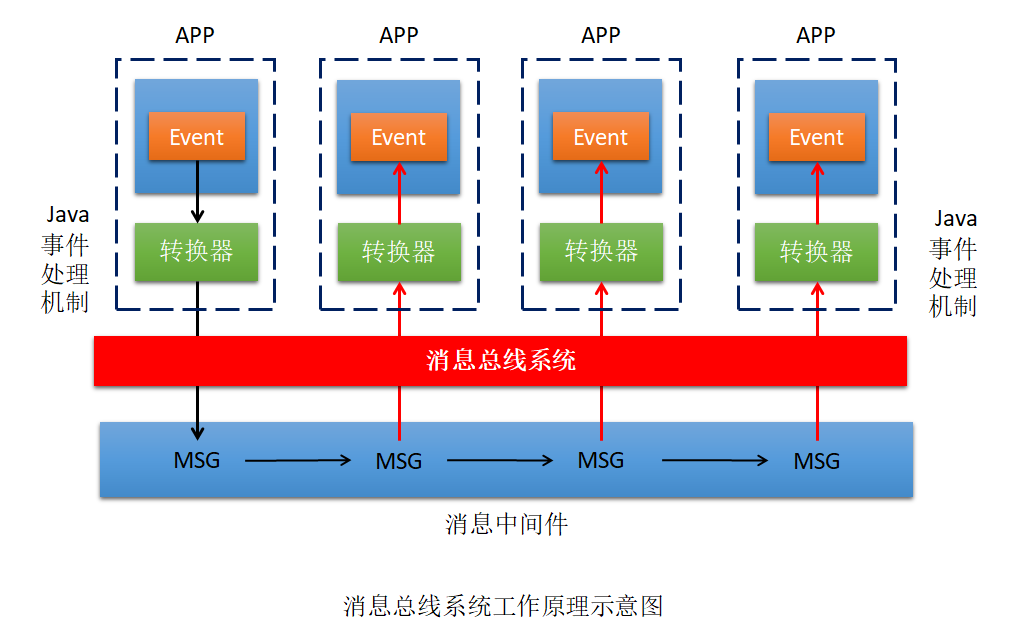
在微服务架构系统中,我们经常会使用轻量级的消息代理来构建一个公用的消息主题让系统中所有的微服务实例都链接上来,由于该主题中产生的消息会被所有实例监听和消费,所以称为消息总线。
在总线上的各个实例都可以方便的广播一些需要让其他连接在该主题上的实例都需要知道的消息,例如配置信息的变更或者一些其他的一些管理操作。
消息总线可以使用ActiveMQ、Kafka、RabbitMQ、RocketMQ等,这里使用Kafka演示消息总线用于实时更新配置。
(一)环境搭建
1、配置ConfigServer
pom文件
        <dependency>
            <groupId>org.springframework.cloud</groupId>
            <artifactId>spring-cloud-config-server</artifactId>
        </dependency>
        <dependency>
            <groupId>org.springframework.boot</groupId>
            <artifactId>spring-boot-starter-actuator</artifactId>
        </dependency>
        <dependency>
            <groupId>org.springframework.cloud</groupId>
            <artifactId>spring-cloud-starter-bus-kafka</artifactId>
        </dependency>
配置文件调整:主要是需要配置kafka和开放指定监控端口
server:
  port: 9999

spring:
  application:
    name: springcloud-config-bus-server
  cloud:
    config:
      server:
        git:
          # 设置git仓库地址
          uri: git@github.com:menglongdeye/lcl-springcloud.git
          search-paths: zzz-configfile
          # git连接超时时间
          timeout: 5
          # git分支
          default-label: main
    bus:
      refresh:
        enabled: true
      enabled: true
      trace:
        enabled: true
  # 注册kafka集群
  kafka:
    bootstrap-servers: 192.168.206.131:9092,192.168.206.132:9092,192.168.206.133:9092
    consumer:
      group-id: springcloudConfig

eureka:
  client:
    service-url:
      defaultZone: http://localhost:8000/eureka
  instance:
    # 服务提供者id
    instance-id: config-bus-server
    # 设置当前cleit每1秒向server发送一次心跳
    lease-renewal-interval-in-seconds: 1
    # 设置超过3秒即认为失效
    lease-expiration-duration-in-seconds: 3

management:
  endpoints:
    web:
      exposure:
        include: bus-refresh
启动类调整:启动类添加@EnableConfigServer注解
@SpringBootApplication
@EnableConfigServer
@EnableEurekaClient
public class ConfigServerBus029999Application {
    public static void main(String[] args) {    SpringApplication.run(ConfigServerBus029999Application.class, args);
    }

}
2、配置configclient
pom文件
        <!--actuator 依赖-->
        <dependency>
            <groupId>org.springframework.boot</groupId>
            <artifactId>spring-boot-starter-actuator</artifactId>
        </dependency>
        <dependency>
            <groupId>org.springframework.cloud</groupId>
            <artifactId>spring-cloud-starter-config</artifactId>
            <version>3.0.2</version>
        </dependency>
        <dependency>
            <groupId>org.springframework.cloud</groupId>
            <artifactId>spring-cloud-starter-bootstrap</artifactId>
            <version>3.0.2</version>
        </dependency>

        <dependency>
            <groupId>org.springframework.cloud</groupId>
            <artifactId>spring-cloud-starter-bus-kafka</artifactId>
        </dependency>
配置文件:
spring:
  profiles:
    active: dev
  application:
    name: application-provider-config
  cloud:
    config:
      uri: http://configserver.com:9999
      label: main
      name: ${spring.application.name}
      profile: ${spring.profiles.active}
    bus:
      refresh:
        enabled: true
      enabled: true
      trace:
        enabled: true
  # 注册kafka集群
  kafka:
    bootstrap-servers: 192.168.206.131:9092,192.168.206.132:9092,192.168.206.133:9092

management:
  endpoints:
    web:
      exposure:
        include: bus-refresh

eureka:
  client:
    service-url:
      defaultZone: http://localhost:8000/eureka
  instance:
    # 服务提供者id
    instance-id: provider-bus
    # 设置当前cleit每1秒向server发送一次心跳
    lease-renewal-interval-in-seconds: 1
    # 设置超过3秒即认为失效
    lease-expiration-duration-in-seconds: 3
处理器类添加刷新支持注解@RefreshScope
@RestController
@RequestMapping("/depart")
@Slf4j
@RefreshScope
public class DepartController {
    @Value("${test.config}")
    private String testconfig;
    @GetMapping("/findAll")
    public String findAll() throws Exception {
        return testconfig;
    }
}
(二)验证
配置application-provider-config-dev.yml文件
test:
  config: provider
项目启动后:访问http://localhost:9999/application-provider-config-dev.yml,显示结果为
test:
  config: provider
访问http://localhost:8081/depart/findAll,输出为:provider
更新git中配置文件,将其更新为:provider2
此时访问http://localhost:9999/application-provider-config-dev.yml,结果更新为provider2
访问http://localhost:8081/depart/findAll,输出结果仍为:provider,没有更新,因为需要手动刷新才可以
调用(post)http://localhost:8081/actuator/refresh刷新后,重新访问http://localhost:8081/depart/findAll,输出结果为:provider2,已经更新
十、调用链跟踪 Spring Cloud Sleuth+zipkin
(一)简述
1、概念
Spring Cloud Sleuth可以实现针对Spring Cloud应用程序的分布式跟踪,兼容Zipkin、HTrace和基于日志的(如ELK)跟踪。对于大多数用户来说,Sleuth是不可见的,并且当前应用与外部系统的所有交互都是自动检测的,我们可以简单的在日志中捕获数据,或者将其发送到远程收集器中。
Spring Cloud Sleuth中存在跟踪单元的概念,而跟踪单元中涉及三个重要概念:trace、span、annotation
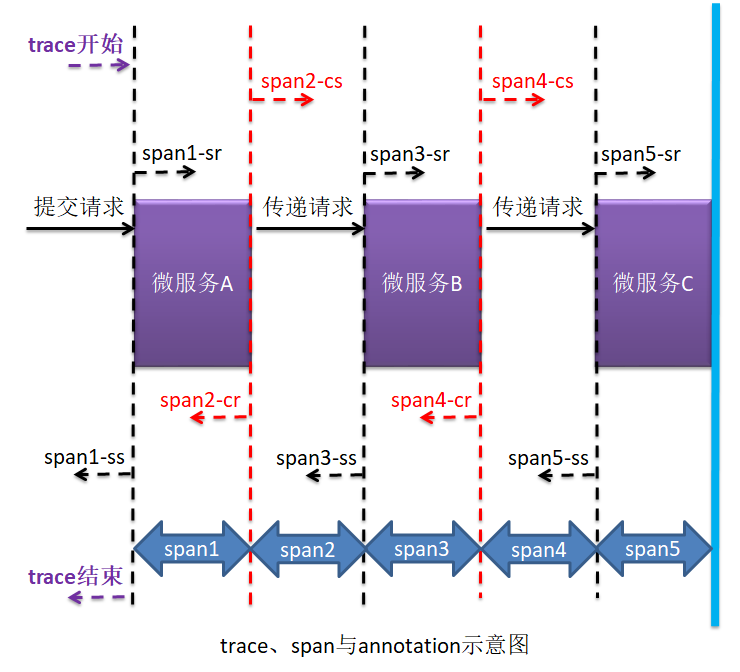
trace:跟踪单元是从客户端发起的请求抵达被跟踪系统的边界开始,到被跟踪系统向客户端返回响应为止的过程,这个过程称为一个trace。
span:每个trace中会调用多个服务,为了记录调用了哪些服务,以及每次调用所消耗的时间等信息,在每次调用服务时,埋入一个调用记录,这样两个调用记录之间的区域称为一个span。一个trace中有一或多个span组成。
annotation:其是用来及时记录事件的实体,表示一个事件发生的时间点。
2、配置
(1)日志生成
只要在工程中添加了Spring Cloud Sleuth依赖,那么在程序启动和运行过程中就会自动生成很多日志。Sleuth会为这些日志打上收集标记,需要收集的设置为true,不需要收集的设置为false。这个配置可以通过在代码中添加自己的日志信息看到。
(2)日志采样率
Sleuth支持对日志的抽样收集,即并不是会对所有的日志都收集到服务器,日志收集标记就是起到这个作用,默认的采样比例是0.1,即10%,在配置文件中可以修改该值,若设置为1,则表示100%收集。
日志采样默认使用的是水塘抽样算法。
(二)搭建
搭建三个项目,分别是sleuth-provider-01-8081、sleuth-consumer-01-8080、sleuth-client-01-8082,三个项目的关系是:页面调用、sleuth-client-01-8082,然后sleuth-client-01-8082通过feign调用sleuth-consumer-01-8080,然后sleuth-consumer-01-8080通过geign调用sleuth-provider-01-8081
1、首先搭建sleuth-provider-01-8081
与之前的provider没有什么区别。搭建后,添加对Spring Cloud Sleuth的依赖。
        <dependency>
            <groupId>org.springframework.cloud</groupId>
            <artifactId>spring-cloud-starter-sleuth</artifactId>
        </dependency>
Controller添加日志输出
@RestController
@RequestMapping("/depart")
@Slf4j
public class DepartController {
    @Autowired
    private DepartService departService;
    @GetMapping("/findAll")
    public List<Depart> findAll() throws Exception {
        log.info("provider findAll 被调用");
        return departService.findAll();
    }
}
同时需要注释掉日志的相关配置,否则可能看不到后面的演示效果。
# 配置日志
#logging:
#  pattern:
#    console: level-%level %msg%n
#  level:
#    root: info
#    # hibernate输出日志级别
#    org.hibernate: info
#    # 在show-sql为true时,显示sql中的动态值
#    org.hibernate.type.descriptor.sql.BasicBinder: trace
#    # 在show-sql为true时,显示查询结果
#    org.hibernate.hql.internal.ast.exec.BasicExecutor: trace
#    # 设置自己代码的日志级别
#    com.lcl.springcloud: debug
2、搭建sleuth-consumer-01-8080、sleuth-client-01-8082
然后相同的方式搭建sleuth-consumer-01-8080、sleuth-client-01-8082,区别就是需要调整端口号、项目实例名等内容。
(三)验证
启动服务,可以看到sleuth的日志

INFO中的第一个就是该项目的服务实例:spring.application.name的配置
调用http://localhost:8082/depart/findAll时,服务的调用顺序是sleuth-client-01-8082、sleuth-consumer-01-8080、sleuth-provider-01-8081,各个项目的输出结果如下:


通过上面的输出结果可以发现,INFO中的三个参数,第一个是服务名,第二个是一次调用的唯一id(transid),第三个是当前服务的id(spanid)
十一、Zipkin及Zipkin + Sleuth
zipkin 是 Twitter 开发的一个分布式系统 APM(Application Performance Management,应用性能管理)工具,其是基于 Google Dapper 实现的,用于完成日志的聚合。其与 Sleuth 联用,可以为用户提供调用链路监控可视化 UI 界面。
(一)Zipkin系统结构
1、服务器组成
Zipkin服务器组成如下图所示
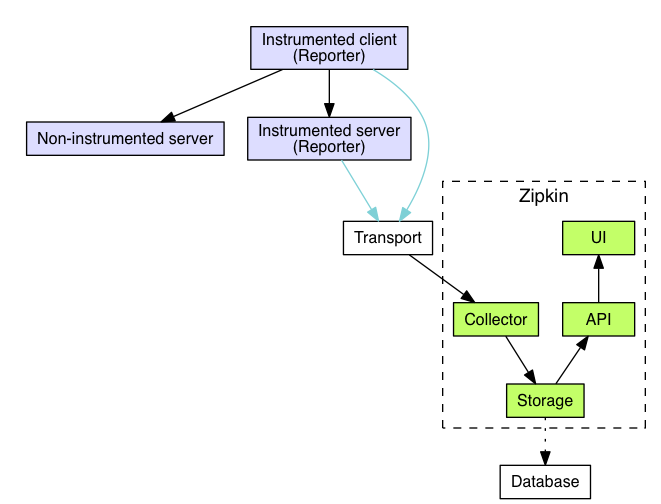
Zipkin服务器主要由4个核心组件够构成:
(1)Collection:收集器,它主要用于处理从外部系统发送过来的跟踪信息,将这些信息转换为Zipkin内部处理的Span格式,以支持后续的存储、分析、展示等功能。
(2)Storage:存储组件,它主要用于处理收集器收到的跟踪信息,默认会将这些信息存储到内哦村中,也可以修改存储策略,例如可以将数据存储到数据库中。
(3)API:外部访问接口组件,外部系统通过这里的API可以实现对系统的监控
(4)UI:用于操作界面组件,基于API组件实现的上层应用。通过UI组件用户可以方便而又直观的查询和分析跟踪信息。
2、日志的发送方式
在Spring Cloud Sleuth + Zipkin的系统中,客户端中一旦发生服务间的调用,就会被配置在微服务中的Sleuth的监听器的监听,然后生成相应的Trance和Span等日志信息,并发送给zipkin服务端。
发送的方式主要有两种:通过viaHttp报文的方式;通过消息队列发送。
(二)Zikpin服务端搭建
三种方法
(1)wget
wget -O zipkin.jar 'https://search.maven.org/remote_content?g=io.zipkin.java&a=zipkin-server&v=LATEST&c=exec'
(2)curl
curl -sSL https://zipkin.io/quickstart.sh | bash -s
(3)源代码
git clone https://github.com/openzipkin/zipkin
cd zipkin
# Build the server and also make its dependencies
./mvnw -DskipTests --also-make -pl zipkin-server clean install
# Run the server
java -jar ./zipkin-server/target/zipkin-server-*exec.jar
我是用的是第一种,启动zipkin
java -jar zipkin.jar
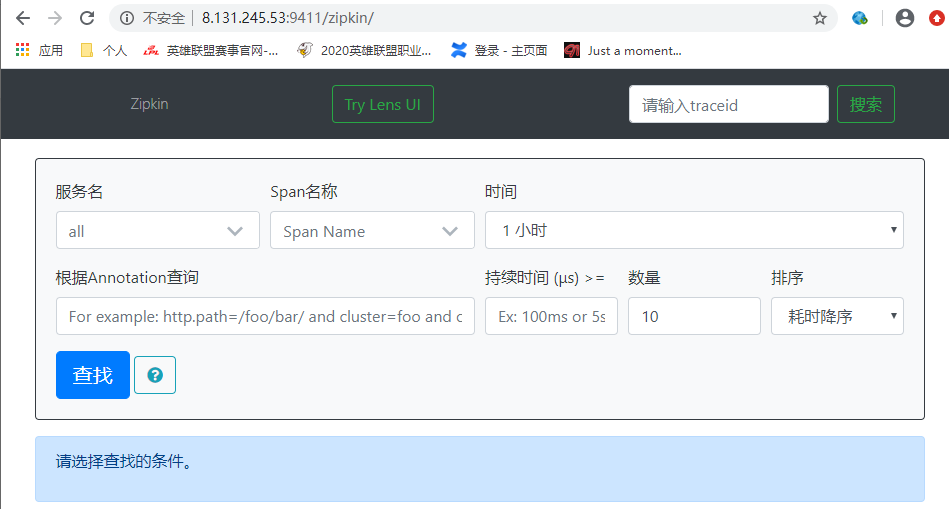
zipkin默认端口是9411,访问zipkin:http://ip:9411/zipkin/
(三)via Http 方式收集日志
搭建三个项目,分别是zipkin-provider-01-8081、zipkin-consumer-01-8080、zipkin-client-01-8082,三个项目的关系是:页面调用、zipkin-client-01-8082,然后zipkin-client-01-8082通过feign调用zipkin-consumer-01-8080,然后zipkin-consumer-01-8080通过geign调用zipkin-provider-01-8081
1、首先搭建zipkin-provider-01-8081
与之前的sleuth-provider-01-8081没有什么区别。搭建后,添加对Spring Cloud Zipkin的依赖。
        <dependency>
            <groupId>org.springframework.cloud</groupId>
            <artifactId>spring-cloud-starter-sleuth</artifactId>
        </dependency>
        <dependency>
            <groupId>org.springframework.cloud</groupId>
            <artifactId>spring-cloud-sleuth-zipkin</artifactId>
        </dependency>
然后添加zipkin的配置:zipkin地址和日志收集比例
spring:
  zipkin:
    base-url: http://8.131.245.53:9411
  sleuth:
    sampler:
      probability: 1.0
2、然后同样的搭建zipkin-consumer-01-8080和zipkin-client-01-8082
3、访问http://localhost:8082/depart/findAll
4、查看zipkin控制台:http://8.131.245.53:9411/zipkin/
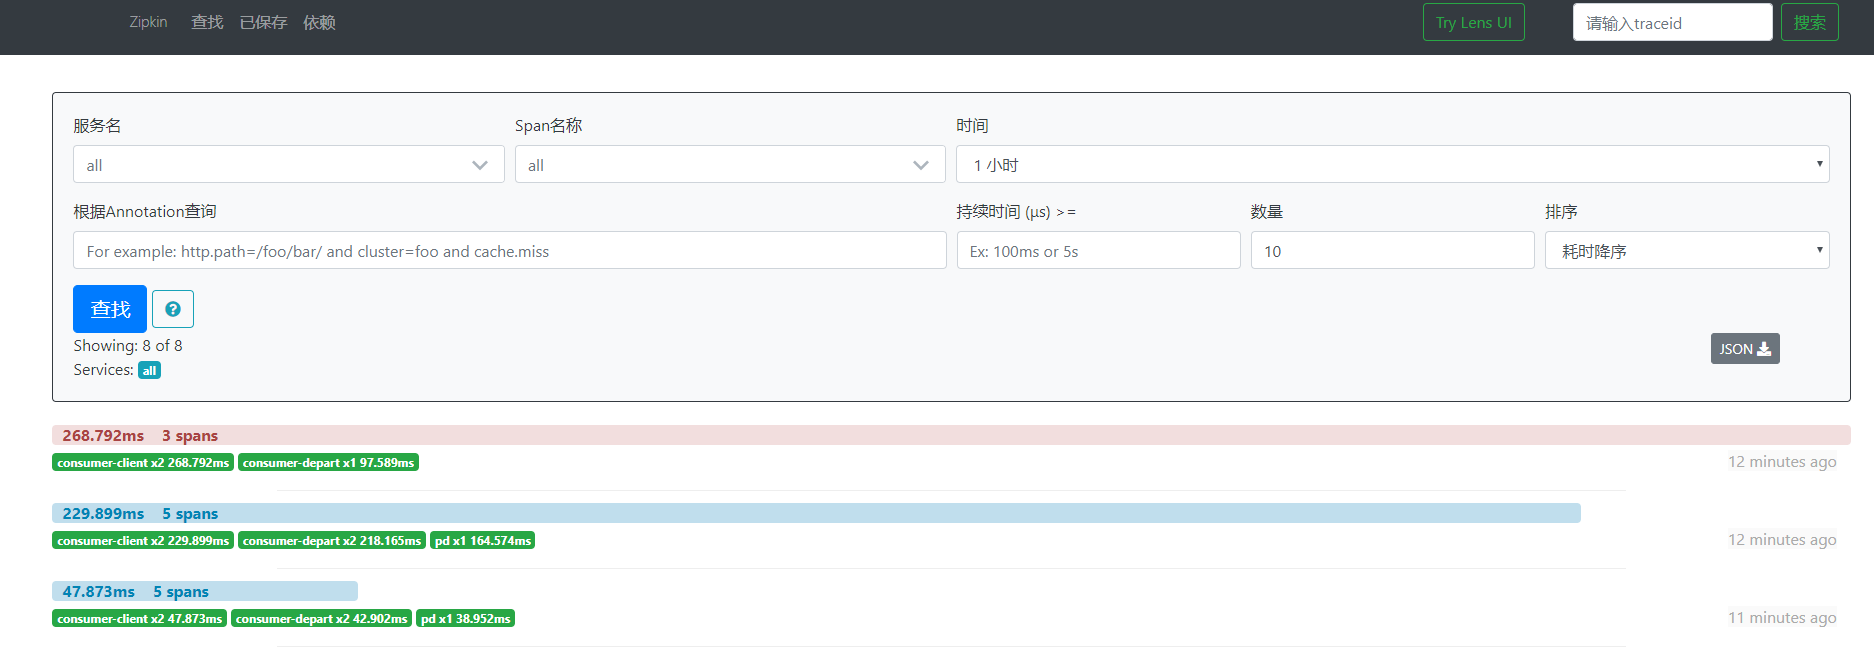
点进去后,可以查看调用链和调用时间

(四)消息队列的方式收集日志
默认情况下,Sleuth是通过将调用日志写入到via头部信息中的方式实现链路追踪的,但是在高并发场景下,这种方式的效率会非常低,会影响链路信息查看。此时,可以让Sleuth将其生成的调用日志写入到MQ中(目前只支持Kafka和RabbitMQ), 让Zipkin从这些中间件中获取日志。
直接修改上面使用via Http的三个项目
1、添加kafka依赖
        <dependency>
            <groupId>org.springframework.kafka</groupId>
            <artifactId>spring-kafka</artifactId>
            <version>2.7.1</version>
        </dependency>
2、修改配置文件
spring:
  zipkin:
    # base-url: http://8.131.245.53:9411
    sender:
      type: kafka
  sleuth:
    sampler:
      probability: 1.0
  kafka:
    bootstrap-servers: 192.168.206.131:9092,192.168.206.132:9092,192.168.206.133:9092
3、然后使zipkin启动时连接上kafka
java -DKAFKA_BOOTSTRAP_SERVERS=192.168.206.131:9092,192.168.206.132:9092,192.168.206.133:9092 -jar zipkin.jar
也同样可以收集调用日志。
(五)将日志收集的信息存储到数据库
1、首先创建一个zipkin数据库,因为zipkin默认使用的数据库名称为zipkin,如果使用jar包部署zipkin,则数据库必须使用该名称。然后创建表
CREATE TABLE IF NOT EXISTS zipkin_spans (
  `trace_id_high` BIGINT NOT NULL DEFAULT 0 COMMENT 'If non zero, this means the trace uses 128 bit traceIds instead of 64 bit',
  `trace_id` BIGINT NOT NULL,
  `id` BIGINT NOT NULL,
  `name` VARCHAR(255) NOT NULL,
  `parent_id` BIGINT,
  `debug` BIT(1),
  `start_ts` BIGINT COMMENT 'Span.timestamp(): epoch micros used for endTs query and to implement TTL',
  `duration` BIGINT COMMENT 'Span.duration(): micros used for minDuration and maxDuration query'
) ENGINE=InnoDB ROW_FORMAT=COMPRESSED CHARACTER SET=utf8 COLLATE utf8_general_ci;

ALTER TABLE zipkin_spans ADD UNIQUE KEY(`trace_id_high`, `trace_id`, `id`) COMMENT 'ignore insert on duplicate';
ALTER TABLE zipkin_spans ADD INDEX(`trace_id_high`, `trace_id`, `id`) COMMENT 'for joining with zipkin_annotations';
ALTER TABLE zipkin_spans ADD INDEX(`trace_id_high`, `trace_id`) COMMENT 'for getTracesByIds';
ALTER TABLE zipkin_spans ADD INDEX(`name`) COMMENT 'for getTraces and getSpanNames';
ALTER TABLE zipkin_spans ADD INDEX(`start_ts`) COMMENT 'for getTraces ordering and range';

CREATE TABLE IF NOT EXISTS zipkin_annotations (
  `trace_id_high` BIGINT NOT NULL DEFAULT 0 COMMENT 'If non zero, this means the trace uses 128 bit traceIds instead of 64 bit',
  `trace_id` BIGINT NOT NULL COMMENT 'coincides with zipkin_spans.trace_id',
  `span_id` BIGINT NOT NULL COMMENT 'coincides with zipkin_spans.id',
  `a_key` VARCHAR(255) NOT NULL COMMENT 'BinaryAnnotation.key or Annotation.value if type == -1',
  `a_value` BLOB COMMENT 'BinaryAnnotation.value(), which must be smaller than 64KB',
  `a_type` INT NOT NULL COMMENT 'BinaryAnnotation.type() or -1 if Annotation',
  `a_timestamp` BIGINT COMMENT 'Used to implement TTL; Annotation.timestamp or zipkin_spans.timestamp',
  `endpoint_ipv4` INT COMMENT 'Null when Binary/Annotation.endpoint is null',
  `endpoint_ipv6` BINARY(16) COMMENT 'Null when Binary/Annotation.endpoint is null, or no IPv6 address',
  `endpoint_port` SMALLINT COMMENT 'Null when Binary/Annotation.endpoint is null',
  `endpoint_service_name` VARCHAR(255) COMMENT 'Null when Binary/Annotation.endpoint is null'
) ENGINE=InnoDB ROW_FORMAT=COMPRESSED CHARACTER SET=utf8 COLLATE utf8_general_ci;

ALTER TABLE zipkin_annotations ADD UNIQUE KEY(`trace_id_high`, `trace_id`, `span_id`, `a_key`, `a_timestamp`) COMMENT 'Ignore insert on duplicate';
ALTER TABLE zipkin_annotations ADD INDEX(`trace_id_high`, `trace_id`, `span_id`) COMMENT 'for joining with zipkin_spans';
ALTER TABLE zipkin_annotations ADD INDEX(`trace_id_high`, `trace_id`) COMMENT 'for getTraces/ByIds';
ALTER TABLE zipkin_annotations ADD INDEX(`endpoint_service_name`) COMMENT 'for getTraces and getServiceNames';
ALTER TABLE zipkin_annotations ADD INDEX(`a_type`) COMMENT 'for getTraces';
ALTER TABLE zipkin_annotations ADD INDEX(`a_key`) COMMENT 'for getTraces';

CREATE TABLE IF NOT EXISTS zipkin_dependencies (
  `day` DATE NOT NULL,
  `parent` VARCHAR(255) NOT NULL,
  `child` VARCHAR(255) NOT NULL,
  `call_count` BIGINT
) ENGINE=InnoDB ROW_FORMAT=COMPRESSED CHARACTER SET=utf8 COLLATE utf8_general_ci;

ALTER TABLE zipkin_dependencies ADD UNIQUE KEY(`day`, `parent`, `child`);
2、启动zipkin时连接数据库即可
STORAGE_TYPE=mysql MYSQL_USER=root MYSQL_PASS=root MYSQL_HOST=192.168.1.108 MYSQL_TCP_PORT=3306 java -DKAFKA_BOOTSTRAP_SERVERS=192.168.206.131:9092,192.168.206.132:9092,192.168.206.133:9092 -jar zipkin.jar
十一、消息系统整合框架Spring Cloud Stream
Spring Cloud Stream 是一个用来为微服务应用构建消息驱动能力的框架。通过使用Spring Cloud Stream,可以有效简化开发人员对于消息中间件的使用复杂度。目前Spring Cloud Stream只支持RabbitMQ和Kafka。
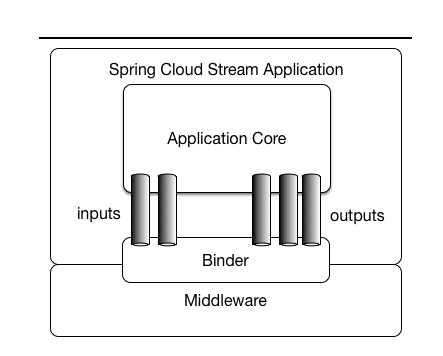
应用程序的核心部分通过Inputs和Outputs管道,与中间件连接,而管道是通过绑定器Binder与中间件相绑定的。
(一)发送者配置
1、发送一个topic
(1)搭建一个项目,引入spring-cloud-stream-binder-kafka依赖
        <dependency>
            <groupId>org.springframework.cloud</groupId>
            <artifactId>spring-cloud-stream-binder-kafka</artifactId>
        </dependency>
(2)配置发送者
@Component
@EnableBinding(Source.class)
public class SomeProducer {
    @Autowired
    @Qualifier(Source.OUTPUT)
    private MessageChannel channel;

    public void sendMsg(String message){
        channel.send(MessageBuilder.withPayload(message).build());
    }
}
(3)发送消息
@RestController
@RequestMapping("/depart")
@Slf4j
public class DepartController {

    @Autowired
    private SomeProducer producer;

    @GetMapping("/send")
    public String send() throws Exception {
        producer.sendMsg("stream send message=============");
        return "OK";
    }

}
(4)配置kafka地址
spring:
  cloud:
    stream:
      kafka:
        binder:
          # kafka地址
          brokers: 192.168.1.110:9092
          # 是否自动创建topic
          auto-create-topics: true
      bindings:
        # 输出的主题及类型
        output:
          destination: stram-test
          content-type: text/plain
2、配置多个发送者
(1)配置topic信息
public interface ProducerSource001 {
    String CHANNEL_NAME = "stram-test-001";

    @Output(ProducerSource001.CHANNEL_NAME)
    MessageChannel output();
}
public interface ProducerSource002 {
    String CHANNEL_NAME = "stram-test-002";

    @Output(ProducerSource002.CHANNEL_NAME)
    MessageChannel output();
}
(2)配置发送者
@Component
@EnableBinding({Source.class, ProducerSource001.class, ProducerSource002.class})
public class SelfProducer {

    @Autowired
    @Qualifier(Source.OUTPUT)
    private MessageChannel channel;

    @Autowired
    @Qualifier(ProducerSource001.CHANNEL_NAME)
    private MessageChannel channel001;

    @Autowired
    @Qualifier(ProducerSource002.CHANNEL_NAME)
    private MessageChannel channel002;

    public void sendMsg(String message){
        Message<String> msg = MessageBuilder.withPayload(message).build();
        channel.send(msg);
        channel001.send(msg);
        channel002.send(msg);
    }
}
(3)发送消息
@RestController
@RequestMapping("/depart")
@Slf4j
public class DepartController {

    @Autowired
    private SelfProducer selfProducer;

    @GetMapping("/sendAll")
    public String sendAll() throws Exception {
        selfProducer.sendMsg("stream send all message=============");
        return "OK";
    }

}
(二)配置消费者
Spring Cloud Stream 提供了三种创建消费者的方式,这三种方式的都是在消费者类的“消 费”方法上添加注解。只要有新的消息写入到了管道,该“消费”方法就会执行。只不过三 种注解,其底层的实现方式不同。即当新消息到来后,触发“消费”方法去执行的实现方式 不同。
@PostConstruct:以发布/订阅方式实现
@ServiceActivator:新的消息激活服务方式实现
@StreamListener:以监听方式实现
1、@PostConstruct
@Component
@EnableBinding(Sink.class)
@Slf4j
public class SomeConsumer {

    @Autowired
    @Qualifier(Sink.INPUT)
    private SubscribableChannel channel;

    @PostConstruct
    public void printMsg(){
        channel.subscribe(new MessageHandler() {
            @Override
            public void handleMessage(Message<?> message) throws MessagingException {
                log.info("output/input========={}========={}",message.getHeaders(), new String((byte[]) message.getPayload()));
            }
        });
    }
}
2、@ServiceActivator
(1)配置Sinkl
public interface Sink001 {
    String CHANNEL_NAME = "stram-test-001";

    @Input(Sink001.CHANNEL_NAME)
    SubscribableChannel input();
}
(2)消费
@Component
@EnableBinding(Sink001.class)
@Slf4j
public class SomeConsumer001 {

    @ServiceActivator(inputChannel = Sink001.CHANNEL_NAME)
    public void printMsg(Object object){
        log.info("stram-test-001========={}",object);
    }

}
3、@StreamListener
(1)配置Sink
public interface Sink002 {
    String CHANNEL_NAME = "stram-test-002";

    @Output(Sink002.CHANNEL_NAME)
    MessageChannel input();
}
(2)消费
@Component
@EnableBinding(Sink002.class)
@Slf4j
public class SomeConsumer002 {

    @StreamListener(Sink002.CHANNEL_NAME)
    public void printMsg(Object object){
        log.info("stram-test-002========={}",object);
    }

}
-----------------------------------------------------------
---------------------------------------------
朦胧的夜 留笔~~


【推荐】国内首个AI IDE,深度理解中文开发场景,立即下载体验Trae
【推荐】编程新体验,更懂你的AI,立即体验豆包MarsCode编程助手
【推荐】抖音旗下AI助手豆包,你的智能百科全书,全免费不限次数
【推荐】轻量又高性能的 SSH 工具 IShell:AI 加持,快人一步
· AI与.NET技术实操系列:向量存储与相似性搜索在 .NET 中的实现
· 基于Microsoft.Extensions.AI核心库实现RAG应用
· Linux系列:如何用heaptrack跟踪.NET程序的非托管内存泄露
· 开发者必知的日志记录最佳实践
· SQL Server 2025 AI相关能力初探
· 震惊!C++程序真的从main开始吗?99%的程序员都答错了
· 【硬核科普】Trae如何「偷看」你的代码?零基础破解AI编程运行原理
· 单元测试从入门到精通
· 上周热点回顾(3.3-3.9)
· winform 绘制太阳,地球,月球 运作规律