SpringCloud--Eureka--搭建
Spring Cloud Eureka是Spring Cloud Netflix微服务套件中的一部分,它基于Netflix Eureka做了二次封装,主要负责完成微服务架构中的服务治理功能。
Eureka分为服务端和客户端。
其中Eureka服务端,我们也称为服务注册中心。如果Eureka以集群部署,当集群出现分片故障时,那么Eureka就转入自我保护模式,它允许在分片故障期间继续提供服务的注册与发现,当故障分片恢复时,集群中的其他分片会将它的状态再同步回来(不同可用区域的服务注册中心通过异步模式互相复制各自的状态),这意味着在任意给定时间点每个实例关于所有服务的状态是有细微差别的。
Eureka客户端,主要处理服务的注册与发现,客户端服务通过注解和参数配置的方式,嵌入在客户端应用程序的代码中,在应用程序运行时,Eureka客户端向注册中心注册自身提供的服务并周期性的发送心跳来更新它的服务租约。同时,它也能从服务端查询当前注册的服务信息并把它们缓存到本地并周期性的刷新服务状态。
一、构建服务注册中心
1、单节点注册中心
(1)创建一个eureka server项目,创建步骤和创建一个springboot项目一样,只有在最后选择依赖时,使用Eureka Server依赖即可。也可以直接创建Spring Boot项目,自行添加对Sureka Server的依赖,

对于springCloud版本不明白的话,可以看下https://zhuanlan.zhihu.com/p/63653091
(2)创建完毕后,项目的pom文件如下:
<?xml version="1.0" encoding="UTF-8"?>
<project xmlns="http://maven.apache.org/POM/4.0.0" xmlns:xsi="http://www.w3.org/2001/XMLSchema-instance"
         xsi:schemaLocation="http://maven.apache.org/POM/4.0.0 https://maven.apache.org/xsd/maven-4.0.0.xsd">
    <modelVersion>4.0.0</modelVersion>
    <parent>
        <groupId>org.springframework.boot</groupId>
        <artifactId>spring-boot-starter-parent</artifactId>
        <version>2.3.1.RELEASE</version>
        <relativePath/> <!-- lookup parent from repository -->
    </parent>
    <groupId>lcl.spring.cloud.demo</groupId>
    <artifactId>eureka-server-one</artifactId>
    <version>0.0.1-SNAPSHOT</version>
    <name>eureka-server-one</name>
    <description>Demo project for Spring Boot</description>

    <properties>
        <java.version>1.8</java.version>
        <spring-cloud.version>Hoxton.SR6</spring-cloud.version>
    </properties>

    <dependencies>
        <dependency>
            <groupId>org.springframework.cloud</groupId>
            <artifactId>spring-cloud-starter-netflix-eureka-server</artifactId>
        </dependency>

        <dependency>
            <groupId>org.springframework.boot</groupId>
            <artifactId>spring-boot-starter-test</artifactId>
            <scope>test</scope>
            <exclusions>
                <exclusion>
                    <groupId>org.junit.vintage</groupId>
                    <artifactId>junit-vintage-engine</artifactId>
                </exclusion>
            </exclusions>
        </dependency>
    </dependencies>

    <dependencyManagement>
        <dependencies>
            <dependency>
                <groupId>org.springframework.cloud</groupId>
                <artifactId>spring-cloud-dependencies</artifactId>
                <version>${spring-cloud.version}</version>
                <type>pom</type>
                <scope>import</scope>
            </dependency>
        </dependencies>
    </dependencyManagement>

    <build>
        <plugins>
            <plugin>
                <groupId>org.springframework.boot</groupId>
                <artifactId>spring-boot-maven-plugin</artifactId>
            </plugin>
        </plugins>
    </build>

</project>
(3)然后,需要启动Spring Cloud Eureka,即在项目主函数上添加@EnableEurekaServer注解
package lcl.spring.cloud.demo.eurekaserver.one;

import org.springframework.boot.SpringApplication;
import org.springframework.boot.autoconfigure.SpringBootApplication;
import org.springframework.cloud.netflix.eureka.server.EnableEurekaServer;

@EnableEurekaServer
@SpringBootApplication
public class EurekaServerOneApplication {

    public static void main(String[] args) {
        SpringApplication.run(EurekaServerOneApplication.class, args);
    }

}
(4)最后一步,就是需要配置相关内容
server:
  port: 1111
eureka:
  instance:
    hostname: localhost
  client:
    register-with-eureka: false
    fetch-registry: false
    service-url:
      defaultZone: http://${eureka.instance.hostname}:${server.port}/eureka/
配置内容如上所示,具体说明如下:
server.port:由于是在本地启动,后续需要启动多个项目,因此调整启动参数
eureka.instance.hostname: 设置本机名称
eureka.client.register-with-eureka: 是否向注册中心注册自己,由于该项目是注册中心,因此不向注册中心注册自己
eureka.client.fetch-registry: 是否需要检索服务,由于该项目是注册中心,因此不需要去检索服务
eureka.client.service-url.defaultZone: 这只注册中心地址
(5)所有配置完毕后,启动项目,访问:http://localhost:1111/
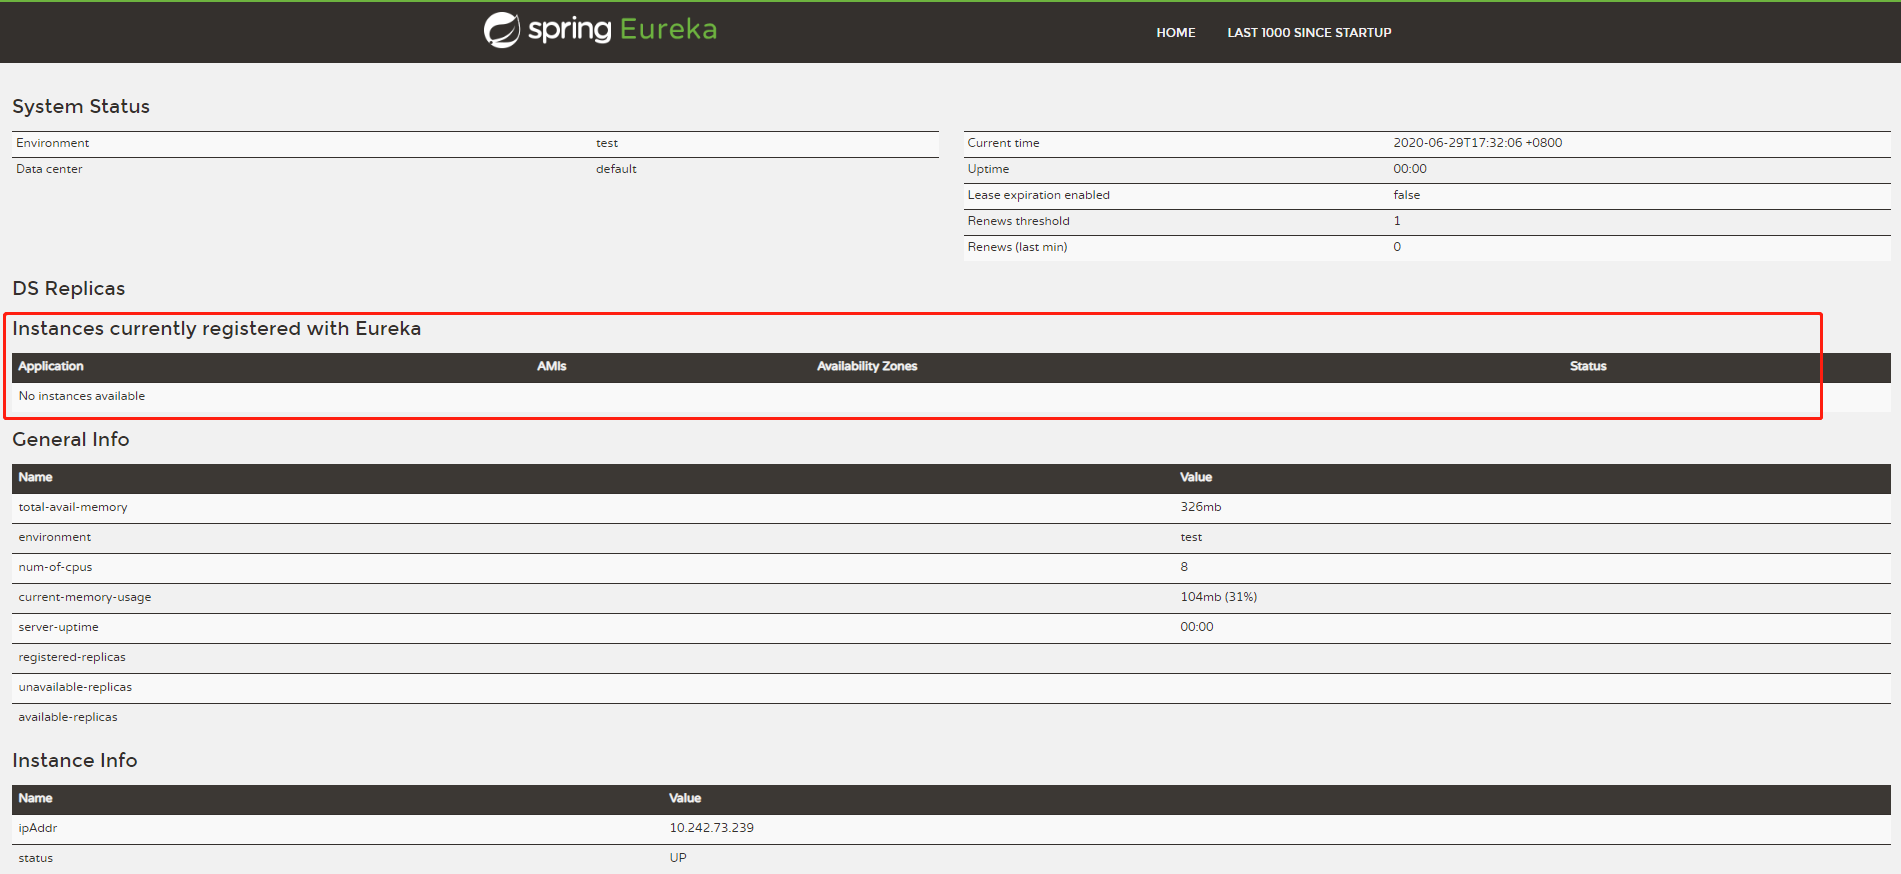
如上图所示,Instances currently registered with Eureka栏是空的,说明该注册中心还没有任务服务注册。
2、高可用注册中心
(1)新搭建一个与eureka-server-one一样的项目eureka-server-two(由于是在本地测试,因此需要多个项目,如果是在服务器,使用springboot的多环境--profile部署即可)
(2)修改eureka-server-one项目配置文件,让其注册中心指向eureka-server-two项目
server:
  port: 1111
eureka:
  instance:
    hostname: eureka-server1
  client:
    register-with-eureka: false
    fetch-registry: false
    service-url:
      defaultZone: http://eureka-server2:1112/eureka/
      #defaultZone: http://${eureka.instance.hostname}:${server.port}/eureka/
spring:
  application:
    name: eureka-server
(3)修改eureka-server-two项目配置文件,让其注册中心指向eureka-server-one项目
server:
  port: 1112
eureka:
  instance:
    hostname: eureka-server2
  client:
    register-with-eureka: false
    fetch-registry: false
    service-url:
      defaultZone: http://eureka-server1:1111/eureka/
      #defaultZone: http://${eureka.instance.hostname}:${server.port}/eureka/
spring:
  application:
    name: eureka-server
(4)修改host文件
127.0.0.1 eureka-server1
127.0.0.1 eureka-server2
(5)启动eureka-server-one和eureka-server-two两个项目,访问:http://localhost:1111/
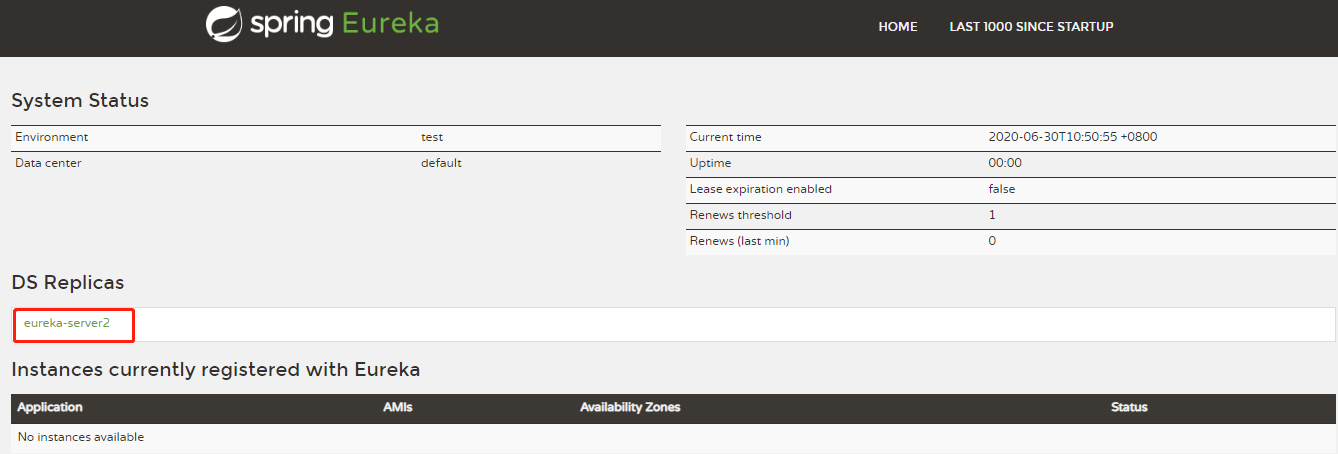
由上图可见,访问eureka-server-one,发现已经有了eureka-server2的节点,同样的,访问eureka-server-two,也会存在eureka-server1节点。
(6) 对于单节点的配置,我们设置eureka.client.register-with-eureka和eureka.client.fetch-registry均为false,为了高可用,可以将其设置为true,以达到注册中心相互向对方注册自己的服务,形成一组互相注册的注册中心,以实现服务清单的互相同步。
调整配置参数后,重新启动两个注册中心,访问:http://localhost:1111/
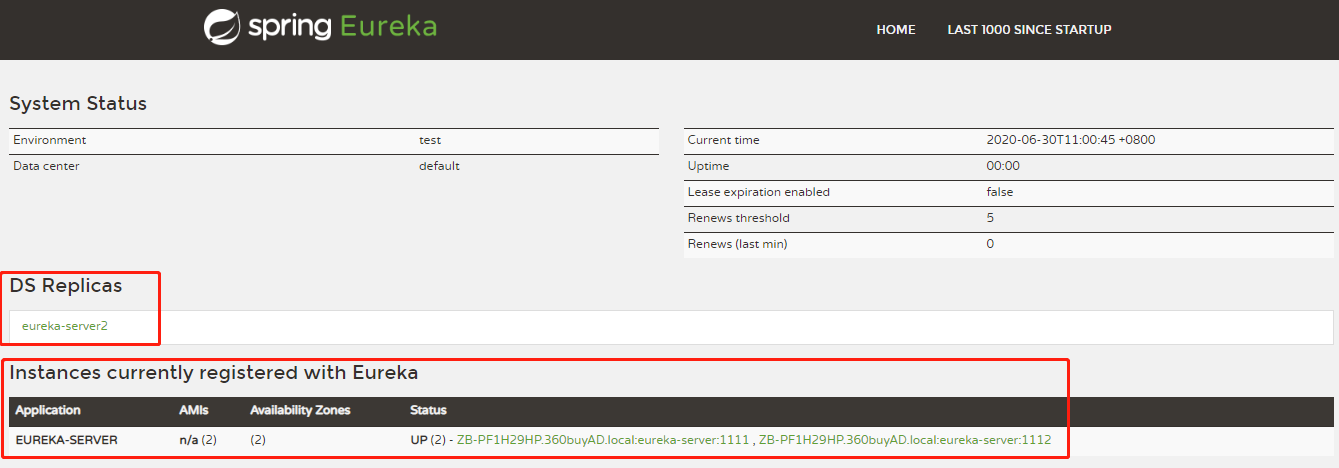
由上图可以看到,已经有两个Eureka-server项目注册到了注册中心
二、服务注册与服务发现
1、单节点注册中心服务注册
(1)新建springboot项目,然后添加对eureka-client的依赖
<?xml version="1.0" encoding="UTF-8"?>
<project xmlns="http://maven.apache.org/POM/4.0.0" xmlns:xsi="http://www.w3.org/2001/XMLSchema-instance"
         xsi:schemaLocation="http://maven.apache.org/POM/4.0.0 https://maven.apache.org/xsd/maven-4.0.0.xsd">
    <modelVersion>4.0.0</modelVersion>
    <parent>
        <groupId>org.springframework.boot</groupId>
        <artifactId>spring-boot-starter-parent</artifactId>
        <version>2.3.1.RELEASE</version>
        <relativePath/> <!-- lookup parent from repository -->
    </parent>
    <groupId>lcl.spring.cloud.demo</groupId>
    <artifactId>eureka-client-one</artifactId>
    <version>0.0.1-SNAPSHOT</version>
    <name>eureka-client-one</name>
    <description>Demo project for Spring Boot</description>

    <properties>
        <java.version>1.8</java.version>
        <spring-cloud.version>Hoxton.SR6</spring-cloud.version>
    </properties>

    <dependencies>
        <dependency>
            <groupId>org.springframework.boot</groupId>
            <artifactId>spring-boot-starter-web</artifactId>
        </dependency>

        <dependency>
            <groupId>org.springframework.boot</groupId>
            <artifactId>spring-boot-starter-test</artifactId>
            <scope>test</scope>
            <exclusions>
                <exclusion>
                    <groupId>org.junit.vintage</groupId>
                    <artifactId>junit-vintage-engine</artifactId>
                </exclusion>
            </exclusions>
        </dependency>

        <dependency>
            <groupId>org.springframework.cloud</groupId>
            <artifactId>spring-cloud-starter-netflix-eureka-client</artifactId>
        </dependency>

        <dependency>
            <groupId>org.projectlombok</groupId>
            <artifactId>lombok</artifactId>
            <version>${lombok.version}</version>
        </dependency>
    </dependencies>

    <dependencyManagement>
        <dependencies>
            <dependency>
                <groupId>org.springframework.cloud</groupId>
                <artifactId>spring-cloud-dependencies</artifactId>
                <version>${spring-cloud.version}</version>
                <type>pom</type>
                <scope>import</scope>
            </dependency>
        </dependencies>
    </dependencyManagement>

    <build>
        <plugins>
            <plugin>
                <groupId>org.springframework.boot</groupId>
                <artifactId>spring-boot-maven-plugin</artifactId>
            </plugin>
        </plugins>
    </build>

</project>
(2)创建API请求类
package lcl.spring.cloud.demo.eurekaclient.one.api;

import lombok.extern.slf4j.Slf4j;
import org.springframework.web.bind.annotation.GetMapping;
import org.springframework.web.bind.annotation.RequestMapping;
import org.springframework.web.bind.annotation.RestController;

@RestController
@RequestMapping("/v1")
@Slf4j
public class HelloApi {

    @GetMapping("/hello")
    public String hello(){
        return "hello......";
    }
}
(3)在项目主函数中添加@EnableDiscoveryClient注解,启用Eureka Client
package lcl.spring.cloud.demo.eurekaclient.one;

import org.springframework.boot.SpringApplication;
import org.springframework.boot.autoconfigure.SpringBootApplication;
import org.springframework.cloud.client.discovery.EnableDiscoveryClient;

@EnableDiscoveryClient
@SpringBootApplication
public class EurekaClientOneApplication {

    public static void main(String[] args) {
        SpringApplication.run(EurekaClientOneApplication.class, args);
    }

}
(4)配置客户端名称及注册中心地址
spring:
  application:
    name: eureka-client
eureka:
  client:
    service-url:
      defaultZone: http://localhost:1111/eureka/
  instance:
    hostname: lcl-pc1

server:
  port: 8081
(5)启动eureka-client项目,出现以下日志,说明服务注册成功:

(6)重新访问http://localhost:1111/,可以发现,服务已经注册
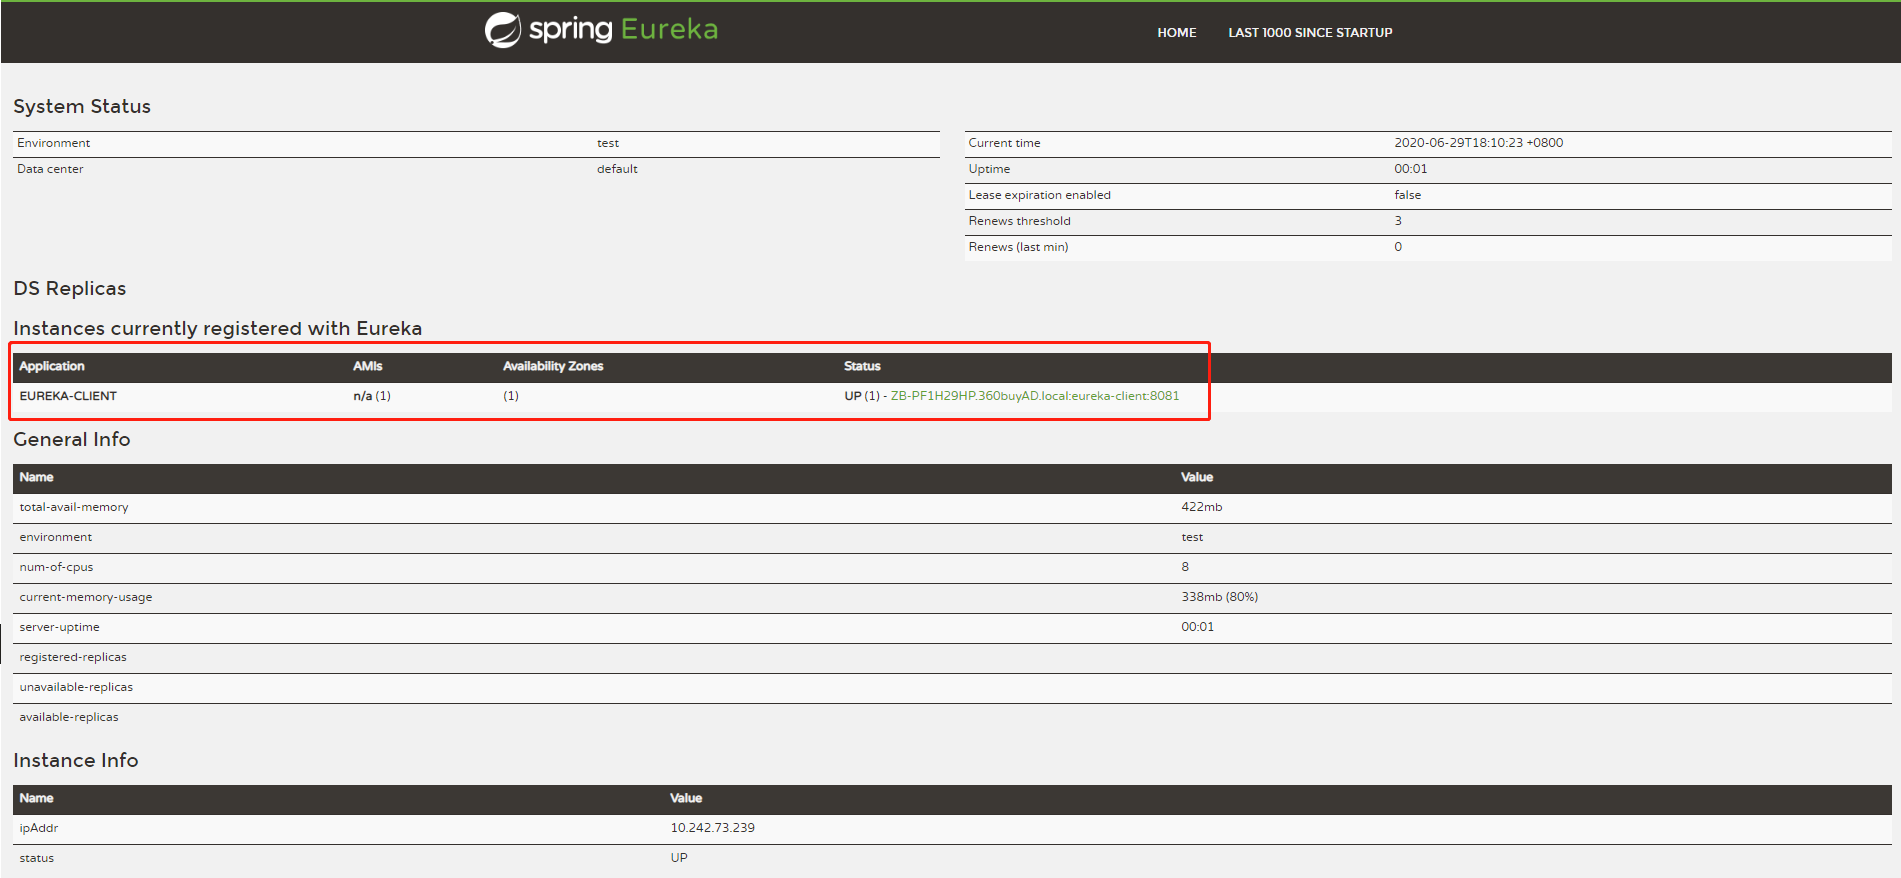
2、高可用注册中心服务注册
(1)只需要调整配置文件中注册中心地址和eureka.instance.hostname即可,多个注册中心使用逗号分隔
spring:
  application:
    name: eureka-client
eureka:
  client:
    service-url:
      defaultZone: http://localhost:1111/eureka/,http://localhost:1112/eureka/
  instance:
    hostname: lcl-pc2

server:
  port: 8081
(2)启动eureka-client-one项目,并重新访问注册中心:http://localhost:1111/
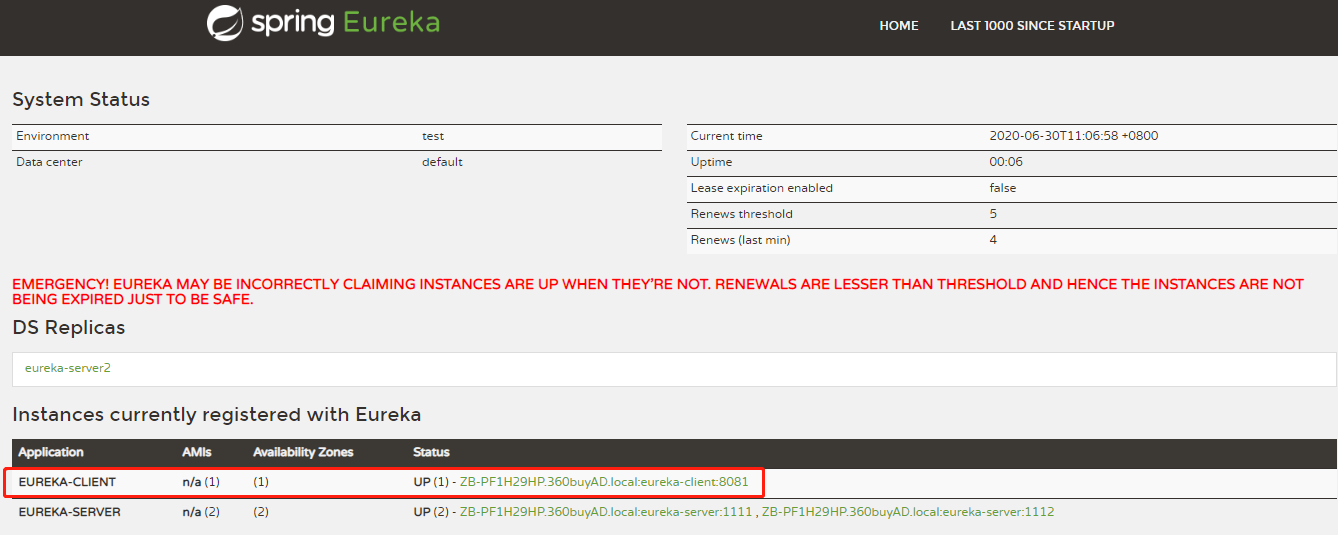
(3)如果我们不想使用主机名来定义注册中心的地址,也可以使用IP地址的形式,开启使用IP地址的形式,需要配置如下参数:
eureka.instance.eureka.instance.prefer-ip-address: true
3、服务发现与服务消费
(1)为了模拟多个服务提供者,根据项目eureka-client-one复制项目eureka-client-two,调整eureka-client-two的端口号为8082(此处主要是因为在本地执行,如果在linux服务器上执行,可以使用springboot的多环境部署),运行eureka-client-two项目,访问:http://localhost:1111/,可以发现两个项目均已注册。

(2)新建一个项目,用于消费该服务,需要依赖eureka-client和ribbon,整体pom文件如下:
<?xml version="1.0" encoding="UTF-8"?>
<project xmlns="http://maven.apache.org/POM/4.0.0" xmlns:xsi="http://www.w3.org/2001/XMLSchema-instance"
         xsi:schemaLocation="http://maven.apache.org/POM/4.0.0 https://maven.apache.org/xsd/maven-4.0.0.xsd">
    <modelVersion>4.0.0</modelVersion>
    <parent>
        <groupId>org.springframework.boot</groupId>
        <artifactId>spring-boot-starter-parent</artifactId>
        <version>2.3.1.RELEASE</version>
        <relativePath/> <!-- lookup parent from repository -->
    </parent>
    <groupId>com.example</groupId>
    <artifactId>spring-cloud-demo</artifactId>
    <version>0.0.1-SNAPSHOT</version>
    <name>spring-cloud-demo</name>
    <description>Demo project for Spring Boot</description>

    <properties>
        <java.version>1.8</java.version>
        <spring-cloud.version>Hoxton.SR6</spring-cloud.version>
    </properties>

    <dependencies>
        <dependency>
            <groupId>org.springframework.boot</groupId>
            <artifactId>spring-boot-starter-web</artifactId>
        </dependency>

        <dependency>
            <groupId>org.springframework.boot</groupId>
            <artifactId>spring-boot-starter-test</artifactId>
            <scope>test</scope>
            <exclusions>
                <exclusion>
                    <groupId>org.junit.vintage</groupId>
                    <artifactId>junit-vintage-engine</artifactId>
                </exclusion>
            </exclusions>
        </dependency>
        <dependency>
            <groupId>org.springframework.cloud</groupId>
            <artifactId>spring-cloud-starter-netflix-eureka-client</artifactId>
        </dependency>
        <dependency>
            <groupId>org.springframework.cloud</groupId>
            <artifactId>spring-cloud-starter-netflix-ribbon</artifactId>
        </dependency>
    </dependencies>
    <dependencyManagement>
        <dependencies>
            <dependency>
                <groupId>org.springframework.cloud</groupId>
                <artifactId>spring-cloud-dependencies</artifactId>
                <version>${spring-cloud.version}</version>
                <type>pom</type>
                <scope>import</scope>
            </dependency>
        </dependencies>
    </dependencyManagement>

    <build>
        <plugins>
            <plugin>
                <groupId>org.springframework.boot</groupId>
                <artifactId>spring-boot-maven-plugin</artifactId>
            </plugin>
        </plugins>
    </build>

</project>
(3)配置注册中心地址、项目端口号、项目名称等内容
server:
  port: 5551
spring:
  application:
    name: ribbon-concumer
eureka:
  client:
    service-url:
      defaultZone: http://localhost:1111/eureka/,http://localhost:1112/eureka/
(4)项目主函数添加@EnableDiscoveryClient,同时在主函数中创建RestTemplate实例,并使用@LoadBalanced开启客户端负载均衡
package com.example.spring.cloud.demo;

import org.springframework.boot.SpringApplication;
import org.springframework.boot.autoconfigure.SpringBootApplication;
import org.springframework.cloud.client.discovery.EnableDiscoveryClient;
import org.springframework.cloud.client.loadbalancer.LoadBalanced;
import org.springframework.context.annotation.Bean;
import org.springframework.web.client.RestTemplate;

@EnableDiscoveryClient
@SpringBootApplication
public class SpringCloudDemoApplication {

    @Bean
    @LoadBalanced
    RestTemplate restTemplate(){
        return new RestTemplate();
    }

    public static void main(String[] args) {
        SpringApplication.run(SpringCloudDemoApplication.class, args);
    }

}
(5)创建一个api类,该类中使用RestTemplate请求服务提供者
package com.example.spring.cloud.demo.api;

import org.springframework.beans.factory.annotation.Autowired;
import org.springframework.web.bind.annotation.GetMapping;
import org.springframework.web.bind.annotation.RequestMapping;
import org.springframework.web.bind.annotation.RestController;
import org.springframework.web.client.RestTemplate;

@RestController
@RequestMapping("/v1")
public class HelloApi {

    @Autowired
    RestTemplate restTemplate;

    @GetMapping("/helloConsumer")
    public String getStr(){
        return restTemplate.getForEntity("http://EUREKA-CLIENT/v1/hello",String.class).getBody();
    }
}
(6)由于在eureka-client的两个项目中,分别配置了eureka.instance.hostname为lcl1-pc1和lcl-pc2,因此需要设置host
127.0.0.1 lcl-pc1
127.0.0.1 lcl-pc2
(7)启动新项目,访问注册中心:http://localhost:1111/

可以发现新增加的项目也注册到注册中心上了
(8)访问新项目接口:http://localhost:5551/v1/helloConsumer,可以发现返回结果即是服务提供者的返回。
这里可以给两个eureka-client的hello方法加上日志输出,可以发现,调用新项目接口时,是轮询访问两个client项目的。
-----------------------------------------------------------
---------------------------------------------
朦胧的夜 留笔~~


 浙公网安备 33010602011771号