
常用模块
一、logging模块
参考1:egon老师
参考2:dahu的菜园子
参考3:RainSorrow的博客
1、简介
'''
logging模块是Python内置的标准模块,主要用于输出程序运行日志,可以设置输出日志的等级、保存路径、日志文件回滚等,相比print,具备如下优点:
     可以通过设置不同的日志等级,在release版本中只输出重要信息,而不必产生大量调试信息,利于快速定位bug
    print将所有信息输出到标准输出中,严重影响程序员从标准输出中查看其它数据,logging则可以自定义将日志输出到指定地方,以及怎么输出

日志级别:
    CRITICAL = 50 #FATAL = CRITICAL
    ERROR = 40
    WARNING = 30 #WARN = WARNING
    INFO = 20
    DEBUG = 10
    NOTSET = 0 #不设置
    默认日志级别为:WARNING 默认输出到终端
'''


import logging
logging.debug('this is debug log')
logging.info('this is info log')
logging.warning('this is warning log')
logging.error('this is error log')
logging.critical('this is critical log')


# 结果输出
WARNING:root:this is warning log
ERROR:root:this is error log
CRITICAL:root:this is critical log

# so  logging默认输出到终端,级别为warning
2、logging模块的使用
2.1、logging.basicConfig()初探
import logging
'''
logging.basicConfig()
可在logging.basicConfig()函数中通过具体参数来更改logging模块默认行为,可用参数有
filename:用指定的文件名创建FiledHandler,这样日志会被存储在指定的文件中。
filemode:文件打开方式,在指定了filename时使用这个参数,默认值为“a”还可指定为“w”。
format:指定handler使用的日志显示格式。
datefmt:指定日期时间格式。
level:设置日志级别
stream:用指定的stream创建StreamHandler。可以指定输出到sys.stderr,sys.stdout或者文件,默认为sys.stderr。若同时列出了filename和stream两个参数,则stream参数会被忽略。

format参数中可能用到的格式化串:
%(name)s Logger的名字
%(levelno)s 数字形式的日志级别
%(levelname)s 文本形式的日志级别
%(pathname)s 调用日志输出函数的模块的完整路径名,可能没有
%(filename)s 调用日志输出函数的模块的文件名
%(module)s 调用日志输出函数的模块名
%(funcName)s 调用日志输出函数的函数名
%(lineno)d 调用日志输出函数的语句所在的代码行
%(created)f 当前时间,用UNIX标准的表示时间的浮 点数表示
%(relativeCreated)d 输出日志信息时的,自Logger创建以 来的毫秒数
%(asctime)s 字符串形式的当前时间。默认格式是 “2003-07-08 16:49:45,896”。逗号后面的是毫秒
%(thread)d 线程ID。可能没有
%(threadName)s 线程名。可能没有
%(process)d 进程ID。可能没有
%(message)s用户输出的消息

'''
logging.basicConfig(
    filename='info.log',
    format='%(asctime)s-%(name)s-%(levelname)s-%(module)s:%(message)s',
    datefmt='%Y-%m-%d %X',
    level=10

)

logging.debug('debug log')
logging.info('info log')
logging.warning('warning log')
logging.error('error log')
logging.critical('critical log')

'''
输出结果:
2018-08-06 11:14:36-root-DEBUG-log:debug log
2018-08-06 11:14:36-root-INFO-log:info log
2018-08-06 11:14:36-root-WARNING-log:warning log
2018-08-06 11:14:36-root-ERROR-log:error log
2018-08-06 11:14:36-root-CRITICAL-log:critical log

'''
2.2、logging模块的四种对象(logger,filter,handler,format)
'''
logger:产生日志对象
filter:过滤日志对象
handler:接收日志然后控制打印到不同地方,FileHandler 打印到文件中  StreamHandler 打印到终端
formatter:可以定制不同的日志格式对象,然后绑定给不同的handler对象使用,以此来控制不同handler的日志格式
'''
import logging

# 1) logger对象产生日志
logger=logging.getLogger(__name__)      # Python文件作为模块被导入时,__name == '模块名'

# 2) filter过滤,不常用

# 3) handler对象需要与logger对象绑定,用来接收logger对象传过来的日志,控制打印到不同地方
fh=logging.FileHandler(filename='transaction.log',encoding='utf8')  # 打印到文件
sh=logging.StreamHandler()   # 打印到终端

# 4) formatter对象需要与handler对象绑定,用于控制handler对象的日志格式

formatter_file=logging.Formatter(            # 设置打印到文件的日志格式
    fmt='%(asctime)s - %(name)s - %(levelname)s -%(module)s:  %(message)s',
    datefmt='%Y-%m-%d %X'
)

formatter_stream=logging.Formatter(           # 设置打印到终端的日志格式
    fmt='%(asctime)s - %(levelname)s :  %(message)s',
    datefmt='%Y-%m-%d %X'
)

# 5)设置日志级别,logger和handler都要设置
logger.setLevel(10)    # logger对象设置为debug  即logger层全放行
fh.setLevel(40)        # 文件置为error
sh.setLevel(10)        # 终端设置为debug

# 6) 建立logger对象与handler对象的绑定关系
logger.addHandler(fh)
logger.addHandler(sh)

# 7) 建立handler对象与formatter对象的绑定关系
fh.setFormatter(formatter_file)
sh.setFormatter(formatter_stream)


# 执行logger对象产生日志
logger.debug('The fred witchdraw 一百万')
logger.error('The fred withdraw Fail')


'''
执行结果
终端
    2018-08-06 12:06:40 - DEBUG :  The fred witchdraw 一百万
    2018-08-06 12:06:40 - ERROR :  The fred withdraw Fail
    # 接收debug及以上的日志
文件
    2018-08-06 13:51:50 - __main__ - ERROR -log:  The fred withdraw Fail
    #只接收error及以上的日志
'''
2.3、TimedRotatingFileHandler 按时间切割日志
import logging
from logging.handlers import TimedRotatingFileHandler
import os
import time

logger = logging.getLogger(__name__)
logger.setLevel(logging.DEBUG)
file_handler = TimedRotatingFileHandler(os.path.join('log', 'tansaction.log'), when='s')
file_handler.setLevel(logging.DEBUG)
formatter = logging.Formatter(
    fmt='%(asctime)s - %(name)s - %(levelname)s -%(module)s:  %(message)s',
    datefmt='%Y-%m-%d %X'
)
logger.addHandler(file_handler)
file_handler.setFormatter(formatter)

logger.debug('This is debug log')
time.sleep(3)
logger.error('this is error log')

'''
结果:
d:\python_study_new\day6\log>tree /F /A
文件夹 PATH 列表
卷序列号为 9EE1-59A0
D:.
    tansaction.log
    tansaction.log.2018-08-06_14-15-25
'''

'''
TimedRotatingFileHandler  when的参数

Value        Type of interval
'S'            Seconds
'M'            Minutes
'H'            Hours
'D'            Days
'W'            Week day (0=Monday)
'midnight'    Roll over at midnight

when参数默认是“h”按小时分割,该参数对大小写不敏感,所以无所谓是H还是h了。

'''
2.4、RotatingFileHandler 按日志大小切割
import logging
from logging.handlers import RotatingFileHandler
import os
import time

logger = logging.getLogger(__name__)
logger.setLevel(logging.DEBUG)
file_handler = RotatingFileHandler(
    os.path.join('log', 'transaction.log'),
    maxBytes=1,  # 单个日志最大大小
    backupCount=2  # 切割日志的个数
)
file_handler.setLevel(logging.DEBUG)
formatter = logging.Formatter(
    fmt='%(asctime)s - %(name)s - %(levelname)s -%(module)s:  %(message)s',
    datefmt='%Y-%m-%d %X'
)
logger.addHandler(file_handler)
file_handler.setFormatter(formatter)

for k in range(10):
    logger.debug('this is a debug log %s' % k)

'''
执行结果:
d:\python_study_new\day6\log>tree /F /A
文件夹 PATH 列表
卷序列号为 9EE1-59A0
D:.
    transaction.log
    transaction.log.1
    transaction.log.2
日志只保留3份,
    transaction.log       # 最新的log
    transaction.log.2     # transaction.log之前的
    transaction.log.1     # transaction.log.2之前的

会在这个日志里循环写,新的内容覆盖老的

# 此方式的弊端:
    如果日志大小设置不合理,则新日志内容会覆盖老的日志内容,不利于查问题
# 优点:
    可以根据日志大小合理安排磁盘空间

'''
2.5、捕获traceback
import logging
from logging.handlers import TimedRotatingFileHandler
import os
import time

logger = logging.getLogger(__name__)
logger.setLevel(logging.DEBUG)
file_handler = TimedRotatingFileHandler(os.path.join('log', 'tansaction.log'), when='d')
file_handler.setLevel(logging.DEBUG)
formatter = logging.Formatter(
    fmt='%(asctime)s - %(name)s - %(levelname)s -%(module)s:  %(message)s',
    datefmt='%Y-%m-%d %X'
)
logger.addHandler(file_handler)
file_handler.setFormatter(formatter)

try:
    open('a.txt','rb')
except Exception as error:
    logger.error('open a.txt Faild',exc_info=True)

'''
日志内容:
2018-08-06 15:37:53 - __main__ - ERROR -day06:  open a.txt Faild
Traceback (most recent call last):
  File "D:/python_study_new/day6/day06.py", line 29, in <module>
    open('a.txt','rb')
FileNotFoundError: [Errno 2] No such file or directory: 'a.txt'

'''
3、通过配置文件导入logger配置
3.1 通过json文件配置
{
    "version":1,
    "disable_existing_loggers":false,
    "formatters":{
        "simple":{
            "format":"%(asctime)s - %(name)s - %(levelname)s - %(message)s"
        }
    },
    "handlers":{
        "console":{
            "class":"logging.StreamHandler",
            "level":"DEBUG",
            "formatter":"simple",
            "stream":"ext://sys.stdout"
        },
        "info_file_handler":{
            "class":"logging.handlers.TimedRotatingFileHandler",
            "level":"INFO",
            "formatter":"simple",
            "filename":"info.log",
            "when":"s"
        },
        "error_file_handler":{
            "class":"logging.handlers.TimedRotatingFileHandler",
            "level":"ERROR",
            "formatter":"simple",
            "filename":"error.log",
            "when":"s"
        }
    },
    "loggers":{
        "info_logger":{
            "level":"INFO",
            "handlers":["info_file_handler"],
            "propagate":"no"
        },
        "error_logger":{
            "level":"ERROR",
            "handlers":["error_file_handler"],
            "propagate":"no"
        }
    },
    "root":{
        "level":"INFO",
        "handlers":["console","info_file_handler","error_file_handler"]
    }
}
import json
import logging.config
import os
import time

base_dir = os.path.dirname(__file__)
json_config = os.path.join(base_dir, 'logger_json.json')


def setup_logging(default_path=json_config, default_level=logging.INFO, env_key="LOG_CFG"):
    path = default_path
    value = os.getenv(env_key, None)
    if value:
        path = value
    if os.path.exists(path):
        with open(path, 'rt', encoding='utf8') as f:
            config = json.load(f)
            logging.config.dictConfig(config)
    else:
        logging.basicConfig(level=default_level)


def func(msg1,msg2):
    logging.info(msg1)
    logging.error(msg2)
    time.sleep(3)
    logging.error(msg2)


if __name__ == '__main__':
    setup_logging()
    func('this is info log', 'this is a error log')
3.2 通过yaml文件配置
需要安装pyyaml模块
pip3.6 install pyyaml -i http://mirrors.aliyun.com/pypi/simple/ --trusted-host mirrors.aliyun.com
version: 1
disable_existing_loggers: False
formatters:
        simple:
            format: "%(asctime)s - %(name)s - %(levelname)s - %(message)s"
handlers:
    console:
            class: logging.StreamHandler
            level: DEBUG
            formatter: simple
            stream: ext://sys.stdout
    info_file_handler:
            class: logging.handlers.TimedRotatingFileHandler
            level: INFO
            formatter: simple
            filename: info.log
            when: s


    error_file_handler:
            class: logging.handlers.TimedRotatingFileHandler
            level: ERROR
            formatter: simple
            filename: errors.log
            when: s
loggers:
    error_file_module:
            level: ERROR
            handlers: [info_file_handler]
            propagate: no
root:
    level: INFO
    handlers: [console,info_file_handler,error_file_handler]
 1 import yaml
 2 import logging.config
 3 import os
 4 import time
 5
 6 base_dir = os.path.dirname(__file__)
 7 json_config = os.path.join(base_dir, 'logger_yaml')
 8
 9
10 def setup_logging(default_path=json_config, default_level=logging.INFO, env_key="LOG_CFG"):
11     path = default_path
12     value = os.getenv(env_key, None)
13     if value:
14         path = value
15     if os.path.exists(path):
16         with open(path, 'rt', encoding='utf8') as f:
17             config = yaml.load(f)
18             logging.config.dictConfig(config)
19     else:
20         logging.basicConfig(level=default_level)
21
22
23 def func(msg1, msg2):
24     logging.info(msg1)
25     logging.error(msg2)
26     time.sleep(3)
27     logging.error(msg2)
28
29
30 if __name__ == '__main__':
31     setup_logging()
32     func('this is info log', 'this is a error log')
3.3 通过自定义配置文件
"""
logging配置
"""

import os
import logging.config


# 定义三种日志输出格式 开始

standard_format = '[%(asctime)s][%(threadName)s:%(thread)d][task_id:%(name)s][%(filename)s:%(lineno)d]' \
                  '[%(levelname)s][%(message)s]'  # 其中name为getlogger指定的名字

simple_format = '[%(levelname)s][%(asctime)s][%(filename)s:%(lineno)d]%(message)s'

id_simple_format = '[%(levelname)s][%(asctime)s] %(message)s'

# 定义日志输出格式 结束

logfile_dir = os.path.join(os.path.dirname(__file__),'log')  # log文件的目录


logfile_name = 'tansaction.log'  # log文件名

# 如果不存在定义的日志目录就创建一个
if not os.path.isdir(logfile_dir):
    os.mkdir(logfile_dir)

# log文件的全路径
logfile_path = os.path.join(logfile_dir, logfile_name)

# log配置字典
LOGGING_DIC = {
    'version': 1,
    # 不覆盖之前的logger
    'disable_existing_loggers': False,
    'formatters': {
        'standard': {
            'format': standard_format
        },
        'simple': {
            'format': simple_format
        },
    },
    'filters': {},
    'handlers': {
        #打印到终端的日志
        'console': {
            'level': 'DEBUG',
            'class': 'logging.StreamHandler',  # 打印到屏幕
            'formatter': 'simple'
        },
        #打印到文件的日志,收集info及以上的日志
        'default': {
            'level': 'DEBUG',
            'class': 'logging.handlers.RotatingFileHandler',  # 保存到文件
            'formatter': 'standard',
            'filename': logfile_path,  # 日志文件
            'maxBytes': 1024*1024*5,  # 日志大小 5M
            'backupCount': 5,
            'encoding': 'utf-8',  # 日志文件的编码,再也不用担心中文log乱码了
        },

    },
    'loggers': {
        #logging.getLogger(__name__)拿到的logger配置或者程序自己去指定,当前key为空
        # 所有业务共用一份日志配置,这就是空key的效果,相当于全局配置
        '': {
            'handlers': ['default', 'console'],  # 这里把上面定义的两个handler都加上,即log数据既写入文件又打印到屏幕
            'level': 'DEBUG',
            'propagate': True,  # 向上(更高level的logger)传递
        },
    },
}
import logging.config

from day6 import my_logging

config=my_logging.LOGGING_DIC

def load_my_logging_cfg():
    logging.config.dictConfig(config)  # 导入上面定义的logging配置
    logger = logging.getLogger(__name__)  # 生成一个log实例
    logger.info('It works!')  # 记录该文件的运行状态

if __name__ == '__main__':
    load_my_logging_cfg()
二、re模块
'''
什么是正则
    正则就是用一些具有特殊含义的符号组合到一起(即正则表达式)来描述字符或者字符串的方法
    或者说,正则就是用来描述一类事物的规则
    在Python中它是内置的,通过re模块来实现,正则表达式模式被编译成一系列的字节码,然后用C编写的匹配引擎执行

'''
import re

'''
^    匹配字符串的开头
$    匹配字符串的末尾。
.    匹配任意字符,除了换行符,当re.DOTALL标记被指定时,则可以匹配包括换行符的任意字符。
[...]    用来表示一组字符,单独列出:[amk] 匹配 'a','m'或'k'
[^...]    不在[]中的字符:[^abc] 匹配除了a,b,c之外的字符。
re*    匹配0个或多个的表达式。
re+    匹配1个或多个的表达式。
re?    匹配0个或1个由前面的正则表达式定义的片段,非贪婪方式
re{ n}    匹配n个前面表达式。例如,"o{2}"不能匹配"Bob"中的"o",但是能匹配"food"中的两个o。
re{ n,}    精确匹配n个前面表达式。例如,"o{2,}"不能匹配"Bob"中的"o",但能匹配"foooood"中的所有o。"o{1,}"等价于"o+"。"o{0,}"则等价于"o*"。
re{ n, m}    匹配 n 到 m 次由前面的正则表达式定义的片段,贪婪方式
a| b    匹配a或b
(re)    G匹配括号内的表达式,也表示一个组
(?imx)    正则表达式包含三种可选标志:i, m, 或 x 。只影响括号中的区域。
(?-imx)    正则表达式关闭 i, m, 或 x 可选标志。只影响括号中的区域。
(?: re)    类似 (...), 但是不表示一个组
(?imx: re)    在括号中使用i, m, 或 x 可选标志
(?-imx: re)    在括号中不使用i, m, 或 x 可选标志
(?#...)    注释.
(?= re)    前向肯定界定符。如果所含正则表达式,以 ... 表示,在当前位置成功匹配时成功,否则失败。但一旦所含表达式已经尝试,匹配引擎根本没有提高;模式的剩余部分还要尝试界定符的右边。
(?! re)    前向否定界定符。与肯定界定符相反;当所含表达式不能在字符串当前位置匹配时成功。
(?> re)    匹配的独立模式,省去回溯。
\w    匹配数字字母下划线
\W    匹配非数字字母下划线
\s    匹配任意空白字符,等价于 [\t\n\r\f]。
\S    匹配任意非空字符
\d    匹配任意数字,等价于 [0-9]。
\D    匹配任意非数字
\A    匹配字符串开始
\Z    匹配字符串结束,如果是存在换行,只匹配到换行前的结束字符串。
\z    匹配字符串结束
\G    匹配最后匹配完成的位置。
\b    匹配一个单词边界,也就是指单词和空格间的位置。例如, 'er\b' 可以匹配"never" 中的 'er',但不能匹配 "verb" 中的 'er'。
\B    匹配非单词边界。'er\B' 能匹配 "verb" 中的 'er',但不能匹配 "never" 中的 'er'。
\n, \t, 等。    匹配一个换行符。匹配一个制表符, 等
\1...\9    匹配第n个分组的内容。
\10    匹配第n个分组的内容,如果它经匹配。否则指的是八进制字符码的表达式。
'''


s='root :x:0 :0:root:/root:/bin/bash'

# \w 与 \W
print(re.findall('\W',s))    # 匹配非数字字母下划线
print(re.findall('\w',s))    # 匹配数字字母下划线
'''
结果对比:
[':', ':', ':', ':', ':', '/', ':', '/', '/']
['r', 'o', 'o', 't', 'x', '0', '0', 'r', 'o', 'o', 't', 'r', 'o', 'o', 't', 'b', 'i', 'n', 'b', 'a', 's', 'h']
'''

# \s 与 \S

print(re.findall('\s',s))    # 匹配任意空白字符,等价于 [\t\n\r\f]
print(re.findall('\S',s))    # 匹配任意非空字符

'''
结果对比
[' ', ' ']
['r', 'o', 'o', 't', ':', 'x', ':', '0', ':', '0', ':', 'r', 'o', 'o', 't', ':', '/', 'r', 'o', 'o', 't', ':', '/', 'b', 'i', 'n', '/', 'b', 'a', 's', 'h']
'''

# \d 与 \D
print(re.findall('\d',s))   # 匹配任意数字,等价于0-9
print(re.findall('\D',s))   # 匹配任意非数字

'''
结果对比:
['0', '0']
['r', 'o', 'o', 't', ' ', ':', 'x', ':', ' ', ':', ':', 'r', 'o', 'o', 't', ':', '/', 'r', 'o', 'o', 't', ':', '/', 'b', 'i', 'n', '/', 'b', 'a', 's', 'h']
'''

# \A 与 \Z

# \A 匹配以指定字符开头的字符串
l1=['root ', 'x', '0 ', '0', 'root', '/root', '/bin/bash']

a1=[]
for i in l1:
    if re.findall('\Aroot',i):       # 以root开头的字符串,等价于^
        a1.append(i)
print(a1)
'''
执行结果:
['root ', 'root']        # /root 没有匹配到
'''
# \Z   匹配字符串结束,如果是存在换行,只匹配到换行前的结束字符串
b1=[]
for i in l1:
    if re.findall('root\Z',i):   # 以root结尾的,等价于$
        b1.append(i)
print(b1)

'''
执行结果:
['root', '/root']      # 第一个root没有被匹配到,因为它后面还有一个空格(root )
'''

# .匹配除了换行符以外的任意单个字符
s1='root :x:0 :0:root:/root:/bin/bash:boon,bon'
print(re.findall('b.n',s1))    # 匹配b和n之间任意单个字符
'''
执行结果:
['bin', 'bon']      # boon没被匹配出来,因为boon中间中间隔了2个字符
'''

# []匹配指定范围的任意一个字符
print(re.findall('\d[-+*/]\d','1+3 a1!3sdf 2*3 1/4 2-3 aadsf hello'))   # 匹配数字中间有-+*/的字符串
'''
['1+3', '2*3', '1/4', '2-3']
'''
print(re.findall('a[0-9]c','a1c a2c a11c abc a*c a9c'))     # 匹配ac中间有一个数字的字符串
'''
['a1c', 'a2c', 'a9c']
'''
print(re.findall('a[0-9][0-9]c','a1c a2c a11c abc a*c a9c'))   # 匹配ac中间有两个数字的字符串
'''
['a11c']
'''
print(re.findall('a[a-z]c','a1c aAc a2c acc aec a11c abc a*c a9c'))   # 匹配ac中间有一个小写字母的字符串
'''
['acc', 'aec', 'abc']
'''

print(re.findall('a[A-Z]c','a1c aAc a2c acc aec a11c abc a*c a9c'))   # 匹配ac中间有一个大写字母的字符串

'''
['aAc']
'''
print(re.findall('a[A-Za-z]c','a1c aAc a2c acc aec a11c abc a*c a9c')) # 匹配ac中有个大写或小写字母的字符串
'''
['aAc', 'acc', 'aec', 'abc']
'''
print(re.findall('a[^1*-]b','a1b a*b a-b a=b')) #[]内的^代表的意思是取反,所以结果为['a=b']
'''
['a=b']
'''
# 重复匹配

# ?左边那一个字符出现0次或者1次
print(re.findall('root?','root rootttt,rooot,roooot'))
print(re.findall('root{0,1}', 'root rootttt,rooot,roooot'))
'''
['root', 'root', 'roo', 'roo']
'''

# *左边那一个字符出现0次或者无穷次,如果没有可以凑合,但如果>1个,有多少取多少
print(re.findall('root*','root rootttt,rooot,roooot'))
print(re.findall('root{0,}','root rootttt,rooot,roooot'))
'''
['root', 'rootttt', 'roo', 'roo']    rooottttt 就是*的作用
'''
print(re.findall('root{0}','root rootttt,rooot,roooot'))
'''
['roo', 'roo', 'roo', 'roo']    只匹配t出现0次的
'''
# +左边那一个字符出现1次或者无穷次,至少要有一个,但如果有>1个,有多少就必须拿多少
print(re.findall('root+','root rootttt,rooot,roooot'))
print(re.findall('root{1,}','root rootttt,rooot,roooot'))
'''
['root', 'rootttt']      # rooottttt没有被匹配到,因为root至少要出现一次
'''
print(re.findall('root{1}','root rootttt,rooot,roooot'))
'''
['root', 'root']      # root只出现一次
'''

# {n,m}左边那一个字符出现n次到m次,至少要有n个,但如果有>n个,就拿<=m个
print(re.findall('root{2,5}','root rootttt,rooot,roooot'))
'''
['rootttt']           # 至少要出现2次
'''

# .* 匹配0个或无穷个任意字符,默认是贪婪匹配
print(re.findall('a.*c','helloac a123lllc4a567+-1c fred'))
'''
['ac a123lllc4a567+-1c']
'''

# .*?匹配0个或无穷个任意字符,非贪婪匹配
print(re.findall('a.*?c','helloac a123lllc4a567+-1c a2c fred'))
'''
['ac', 'a123lllc', 'a567+-1c', 'a2c']
'''

# () 分组
print(re.findall('href="(.*?)"','<div class="div1"><a href="https://www.baidu.com">点我啊</a></div><div class="div1"><a href="https://www.python.org">点我啊</a></div>'))
print(re.findall('href=".*?"','<div class="div1"><a href="https://www.baidu.com">点我啊</a></div><div class="div1"><a href="https://www.python.org">点我啊</a></div>'))

'''
分组与未分组对比:
['https://www.baidu.com', 'https://www.python.org']    只取组内的内容
['href="https://www.baidu.com"', 'href="https://www.python.org"']
'''
三、random模块
import random
'''
查看random模块的帮助信息
print(random.__doc__)
help(random)

'''

print(random.random())  # 大于0且小于1的随机浮点数
print(random.randint(1, 3))  # 大于等于1且小于等于3的随机整数[顾头顾尾]
print(random.randrange(1, 3))  # 大于等于1且小于3的随机整数[顾头不顾尾]
print(random.choice([1, 'a', [4, 6]]))  # 1 或者 a 或者[4,6]
print(random.sample([1, 'a', [4, 6]], 2))  # 列表与元素任意两个组合
print(random.uniform(2, 5))  # 大于2且小于5的的随机浮点数

item = [1, 5, 7, 9, 'a', 'b']
random.shuffle(item)  # 随机打乱item的顺序
print(item)
import random

def make_code(n=5):
    res = ''
    for i in range(n):
        num = str(random.randint(0, 9))     # 随机数字
        s1 = chr(random.randint(65, 90))    # 随机大写字母
        s2 = chr(random.randint(97, 122))   # 随机小写字母
        s3 = chr(random.randint(33, 47))    # !"#$%&'()*+,-./
        s4 = chr(random.randint(123, 126))  # {|}~
        res += random.choice([num, s1, s2, s3, s4])
    return res

'''
chr() 用一个范围在 range(256)内的(就是0~255)整数作参数,返回一个ASCII码表中对应的字符
'''

print(make_code(10))
四、hashlib模块
'''
什么是hansh
    hash一种算法,3.x里代替了md5模块和sha模块,主要提供 SHA1, SHA224, SHA256, SHA384, SHA512 ,MD5 算法),该算法接受传入的内容,经过运算得到一串hash值

hash值的特点
    只要传入的内容一样,得到的hash值必然一样
    不能由hash值反解成内容
    只要使用的hash算法不变,无论校验内容有多大,得到的hash值长度是固定的

为何要用hash
    用来做文件完整性校验
    可以对密码进行加密
'''
import hashlib

m = hashlib.md5()
m1 = hashlib.md5()

with open('fred_li-shopping_cart-master.zip','rb') as f:
    m1.update(f.read())
    print(m1.hexdigest())

with open('fred_li-shopping_cart-master.zip', 'rb') as f1:
    for line in f1:
        m.update(line)
    print(m.hexdigest())

'''
PS:
    把一段很长的数据update多次,与一次update这段长数据,得到的结果一样
    但update多次为校验大文件提供了可能
'''
以上加密算法虽然依然非常厉害,但时候存在缺陷,即:通过撞库可以反解。所以,有必要对加密算法中添加自定义key再来做加密。
import hashlib

m1=hashlib.md5('24e5917c'.encode('utf8'))

passwd='c-&L)/unN2'

m1.update(passwd.encode('utf8'))
print(m1.hexdigest())

# 这种做法,服务端和客户端必须要用相同key
python 还有一个 hmac 模块,它内部对我们创建 key 和 内容 进行进一步的处理然后再加密
import hmac
h = hmac.new('alvin'.encode('utf8'))
h.update('hello'.encode('utf8'))
print (h.hexdigest())#320df9832eab4c038b6c1d7ed73a5940
五、json与 pickle模块
'''
什么是序列化
    序列化:将内存中的数据类型序列化成一种中间格式然后存储到文件中或者基于网络发送
    反序列化:将文件中或基于网络发送过来的数据转换成应用程序中的数据类型

为何要序列化
    数据类型的持久化
    数据跨平台交互

如何序列化
    json:
        优点:所有编程语言都可以识别的中间格式
        缺点:无法识别Python所有数据类型(json格式里全部都为双引号)
    pickle:
        优点:可以识别Python所有数据类型
        缺点:只能在Python内使用,不能跨平台

'''
1、json
import json

info = {
    'name': 'fred',
    'age': 18,
    'sex': None,
    'is_work': True,
}

info_json = json.dumps(info)             # 将Python中的字典类型序列化成json格式
print(info)
print(info_json)
'''
{'name': 'fred', 'age': 18, 'sex': None, 'is_work': True}
{"name": "fred", "age": 18, "sex": null, "is_work": true}   # json中全是双引号,None变为null,True变为true
'''


print(json.loads(info_json, encoding='utf8'))     # loads反序列化
'''
{'name': 'fred', 'age': 18, 'sex': None, 'is_work': True}
'''
import json

info = {
    'name': 'fred',
    'age': 26,
    'sex': None,
    'is_work': True,
}

with open('info.txt', 'wt', encoding='utf8') as f:
    json.dump(info, f)  # 将Python数据类型序列成json格式,然后写入文件中

with open('info.txt', 'rt', encoding='utf8') as f1:
    data = json.load(f1)  # 反序列化文件内容
    print(data)
2、 pickle
import pickle

info = {
    'name': 'fred',
    'age': 26,
    'sex': None,
    'is_work': True,
}

info_pickle=pickle.dumps(info)            # pickle.dumps() 将Python数据类型序列化成pickle格式的数据(以Bytes类型存储)
print(info_pickle)
print(info)
'''
b'\x80\x03}q\x00(X\x04\x00\x00\x00nameq\x01X\x04\x00\x00\x00fredq\x02X\x03\x00\x00\x00ageq\x03K\x1aX\x03\x00\x00\x00sexq\x04NX\x07\x00\x00\x00is_workq\x05\x88u.'
{'name': 'fred', 'age': 26, 'sex': None, 'is_work': True}
'''

print(pickle.loads(info_pickle))          # pickle.loads() 反序列化pickle格式的数据
'''
{'name': 'fred', 'age': 26, 'sex': None, 'is_work': True}
'''
import pickle

info = {
    'name': 'fred',
    'age': 26,
    'sex': None,
    'is_work': True,
}

with open('info', 'wb') as f:       # 以b模式写
    pickle.dump(info, f)            # pickle.dump() 将Python数据类型序列化成pickle格式的数据,并写入文件

with open('info', 'rb') as f1:      # 以b模式打开
    date = pickle.load(f1)          # pickle.load() 反序列化文件内容
    print(date)
六、time与datetime模块
''''
在Python中,通常有这几种方式表示时间:
    时间戳(timestamp):通常来说,时间戳表示的是1970年1月1日00:00:00开始按秒计算的偏移量运行“type(time.time())”,返回的是float类型
    格式化的时间字符串(Format String)
    结构化的时间(struct_time):struct_time元组共有9个元素共九个元素:(年,月,日,时,分,秒,一年中第几周,一年中第几天,夏令时)
'''

import time
print(time.time())             # 时间戳
print(time.strftime("%Y-%m-%d %X"))  # 格式化的时间字符串
print(time.localtime())        # 本地时区的struct_time
print(time.gmtime())       # UTC时区的struct_time
%a    Locale’s abbreviated weekday name.
%A    Locale’s full weekday name.
%b    Locale’s abbreviated month name.
%B    Locale’s full month name.
%c    Locale’s appropriate date and time representation.
%d    Day of the month as a decimal number [01,31].
%H    Hour (24-hour clock) as a decimal number [00,23].
%I    Hour (12-hour clock) as a decimal number [01,12].
%j    Day of the year as a decimal number [001,366].
%m    Month as a decimal number [01,12].
%M    Minute as a decimal number [00,59].
%p    Locale’s equivalent of either AM or PM.    (1)
%S    Second as a decimal number [00,61].    (2)
%U    Week number of the year (Sunday as the first day of the week) as a decimal number [00,53]. All days in a new year preceding the first Sunday are considered to be in week 0.    (3)
%w    Weekday as a decimal number [0(Sunday),6].
%W    Week number of the year (Monday as the first day of the week) as a decimal number [00,53]. All days in a new year preceding the first Monday are considered to be in week 0.    (3)
%x    Locale’s appropriate date representation.
%X    Locale’s appropriate time representation.
%y    Year without century as a decimal number [00,99].
%Y    Year with century as a decimal number.
%z    Time zone offset indicating a positive or negative time difference from UTC/GMT of the form +HHMM or -HHMM, where H represents decimal hour digits and M represents decimal minute digits [-23:59, +23:59].
%Z    Time zone name (no characters if no time zone exists).
%%    A literal '%' character.
#时间加减
import datetime

# print(datetime.datetime.now()) #返回 2016-08-19 12:47:03.941925
#print(datetime.date.fromtimestamp(time.time()) )  # 时间戳直接转成日期格式 2016-08-19
# print(datetime.datetime.now() )
# print(datetime.datetime.now() + datetime.timedelta(3)) #当前时间+3天
# print(datetime.datetime.now() + datetime.timedelta(-3)) #当前时间-3天
# print(datetime.datetime.now() + datetime.timedelta(hours=3)) #当前时间+3小时
# print(datetime.datetime.now() + datetime.timedelta(minutes=30)) #当前时间+30分


#
# c_time  = datetime.datetime.now()
# print(c_time.replace(minute=3,hour=2)) #时间替换
七、subprocess模块
'''
subprocess模块:
    执行系统命令

与os.system('command')的区别
    os.system()是由父进程直接执行,并将结果打印到屏幕
    subprocess是fork一个子进程,由这个子进程运行系统命令,父进程可以通过管道获取命令执行的结果
'''

import subprocess

# 实例化出一个对象,用来执行系统命令
obj=subprocess.Popen(
    # 'netstat -an |findstr 80',
    'ping www.baidu.com',
    shell=True,
    stdout=subprocess.PIPE,
    stderr=subprocess.PIPE
)

'''
subprocess.Popen()参数解释:
'command'  字符串形式的系统命令
shell=True 如果shell为True,那么指定的命令将通过shell真系那个。如果我们需要访问某些shell的特性,如管道、文件名通配符、环境变量扩展功能,这将是非常有用的
stdout:命令的正确输出
stderr:命令的错误输出
run()函数默认不会捕获命令执行结果的正常输出和错误输出,如果我们向获取这些内容需要传递subprocess.PIPE,然后可以通过返回的CompletedProcess类实例的stdout和stderr属性或捕获相应的内容

'''
print(obj)

stdout=obj.stdout.read()      #obj.stdout.read()的结果是bytes类型
print(stdout)
print(stdout.decode('gbk'))   # 因为此处执行的是Windows的系统命令,所以用gbk解码
# 注意:
    # stdout和stderr都只能读取一次,再读就空了
    # 如果子进程还没执行完系统命令,而父进程已经结束了,此时管道中是没有结果的
八、os模块(与操作系统交互)
os.getcwd() 获取当前工作目录,即当前python脚本工作的目录路径
os.chdir("dirname")  改变当前脚本工作目录;相当于shell下cd
os.curdir  返回当前目录: ('.')
os.pardir  获取当前目录的父目录字符串名:('..')
os.makedirs('dirname1/dirname2')    可生成多层递归目录
os.removedirs('dirname1')    若目录为空,则删除,并递归到上一级目录,如若也为空,则删除,依此类推
os.mkdir('dirname')    生成单级目录;相当于shell中mkdir dirname
os.rmdir('dirname')    删除单级空目录,若目录不为空则无法删除,报错;相当于shell中rmdir dirname
os.listdir('dirname')    列出指定目录下的所有文件和子目录,包括隐藏文件,并以列表方式打印
os.remove()  删除一个文件
os.rename("oldname","newname")  重命名文件/目录
os.stat('path/filename')  获取文件/目录信息
os.sep    输出操作系统特定的路径分隔符,win下为"\\",Linux下为"/"
os.linesep    输出当前平台使用的行终止符,win下为"\t\n",Linux下为"\n"
os.pathsep    输出用于分割文件路径的字符串 win下为;,Linux下为:
os.name    输出字符串指示当前使用平台。win->'nt'; Linux->'posix'
os.system("bash command")  运行shell命令,直接显示
os.environ  获取系统环境变量
os.path.abspath(path)  返回path规范化的绝对路径
os.path.split(path)  将path分割成目录和文件名二元组返回
os.path.dirname(path)  返回path的目录。其实就是os.path.split(path)的第一个元素
os.path.basename(path)  返回path最后的文件名。如何path以/或\结尾,那么就会返回空值。即os.path.split(path)的第二个元素
os.path.exists(path)  如果path存在,返回True;如果path不存在,返回False
os.path.isabs(path)  如果path是绝对路径,返回True
os.path.isfile(path)  如果path是一个存在的文件,返回True。否则返回False
os.path.isdir(path)  如果path是一个存在的目录,则返回True。否则返回False
os.path.join(path1[, path2[, ...]])  将多个路径组合后返回,第一个绝对路径之前的参数将被忽略
os.path.getatime(path)  返回path所指向的文件或者目录的最后存取时间
os.path.getmtime(path)  返回path所指向的文件或者目录的最后修改时间
os.path.getsize(path) 返回path的大小
import os

# 获取当前路径
print(os.path.dirname(__file__))
# python3 获取cpu核心数

import os
print(os.cpu_count())
# python2 获取cpu核心数
# coding:utf-8

import psutil
print(psutil.cpu_count())
九、sys模块
# sys.argv           命令行参数List,第一个元素是程序本身路径
# sys.exit(n)        退出程序,正常退出时exit(0)
# sys.version        获取Python解释程序的版本信息
# sys.maxint         最大的Int值
# sys.path           返回模块的搜索路径,初始化时使用PYTHONPATH环境变量的值
# sys.platform       返回操作系统平台名称
import sys


def humanbytes(B):
    'Return the given bytes as a human friendly KB, MB, GB, or TB string'
    B = float(B)
    KB = float(1024)
    MB = float(KB ** 2)  # 1048576
    GB = float(KB ** 3)  # 1073741824
    TB = float(KB ** 4)  # 1099511627776

    if B < KB:
        return '{0} {1}'.format(B, 'Bytes')
    elif KB <= B < MB:
        # 0:整数位   2f:小数位 ,不四舍五入
        return '{0:.2f} KB'.format(B / KB)  #
    elif MB <= B < GB:
        return '{0:.2f} MB'.format(B / MB)
    elif GB <= B < TB:
        return '{0:.2f} GB'.format(B / GB)
    elif TB <= B:
        return '{0:.2f} TB'.format(B / TB)


def progres(num, Sum):
    """
    显示上传进度条
    num:已上传大小
    Sum:文件总大小
    #l:定义进度条大小
    """
    bar_length = 50  # 定义进度条大小
    percent = float(num) / float(Sum)
    hashes = '=' * int(percent * bar_length)  # 定义进度显示的数量长度百分比
    spaces = ' ' * (bar_length - len(hashes))  # 定义空格的数量=总长度-显示长度

    sys.stdout.write(
        "\r传输中: [%s] %d%%  %s/%s " % (hashes + spaces, percent * 100, humanbytes(num), humanbytes(Sum)))  # 输出显示进度条
    # %d%%  %d是能传数字 %%:第二个%号代表取消第一个%的特殊意义
    sys.stdout.flush()  # 强制刷新到屏幕


progres(45, 1025)
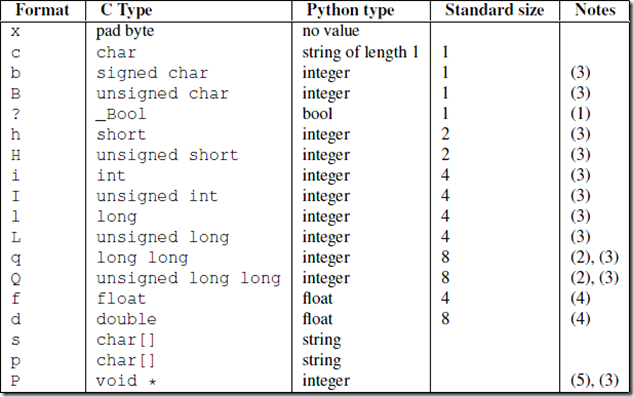
十、struct模块
''''
struct
    1、按照指定格式将Python数据转换为字符串,该字符串为字节流,如网络传输时,不能传输int,此时先将int转化为字节流,然后再发送;
    2、按照指定格式将字节流转换为Python指定的数据类型;
    3、处理二进制数据,如果用struct来处理文件的话,需要用’wb’,’rb’以二进制(字节流)写,读的方式来处理文件;
    4、处理c语言中的结构体
在socket编程中,可以使用struct将整型数据打包成固定长度的bytes类型,基于网络传输
'''
import struct

# 打包
res=struct.pack('i',1234567890)      # fmt=i是格式符   将后面的的整型数据打包成4个bytes   i最多能打包10位的整型数据
print(res,type(res),len(res))

res1=struct.pack('q',1234567890123456789)   # fmt=q是格式符  将后面的的整型数据打包成8个bytes   q最多能打包19位整型数据
print(res1,type(res1),len(res1))

# 解包

data=struct.unpack('i',res)          # 注意:解包要遵循,打包时使用的格式符进行解包  比如 打包时使用i,解包也得使用i
print(data[0])

data1=struct.unpack('q',res1)
struct格式符
十一、urllib模块
'''
Urllib库是Python中的一个功能强大、用于操作URL,并在做爬虫的时候经常要用到的库。
在Python2.x中,分为Urllib库和Urllin2库,
Python3.x之后都合并到Urllib库中,使用方法稍有不同。
'''
'''
Py2.x:
    Urllib库
    Urllin2库
Py3.x:
    Urllib库
变化:

在Pytho2.x中使用import urllib2——-对应的,在Python3.x中会使用import urllib.request,urllib.error。
在Pytho2.x中使用import urllib——-对应的,在Python3.x中会使用import urllib.request,urllib.error,urllib.parse。
在Pytho2.x中使用import urlparse——-对应的,在Python3.x中会使用import urllib.parse。
在Pytho2.x中使用import urlopen——-对应的,在Python3.x中会使用import urllib.request.urlopen。
在Pytho2.x中使用import urlencode——-对应的,在Python3.x中会使用import urllib.parse.urlencode。
在Pytho2.x中使用import urllib.quote——-对应的,在Python3.x中会使用import urllib.request.quote。
在Pytho2.x中使用cookielib.CookieJar——-对应的,在Python3.x中会使用http.CookieJar。
在Pytho2.x中使用urllib2.Request——-对应的,在Python3.x中会使用urllib.request.Request
'''
get方法:
def UrlPush(Url, type):
    '''
    :param Url: 需要刷新的url
    :param type: 目录(type=0) URL (type=1)
    :return:
    '''
    global Captcha
    base_url = 'url'
    data_dic = {
        'captcha': Captcha,
        'url': Url,
        'type': type,
    }

    # 编码成url参数
    parse_string = parse.urlencode(data_dic)

    # 拼接(api+参数)
    new_url = base_url + "?" + parse_string
    try:
        # get方式请求
        response = request.urlopen(new_url)

        # 使用xmltodict读取接口返回的xml数据
        xml_response = xmltodict.parse(response.read().decode('gbk'))

        # 将xml转成json数据
        json_response = json.dumps(xml_response)

        # json数据转成字典格式
        res_dic = json.loads(json_response)

        res = {
            'code': res_dic['ccsc']['code'],
            'patchId': res_dic['ccsc']['patchId'],
            'result': res_dic['ccsc']['result'],
            'detail': res_dic['ccsc']['detail']
        }
        return res
    except Exception as e:
        print(e)
        sys.exit(2)
get方式访问远端接口
def notice(key, host, msg):
    md5key = sign(key, (msg))
    msg = quote(msg)  # quote可以将中文字符串转换成百分号编码模式,这样就可以encode成ASCII  中文字符无法编码成ASCII码
    # %E5%BF%AB%E7%BB%9C%E8%81%94%E7%9B%9F%E6%A3%8B%E7%89%8C%E6%B5%8B%E8%AF%95%E6%9C%8D%E7%AC%AC%E4%BA%8C%E6%9D%A1%E5%85%AC%E5%91%8A
    print(msg)
    url = ('http://%s:5961/set_notice?notice=%s&s=%s' % (host, msg, md5key))
    return url_request(url)
post方法:
import json
import urllib.request
import urllib.parse
import hashlib

key = 'npa98JBdaQid12NNacP'


def dismiss_room(room_id):
    url = 'http://127.0.0.1:8080/web/dismiss_room'
    param_list = str(room_id) + key
    m1 = hashlib.md5()
    m1.update(param_list.encode('utf8'))
    sign = m1.hexdigest()

    data = {'room_id': room_id, 'sign': sign, 'force':1}

    # data参数如果要传必须传bytes(字节流)类型的,如果是一个字典,先用urllib.parse.urlencode()编码
    #body_data=urllib.parse.urlencode(data).encode('utf8')

    body_data = json.dumps(data).encode('utf8')  # 将字典类型的数据使用utf8编码序列化成json格式

    # data数据怎么编码,需要看远端服务器的标准
    req = urllib.request.Request(url=url, data=body_data)    # 构建请求URL
    print(req.__dict__)    # 查看构建的url的所有参数
    response = urllib.request.urlopen(req)

    return response.read().decode('utf8')
#注意:如果参数中带有中文

'''
一般来说,URL标准中只会允许一部分ASCII字符比如数字、字母、部分符号等,而其他的一些字符,比如汉字等,是不符合URL标准的。此时,我们需要编码
 urllib.parse中的quote方法进行编码
'''
from urllib import request
from urllib.parse import quote
import json
import sys
#示例
def url_request(url):
    try:

        req = request.urlopen(url).read().decode('utf8')
        ret = json.loads(req, encoding='utf8')
        return ret
    except Exception as e:  # 如果网络链路不正常,则直接退出
        print(e)
        sys.exit(1)


def send_notice(msg):
    global host
    msg=quote(msg)   # quote编码
    url=(r'http://%s/set_notice?notice=%s&s=%s' % (host,msg))
    print(url)
    return url_request(url)
转载请注明出处:http://www.cnblogs.com/lichunke/

 浙公网安备 33010602011771号