应用程序配置管理
一.给容器传参的集中方式
- 将配置文件直接打包到镜像中,但这种方式不推荐使用. (dev、test.prod配置文件肯定不能通用)
- 通过定义Pod清单时,指定自定义命令行参数,即设定args:["命令参数"],这种也可以在启动Pod时,传参来修改Pod应用程序的配置文件
- 使用环境变量来给Pod中的应用传参修改配置
- Pod中的应用程序必须是Cloud Native的应用程序,即支持直接通过环境变量来加载配置信息
- 通过使用set sed grep等工具来实现修改,但也要确保容器中有这些工具
- 存储卷:可以将配置信息直接放到存储卷中,如PV中,Pod启动时,自动挂载存储卷到配置文件目录
- configMap或者secret
二.configMap管理非敏感数据
- configMap是一个API对象,用来将非机密性的数据保存到健值对中。使用时, Pods 可以将其用作环境变量、命令行参数或者存储卷中的配置文件。
- configMap就是为了让镜像和配置文件解耦,以实现镜像的可移植性和可复用性,因为一个configMap其实就是一系列配置信息的集合,将来可以直接注入到pod容器中使用
- 如果需要存储机密性数据,如密码类的则使用secret
- 创建configMap后,数据实际存储在k8s的etcd数据库中,然后创建pod时引用该数据
apiVersion: v1
kind: ConfigMap
metadata:
  name: game-demo
data:
  # key:value数据类型
  player_initial_lives: "3"
  ui_properties_file_name: "user-interface.properties"

  # 多行数据
  redis.connect: |
    host: 172.31.69.111
    port: 6379
  mysql.connect: |
    host: 172.31.69.111
    port: 3306
引用configmap中的数据
apiVersion: v1
kind: Pod
metadata:
  name: configmap-demo-pod
spec:
  containers:
    - name: demo
      image: alpine
      command: ["sleep", "3600"]
      env:
        # 定义环境变量
        - name: PLAYER_INITIAL_LIVES # 变量名
          valueFrom:
            configMapKeyRef:
              name: game-demo           # 这个名字是configmap name
              key: player_initial_lives # 需要取的健
        - name: UI_PROPERTIES_FILE_NAME
          valueFrom:
            configMapKeyRef:
              name: game-demo
              key: ui_properties_file_name
      volumeMounts:
      - name: config   # 数据卷名称
        mountPath: "/config"  # 挂载的目标路径
        readOnly: true        # 权限
  volumes:
    # Pod 级别设置卷,然后将其挂载到 Pod 内的容器中
    - name: config  # 引用volumeMounts中的name
      configMap:
        name: game-demo    # configmap中定义的name
        # 来自 ConfigMap 的一组键,将被创建为文件
        items:
        - key: "redis.connect"
          path: "redis.connect"
        - key: "mysql.connect"
          path: "mysql.connect"


################################################################
上面的例子定义了一个卷并将它作为 /config 文件夹挂载到 demo 容器内
创建两个文件,/config/game.properties 和 /config/user-interface.properties尽管 ConfigMap 中包含了四个键,这是因为 Pod 定义中在 volumes 节指定了一个 items 数组。
如果你完全忽略 items 数组,则 ConfigMap 中的每个键都会变成一个与该键同名的文件,因此你会得到四个文件
可以使用四种方式来使用 ConfigMap 配置 Pod 中的容器:
- 容器 entrypoint 的命令行参数
- 容器的环境变量
- 在只读卷里面添加一个文件,让应用来读取
- 编写代码在 Pod 中运行,使用 Kubernetes API 来读取 ConfigMap
也可通过以引用现有文件的方式创建configMap
  # Create a new configmap named my-config based on folder bar
  kubectl create configmap my-config --from-file=path/to/bar

  # Create a new configmap named my-config with specified keys instead of file basenames on disk
  kubectl create configmap my-config --from-file=key1=/path/to/bar/file1.txt --from-file=key2=/path/to/bar/file2.txt


  # Create a new configmap named my-config from the key=value pairs in the file
  kubectl create configmap my-config --from-file=path/to/bar

  # Create a new configmap named my-config from an env file
  kubectl create configmap my-config --from-env-file=path/to/bar.env
三.secret管理敏感数据
与configMap类似,区别在于主要存储敏感数据,所有的数据要经过base64编码

应用场景:储存凭据类的数据

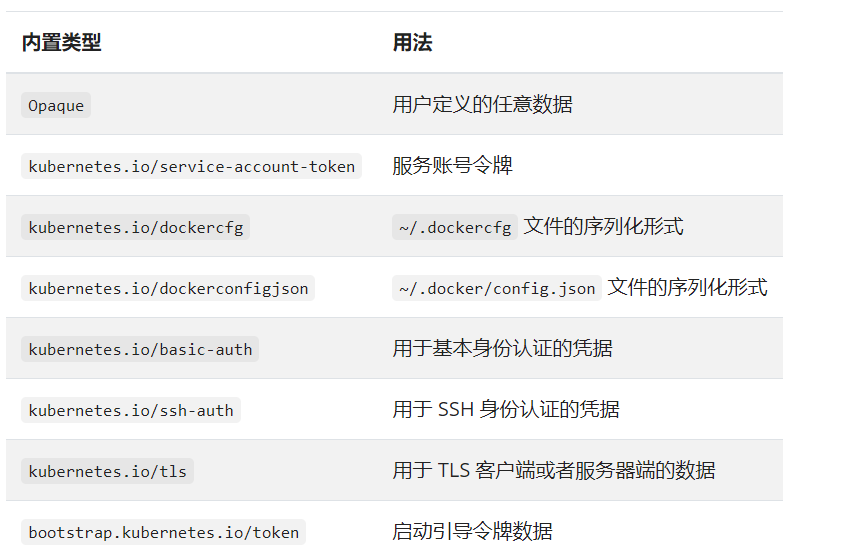
kubectl create secret 支持三种数据类型:
- docker-registry( kubernetes.io/dockerconfigjson):存储镜像仓库认证信息
- generic( Opaque):存储密码、密钥等
- tls( kubernetes.io/tls):存储TLS证书
1.创建secret的方式
1.1.通过--from-literal
kubectl create secret generic my-secret --from-literal=key1=value1 --from-literal=key2=value2
1.2 通过--from-file
kubectl create secret generic ssh-key-secret --from-file=/root/.ssh/id_rsa --from-file=/root/.ssh/id_rsa.pub
1.3 通过--from-env-file
kubectl create secret generic my-secret --from-env-file=path/to/bar.env
1.4 通过yaml文件(以上三种secret会自动使用base64编码,第四种yaml文件中的value必须是base64加密过的字符串)
apiVersion: v1
kind: Secret
metadata:
  name: db-user-pass
type: Opaque  # secret类型
data:
  username: YWRtaW4=      # echo -n 'admin' | base64
  password: MWYyZDFlMmU2N2Rm   # echo -n '1f2d1e2e67df' | base64

2.查看secret
2.1 通过kubectl get secret -n namespace 查看已存在的secret
[root@k8s-master yaml]# kubectl get secret -n default
NAME                    TYPE                                  DATA   AGE
db-user-pass            Opaque                                2      8m43s
2.2 通过kubectl describe secret secret-name -n default 查看secret的key
[root@k8s-master yaml]# kubectl describe secret db-user-pass -n default
Name:         db-user-pass
Namespace:    default
Labels:       <none>
Annotations:  <none>

Type:  Opaque

Data
====
password:  12 bytes
username:  5 bytes
2.3 通过kubectl edit secret 查看secret的详细信息
[root@k8s-master yaml]# kubectl edit secret db-user-pass -n default

# Please edit the object below. Lines beginning with a '#' will be ignored,
# and an empty file will abort the edit. If an error occurs while saving this file will be
# reopened with the relevant failures.
#
apiVersion: v1
data:
  password: MWYyZDFlMmU2N2Rm
  username: YWRtaW4=
kind: Secret
metadata:
  annotations:
    kubectl.kubernetes.io/last-applied-configuration: |
      {"apiVersion":"v1","data":{"password":"MWYyZDFlMmU2N2Rm","username":"YWRtaW4="},"kind":"Secret","metadata":{"annotations":{},"name":"db-user-pass","namespace":"default"},"type":"Opaque"}
  creationTimestamp: "2020-12-10T08:32:04Z"
  name: db-user-pass
  namespace: default
  resourceVersion: "2207077"
  selfLink: /api/v1/namespaces/default/secrets/db-user-pass
  uid: 1dc9d7b2-06dd-418e-a3f3-c8177e459506
type: Opaque
2.4 通过base64将value解码
[root@k8s-master ~]# echo -n "YWRtaW4=" |base64 --decode
admin
3. 使用secret
apiVersion: v1
kind: Pod
metadata:
  name: secret-demo-pod
spec:
  containers:
  - name: demo
    image: nginx
    env:                   ### env方式引用
    - name: USER
      valueFrom:
        secretKeyRef:
          name: db-user-pass
          key: username
    - name: PASS
      valueFrom:
        secretKeyRef:
          name: db-user-pass
          key: password
    volumeMounts:
    - name: config
      mountPath: "/config"
      readOnly: true
  volumes:                     # volumes方式使用
  - name: config
    secret:
      secretName: db-user-pass
      items:
      - key: username
        path: my-username
四.pod中的应用程序如何动态更新配置
应用程序动态更新配置方案:
• 当ConfigMap发生变更时,应用程序自动感知动态加载(需要程序自身支持)
• 触发滚动更新,即重启服务
转载请注明出处:http://www.cnblogs.com/lichunke/


