Kubernetes基础
一.docker和kubernetes
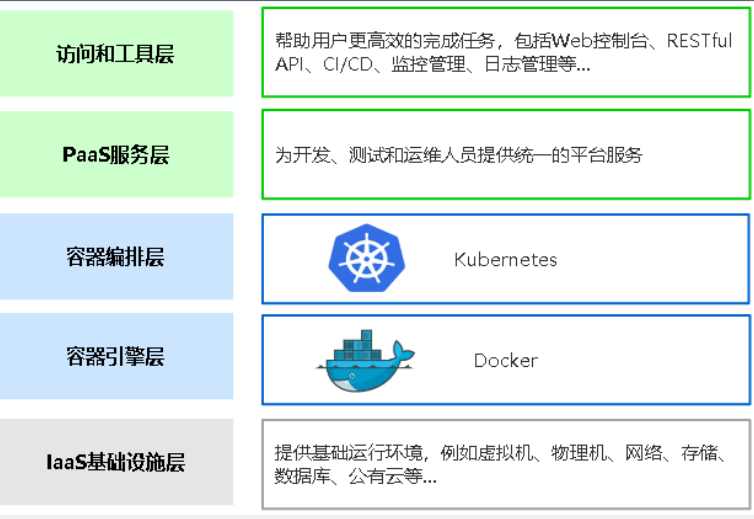
Docker是一个开源的应用容器引擎,开发者可以打包他们的应用及依赖到一个可移植的容器中,发布到流行的Linux机器上,也可实现虚拟化

docker-compose用来管理单机上编排管理容器(定义和管理多个容器)     # 管理单机容器

Kubernetes是一个开源的容器集群管理系统,可以实现容器集群的自动化部署、自动扩缩容、维护等功能。

二.Kubernetes是什么
- Kubernetes是Google在2014年开源的一款容器集群系统,简称k8s
- Kubernetes用于容器化应用程序部署、扩展和管理,目标是让容器化应用简单高效
- 官方网站:https://kubernetes.io/
- 官方文档:https://kubernetes.io/zh/docs/home/
三.Kubernetes集群架构与组件
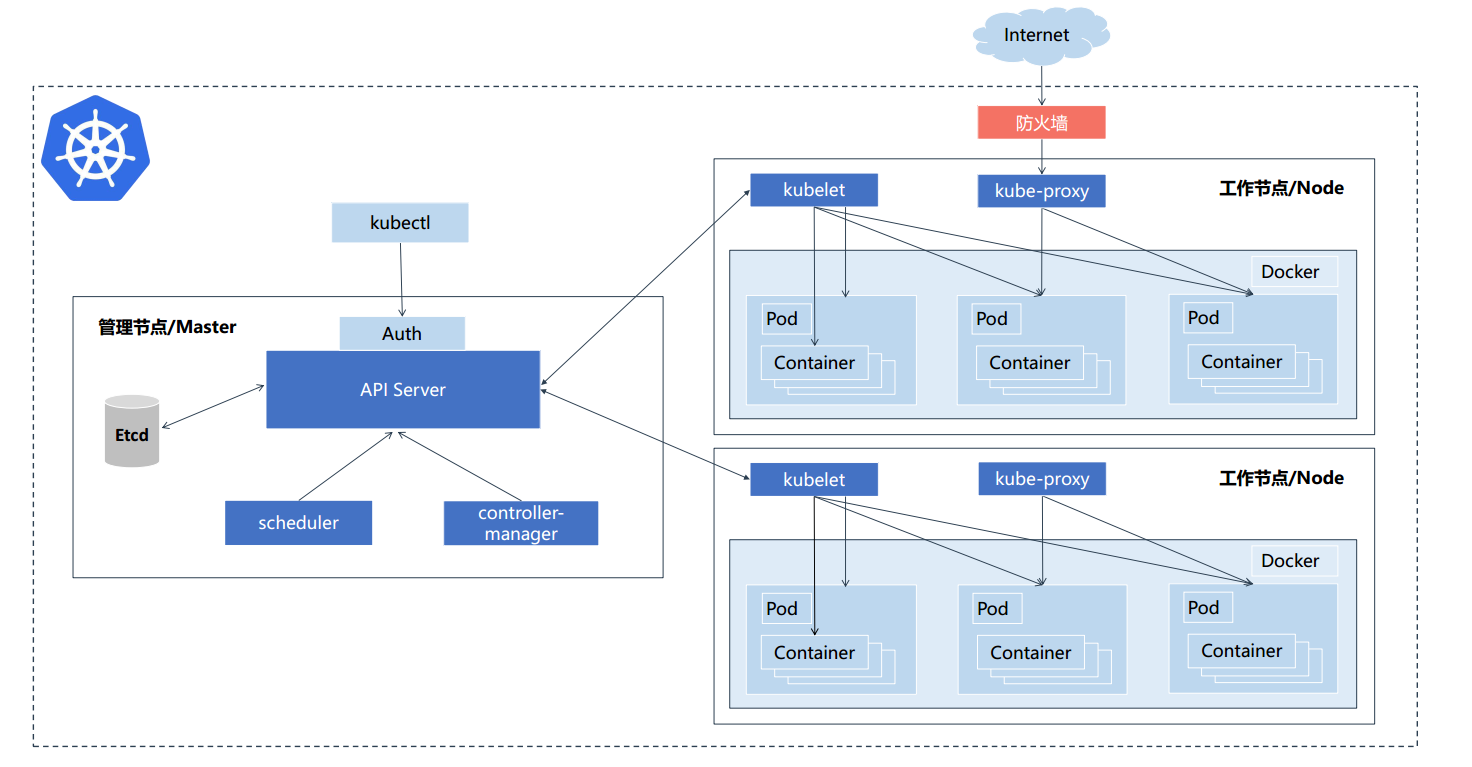
Master组件
- apiserver
Kubernetes API:集群统一入口,各个组件的协调者,以RESTful API提供接口服务,所有对象资源的增删改查和监听操作都交给apiserver处理后再提交etcd存储
- controller-manager
处理集群中常规的后台任务,一个资源对应一个控制器。而controller-manager就是负责管理这些控制器的
维护集群的状态。比如故障检测、自动扩展、滚动更新等
- scheduler
负责资源调度,按照预定的调度策略将Pod调度到相应Node上
- etcd
分布式键值存储系统。用于保存集群状态数据,比如Pod。Service等对象信息
Node组件
- kubelet
kubelet是Master在Node节点上的Agent,管理本机运行容器的生命周期。比如创建容器、Pod挂载数据卷、下载secret、获取容器和节点状态等工作。kubelet将每个Pod转换成一组容器
- kube-proxy
在Node节点或实现Pod网络代理,维护网络规则和四层负载均衡工作
- docker或rocket
容器引擎:运行容器

四.快速部署一个Kubernetes集群
部署K8s集群的两种方式
- kubeadm
kubeadm是一个工具,提供kubeadm init 和kubeadm join,用于快速部署Kubernetes集群
官方地址:https://kubernetes.io/docs/reference/setup-tools/kubeadm/
- 二进制
推荐,从官方下载发行版的二进制包,手动部署每个组件,组成Kubernetes集群
下载地址:https://github.com/kubernetes/kubernetes/releases
使用kubeadm快速部署一个Kubernetes集群
1.安装要求
- 两台以上(master*1,node最少一台),centos7.x_x86_64
- 硬件配置:至少2G内存,2核cpu或更多,硬盘20G就行(内存必须最少2G,亲测1G起不来)
- 集群中所有机器之间网络互通
- 集群中所有机器需要连接外网,用于拉取镜像
- 禁止swap分区
2.实验机名称及ip分配
- k8s-master 192.168.11.130
- k8s-node1 192.168.11.134
- k8s-node2192.168.11.135
3.根据以上安装要求,列出一下初始化项

#!/bin/bash

yum install wget -y

if [ ! -n "$1" ];then
    echo -e "\033[31m=============主机名不能为空=================\033[0m"
    exit 2
fi

#关闭防火墙
systemctl stop firewalld
systemctl disable firewalld

#关闭Selinux
sed -i 's/enforcing/disabled/' /etc/selinux/config  # 永久
setenforce 0  # 临时

#关闭swap
sed -i '/swap/d' /etc/fstab  # 永久
swapoff -a  # 临时

# 设置主机名
hostnamectl set-hostname $1

# 将桥接的IPv4流量传递到iptables的链
cat > /etc/sysctl.d/k8s.conf << EOF
net.bridge.bridge-nf-call-ip6tables = 1
net.bridge.bridge-nf-call-iptables = 1
EOF

sysctl --system  # 生效

#时间同步
yum install ntpdate -y
ntpdate time.windows.com

#安装docker
wget https://mirrors.aliyun.com/docker-ce/linux/centos/docker-ce.repo -O /etc/yum.repos.d/docker-ce.repo
yum -y install docker-ce-18.06.1.ce-3.el7

#配置docker加速器
cat > /etc/docker/daemon.json << EOF
{
  "registry-mirrors": ["https://b9pmyelo.mirror.aliyuncs.com"]
}
EOF

systemctl enable docker && systemctl start docker

# 添加阿里云YUM软件源
cat > /etc/yum.repos.d/kubernetes.repo << EOF
[kubernetes]
name=Kubernetes
baseurl=https://mirrors.aliyun.com/kubernetes/yum/repos/kubernetes-el7-x86_64
enabled=1
gpgcheck=0
repo_gpgcheck=0
gpgkey=https://mirrors.aliyun.com/kubernetes/yum/doc/yum-key.gpg https://mirrors.aliyun.com/kubernetes/yum/doc/rpm-package-key.gpg
EOF

# 安装kubeadm,kubelet和kubectl
yum install -y kubelet-1.19.0 kubeadm-1.19.0 kubectl-1.19.0

# 在master上添加解析
cat >> /etc/hosts << EOF
192.168.11.130 k8s-master
192.168.11.134 k8s-node1
192.168.11.135 k8s-node2
EOF

#!/bin/bash

yum install wget -y

if [ ! -n "$1" ];then
    echo -e "\033[31m=============主机名不能为空=================\033[0m"
    exit 2
fi

#关闭防火墙
systemctl stop firewalld
systemctl disable firewalld

#关闭Selinux
sed -i 's/enforcing/disabled/' /etc/selinux/config  # 永久
setenforce 0  # 临时

#关闭swap
sed -i '/swap/d' /etc/fstab  # 永久
swapoff -a  # 临时

# 设置主机名
hostnamectl set-hostname $1

# 将桥接的IPv4流量传递到iptables的链
cat > /etc/sysctl.d/k8s.conf << EOF
net.bridge.bridge-nf-call-ip6tables = 1
net.bridge.bridge-nf-call-iptables = 1
EOF

sysctl --system  # 生效

#时间同步
yum install ntpdate -y
ntpdate time.windows.com

#安装docker
wget https://mirrors.aliyun.com/docker-ce/linux/centos/docker-ce.repo -O /etc/yum.repos.d/docker-ce.repo
yum -y install docker-ce-18.06.1.ce-3.el7

#配置docker加速器
cat > /etc/docker/daemon.json << EOF
{
  "registry-mirrors": ["https://b9pmyelo.mirror.aliyuncs.com"]
}
EOF

systemctl enable docker && systemctl start docker

# 添加阿里云YUM软件源
cat > /etc/yum.repos.d/kubernetes.repo << EOF
[kubernetes]
name=Kubernetes
baseurl=https://mirrors.aliyun.com/kubernetes/yum/repos/kubernetes-el7-x86_64
enabled=1
gpgcheck=0
repo_gpgcheck=0
gpgkey=https://mirrors.aliyun.com/kubernetes/yum/doc/yum-key.gpg https://mirrors.aliyun.com/kubernetes/yum/doc/rpm-package-key.gpg
EOF

# 安装kubeadm,kubelet和kubectl
yum install -y kubelet-1.19.0 kubeadm-1.19.0 kubectl-1.19.0
3.使用kubeadm部署kubernetes-master
kubeadm init \
--apiserver-advertise-address=192.168.11.130 \
--image-repository registry.aliyuncs.com/google_containers \
--kubernetes-version v1.19.0 \
--service-cidr=10.96.0.0/12 \
--pod-network-cidr=10.244.0.0/16 \
--ignore-preflight-errors=all
###################################################################################################
- --apiserver-advertise-address:apiserver的地址
- --image-repository:由于拉取镜像地址默认是k8s.gcr.io国内无法访问,这里指定阿里云的镜像仓库地址
- --kubernetes-version:kubernetes的版本
- --service-cidr:集群内部虚拟网络,pod的统一访问入口
- --pod-network-cidr:pod网络,与CNI网络组件的网络配置保持一致

W1117 09:39:33.259050    1827 configset.go:348] WARNING: kubeadm cannot validate component configs for API groups [kubelet.config.k8s.io kubeproxy.config.k8s.io]
[init] Using Kubernetes version: v1.19.0
[preflight] Running pre-flight checks
    [WARNING IsDockerSystemdCheck]: detected "cgroupfs" as the Docker cgroup driver. The recommended driver is "systemd". Please follow the guide at https://kubernetes.io/docs/setup/cri/
[preflight] Pulling images required for setting up a Kubernetes cluster
[preflight] This might take a minute or two, depending on the speed of your internet connection
[preflight] You can also perform this action in beforehand using 'kubeadm config images pull'
[certs] Using certificateDir folder "/etc/kubernetes/pki"
[certs] Generating "ca" certificate and key
[certs] Generating "apiserver" certificate and key
[certs] apiserver serving cert is signed for DNS names [k8s-master kubernetes kubernetes.default kubernetes.default.svc kubernetes.default.svc.cluster.local] and IPs [10.96.0.1 192.168.11.130]
[certs] Generating "apiserver-kubelet-client" certificate and key
[certs] Generating "front-proxy-ca" certificate and key
[certs] Generating "front-proxy-client" certificate and key
[certs] Generating "etcd/ca" certificate and key
[certs] Generating "etcd/server" certificate and key
[certs] etcd/server serving cert is signed for DNS names [k8s-master localhost] and IPs [192.168.11.130 127.0.0.1 ::1]
[certs] Generating "etcd/peer" certificate and key
[certs] etcd/peer serving cert is signed for DNS names [k8s-master localhost] and IPs [192.168.11.130 127.0.0.1 ::1]
[certs] Generating "etcd/healthcheck-client" certificate and key
[certs] Generating "apiserver-etcd-client" certificate and key
[certs] Generating "sa" key and public key
[kubeconfig] Using kubeconfig folder "/etc/kubernetes"
[kubeconfig] Writing "admin.conf" kubeconfig file
[kubeconfig] Writing "kubelet.conf" kubeconfig file
[kubeconfig] Writing "controller-manager.conf" kubeconfig file
[kubeconfig] Writing "scheduler.conf" kubeconfig file
[kubelet-start] Writing kubelet environment file with flags to file "/var/lib/kubelet/kubeadm-flags.env"
[kubelet-start] Writing kubelet configuration to file "/var/lib/kubelet/config.yaml"
[kubelet-start] Starting the kubelet
[control-plane] Using manifest folder "/etc/kubernetes/manifests"
[control-plane] Creating static Pod manifest for "kube-apiserver"
[control-plane] Creating static Pod manifest for "kube-controller-manager"
[control-plane] Creating static Pod manifest for "kube-scheduler"
[etcd] Creating static Pod manifest for local etcd in "/etc/kubernetes/manifests"
[wait-control-plane] Waiting for the kubelet to boot up the control plane as static Pods from directory "/etc/kubernetes/manifests". This can take up to 4m0s
[apiclient] All control plane components are healthy after 19.508037 seconds
[upload-config] Storing the configuration used in ConfigMap "kubeadm-config" in the "kube-system" Namespace
[kubelet] Creating a ConfigMap "kubelet-config-1.19" in namespace kube-system with the configuration for the kubelets in the cluster
[upload-certs] Skipping phase. Please see --upload-certs
[mark-control-plane] Marking the node k8s-master as control-plane by adding the label "node-role.kubernetes.io/master=''"
[mark-control-plane] Marking the node k8s-master as control-plane by adding the taints [node-role.kubernetes.io/master:NoSchedule]
[bootstrap-token] Using token: co9nn4.rcjozsebq3i2ners
[bootstrap-token] Configuring bootstrap tokens, cluster-info ConfigMap, RBAC Roles
[bootstrap-token] configured RBAC rules to allow Node Bootstrap tokens to get nodes
[bootstrap-token] configured RBAC rules to allow Node Bootstrap tokens to post CSRs in order for nodes to get long term certificate credentials
[bootstrap-token] configured RBAC rules to allow the csrapprover controller automatically approve CSRs from a Node Bootstrap Token
[bootstrap-token] configured RBAC rules to allow certificate rotation for all node client certificates in the cluster
[bootstrap-token] Creating the "cluster-info" ConfigMap in the "kube-public" namespace
[kubelet-finalize] Updating "/etc/kubernetes/kubelet.conf" to point to a rotatable kubelet client certificate and key
[addons] Applied essential addon: CoreDNS
[addons] Applied essential addon: kube-proxy

Your Kubernetes control-plane has initialized successfully!

To start using your cluster, you need to run the following as a regular user:

  mkdir -p $HOME/.kube
  sudo cp -i /etc/kubernetes/admin.conf $HOME/.kube/config
  sudo chown $(id -u):$(id -g) $HOME/.kube/config

You should now deploy a pod network to the cluster.
Run "kubectl apply -f [podnetwork].yaml" with one of the options listed at:
  https://kubernetes.io/docs/concepts/cluster-administration/addons/

Then you can join any number of worker nodes by running the following on each as root:

kubeadm join 192.168.11.130:6443 --token co9nn4.rcjozsebq3i2ners \
    --discovery-token-ca-cert-hash sha256:fbe23aa6c7ad0832d541b43d6bc8cd42c3e2b520b883399fd5a25ef1e5bd5b2b

1.[preflight]:环境检查以及拉取镜像(kubeadm config images pull)
2.[certs]: 生成k8s证书和etcd证书 证书目录:/etc/kubernetes/pki
3.[kubeconfig]:生成master上各组件的的配置文件
4.[kubelet-start]: 启动kubelet
5.[control-plane]: 部署管理节点组件,用镜像启动容器  kubectl get pods -n kube-system
6.[etcd]: 部署etcd数据库,用镜像启动容器
7.[upload-config]: kubelet] [upload-certs] 上传配置文件到k8s中
8.[mark-control-plane]: 给管理节点添加一个标签 node-role.kubernetes.io/master='',再添加一个污点[node-role.kubernetes.io/master:NoSchedule]
9.[bootstrap-token] 自动为kubelet颁发证书
10.[addons] 部署插件,CoreDNS、kube-proxy
4.拷贝kubectl使用的连接k8s认证文件到默认路径
mkdir -p $HOME/.kube
sudo cp -i /etc/kubernetes/admin.conf $HOME/.kube/config
sudo chown $(id -u):$(id -g) $HOME/.kube/config
5.node加入kubernetes集群
在每个node节点上执行
kubeadm join 192.168.11.130:6443 --token co9nn4.rcjozsebq3i2ners \
--discovery-token-ca-cert-hash sha256:fbe23aa6c7ad0832d541b43d6bc8cd42c3e2b520b883399fd5a25ef1e5bd5b2b
###########################################################################################################
默认token有效期为24小时,当过期之后,该token就不可用了。这时就需要重新创建token,操作如下
kubeadm token create --print-join-command
参考文档:https://kubernetes.io/docs/reference/setup-tools/kubeadm/kubeadm-join
6.部署容器网络
Calico是一个纯三层的数据中心网络方案,Calico支持广泛的平台,包括Kubernetes、OpenStack等。
Calico 在每一个计算节点利用 Linux Kernel 实现了一个高效的虚拟路由器( vRouter) 来负责数据转发,而每个 vRouter 通过 BGP 协议负责把自己上运行的 workload 的路由信息向整个 Calico 网络内传播。
此外,Calico 项目还实现了 Kubernetes 网络策略,提供ACL功能。
wget https://docs.projectcalico.org/manifests/calico.yaml # 实际测试格式有问题
需要修改里面定义Pod网络(CALICO_IPV4POOL_CIDR),与前面kubeadm init指定的一样
修改完后应用清单:
kubectl apply -f calico.yaml
kubectl get pods -n kube-system

7.验证集群是否正常(部署一个nginx服务)
kubectl create deployment nginx --image=nginx # 如果不指定namespace,则使用default
kubectl expose deployment nginx --port=80 --type=NodePort
kubectl get pod,svc

客户端访问:
http://node:32290
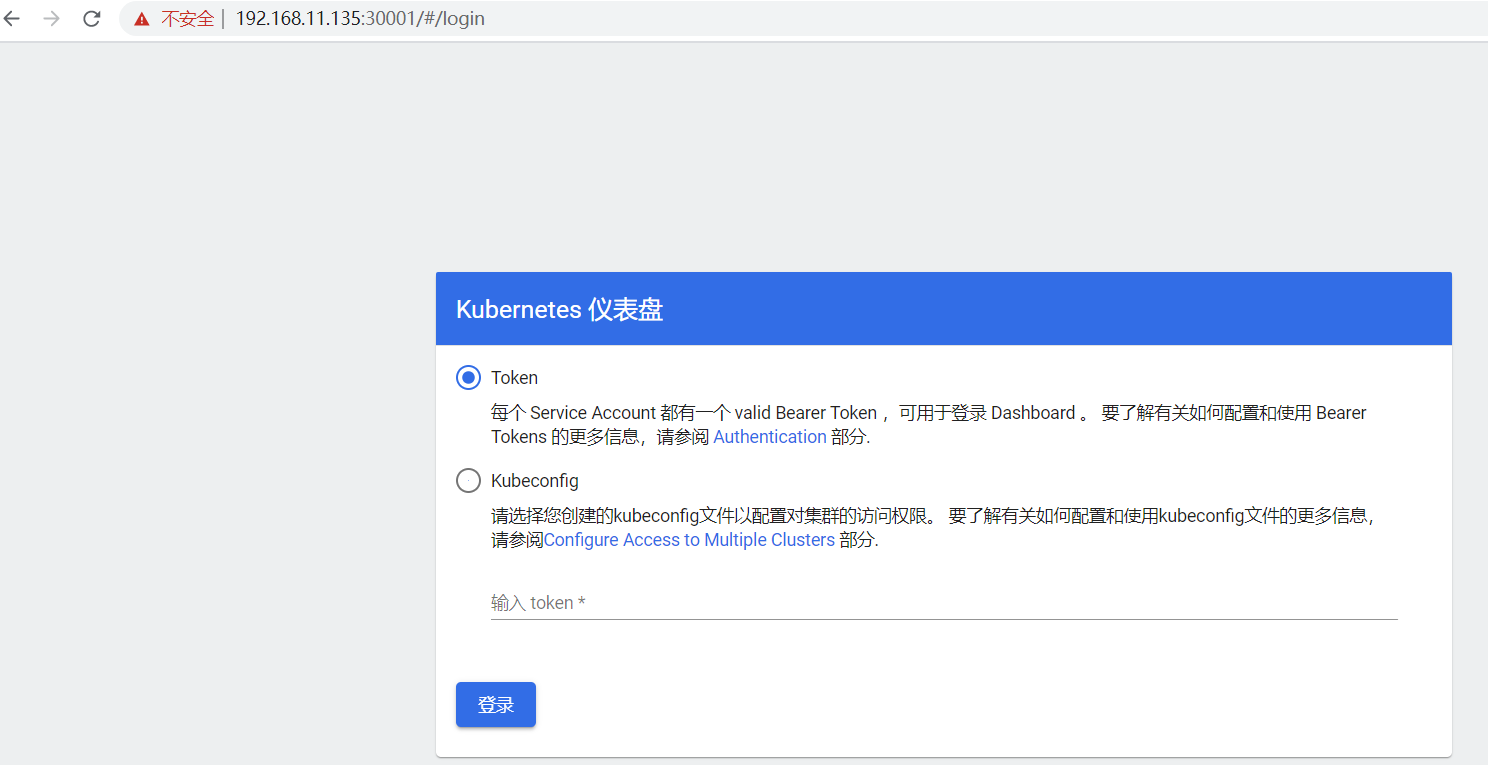
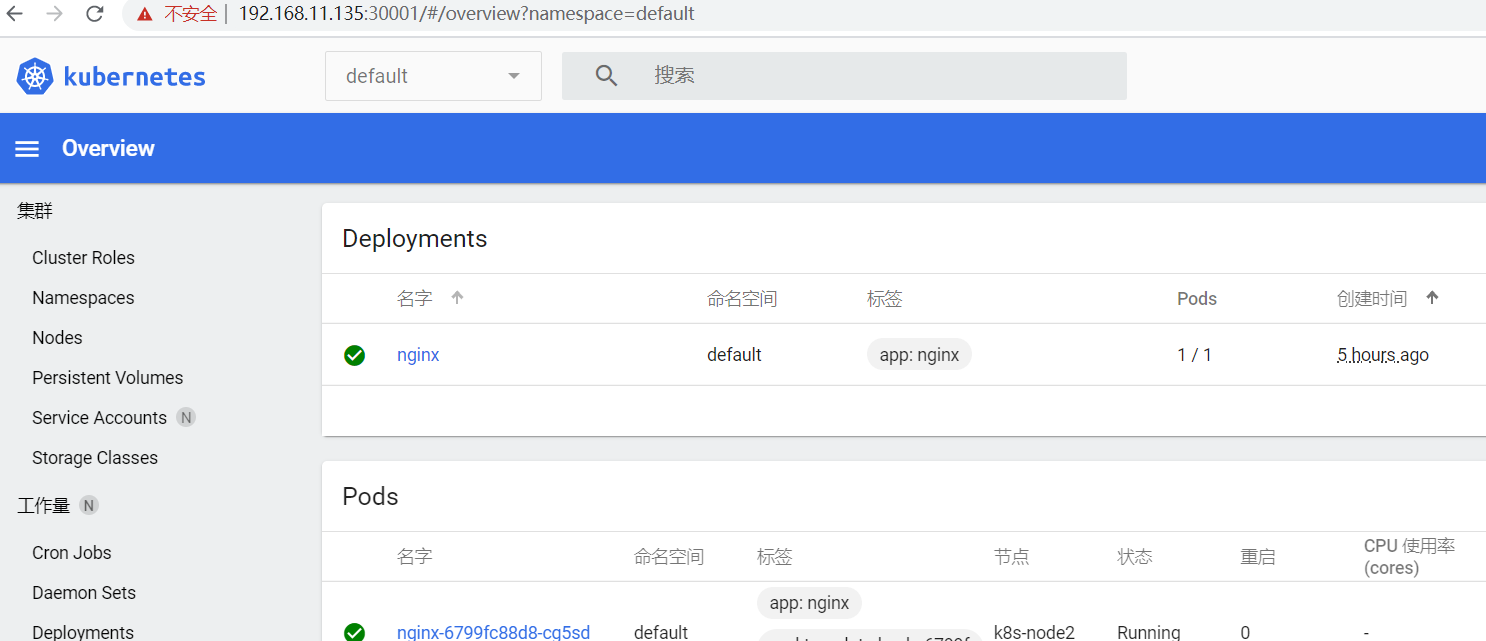
8.部署 Dashboard
wget https://raw.githubusercontent.com/kubernetes/dashboard/v2.0.3/aio/deploy/recommended.yaml
默认Dashboard只能集群内部访问,修改Service为NodePort类型,暴露到外部:
spec:
ports:
- port: 443
targetPort: 8443
nodePort: 30001
selector:
k8s-app: kubernetes-dashboard
type: NodePort
kubectl apply -f recommended.yaml
kubectl get pods -n kubernetes-dashboard

访问地址:
https://node:3000

创建service account并绑定默认cluster-admin管理员集群角色
创建用户
kubectl create serviceaccount dashboard-admin -n kube-system
用户授权
kubectl create clusterrolebinding dashboard-admin --clusterrole=cluster-admin --serviceaccount=kube-system:dashboard-admin
获取用户Token
kubectl describe secrets -n kube-system $(kubectl -n kube-system get secret | awk '/dashboard-admin/{print $1}')
使用输出的token登录Dashboard

五.kubctl常用命令
1.基础命令
- get
-o wide 显示详细信息
-n namespace 指定命名空间 不指定默认是default
1).查看节点信息:kubectl get node -o wide
[root@k8s-master ~]# kubectl get node -o wide
NAME STATUS ROLES AGE VERSION INTERNAL-IP EXTERNAL-IP OS-IMAGE KERNEL-VERSION CONTAINER-RUNTIME
k8s-master Ready master 17h v1.19.0 192.168.11.130 <none> CentOS Linux 7 (Core) 3.10.0-1062.el7.x86_64 docker://18.6.1
k8s-node1 Ready <none> 17h v1.19.0 192.168.11.134 <none> CentOS Linux 7 (Core) 3.10.0-1062.el7.x86_64 docker://18.6.1
k8s-node2 Ready <none> 17h v1.19.0 192.168.11.135 <none> CentOS Linux 7 (Core) 3.10.0-1062.el7.x86_64 docker://18.6.1
2).查看namespace信息:kubectl get namespace
[root@k8s-master ~]# kubectl get namespace
NAME STATUS AGE
default Active 17h
kube-node-lease Active 17h
kube-public Active 17h
kube-system Active 17h
kubernetes-dashboard Active 45m
web Active 16h
3).查看pod信息:kubectl get pod -n web -o wide
[root@k8s-master ~]# kubectl get pod -n web -o wide
NAME READY STATUS RESTARTS AGE IP NODE NOMINATED NODE READINESS GATES
nginx-6799fc88d8-w9x7t 1/1 Running 1 16h 10.244.36.69 k8s-node1 <none> <none>
4).查看服务及pod的信息:kubectl get pod,svc
[root@k8s-master ~]# kubectl get pod,svc -n web
NAME READY STATUS RESTARTS AGE
pod/nginx-6799fc88d8-w9x7t 1/1 Running 1 16h
NAME TYPE CLUSTER-IP EXTERNAL-IP PORT(S) AGE
service/nginx NodePort 10.101.219.60 <none> 80:32573/TCP 16h
5).查看指定命名空间下所有pod的label:kubectl get pod --show-labels -n web
[root@k8s-master ~]# kubectl get pod --show-labels -n web
NAME READY STATUS RESTARTS AGE LABELS
java-ff5bcb7cd-hdll5 1/1 Running 0 100m app=java,pod-template-hash=ff5bcb7cd
6).查看命名空间下指定label的pod:kubectl get pod -l app=java -n web
[root@k8s-master ~]# kubectl get pod -l app=java -n web
NAME READY STATUS RESTARTS AGE
java-ff5bcb7cd-czksp 1/1 Running 0 2m1s
java-ff5bcb7cd-hdll5 1/1 Running 0 110m
java-ff5bcb7cd-rn7gq 1/1 Running 0 2m1s
- delete
1).删除pod:kubectl delete pod nginx-6799fc88d8-w9x7t -n web
[root@k8s-master ~]# kubectl delete pod nginx-6799fc88d8-w9x7t -n web
pod "nginx-6799fc88d8-w9x7t" deleted
2).删除namespace:kubectl delete namespace web
[root@k8s-master ~]# kubectl delete namespace web
namespace "web" deleted
3).删除node:kubectl delete node node_name
4).指定yaml文件删除:kubectl delete -f xxx.yaml
- create
1).创建namespace:kubectl create namespace web
[root@k8s-master ~]# kubectl create namespace web
namespace/web created
2).创建一个pod应用:kubectl create deployment tomcat --image=tomcat -n web
[root@k8s-master ~]# kubectl create deployment tomcat --image=tomcat -n web
deployment.apps/tomcat created
- expose
为deployment创建的service,并通过NodePort方式提供服务
kubectl expose deployment tomcat --port=8001 --type=NodePort -n web
[root@k8s-master ~]# kubectl get svc -n web
NAME TYPE CLUSTER-IP EXTERNAL-IP PORT(S) AGE
tomcat NodePort 10.105.22.246 <none> 8001:32121/TCP 9m33s
2.故障诊断命令
- describe:查看详细信息
kubectl describe pod tomcat-7d987c7694-zd9q6 -n web

Name:         tomcat-7d987c7694-zd9q6
Namespace:    web
Priority:     0
Node:         k8s-node1/192.168.11.134
Start Time:   Thu, 19 Nov 2020 10:55:44 +0800
Labels:       app=tomcat
              pod-template-hash=7d987c7694
Annotations:  cni.projectcalico.org/podIP: 10.244.36.75/32
              cni.projectcalico.org/podIPs: 10.244.36.75/32
Status:       Running
IP:           10.244.36.75
IPs:
  IP:           10.244.36.75
Controlled By:  ReplicaSet/tomcat-7d987c7694
Containers:
  tomcat:
    Container ID:   docker://050bdad3672e8dd672a41246626a6d91782289f1ab815133be94e7e949be2470
    Image:          tomcat
    Image ID:       docker-pullable://tomcat@sha256:a8ad0a5abe77bc26e6d31094c4f77ea63f3dd6b6b65dc0b793be1a3fe119b88c
    Port:           <none>
    Host Port:      <none>
    State:          Running
      Started:      Thu, 19 Nov 2020 11:09:39 +0800
    Ready:          True
    Restart Count:  0
    Environment:    <none>
    Mounts:
      /var/run/secrets/kubernetes.io/serviceaccount from default-token-m9jrg (ro)
Conditions:
  Type              Status
  Initialized       True
  Ready             True
  ContainersReady   True
  PodScheduled      True
Volumes:
  default-token-m9jrg:
    Type:        Secret (a volume populated by a Secret)
    SecretName:  default-token-m9jrg
    Optional:    false
QoS Class:       BestEffort
Node-Selectors:  <none>
Tolerations:     node.kubernetes.io/not-ready:NoExecute op=Exists for 300s
                 node.kubernetes.io/unreachable:NoExecute op=Exists for 300s
Events:
  Type    Reason     Age   From                Message
  ----    ------     ----  ----                -------
  Normal  Scheduled  14m                       Successfully assigned web/tomcat-7d987c7694-zd9q6 to k8s-node1
  Normal  Pulling    14m   kubelet, k8s-node1  Pulling image "tomcat"
  Normal  Pulled     55s   kubelet, k8s-node1  Successfully pulled image "tomcat" in 13m52.710584872s
  Normal  Created    54s   kubelet, k8s-node1  Created container tomcat
  Normal  Started    54s   kubelet, k8s-node1  Started container tomcat
- logs:查看日志
kubectl logs -f tomcat-7d987c7694-zd9q6 -n web 查看web命名空间下的Tomcat pod的日志信息

[root@k8s-master ~]# kubectl logs -f   tomcat-7d987c7694-zd9q6 -n web
NOTE: Picked up JDK_JAVA_OPTIONS:  --add-opens=java.base/java.lang=ALL-UNNAMED --add-opens=java.base/java.io=ALL-UNNAMED --add-opens=java.rmi/sun.rmi.transport=ALL-UNNAMED
19-Nov-2020 03:09:40.850 INFO [main] org.apache.catalina.startup.VersionLoggerListener.log Server version name:   Apache Tomcat/9.0.40
19-Nov-2020 03:09:40.864 INFO [main] org.apache.catalina.startup.VersionLoggerListener.log Server built:          Nov 12 2020 15:35:02 UTC
19-Nov-2020 03:09:40.866 INFO [main] org.apache.catalina.startup.VersionLoggerListener.log Server version number: 9.0.40.0
19-Nov-2020 03:09:40.866 INFO [main] org.apache.catalina.startup.VersionLoggerListener.log OS Name:               Linux
19-Nov-2020 03:09:40.867 INFO [main] org.apache.catalina.startup.VersionLoggerListener.log OS Version:            3.10.0-1062.el7.x86_64
19-Nov-2020 03:09:40.867 INFO [main] org.apache.catalina.startup.VersionLoggerListener.log Architecture:          amd64
19-Nov-2020 03:09:40.867 INFO [main] org.apache.catalina.startup.VersionLoggerListener.log Java Home:             /usr/local/openjdk-11
19-Nov-2020 03:09:40.868 INFO [main] org.apache.catalina.startup.VersionLoggerListener.log JVM Version:           11.0.9.1+1
19-Nov-2020 03:09:40.868 INFO [main] org.apache.catalina.startup.VersionLoggerListener.log JVM Vendor:            Oracle Corporation
19-Nov-2020 03:09:40.868 INFO [main] org.apache.catalina.startup.VersionLoggerListener.log CATALINA_BASE:         /usr/local/tomcat
19-Nov-2020 03:09:40.869 INFO [main] org.apache.catalina.startup.VersionLoggerListener.log CATALINA_HOME:         /usr/local/tomcat
19-Nov-2020 03:09:40.894 INFO [main] org.apache.catalina.startup.VersionLoggerListener.log Command line argument: --add-opens=java.base/java.lang=ALL-UNNAMED
19-Nov-2020 03:09:40.895 INFO [main] org.apache.catalina.startup.VersionLoggerListener.log Command line argument: --add-opens=java.base/java.io=ALL-UNNAMED
19-Nov-2020 03:09:40.895 INFO [main] org.apache.catalina.startup.VersionLoggerListener.log Command line argument: --add-opens=java.rmi/sun.rmi.transport=ALL-UNNAMED
19-Nov-2020 03:09:40.895 INFO [main] org.apache.catalina.startup.VersionLoggerListener.log Command line argument: -Djava.util.logging.config.file=/usr/local/tomcat/conf/logging.properties
19-Nov-2020 03:09:40.895 INFO [main] org.apache.catalina.startup.VersionLoggerListener.log Command line argument: -Djava.util.logging.manager=org.apache.juli.ClassLoaderLogManager
19-Nov-2020 03:09:40.895 INFO [main] org.apache.catalina.startup.VersionLoggerListener.log Command line argument: -Djdk.tls.ephemeralDHKeySize=2048
19-Nov-2020 03:09:40.895 INFO [main] org.apache.catalina.startup.VersionLoggerListener.log Command line argument: -Djava.protocol.handler.pkgs=org.apache.catalina.webresources
19-Nov-2020 03:09:40.895 INFO [main] org.apache.catalina.startup.VersionLoggerListener.log Command line argument: -Dorg.apache.catalina.security.SecurityListener.UMASK=0027
19-Nov-2020 03:09:40.895 INFO [main] org.apache.catalina.startup.VersionLoggerListener.log Command line argument: -Dignore.endorsed.dirs=
19-Nov-2020 03:09:40.896 INFO [main] org.apache.catalina.startup.VersionLoggerListener.log Command line argument: -Dcatalina.base=/usr/local/tomcat
19-Nov-2020 03:09:40.896 INFO [main] org.apache.catalina.startup.VersionLoggerListener.log Command line argument: -Dcatalina.home=/usr/local/tomcat
19-Nov-2020 03:09:40.896 INFO [main] org.apache.catalina.startup.VersionLoggerListener.log Command line argument: -Djava.io.tmpdir=/usr/local/tomcat/temp
19-Nov-2020 03:09:40.906 INFO [main] org.apache.catalina.core.AprLifecycleListener.lifecycleEvent Loaded Apache Tomcat Native library [1.2.25] using APR version [1.6.5].
19-Nov-2020 03:09:40.907 INFO [main] org.apache.catalina.core.AprLifecycleListener.lifecycleEvent APR capabilities: IPv6 [true], sendfile [true], accept filters [false], random [true].
19-Nov-2020 03:09:40.908 INFO [main] org.apache.catalina.core.AprLifecycleListener.lifecycleEvent APR/OpenSSL configuration: useAprConnector [false], useOpenSSL [true]
19-Nov-2020 03:09:40.916 INFO [main] org.apache.catalina.core.AprLifecycleListener.initializeSSL OpenSSL successfully initialized [OpenSSL 1.1.1d  10 Sep 2019]
19-Nov-2020 03:09:42.097 INFO [main] org.apache.coyote.AbstractProtocol.init Initializing ProtocolHandler ["http-nio-8080"]
19-Nov-2020 03:09:42.199 INFO [main] org.apache.catalina.startup.Catalina.load Server initialization in [2177] milliseconds
19-Nov-2020 03:09:42.436 INFO [main] org.apache.catalina.core.StandardService.startInternal Starting service [Catalina]
3.高级命令
- apply:从文件名或标准输入对资源创建/更新
kubectl apply -f xxx.yaml -n namespace
apply与create的区别:
create:要求yaml文件中的配置必须是完整的。只能执行一次,如果修改了配置,需要删除再建
apply:根据yaml文件里面列出的内容,升级现有的资源对象,所以yaml文件内容可以只写需要升级的属性(一般是在完整的配置的基础上修改某些配置)
六.kubectl自动补全
# 安装bash-completion
yum install bash-completion -y

#source生效
source /usr/share/bash-completion/bash_completion
source <(kubectl completion bash)
七、资源编排(yaml)
1.yaml文件格式说明
- 用缩进表示层级关系
- 不支持TAB缩进,使用空格缩进
- 通常开头缩进两个空格
- 字符后缩进一个空格,如冒号、逗号等
- ---表示一个文件的开始
- # 表示注释
2.yaml文件创建资源对象
apiVersion: apps/v1       # API版本,可通过kubectl api-versions查看,也可以查阅官方文档,当前版本下的API版本
kind: Deployment      # 资源类型:Deployment、Job、CronJob、DaemonSet
metadata:          # 资源元数据
  labels:          # 标签
    app: nginx
  name: nginx
  namespace: web      # 命名空间
spec:             # 资源规格
  replicas: 1        # 副本数量
  selector:         # 标签选择器
    matchLabels:
      app: nginx
################################################以上是控制器的定义################################
#############template开始是被控制对象的定义##################################3
  template:         # Pod模板
    metadata:             # pod元数据
      labels:
        app: nginx
    spec:          # 容器配置
      containers:
      - image: nginx
        name: nginx

###等同于kubectl create deployment nginx --image=nginx -n web
apiVersion: v1                 # API版本
kind: Service           # Service对象
metadata:             # 资源元数据
  labels:
    app: nginx
  name: nginx
  namespace: web
spec:                   # Service配置
  ports:             # 端口
  - port: 8080                # Service的端口
    protocol: TCP             # 协议
    targetPort: 80             # pod实例的端口
  selector:               # 标签选择器
    app: nginx
  type: NodePort         # Service类型

###等同于kubectl expose deployment nginx -n web --port=8080 --target-port=80 --type=NodePort


