还是老规矩先上代码
demo.c
#include <linux/init.h>
#include <linux/module.h>
#include <linux/kernel.h>
#include <linux/cdev.h>
#include <linux/fs.h>


int demo_major = 250;
int demo_minor = 0;
int demo_count = 1;

struct cdev cdev;

int  demo_open(struct inode *inodep, struct file * filep) // 打开设备
{
    printk("%s,%d\n", __func__, __LINE__);
    return 0;
}

int demo_release(struct inode * inodep, struct file * filep)  // 关闭设备
{
    printk("%s,%d\n", __func__, __LINE__);
    return 0;
}

struct file_operations  fops =
{
    .owner = THIS_MODULE,
    .open = demo_open,
    .release = demo_release,
};

static int __init demo_init(void)
{
    int ret = 0;
    dev_t  devno;

    printk("%s,%d\n", __func__, __LINE__);

    //使用下列宏则可以通过主设备号和次设备号生成 dev_t
    devno = MKDEV(demo_major, demo_minor);

    printk("devno:%d\n", devno);
    printk("demo_major:%d\n", demo_major);

    /**在调用 cdev_add()函数向系统注册字符设备之前,
      *应首先调用 register_chrdev_region()或alloc_chrdev_region()函数向系统申请设备号
      **/
    if (demo_major)//静态申请
    {
        ret = register_chrdev_region(devno, 1, "demo");
    }
    else //动态分配
    {
        ret = alloc_chrdev_region(&devno, 0, 1, "demo");
    }

    if(ret)
    {
        printk("Failed to register_chrdev_region.\n");
        return ret;
    }

    //cdev_init()函数用于初始化 cdev 的成员,并建立 cdev 和 file_operations 之间的连接
    cdev_init(&cdev, &fops);
    cdev.owner = THIS_MODULE;

    //系统添加一个 cdev,完成字符设备的注册。
    ret = cdev_add(&cdev, devno, demo_count);
    if(ret)
    {
        printk(KERN_NOTICE " Failed to cdev_add [Error] %d adding demo%d", ret, demo_count);
        unregister_chrdev_region(devno, demo_count);
        return ret;
    }

    return 0;
}

static void __exit demo_exit(void)
{
    printk("%s,%d\n", __func__, __LINE__);
    //删除一个 cdev,完成字符设备的注销。
    cdev_del(&cdev);
    //在调用cdev_del()函数从系统注销字符设备之后,unregister_chrdev_region()应该被调用以释放原先申请的设备号
    unregister_chrdev_region( MKDEV(demo_major, demo_minor), demo_count );
}

module_init(demo_init);
module_exit(demo_exit);

MODULE_AUTHOR(" libra13179 ");
MODULE_LICENSE("GPL v2");
Makefile
VERS = $(shell uname -r)

# Kernel modules
obj-m += demo.o

# Specify flags for the module compilation.
#EXTRA_CFLAGS=-g -O0

build: kernel_modules

kernel_modules:
    make -C /lib/modules/$(KVERS)/build M=$(CURDIR) modules

clean:
    make -C /lib/modules/$(KVERS)/build M=$(CURDIR) clean
make测试一下

使用dmesg指令来查看

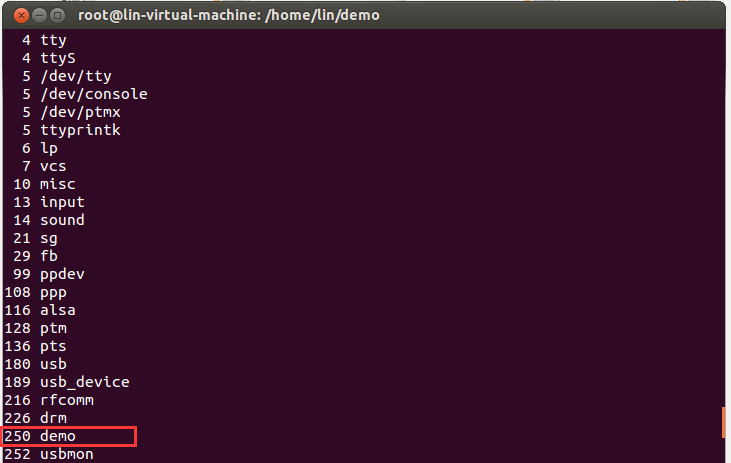
使用 cat /proc/devices看到demo的信息
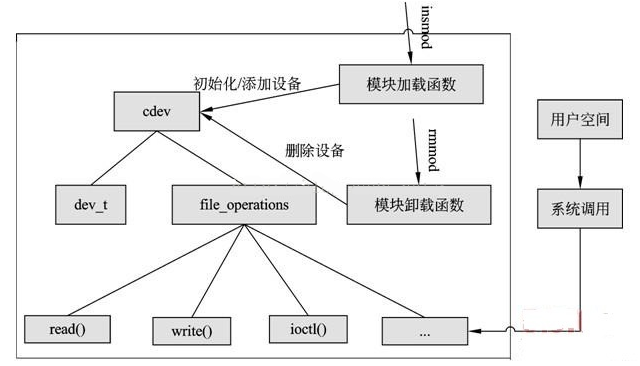
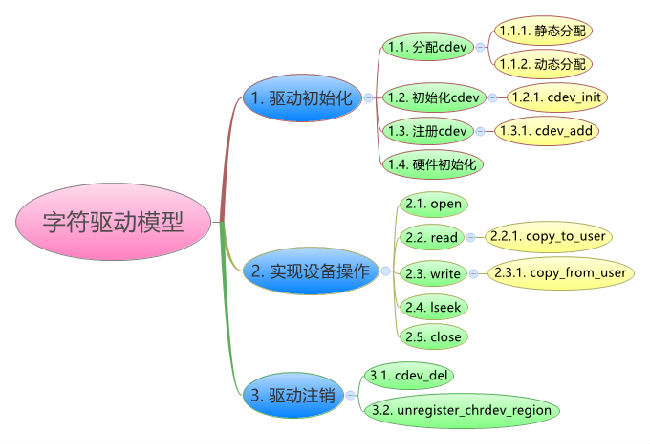
下面截图来自https://blog.csdn.net/u012142460/article/details/78932165
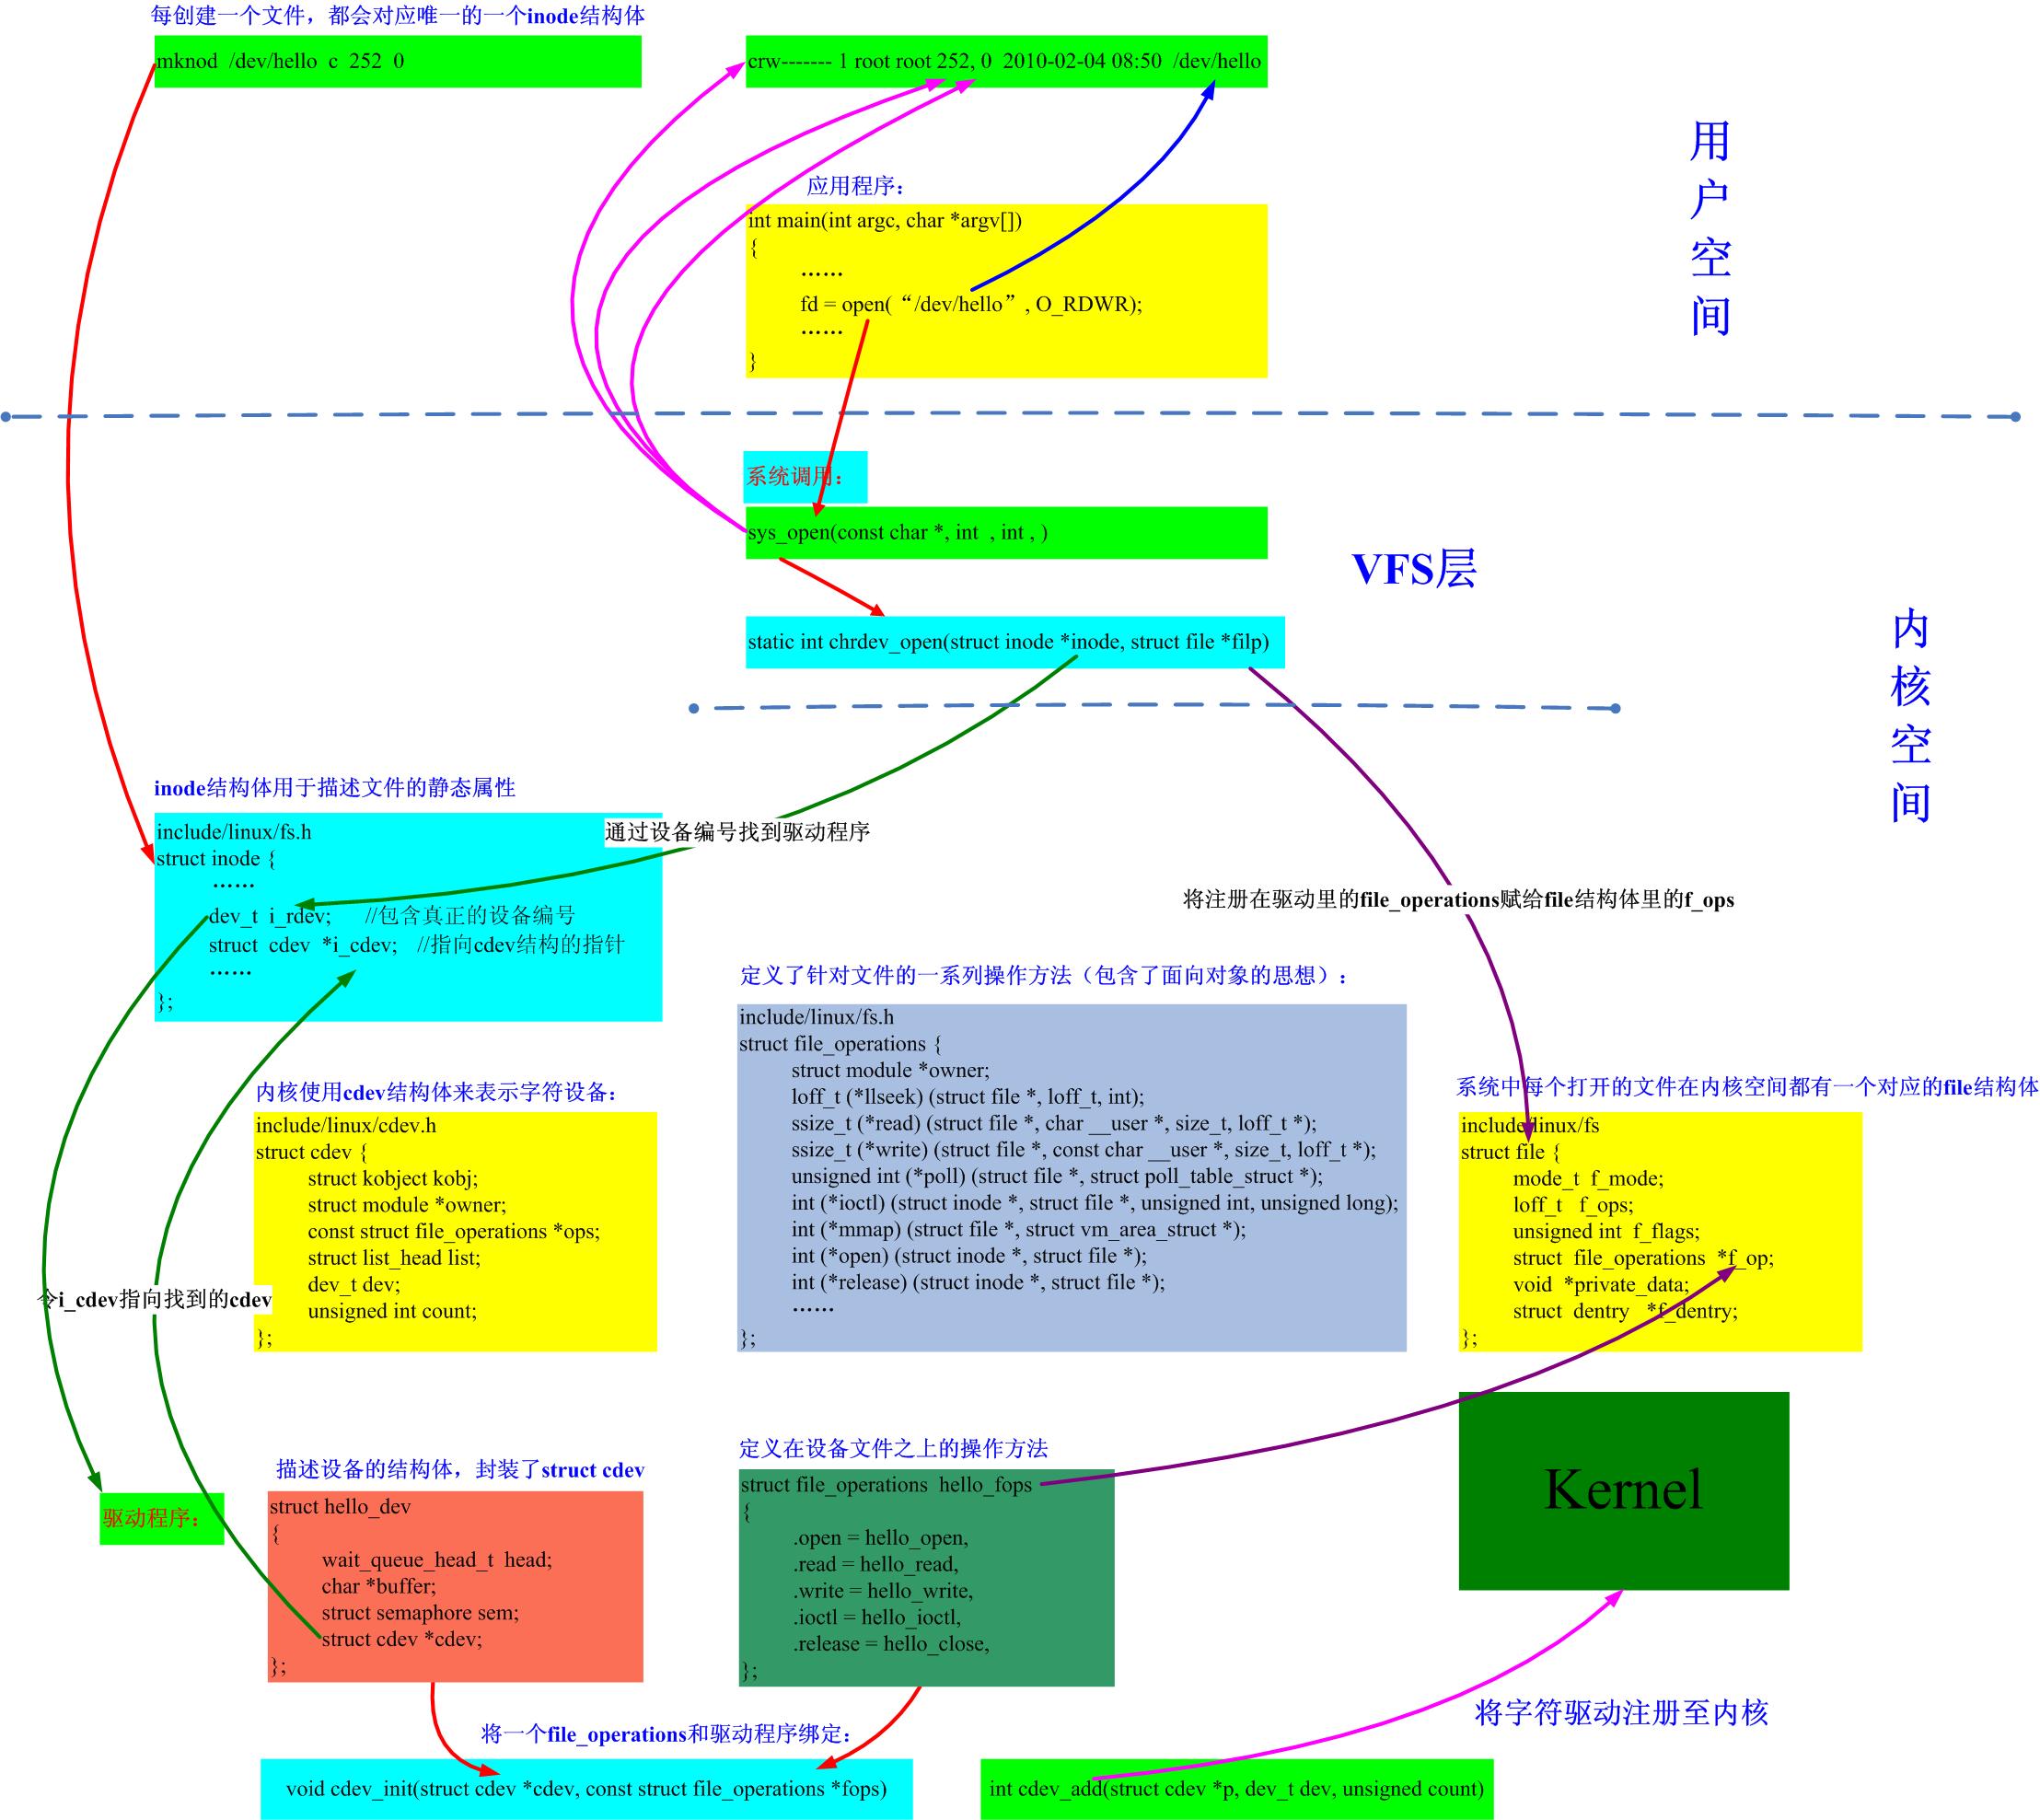
现在主要介绍demo.c中使用到函数和宏,结构体等
<linux/cdev.h>
使用cdev结构体描述一个字符设备


1 struct cdev
2 {
3     struct kobject kobj; /* 内嵌的 kobject 对象 */
4     struct module *owner;    /*所属模块*/
5     struct file_operations *ops;  /*文件操作结构体*/
6     struct list_head list;
7     dev_t dev;           /*设备号*/
8     unsigned int count;
9 };
cdev 结构体的 dev_t 成员定义了设备号,为 32 位,其中 12 位主设备号,20 位次设备号。
比较用到三个宏
<linux/kdev_t.h>
#define MAJOR(dev)    ((unsigned int) ((dev) >> MINORBITS))
#define MINOR(dev)    ((unsigned int) ((dev) & MINORMASK))
#define MKDEV(ma,mi)    (((ma) << MINORBITS) | (mi))
用下列宏可以从 dev_t 获得主设备号和次设备号:
MAJOR(dev_t dev)
MINOR(dev_t dev)
使用下列宏则可以通过主设备号和次设备号生成 dev_t:
MKDEV(int major, int minor)
<linux/cdev.h>
void cdev_init(struct cdev *, const struct file_operations *);//初始化cdev的成员,并建立cdev和file_operations之间关联起来

struct cdev *cdev_alloc(void);//动态申请(构造)cdev内存(设备对象)

void cdev_put(struct cdev *p);//释放cdev内存

int cdev_add(struct cdev *, dev_t, unsigned);//注册cdev设备对象(添加到系统字符设备列表中)

void cdev_del(struct cdev *);//将cdev对象从系统中移除(注销 )
/////////////////////////////////////////////////////////切割线//////////////////////////////////////////////////////////////////////////////
我们增加一个测试
#include <sys/types.h>
#include <sys/stat.h>
#include <fcntl.h>
#include <stdio.h>


int main(int argc, const char *argv[])
{
    int fd;
    int val = 1;
    fd = open("/dev/xyz", O_RDWR);
    if (fd < 0)
    {
        printf("can't open!\n");
        return -1;
    }
    else
    {
        printf("open success.\n");
    }


    getchar();


    close(fd);

    return 0;
}
root@lin-virtual-machine:/home/lin/demo# gcc -o demodrvtest demodrvtest.c
root@lin-virtual-machine:/home/lin/demo# ls
demo~    demodrvtest    demo.mod.c  Makefile~       Untitled Document~
demo.c   demodrvtest.c  demo.mod.o  modules.order
demo.c~  demo.ko        demo.o      Module.symvers
root@lin-virtual-machine:/home/lin/demo# pwd
/home/lin/demo
root@lin-virtual-machine:/home/lin/demo# ./demodrvtest
can't open!
root@lin-virtual-machine:/home/lin/demo# mknod /dev/xyz c 250 0
root@lin-virtual-machine:/home/lin/demo# ./demodrvtest
open success.
这边使用手动来创建
手动创建设备 mknod命令
命令的格式是:mknod 设备名 设备类型(字符:c,块:b) 主设备号 从设备号

 浙公网安备 33010602011771号