
git工具使用
第四章 Asible最佳实践-进阶版-RHCA447-(git代码托管平台)
说明:
|
基础代码架构:无需动手管理基础架构; 自动化代码来定义和构建系统;如果anisble是用来定义这种基础架构的代码;则使用版本控制器;git用来跟踪和控制代码的更改非常有效; 版本控制允许我们对基础架构的代码不同阶段,例如开发、生产、生命周期的管理等等;还能更改我们提交到的分支,并在我们的开发和测试环境中都能很好的应用;测试通过后,可以将其合并到生产代码中去,并且更改应用的基础代码结构;Git就是分布式版本控制系统,允许开发人员管理项目中文件的更改;具有查看和还原旧的版本;比较同一个文件2个版本的识别的更改能力;以及能记录哪些人更改和更改的记录和日志;多个用户更改文件;解决冲突更改并合并在一起的机制;开发人员能克隆远程存储库,在本地存储库创建远程存储库的完整本地副本,而不仅是项目的完整快照;很多快照能暂时存一组相关的更改,并提交给本地存储库,并不会对共享的远程存储库做任何的更改,最后可以push上传到远程存储库;在网络正常的情况下我们可以将远程存储库clone或pull到本地存储库来。 modified:工作树文件的副本已经被编辑,并且与存储库中的最新版本不同。 staged:已经修改的文件已经添加到已更改的文件列表中,以作为一个集合准备提交,但这个状态尚未提交。 committd:已修改的文件已提交到本地存储库中。 |
15.1 安装git与使用
|
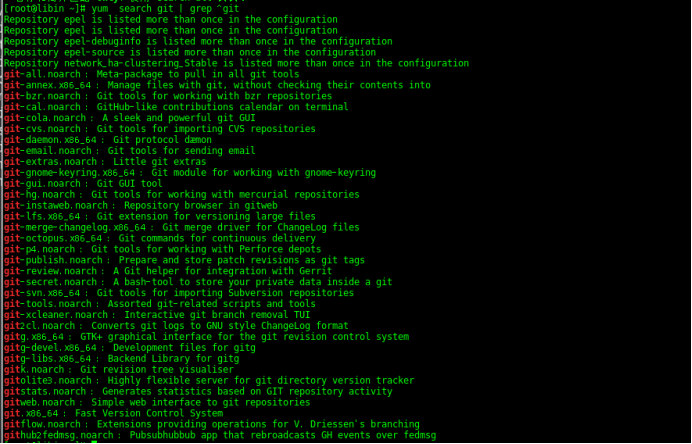
说明:由于我这里没有搭建git服务器,因此都在本地操作 [root@libin ~]# yum search git | grep ^git
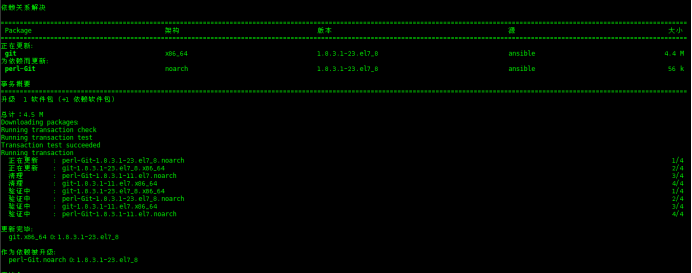
[root@libin ~]# yum install -y git
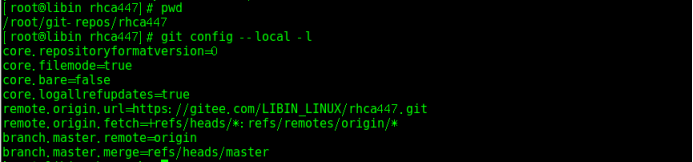
[root@libin ~]# git config -h 用法:git config [选项] 配置文件位置 --global 使用全局配置文件 --system 使用系统级配置文件 --local 使用版本库级配置文件 -f, --file <文件> 使用指定的配置文件 --blob <blob-id> read config from given blob object 操作 --get 获取值:name [value-regex] --get-all 获得所有的值:key [value-regex] --get-regexp 根据正则表达式获得值:name-regex [value-regex] --replace-all 替换所有匹配的变量:name value [value_regex] --add 添加一个新的变量:name value --unset 删除一个变量:name [value-regex] --unset-all 删除所有匹配项:name [value-regex] --rename-section 重命名小节:old-name new-name --remove-section 删除一个小节:name -l, --list 列出所有 -e, --edit 打开一个编辑器 --get-color <slot> 找到配置的颜色:[默认] --get-colorbool <slot> 找到颜色设置:[stdout-is-tty] 类型 --bool 值是 "true" 或 "false" --int 值是十进制数 --bool-or-int 值是 --bool or --int --path 值是一个路径(文件或目录名) 其它 -z, --null 终止值是NUL字节 --includes 查询时参照 include 指令递归查找 merge 切换到我要分支,merge我要合并的那个分支 git remote -v 查看远程库 git log --all 查看所有文件历史修改记录 git log --oneline 查看提交记录信息 cat .git/config 查看本地存储库配置 git branch -vv 查看分支 [root@libin test]# git reset --hard 5xxxxxxxxx 恢复到旧版本 git branch origin 创建分支 git checkout origin 切换分支 git push --set-upstream git@libin.com:test.git origin #指定仓库分支上传push |
15.2 git的基本使用
|
实战1:git的基本命令使用 [root@libin git-repos]# git --version git version 1.8.3.1 https://github.com/git/git/releases #查看git的最新版 不要下载带有-rc的,因为它代表了一个候选发布版本 [root@libin ~]# git config --global -l #查看全局配置
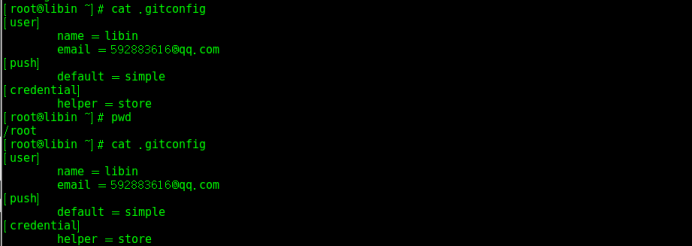
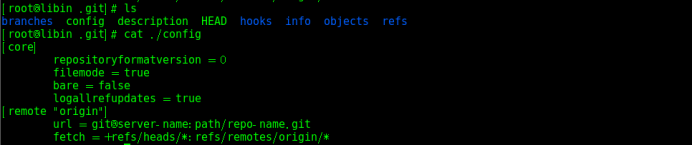
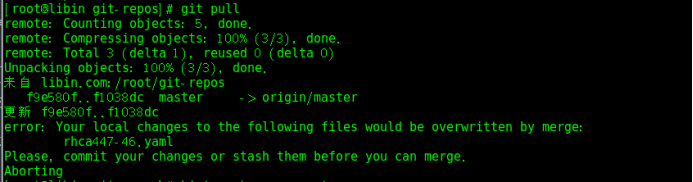
[root@libin ~]# git config --global user.name libin #设置用户名 [root@libin ~]# git config --global user.email 592883616@qq.com #设置邮箱 [root@libin ~]# git config --global push.default simple #简单的推送方式 [root@libin ~]# git config --global credential.helper store [root@libin ~]# mkdir git-repos #创建一个git仓库 [root@libin ~]# cd git-repos/ [root@libin git-repos]# git init #变成Git可以管理的仓库的目录,初始化仓库,会创建一个./git的目录 初始化空的 Git 版本库于 /root/git-repos/.git/ [root@libin git-repos]# git status #查看仓库的状态 拷贝一个yaml文库到本我的git仓库 [root@libin git-repos]# cp /home/libin/ansible/rhca447-46.yaml . [root@libin git-repos]# git status -sb #查看文件当前的状态 [root@libin git-repos]# git add . #将文件添加到暂存区,再观察其状态 [root@libin git-repos]# git commit -m "this is modify by root" #将文件正式提交到本地仓库,git commit -m "信息",##master说明已经将文件上传成功,但是我这里为本地 [root@libin git-repos]# cd .git/ [root@libin .git]# ls #这时就会多了许多文文件 [root@libin .git]# git log #可以查看历史变动 [root@libin git-repos]# git push #表示上传到远程服务器上 [root@libin .git]# git clone root@libin.com:/root/git-repos/ #克隆一个本地版本库 [root@libin git-repos]# vim rhca447-46.yaml #对该文件进行修改 [root@libin git-repos]# cd git-repos/ #进入到另外1个版本库中 [root@libin git-repos]# ls [root@libin git-repos]# git pull #拉取最新的文件 [root@libin git-repos]# git branch libin #建立一个新的分支 [root@libin git-repos]# git checkout libin #切换分支 [root@libin rhca447]# git remote -v #查看关联的远程库 git push --set-upstream origin master libin分支不push到master分支 git branch -a 查看当前分支 git checkout libin 切换分支 git branch rhce 创建分支 rhce git status 查看项目的状态 git remote -v |


15.3 git本地存储库与远程库github关联
|
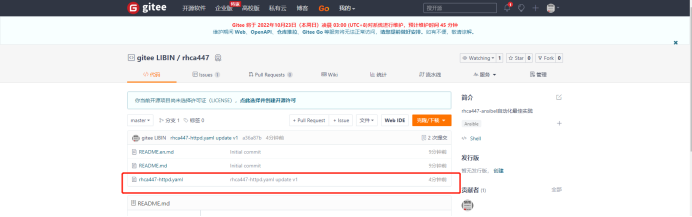
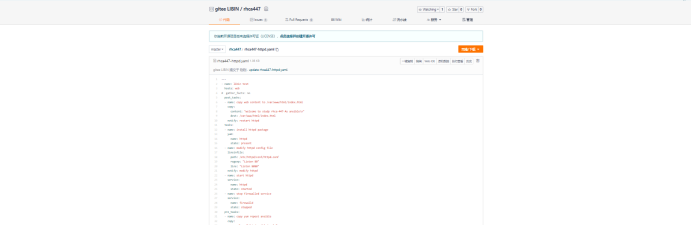
实战2: 本地分支与远程库的关联 1、克隆一个服务端创建的新仓库,克隆gitee上的版本库到本地仓库 [root@libin git-repos]# git clone https://gitee.com/LIBIN_LINUX/rhca447.git 2、进入rhca447目录 [root@libin git-repos]# cd rhca447/ [root@libin rhca447]# pwd /root/git-repos/rhca447 3、编辑一个新的文件 [root@libin rhca447]# vim rhca447-httpd.yaml 4、将文件提交到暂存区 [root@libin redhat]# git add rhca447-20221021.txt [root@libin rhca447]# git commit -m "rhca447-httpd.yaml update v1" 5、正式将本地master分支给服务器推送文件 [root@libin rhca447]# git push origin master 6、服务端便可 以查看到提交,并可查看内容
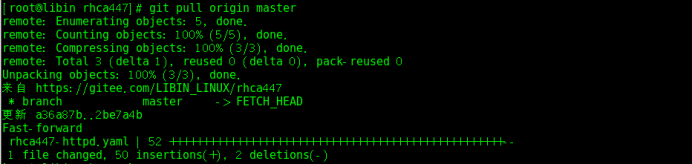
7、服务端编辑更新rhca447-20221021.txt文件提交 8、拉取服务端的更新的文件 [root@libin redhat]# git pull origin master 9、客户端查看内容 |


15.4 不同用户协作分支
|
创建一个裸仓库当成中央仓库,在root 和libin 进行先clone裸仓库,就是一个正常的存储仓库,然后再修改文件,例如:root: push上传中央仓库,普通用户要pull 下来,然后普通用户再修改上传; |
|
实战1: (一)、构建裸仓库 # 创建1个git用户目录 [root@libin ~]# mkdir /home/git # 创建一个git用户 [root@libin ~]# useradd git [root@libin ~]# cd /home/git # 生成一个中央仓库(裸仓库) [root@libin ~]# git init --bare test.git [root@libin ~]# cd /home/git/test.git # 创建分支名,git remote remove name:为删除分支名,这里我没有操作;若后面创建目录为master的分支时需要这条命令:git remote add origin git@libin.com:test.git [root@libin ~]# git remote add origin /home/git/test.git # 这样,裸仓库就搭建成功了 [root@libin ~]# chown -R git:git test.git
(二)、普通用户构建存储库并上传文件至中央仓库 # 下面添加的环境变量就相当于git status -sb=#查看文件当前的状态 [libin@libin ~]$ vim ~/.bashrc export PS1='${debian_chroot:+($debian_chroot)}\u@\h:\w$(__git_ps1 " (%s)")\$' [libin@libin ~]$ source ~/.bashrc
# 创建一个目录 libin@libin:~ (master %)$mkdir test libin@libin:~ (master %)$cd test/ # 克隆裸仓库,形成本地存储库 libin@libin:~/test (master)$git clone git@libin.com:/home/git/test.git # 创建一个文件rhca447.yaml libin@libin:~/test/test (master #)$echo "welcom to study git" >>rhca447.yaml # 提交到暂存区 libin@libin:~/test/test (master #%)$git add . # 提交到本地存储库 libin@libin:~/test/test (master #)$git commit -m 'new rhca447.yaml' # 上传到中央仓库 libin@libin:~/test/test (master)$git push
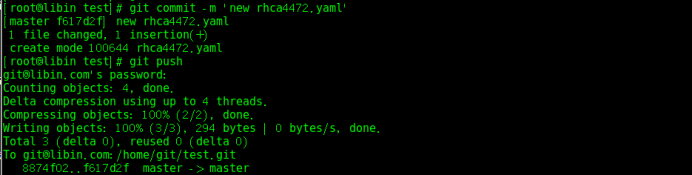
(三)管理员构建存储库并上传文件至中央仓库 [root@libin ~]# mkdir test/ [root@libin ~]# cd test/ # 克隆裸仓库,形成本地存储库,此时clone的存储库中肯定有libin用户提交的文件 [root@libin test]# git clone git@libin.com:/home/git/test.git # 创建一个文件rhca4472.yaml [root@libin test]# echo "welcom to you changsha" >>rhca4472.yaml # 提交到暂存区 [root@libin test]# git add . # 提交到本地存储库 [root@libin test]# git commit -m 'new rhca4472.yaml' # 上传到中央仓库 [root@libin test]# git push
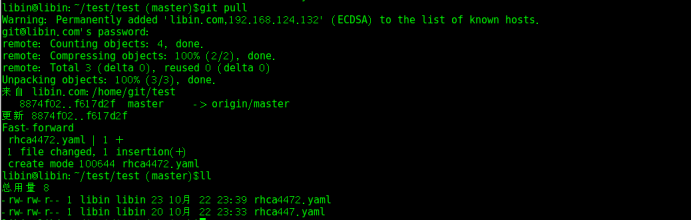
(四)普通用户拉去中央仓库文件 libin@libin:~/test/test (master)$git pull libin@libin:~/test/test (master)$cat rhca4472.yaml welcom to you changsha
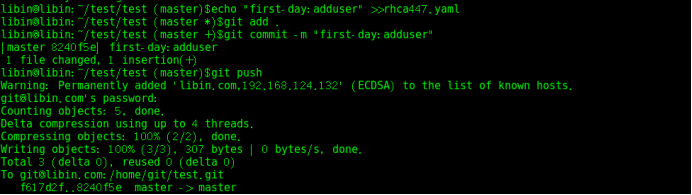
(五)普通用户协作文件并push上传中央仓库 libin@libin:~/test/test (master)$echo "first-day:adduser" >>rhca447.yaml libin@libin:~/test/test (master *)$git add . libin@libin:~/test/test (master +)$git commit -m "first-day:adduser" libin@libin:~/test/test (master)$git push
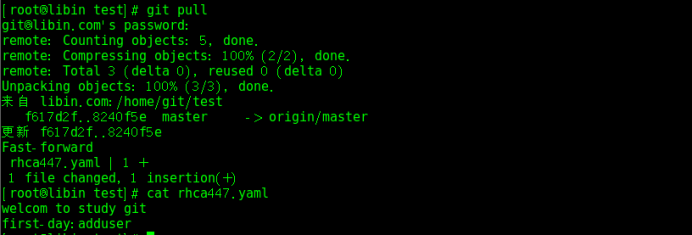
(六)root用户pull拉取普通用户已修改的最新文件 [root@libin test]# git pull
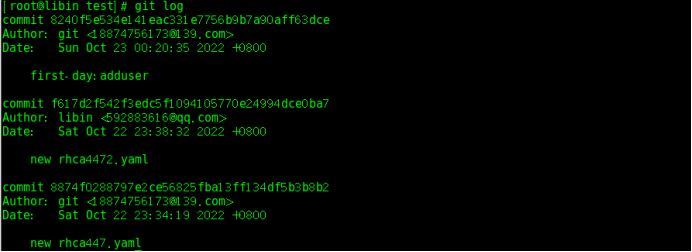
(七)查看文件修改记录,并指定恢复到旧版本 # 查看文件历史修改记录 [root@libin test]# git log # 恢复到旧版本 [root@libin test]# git reset --hard 8874f0288797e2ce56825fba13ff134df5b3b8b2 |


 浙公网安备 33010602011771号