JavaScript数据结构——队列的实现
前面楼主简单介绍了JavaScript数据结构栈的实现,http://www.cnblogs.com/qq503665965/p/6537894.html,本次将介绍队列的实现。
队列是一种特殊的线性表,特殊之处在于它只允许在表的前端(front)进行删除操作,而在表的后端(rear)进行插入操作,和栈一样,队列是一种操作受限制的线性表。进行插入操作的端称为队尾,进行删除操作的端称为队头。
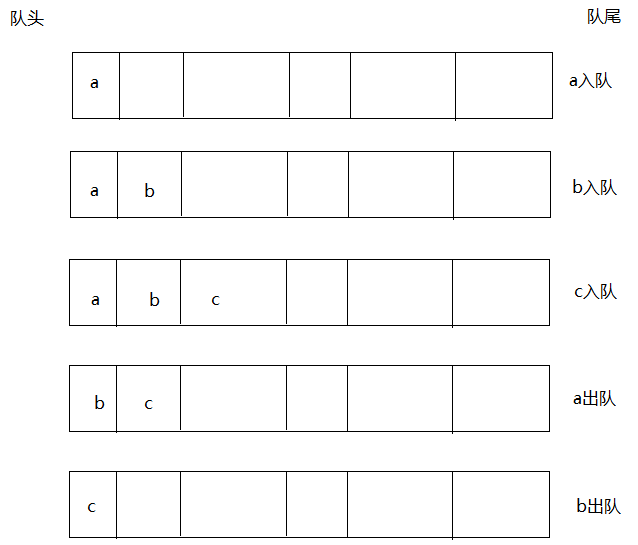
队列的两种主要操作是:向队列中插入新元素和删除队列中的元素。插入操作也叫做入队,删除操作也叫做出队。入队操作在队尾插入新元素,出队操作删除队头的元素。下图演示了这两个操作。

队列的另外一项重要操作是读取队头的元素。这个操作叫做 peek() 。该操作返回队头元素,但不把它从队列中删除。除了读取队头元素,我们还想知道队列中存储了多少元素,可以使用 length 属性满足该需求;要想清空队列中的所有元素,可以使用 clear() 方法来实现。下表定义了队列的一些主要方法:
| dataStorage | Array | 存储数据的底层数据结构 |
| enqueue | int | 入队 |
| dequeue | fucntion | 出队 |
| front | fucntion | 返回队首元素 |
| back | fucntion | 返回队尾元素 |
| toString | fucntion | 显示队列内的所有元素 |
| empty | function | 判断队列是否为空 |
队列的实现
 1 function Queue(array) {
 2     if (array instanceof Array) {
 3         this.dataStorage = array;
 4     } else {
 5         throw "'"+array + "' is not an Array";
 6     }
 7 }
 8
 9 Queue.prototype = {
10     enqueue: function (element) {//向队列中添加元素
11         this.dataStorage.push(element);
12     },
13     dequeue: function () {//删除队首元素
14         return this.dataStorage.shift();
15     },
16     front: function () {//返回队首元素
17         return this.dataStorage[0];
18     },
19     back: function () {//返回队尾元素
20         return this.dataStorage[this.dataStorage.length - 1];
21     },
22     toString: function () {//输出队列中所有元素
23         var result = "";
24         for (var i = 0; i < this.dataStorage.length; i++) {
25             result += this.dataStorage[i] + "\t";
26         }
27         return result;
28     },
29     empty: function () {//判定队列是否为空
30         if (this.dataStorage.length == 0) {
31             return true;
32         }
33         return false;
34     }
35 }
测试:
1  var queue = new Queue(['a','b']);
2 console.log(queue.toString());
3 //queue.dequeue();//a出队
4 //console.log(queue.toString());
5 console.log(queue.front());//队头元素
6 console.log(queue.back());//队尾元素
7 queue.dequeue();
8 queue.dequeue();
9 console.log(queue.empty());
队列的应用——基数排序
原理:对于 0~99 的数字,基数排序将数据集扫描两次。第一次按个位上的数字进行排序,第二次按十位上的数字进行排序。每个数字根据对应位上的数值被分在不同的盒子里。
假设有这样一个数组:{4, 73, 51, 76, 70, 19, 63, 64, 43, 12},经过基数排序第一次扫描之后,数字被分配到如下盒子中:
 1 Box 0: 70
 2 Box 1: 51
 3 Box 2: 12
 4 Box 3: 73,63,43
 5 Box 4: 4,64
 6 Box 5: 76
 7 Box 6:
 8 Box 7:
 9 Box 8:
10 Box 9: 19
根据盒子的顺序,对数字进行第一次排序的结果如下:
70,51,12,73,63,43,4,64,76,19
然后根据十位上的数值再将上次排序的结果分配到不同的盒子中:
 1 Box 0: 4
 2 Box 1: 12,19
 3 Box 2:
 4 Box 3:
 5 Box 4: 43
 6 Box 5: 51
 7 Box 6: 63,64
 8 Box 7: 70,73,76
 9 Box 8:
10 Box 9:
最后,将盒子中的数字取出,组成一个新的列表,该列表即为排好序的数字:
4,12,19,43,51,63,64,70,73,76
使用队列代表盒子,可以实现这个算法。我们需要九个队列,每个对应一个数字。将所有队列保存在一个数组中,使用取余和除法操作决定个位和十位。算法的剩余部分将数字加入相应的队列,根据个位数值对其重新排序,然后再根据十位上的数值进行排序,结果即为排好序的数字。
下面是根据相应位(个位或十位)上的数值,将数字分配到相应队列的方法:
 1      function allocation(nums,queues,n,digit) {
 2             for (var i = 0; i < n; ++i) {
 3                 if (digit == 1) {
 4                     queues[nums[i] % 10].enqueue(nums[i]);
 5                 }
 6                 else {
 7                     queues[Math.floor(nums[i] / 10)].enqueue(nums[i]);
 8                 }
 9             }
10         }
下面是从队列中收集数字的方法:
1     function collection(queues, nums) {
2             var i = 0;
3             for (var digit = 0; digit < 10; ++digit) {
4                 while (!queues[digit].empty()) {
5                     nums[i++] = queues[digit].dequeue();
6                 }
7             }
8         }
测试程序:
 1         var queues = [];
 2         for (var i = 0; i < 10; ++i) {
 3             queues[i] = new Queue([]);
 4         }
 5         var nums = [];
 6         for (var i = 0; i < 10; ++i) {//目标排序数组
 7             nums[i] = Math.floor(Math.floor(Math.random() * 101));
 8         }
 9         console.log("排序前:");
10         showArray(nums);
11         allocation(nums, queues, 10, 1);
12         collection(queues, nums);
13         allocation(nums,queues,10,10);
14         collection(queues, nums);
15         console.log("排序后");
16         showArray(nums);
17
18         function showArray(array) {
19             console.log(array);
20         }
结果:

下篇楼主将带来,链表的实现。
本文的示例代码地址:https://github.com/LJunChina/JavaScript


 浙公网安备 33010602011771号