

分布式文件系统fastdfs
一。介绍fastdfs及原理
FastDFS是一款轻量级的开源分布式文件系统,它用纯C语言实现,支持Linux、FreeBSD、AIX等UNIX系统。只能通过 专有API对文件进行存取访问,不支持POSIX接口方式,不能mount使用。
1> 原理介绍:
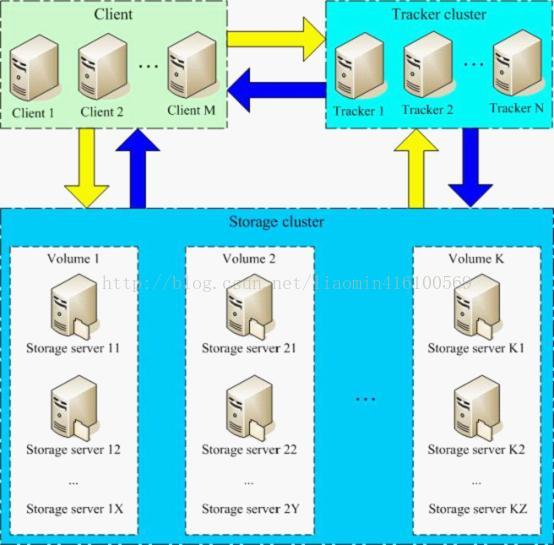
服务分为两大部件Tracker server和Storage server Tracker server负责调度 计算最适合的存储服务器 Storage server负责存储数组 Storage server被分为
多个组 不同的文件上传分发到不同的组中 同一组之间可以形成高可用的主从备份 同一组之间的服务器之间是互为拷贝 数据完全相同。
2> 运行过程:
》》Client询问Tracker server ,Tracker server通过负载算法 返回一台存储 的Storage server;
》》Tracker server 返回的数据为该Storage server的IP地址和端口;
》》Client直接和该Storage server建立连接,进行文件上传,Storage server返回新生成的文件ID,文件上传结束。
二。 安装集群
1>非集群安装
》》模拟环境
Tracker Server 192.168.58.145
Storage Server 192.168.58.146
》》下载安装
安装gcc make 等开发工具包
yum groupinstall "Development Tools"
yum install libevent-devel.x86_64 pcre-devel.x86_64  zlib-devel.x86_64
下载 FastDFS源码 (手工下载地址:https://sourceforge.net/projects/fastdfs/files/)
wget https://nchc.dl.sourceforge.net/project/fastdfs/FastDFS%20Server%20Source%20Code/FastDFS%20Server%20with%20PHP%20Extension%20Source%20Code%20V5.08/FastDFS_v5.08.tar.gz
wget https://nchc.dl.sourceforge.net/project/fastdfs/FastDFS%20Nginx%20Module%20Source%20Code/fastdfs-nginx-module_v1.16.tar.gz[root@bogon fast]# tar zxvf FastDFS_v5.08.tar.gz
[root@bogon fast]# ll
drwxr-xr-x 10 8980 users 4096 Feb 4 2016 FastDFS
-rw-r--r-- 1 root 17510 May 4 2014 fastdfs-nginx-module_v1.16.tar.gz
-rw-r--r-- 1 root root 344620 Feb 4 2016 FastDFS_v5.08.tar.gz
[root@bogon FastDFS]# ./make.sh
cc -Wall -D_FILE_OFFSET_BITS=64 -D_GNU_SOURCE -g -O -DDEBUG_FLAG -c -o ../common/fdfs_global.o ../common/fdfs_global.c
-I../common -I/usr/include/fastcommon../common/fdfs_global.c:20:20:
fatal error: logger.h: No such file or directory #include "logger.h"使用git 克隆代码
[root@bogon fast]# yum -y install git
[root@bogon fast]# git clone https://github.com/happyfish100/libfastcommon.git[root@bogon fast]# cd libfastcommon
[root@bogon libfastcommon]# ll
total 32
drwxr-xr-x 2 root root 114 Sep 4 18:49 doc
-rw-r--r-- 1 root root 8005 Sep 4 18:49 HISTORY
-rw-r--r-- 1 root root 566 Sep 4 18:49 INSTALL
-rw-r--r-- 1 root root 1607 Sep 4 18:49 libfastcommon.spec
-rwxr-xr-x 1 root root 3099 Sep 4 18:49 make.sh
drwxr-xr-x 2 root root 4096 Sep 4 18:49 php-fastcommon
-rw-r--r-- 1 root root 2763 Sep 4 18:49 README
drwxr-xr-x 3 root root 4096 Sep 4 18:49 src
[root@bogon libfastcommon]# ./make.sh
[root@bogon libfastcommon]# ./make.sh install
mkdir -p /usr/lib64
mkdir -p /usr/lib
install -m 755 libfastcommon.so /usr/lib64
install -m 755 libfastcommon.so /usr/lib
#这里发现 安装会将源代码拷贝到/usr/include/fastcommon
mkdir -p /usr/include/fastcommon
install -m 644 common_define.h hash.h chain.h logger.h base64.h shared_func.h pthread_func.h ini_file_reader.h _os_define.h sockopt.h sched_thread.h http_func.h md5.h local_ip_func.h avl_tree.h ioevent.h ioevent_loop.h fast_task_queue.h fast_timer.h process_ctrl.h fast_mblock.h connection_pool.h fast_mpool.h fast_allocator.h fast_buffer.h skiplist.h multi_skiplist.h flat_skiplist.h skiplist_common.h system_info.h fast_blocked_queue.h php7_ext_wrapper.h id_generator.h char_converter.h char_convert_loader.h /usr/include/fastcommon [root@bogon fast]# cd FastDFS
[root@bogon fast]# make.sh
[root@bogon FastDFS]# ./make.sh install
mkdir -p /usr/bin
mkdir -p /etc/fdfs
cp -f fdfs_trackerd /usr/bin
if [ ! -f /etc/fdfs/tracker.conf.sample ]; then cp -f ../conf/tracker.conf /etc/fdfs/tracker.conf.sample; fi
mkdir -p /usr/bin
mkdir -p /etc/fdfs #这里日志显示了创建配置文件目录
cp -f fdfs_storaged /usr/bin
if [ ! -f /etc/fdfs/storage.conf.sample ]; then cp -f ../conf/storage.conf /etc/fdfs/storage.conf.sample; fi
mkdir -p /usr/bin
mkdir -p /etc/fdfs
mkdir -p /usr/lib64
拷贝一个完整的配置文件到 /etc/fdfs目录
cp fastfs源代码/conf/tracker.conf /etc/fdfs 修改 tracker.conf (配置参考http://bbs.chinaunix.net/thread-1941456-1-1.html)
#存储日志和数据的根目录  tacker一般不存储数据 那就是日志(先创建该目录)
base_path=/home/data
#tracker默认的端口号 可以修改
port=22122[root@bogon home]# service fdfs_trackerd start
Starting fdfs_trackerd (via systemctl): [ OK ]
[root@bogon home]# service fdfs_trackerd status
● fdfs_trackerd.service - LSB: FastDFS tracker server
Loaded: loaded (/etc/rc.d/init.d/fdfs_trackerd)
Active: active (running) since Mon 2017-09-04 19:35:05 PDT; 3s ago
Docs: man:systemd-sysv-generator(8)
Process: 7474 ExecStop=/etc/rc.d/init.d/fdfs_trackerd stop (code=exited, status=2)
Process: 7503 ExecStart=/etc/rc.d/init.d/fdfs_trackerd start (code=exited, status=0/SUCCESS)
CGroup: /system.slice/fdfs_trackerd.service
└─7506 /usr/bin/fdfs_trackerd /etc/fdfs/tracker.conf
Sep 04 19:35:05 bogon systemd[1]: Starting LSB: FastDFS tracker server...
Sep 04 19:35:05 bogon fdfs_trackerd[7503]: Starting FastDFS tracker server:
Sep 04 19:35:05 bogon systemd[1]: Started LSB: FastDFS tracker server.[root@bogon home]# netstat -nlp | grep fdfs
tcp 0 0 0.0.0.0:22122 0.0.0.0:* LISTEN 7506/fdfs_trackerd 58.146启动storage服务器
拷贝一个完整的配置文件到 /etc/fdfs目录
cp fastfs源代码/conf/storage.conf /etc/fdfs 修改 storage.conf
#存储日志和数据的根目录 一般存储日志(先创建该目录)
base_path=/home/data
#storage默认的端口号 可以修改
port=23000
#该存储服务器所属的组 集群环境根据group判断
group_name=group1
#store_path数组 从0开始 指定多个存储路径 如果没有任何该配置 默认使用 base_path指定路径
store_path0=/home/data0
# 指定tracker_server的ip和端口
tracker_server=192.168.58.145:22122
# subdir_count  store_path 指定的目录下的data目录 创建的子目录个数 默认是 256个
subdir_count_per_path=256启动并查看[root@bogon ~]# service fdfs_storaged status
● fdfs_storaged.service - LSB: FastDFS storage server
Loaded: loaded (/etc/rc.d/init.d/fdfs_storaged)
Active: active (running) since Thu 2017-09-07 20:11:00 PDT; 7s ago
Docs: man:systemd-sysv-generator(8)
Process: 15993 ExecStart=/etc/rc.d/init.d/fdfs_storaged start (code=exited, status=0/SUCCESS)
CGroup: /system.slice/fdfs_storaged.service
└─15996 /usr/bin/fdfs_storaged /etc/fdfs/storage.conf
Sep 07 20:11:00 bogon systemd[1]: Starting LSB: FastDFS storage server...
Sep 07 20:11:00 bogon fdfs_storaged[15993]: Starting FastDFS storage server:
Sep 07 20:11:00 bogon systemd[1]: Started LSB: FastDFS storage server.
[root@bogon ~]# netstat -nlp | grep fdfs
tcp 0 0 0.0.0.0:23000 0.0.0.0:* LISTEN 15996/fdfs_storaged 查看存储生成的目录 wc -l统计 是 256个子目录
[root@bogon data0]# cd /home/data0 && ll && cd data && ll
total 12
drwxr-xr-x 258 root root 8192 Sep  7 20:11 data
total 3072
drwxr-xr-x 258 root root 8192 Sep  7 20:11 00
drwxr-xr-x 258 root root 8192 Sep  7 20:11 01
drwxr-xr-x 258 root root 8192 Sep  7 20:11 02
drwxr-xr-x 258 root root 8192 Sep 7 20:11 03》》测试文件上传
查看/usr/bin下的所有fdfs工具
[root@bogon fdfs]# ls /usr/bin | grep fdfs
fdfs_appender_test
fdfs_appender_test1
fdfs_append_file
fdfs_crc32
fdfs_delete_file
fdfs_download_file
fdfs_file_info
fdfs_monitor
fdfs_storaged
fdfs_test
fdfs_test1
fdfs_trackerd
fdfs_upload_appender
fdfs_upload_file上传文件时 必须通过trackerserver 来获取合适的storageserver 所以需要指定trackerserver 需要添加一个client.conf配置文件
[root@bogon fdfs]# vi client.conf
tracker_server=192.168.58.145:22122 service iptables stop
iptables --flush文件索引信息包括:组名,虚拟磁盘路径,数据两级目录,文件名。示例:group1/M00/02/44/sdfgsinsdfsdf.jpg
[root@bogon ~]# fdfs_upload_file /etc/fdfs/client.conf ~/a.txt
group1/M00/00/00/wKg6klmyEG-AWCZjAAAADZDfcRo628.txt
查看文件信息(fdfs_file_info <config_file> <file_id>)
[root@bogon 00]# fdfs_file_info /etc/fdfs/client.conf group1/M00/00/00/wKg6klmyEG-AWCZjAAAADZDfcRo628.txt
source storage id: 0
source ip address: 192.168.58.146
file create timestamp: 2017-09-07 20:37:19
file size: 13
file crc32: 2430562586 (0x90DF711A)[root@bogon 00]# fdfs_download_file /etc/fdfs/client.conf group1/M00/00/00/wKg6klmyEG-AWCZjAAAADZDfcRo628.txt ~/bb.txt
[root@bogon 00]# ll ~
total 168836
-rw-------. 1 root root 2913 Apr 5 2016 anaconda-ks.cfg
-rw-r--r-- 1 root root 13 Sep 7 20:35 a.txt
-rw-r--r-- 1 root root 13 Sep 7 20:46 bb.txt[root@bogon 00]# fdfs_delete_file /etc/fdfs/client.conf group1/M00/00/00/wKg6klmyEG-AWCZjAAAADZDfcRo628.txt
#删除了该文件 还可以查看到它的信息
[root@bogon 00]# fdfs_file_info /etc/fdfs/client.conf group1/M00/00/00/wKg6klmyEG-AWCZjAAAADZDfcRo628.txt
source storage id: 0
source ip address: 192.168.58.146
file create timestamp: 2017-09-07 20:37:19
file size: 13
file crc32: 2430562586 (0x90DF711A)
#再次尝试删除 发现报错文件不存在
[root@bogon 00]# fdfs_delete_file /etc/fdfs/client.conf group1/M00/00/00/wKg6klmyEG-AWCZjAAAADZDfcRo628.txt
[2017-09-07 20:48:23] ERROR - file: tracker_proto.c, line: 48, server: 192.168.58.146:23000, response status 2 != 0
delete file fail, error no: 2, error info: No such file or directory
参考(https://www.2cto.com/kf/201611/560911.html)
三。java调用
下载 fastdfsjava客户端的jar包 (https://sourceforge.net/projects/fastdfs/files/Java%20Client%20API%20Library/)
新建一个和上传测试一样的client.conf文件
上传代码:
 ClientGlobal.init("client.conf");
 TrackerServer connection = new TrackerClient().getConnection();
 StorageClient client=new StorageClient(connection,null);
 String[] uploadFile = client.upload_file("c:/无标题.png","png",null);
 for(String a:uploadFile){
    System.out.println(a);
}group1
M00/00/00/wKg6klmyN46AYa-LAAOU-yTEDcU298.png
下载代码:
ClientGlobal.init("client.conf");
 TrackerServer connection = new TrackerClient().getConnection();
 StorageClient client=new StorageClient(connection,null);
 byte[] bt=client.download_file("group1", "M00/00/00/wKg6klmyN46AYa-LAAOU-yTEDcU298.png");
 FileOutputStream fis=new FileOutputStream("c:/a.png");
 fis.write(bt);
 fis.close();
其他相关文档 参考http://elf8848.iteye.com/blog/1739596
