6 云计算系列之Nova安装与配置
preface
上面安装好了glance,下面就开始部署nova计算服务了。
nova组件介绍
首先介绍下nova各个组件。
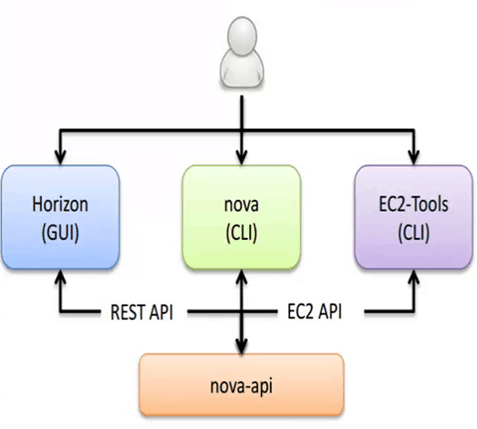
- api 用来接收和响应外部的请求唯一途径,支持Openstack api,EC2(亚马逊) api
- api-metadata 接受来自虚拟机发送的元数据请求
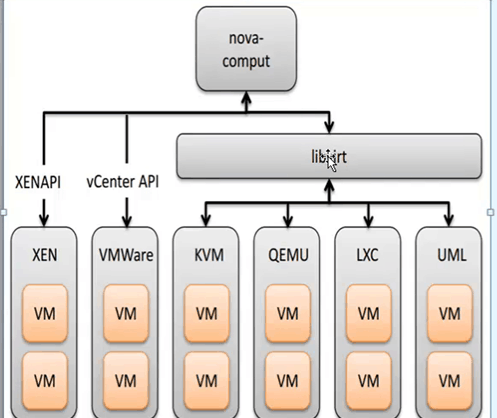
- compute 一个持续工作的守护进程,通过Hypervior的API来创建和销毁虚拟机实例,例如:
- XenServer/XCP 的 XenAPI
- KVM 或 QEMU 的 libvirt
- VMware 的 VMwareAPI
过程是蛮复杂的。最为基本的,守护进程同意了来自队列的动作请求,转换为一系列的系统命令如启动一个KVM实例,然后,到数据库中更新它的状态。
- scheduler 拿到一个来自队列请求虚拟机实例,然后决定那台计算服务器主机来运行它。
- conductor compute服务访问数据库得通过conductor来访问,相当于充当了一个中间价的角色。
- cert 服务器守护进程向Nova Cert服务提供X509证书。用来为
euca-bundle-image生成证书。仅仅是在EC2 API的请求中使用。 - network -orker 与
nova-compute服务类似,从队列中接受网络任务,并且操作网络。执行任务例如创建桥接的接口或者改变IPtables的规则。 - consoleauth 授权控制台的授权验证。
- novncproxy 提供一个代理,用于访问正在运行的实例,通过VNC协议,支持基于浏览器的novnc客户端。
Nova-api

api接受外部的请求并通过Message Queue将请求发送给其他的服务组件。
nova-scheduler
决定把虚拟机创建在哪个计算服务器主机来运行它。
决策一个虚拟机调度到某物理节点,分为两步骤:
- 过滤(filter)
过滤出符合条件的主机,过滤条件有多种,比如你申请的虚拟机要8G内存,4台主机中只有一台主机空闲内存大于8G,再比如有一台主机连接不上glance服务器,或Neutron不正常等等,都是过滤条件。 - 计算权值(Weights)
经过主机过滤后,需要对主机进行权值计算,根据策略选择到相应的某一台主机上。
nova-compute

通过Message queue接受并管理VM的生命周期。通过libvirt管理KVM。
安装Nova
控制节点安装它
1.安装它
[root@linux-node1 images]# yum install openstack-nova-api openstack-nova-conductor \
>   openstack-nova-console openstack-nova-novncproxy \
>   openstack-nova-scheduler
2.修改Nova配置文件
[root@linux-node1 images]# vim /etc/nova/nova.conf

[DEFAULT]
transport_url=rabbit://openstack:openstack@192.168.56.11   rabbit地址
enabled_apis=osapi_compute,metadata
auth_strategy = keystone   # 启用keystone认证
use_neutron=True   # 启用网络服务支持:
firewall_driver = nova.virt.firewall.NoopFirewallDriver   #关闭防火墙

[api_database]
connection=mysql+pymysql://nova:nova@192.168.56.11/nova_api

[database]
connection = mysql+pymysql://nova:nova@192.168.56.11/nova

[keystone_authtoken]
auth_uri = http://192.168.56.11:5000
auth_url = http://192.168.56.11:35357
memcached_servers = 192.168.56.11:11211
auth_type = password
project_domain_name = default
user_domain_name = default
project_name = service
username = nova
password = nova

[vnc]
vncserver_listen=0.0.0.0
vncserver_proxyclient_address=192.168.56.11

[glance]
api_servers= http://192.168.56.11:9292

[oslo_concurrency]
lock_path = /var/lib/nova/tmp
3.初始化数据库
[root@linux-node1 images]#  su -s /bin/sh -c "nova-manage api_db sync" nova
[root@linux-node1 images]#  su -s /bin/sh -c "nova-manage db sync" nova
4.启动服务
添加开机自启动
[root@linux-node1 images]# systemctl enable openstack-nova-api.service \
>   openstack-nova-consoleauth.service openstack-nova-scheduler.service \
>   openstack-nova-conductor.service openstack-nova-novncproxy.service

启动服务
[root@linux-node1 images]# systemctl start openstack-nova-api.service \
>   openstack-nova-consoleauth.service openstack-nova-scheduler.service \
>   openstack-nova-conductor.service openstack-nova-novncproxy.service
5.添加Endpoint和服务
[root@linux-node1 images]# openstack service create --name nova \
>   --description "OpenStack Compute" compute    # 创建服务实体
+-------------+----------------------------------+
| Field       | Value                            |
+-------------+----------------------------------+
| description | OpenStack Compute                |
| enabled     | True                             |
| id          | 84f33de0de8c4da18cfb7f213b63a638 |
| name        | nova                             |
| type        | compute                          |
+-------------+----------------------------------+
[root@linux-node1 images]# openstack endpoint create --region RegionOne compute public http://192.168.56.11:8774/v2.1/%\(tenant_id\)s
+--------------+----------------------------------------------+
| Field        | Value                                        |
+--------------+----------------------------------------------+
| enabled      | True                                         |
| id           | b790368865d34112abba548991a98f79             |
| interface    | public                                       |
| region       | RegionOne                                    |
| region_id    | RegionOne                                    |
| service_id   | 84f33de0de8c4da18cfb7f213b63a638             |
| service_name | nova                                         |
| service_type | compute                                      |
| url          | http://192.168.56.11:8774/v2.1/%(tenant_id)s |
+--------------+----------------------------------------------+
[root@linux-node1 images]# openstack endpoint create --region RegionOne compute internal http://192.168.56.11:8774/v2.1/%\(tenant_id\)s
+--------------+----------------------------------------------+
| Field        | Value                                        |
+--------------+----------------------------------------------+
| enabled      | True                                         |
| id           | 1b3d6aa26e55491faf2c01f779c4fe4c             |
| interface    | internal                                     |
| region       | RegionOne                                    |
| region_id    | RegionOne                                    |
| service_id   | 84f33de0de8c4da18cfb7f213b63a638             |
| service_name | nova                                         |
| service_type | compute                                      |
| url          | http://192.168.56.11:8774/v2.1/%(tenant_id)s |
+--------------+----------------------------------------------+
[root@linux-node1 images]# openstack endpoint create --region RegionOne compute admin http://192.168.56.11:8774/v2.1/%\(tenant_id\)s
+--------------+----------------------------------------------+
| Field        | Value                                        |
+--------------+----------------------------------------------+
| enabled      | True                                         |
| id           | 17547d9fc36e4e5fb3b5bf7c05ac4195             |
| interface    | admin                                        |
| region       | RegionOne                                    |
| region_id    | RegionOne                                    |
| service_id   | 84f33de0de8c4da18cfb7f213b63a638             |
| service_name | nova                                         |
| service_type | compute                                      |
| url          | http://192.168.56.11:8774/v2.1/%(tenant_id)s |
+--------------+----------------------------------------------+
6.验证操作:
[root@linux-node1 images]# openstack host list
+-------------------------+-------------+----------+
| Host Name               | Service     | Zone     |
+-------------------------+-------------+----------+
| linux-node1.example.com | conductor   | internal |
| linux-node1.example.com | consoleauth | internal |
| linux-node1.example.com | scheduler   | internal |
+-------------------------+-------------+----------+
出现以上三行那么就说明没有问题
计算节点操作:
1.首先安装这个计算节点的nova服务
[root@linux-node2 ml2]# yum -y install openstack-nova-compute
2.修改配置文件,配置文件我们从控制节点上复制过去,然后删除数据库的连接信息,以及修改VNC的配置就行了。
[root@linux-node1 ~]# scp /etc/nova/nova.conf 192.168.56.12:/etc/nova/  # 从node1复制过去
[root@linux-node2 nova]# grep -E "^[a-Z]|^\[" nova.conf   # 注意这是node2节点
[DEFAULT]
auth_strategy=keystone
use_neutron=True
enabled_apis=osapi_compute,metadata
firewall_driver = nova.virt.firewall.NoopFirewallDriver
transport_url=rabbit://openstack:openstack@192.168.56.11
[glance]
api_servers= http://192.168.56.11:9292
[keystone_authtoken]
auth_uri = http://192.168.56.11:5000
auth_url = http://192.168.56.11:35357
memcached_servers = 192.168.56.11:11211
auth_type = password
project_domain_name = default
user_domain_name = default
project_name = service
username = nova
password = nova
[oslo_concurrency]
lock_path=/var/lib/nova/tmp
[vnc]
enabled=true
keymap=en-us
vncserver_listen=0.0.0.0
vncserver_proxyclient_address=192.168.56.12
novncproxy_base_url=http://192.168.56.11:6080/vnc_auto.html   # 一定是控制节点上的IP
关于novncproxy_base_url,实际上这是连接控制节点上的6080端口,如果我们创建好云主机以后,发现无法使用控制台,那么就得检查下这一行配置是否正确,一定是控制节点上的IP,第二查看控制节点的6080端口是否存活,服务是否运行了。
3.确定计算节点是否支持虚拟机的硬件加速
[root@linux-node2 nova]#  egrep -c '(vmx|svm)' /proc/cpuinfo
2
如果这个命令返回了大于等于1的值,那么你的计算节点支持硬件加速且不需要额外的配置。如果这个命令返回了0,那么你的计算节点不支持硬件加速。你必须配置 libvirt 来使用 QEMU 去代替 KVM,那么需要修改在 /etc/nova/nova.conf 文件:
[libvirt]
virt_type = qemu  # 默认是KVM
4.启动服务并设置为开机自启动:
[root@linux-node2 nova]# systemctl enable libvirtd.service openstack-nova-compute.service
[root@linux-node2 nova]#  systemctl start libvirtd.service openstack-nova-compute.service
如果服务启动失败,请查看日志/var/log/nova/nova-compute.log
5.启动之后,计算节点能够自动在控制节点能够注册,千万不要修改主机名,改了主机名会认为这个计算节点是新机器,所有在跑的虚拟机都停止。
6.在控制节点查看这个新配置的计算节点是否注册到位:
[root@linux-node1 ~]# source admin_openrc
[root@linux-node1 ~]# nova service-list   # 或者 openstack  compute service list
+----+------------------+-------------------------+----------+---------+-------+----------------------------+-----------------+
| Id | Binary           | Host                    | Zone     | Status  | State | Updated_at                 | Disabled Reason |
+----+------------------+-------------------------+----------+---------+-------+----------------------------+-----------------+
| 1  | nova-conductor   | linux-node1.example.com | internal | enabled | up    | 2017-01-03T13:27:52.000000 | -               |
| 2  | nova-consoleauth | linux-node1.example.com | internal | enabled | up    | 2017-01-03T13:27:56.000000 | -               |
| 3  | nova-scheduler   | linux-node1.example.com | internal | enabled | up    | 2017-01-03T13:28:00.000000 | -               |
| 10 | nova-compute     | linux-node2.example.com | nova     | enabled | up    | 2017-01-03T13:27:53.000000 | -               |    # computer服务注册到位


[root@linux-node1 ~]# openstack host list
+-------------------------+-------------+----------+
| Host Name               | Service     | Zone     |
+-------------------------+-------------+----------+
| linux-node1.example.com | conductor   | internal |
| linux-node1.example.com | consoleauth | internal |
| linux-node1.example.com | scheduler   | internal |
| linux-node2.example.com | compute     | nova     |    # computer服务注册到位
+-------------------------+-------------+----------+


【推荐】国内首个AI IDE,深度理解中文开发场景,立即下载体验Trae
【推荐】编程新体验,更懂你的AI,立即体验豆包MarsCode编程助手
【推荐】抖音旗下AI助手豆包,你的智能百科全书,全免费不限次数
【推荐】轻量又高性能的 SSH 工具 IShell:AI 加持,快人一步
· 10年+ .NET Coder 心语,封装的思维:从隐藏、稳定开始理解其本质意义
· .NET Core 中如何实现缓存的预热?
· 从 HTTP 原因短语缺失研究 HTTP/2 和 HTTP/3 的设计差异
· AI与.NET技术实操系列:向量存储与相似性搜索在 .NET 中的实现
· 基于Microsoft.Extensions.AI核心库实现RAG应用
· TypeScript + Deepseek 打造卜卦网站:技术与玄学的结合
· 阿里巴巴 QwQ-32B真的超越了 DeepSeek R-1吗?
· 【译】Visual Studio 中新的强大生产力特性
· 10年+ .NET Coder 心语 ── 封装的思维:从隐藏、稳定开始理解其本质意义
· 【设计模式】告别冗长if-else语句:使用策略模式优化代码结构