
spring cloud(服务消费者(利用ribbon实现服务消费及负载均衡)——初学二)
Ribbon是一个基于HTTP和TCP客户端的负载均衡器,利用ribbon实现服务消费,并实现客户端的负载均衡。
一、准备工作(利用上一节的内容)
启动服务注册中心
启动computer-service
将computer-service的端口修改为2223,再次启动computer-service
访问 localhost:1111

二、创建消费者
1、创建spring boot项目(利用idea的Spring Initializr快速创建项目)
2、添加ribbon依赖
<?xml version="1.0" encoding="UTF-8"?>
<project xmlns="http://maven.apache.org/POM/4.0.0" xmlns:xsi="http://www.w3.org/2001/XMLSchema-instance"
    xsi:schemaLocation="http://maven.apache.org/POM/4.0.0 http://maven.apache.org/xsd/maven-4.0.0.xsd">
    <modelVersion>4.0.0</modelVersion>

    <groupId>com.daqsoft</groupId>
    <artifactId>customer_demo</artifactId>
    <version>0.0.1-SNAPSHOT</version>
    <packaging>jar</packaging>

    <name>customer_demo</name>
    <description>Demo project for Spring Boot</description>

    <parent>
        <groupId>org.springframework.boot</groupId>
        <artifactId>spring-boot-starter-parent</artifactId>
        <version>1.5.4.RELEASE</version>
        <relativePath/> <!-- lookup parent from repository -->
    </parent>

    <properties>
        <project.build.sourceEncoding>UTF-8</project.build.sourceEncoding>
        <project.reporting.outputEncoding>UTF-8</project.reporting.outputEncoding>
        <java.version>1.8</java.version>
        <spring-cloud.version>Dalston.SR1</spring-cloud.version>
    </properties>

    <dependencies>
        <dependency>
            <groupId>org.springframework.boot</groupId>
            <artifactId>spring-boot-starter-web</artifactId>
        </dependency>

        <dependency>
            <groupId>org.springframework.boot</groupId>
            <artifactId>spring-boot-starter-test</artifactId>
            <scope>test</scope>
        </dependency>

        <dependency>
            <groupId>org.springframework.cloud</groupId>
            <artifactId>spring-cloud-starter-eureka</artifactId>
        </dependency>
        <!--添加ribbon依赖-->
        <dependency>
            <groupId>org.springframework.cloud</groupId>
            <artifactId>spring-cloud-starter-ribbon</artifactId>
        </dependency>
    </dependencies>

    <dependencyManagement>
        <dependencies>
            <dependency>
                <groupId>org.springframework.cloud</groupId>
                <artifactId>spring-cloud-dependencies</artifactId>
                <version>${spring-cloud.version}</version>
                <type>pom</type>
                <scope>import</scope>
            </dependency>
        </dependencies>
    </dependencyManagement>
    <build>
        <plugins>
            <plugin>
                <groupId>org.springframework.boot</groupId>
                <artifactId>spring-boot-maven-plugin</artifactId>
            </plugin>
        </plugins>
    </build>
</project>
3、启动类添加注解开启服务,添加RestTemplate实例并开启负载均衡
package com.daqsoft;

import org.springframework.boot.SpringApplication;
import org.springframework.boot.autoconfigure.SpringBootApplication;
import org.springframework.boot.context.embedded.LocalServerPort;
import org.springframework.cloud.client.discovery.EnableDiscoveryClient;
import org.springframework.cloud.client.loadbalancer.LoadBalanced;
import org.springframework.cloud.netflix.feign.EnableFeignClients;
import org.springframework.context.annotation.Bean;
import org.springframework.web.client.RestTemplate;

@SpringBootApplication
//用来发现注册服务
@EnableDiscoveryClient
public class CustomerDemoApplication {

    /**
     * 创建实例并开启负载均衡
     * @return
     */
    @Bean
    @LoadBalanced
    RestTemplate restTemplate(){
        return new RestTemplate();
    }

    public static void main(String[] args) {
        SpringApplication.run(CustomerDemoApplication.class, args);
    }
}
4、创建消费方来消费add服务
package com.daqsoft;

import org.springframework.beans.factory.annotation.Autowired;
import org.springframework.web.bind.annotation.RequestMapping;
import org.springframework.web.bind.annotation.RequestMethod;
import org.springframework.web.bind.annotation.RestController;
import org.springframework.web.client.RestTemplate;

/**
 * @Description Created by liaoxx on 2017-6-12.
 */
@RestController
public class CustomController {

    @Autowired
    private RestTemplate template;

    @RequestMapping(value = "/add", method = RequestMethod.GET)
    public String add(){
        return template.getForEntity("http://COMPUTE-SERVICE/add?a=15&b=25",String.class).getBody();

    }
}
5、修改配置文件
spring.application.name=ribbon-consumer

server.port=3333
#服务注册中心地址
eureka.client.serviceUrl.defaultZone=http://localhost:1111/eureka/
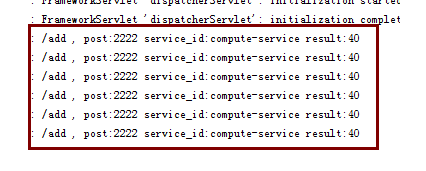
6、启动服务,多次访问 localhost:3333/add
在服务提供方不同端口打印出来的信息,实现了对服务的负载均衡

posted on 2017-06-12 17:24 Sunday_xiao 阅读(191) 评论(0) 编辑 收藏 举报
