shell语法习题练习进阶版
第4章 shell语法深度习题练习
4.1 使用if,case,函数的方法将服务改成system(centos6)
4.1.1 if方法
4.1.1.1 system实现
4.1.1.1.1 编写代码信息
[root@oldboyedu run]# vim /server/scripts/rsyncd
para=$1
proc_file="/var/run/rsyncd.pid"
if [ "x$para" == "xstart" ]
then
if [ -f $proc_file ]
then
kill `cat /var/run/rsyncd.pid` &>/dev/null
sleep 1
rsync --daemon &>/dev/null
else
rsync --daemon &>/dev/null
fi
elif [ "x$para" == "xstop" ]
then
if [ -f $proc_file ]
then
kill `cat /var/run/rsyncd.pid` &>/dev/null
else
rsync --daemon &>/dev/null
sleep 1
kill `cat /var/run/rsyncd.pid` &>/dev/null
fi
elif [ "x$para" == "xrestart" ]
then
if [ -f $proc_file ]
then
kill `cat /var/run/rsyncd.pid` &>/dev/null
sleep 2
rsync --daemon &>/dev/null
else
rsync --daemon &>/dev/null
fi
else
echo $0 "[stop] [start] [restart]"
fi
4.1.1.1.2 将rsync加入开机自启动里面
[root@oldboyedu run]# mv /server/scripts/rsyncd /etc/init.d/
[root@oldboyedu run]# cd /etc/init.d/
[root@oldboyedu init.d]# chmod +x rsyncd
[root@oldboyedu init.d]#
[root@oldboyedu init.d]# vim rsyncd
#!/bin/bash
# chkconfig: 2345 98 99
para=$1
[root@oldboyedu init.d]# chkconfig --add rsyncd
[root@oldboyedu init.d]#
[root@oldboyedu init.d]# chkconfig --list rsyncd
rsyncd 0:off 1:off 2:on 3:on 4:on 5:on 6:off
[root@oldboyedu init.d]#
4.1.1.1.3 使用service测试
[root@oldboyedu ~]# service rsyncd start
[root@oldboyedu ~]# service rsyncd restart
[root@oldboyedu ~]#
4.1.2 函数和case结合方法
4.1.2.1 编写代码信息
[root@oldboyedu scripts]# cat /server/scripts/rsyncd
#!/bin/bash
# chkconfig: 2345 98 99
proc_file="/var/run/rsyncd.pid"
START() {
if [ -f $proc_file ]
then
kill `cat /var/run/rsyncd.pid` &>/dev/null
sleep 1
rsync --daemon &>/dev/null
else
rsync --daemon &>/dev/null
fi
}
STOP() {
if [ -f $proc_file ]
then
kill `cat /var/run/rsyncd.pid` &>/dev/null
else
rsync --daemon &>/dev/null
sleep 1
kill `cat /var/run/rsyncd.pid` &>/dev/null
fi
}
RESTART() {
if [ -f $proc_file ]
then
kill `cat /var/run/rsyncd.pid` &>/dev/null
sleep 2
rsync --daemon &>/dev/null
else
rsync --daemon &>/dev/null
fi
}
OTHER() {
echo $0 "[stop] [start] [restart]"
}
case $1 in
start) START ;;
stop) STOP ;;
restart) RESTART ;;
*) OTHER ;;
esac
4.1.2.2 将rsyncd加入开机自启
[root@oldboyedu run]# mv /server/scripts/rsyncd /etc/init.d/
[root@oldboyedu run]# cd /etc/init.d/
[root@oldboyedu init.d]# chmod +x rsyncd
[root@oldboyedu init.d]#
[root@oldboyedu init.d]# vim rsyncd
#!/bin/bash
# chkconfig: 2345 98 99
para=$1
[root@oldboyedu init.d]# chkconfig --add rsyncd
[root@oldboyedu init.d]#
[root@oldboyedu init.d]# chkconfig --list rsyncd
rsyncd 0:off 1:off 2:on 3:on 4:on 5:on 6:off
[root@oldboyedu init.d]#
4.1.2.3 使用service进行测试
[root@oldboyedu scripts]# service rsyncd start
[root@oldboyedu scripts]# service rsyncd stop
[root@oldboyedu scripts]#
4.2 将服务改成systemctl(centos7)
4.2.1 将centos6下面的脚本rsyncd移动到centos7下
scp -r root@10.0.0.222:/etc/init.d/rsyncd /server/
[root@m01 server] # ls
regular rsyncd scripts
mv rsyncd /etc/init.d/
4.2.2 编写centos7的配置文件(man systemctl)
[Unit]
Description= this is a new rsync
After=network.service
[Service]
Type=forking
ExecStart=/bin/sh /etc/init.d/rsyncd start
ExecStop=/bin/sh /etc/init.d/rsyncd stop
ExecReload=/bin/sh /etc/init.d/rsyncd restart
[Install]
WantedBy=multi.user_target
4.2.3 启动rsyncd
[root@m01 system] # systemctl start rsyncd-new.service
[root@m01 system] # systemctl status rsyncd-new.service
● rsyncd-new.service - this is a new rsync
Loaded: loaded (/usr/lib/systemd/system/rsyncd-new.service; disabled; vendor preset: disabled)
Active: active (running) since Wed 2020-01-08 11:59:17 CST; 1s ago
Process: 4374 ExecStart=/bin/sh /etc/init.d/rsyncd start (code=exited, status=0/SUCCESS)
Main PID: 4377 (rsync)
Tasks: 1
CGroup: /system.slice/rsyncd-new.service
└─4377 rsync --daemon
Jan 08 11:59:17 m01 systemd[1]: Starting this is a new rsync...
Jan 08 11:59:17 m01 systemd[1]: Started this is a new rsync.
[root@m01 system] #
4.3 实现1-100的和(while循环和for循环)
[root@m01 test_init] # cat para_0.sh
#!/bin/bash
sum=0
i=0
while [ $i -le 100 ]
do
((sum=sum+i))
let i++
done
echo $sum
[root@m01 test_init] # sh para_0.sh
5050
[root@m01 test_init] #
[root@m01 test_init] # cat para_0.sh
#!/bin/bash
sum=0
i=0
for i in `seq 100`
do
((sum=sum+i))
done
echo $sum
[root@m01 test_init] # sh para_0.sh
5050
[root@m01 test_init] #
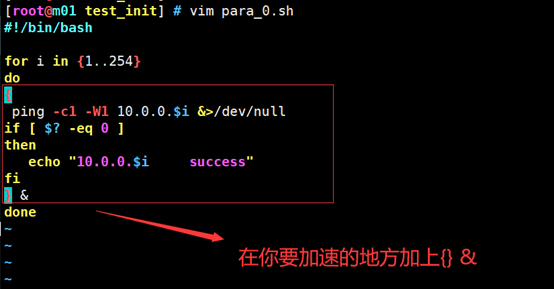
4.4 使用for循环判断10.0.0.0网段有多少台机器是通的
[root@m01 test_init] # cat para_0.sh
#!/bin/bash
for i in {1..254}
do
{
ping -c1 -W1 10.0.0.$i &>/dev/null
if [ $? -eq 0 ]
then
echo "10.0.0.$i success"
fi
} &
done
[root@m01 test_init] # sh para_0.sh
10.0.0.1 success
10.0.0.61 success
10.0.0.222 success
10.0.0.254 success
[root@m01 test_init] #
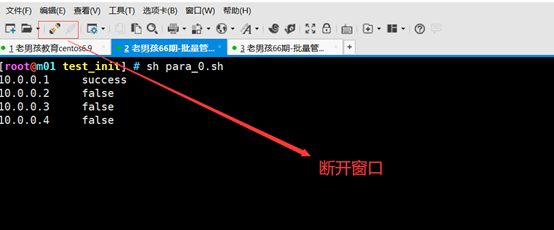
4.5 实现串联执行脚本的时候输出过多的问题
4.5.1 ctrl+z
4.5.1.1 使用ctrl+z让程序进入后台执行

4.5.1.2 查看进入后台的进程
- jobs 查看所有暂停的程序
- bg 在后台运行
- fg 在前台运行

4.5.1.3 结束暂停的程序进程

4.5.2 使用加速来进行处理
4.5.3 使用screen来进行处理
通过命令创建一个shell环境,
4.5.3.1 安装screen
[root@m01 test_init] # yum -y install screen
4.5.3.2 screen常用的参数
screen -ls 查看当前在screen存在的进程信息
screen -r 恢复当前在screen存在的进程信息
screen +a +d 相当于断开窗口连接
screen +a +k 相当于在screen窗口中先ctrl+c,接着ctrl+d
4.5.3.3 在screen窗口运行


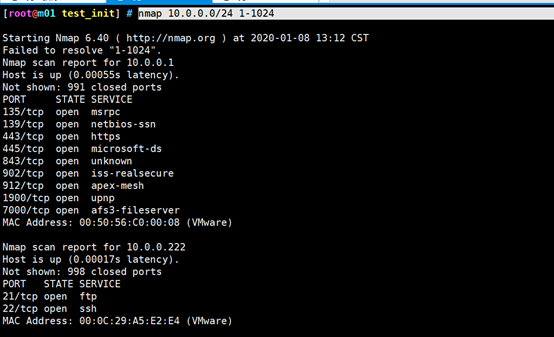
4.6 nmap的使用方法
4.6.1 nmap的概念介绍
nmap是网络扫描工具,用来扫描网络上面的连接端,(IP/端口,域名)
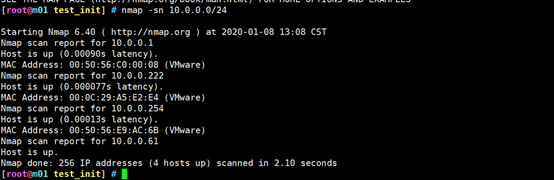
4.6.2 nmap的使用
nmap -sn 10.0.0.0/24 只做ping,不做端口扫描(n不做反向解析)
nmap 10.0.0.0/24 1-1024 探测10.0.0.0网段1-1024哪些端口开放的