springboot2.0 web应用接入微信公众号步骤和一些坑
1可以利用测试公众号进行开发(个人的是没有网页授权的)
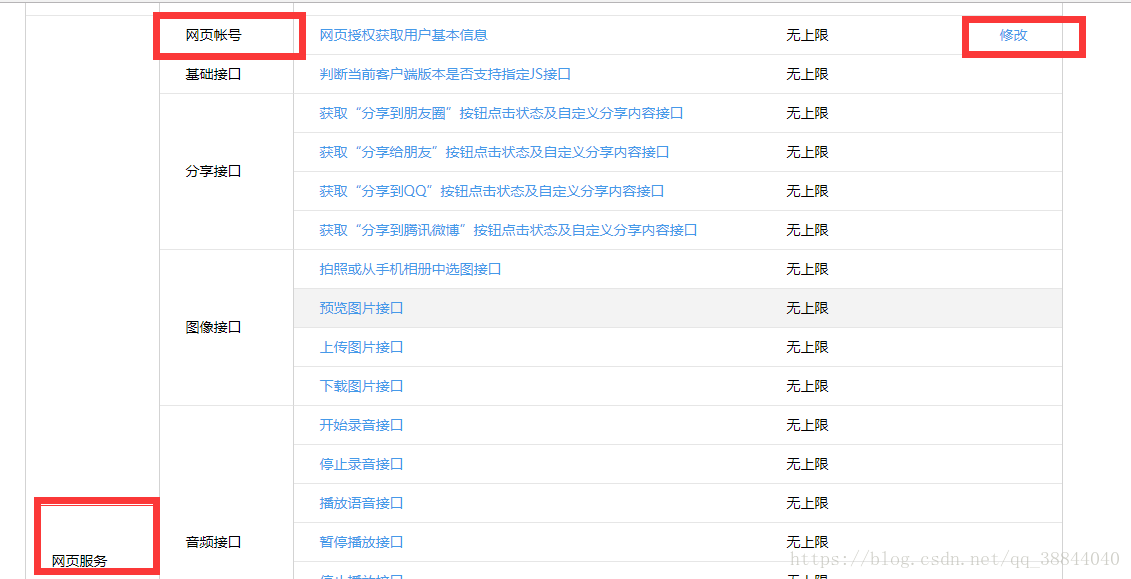
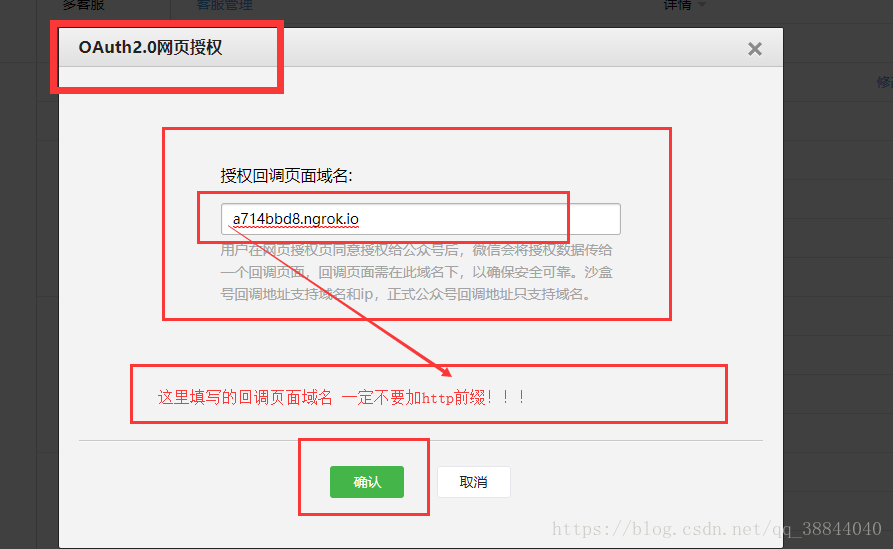
配置好相关信息
这里我们可以手工方式原生的按照微信文档进行操作 但现在我们使用第三方sdk来接入,
这个sdk的稳定性 安全性 可用性是值得信赖的 在github上有近1W的star。(包含了微信相关开发的所有了 下面的 mp是公众号模块)
给出github地址:https://github.com/chanjarster/weixin-java-tools/;
我们在项目里引入依赖(maven gradle 都支持)
        <dependency>
            <groupId>com.github.binarywang</groupId>
            <artifactId>weixin-java-mp</artifactId>
            <version>2.7.0</version>
        </dependency>
下面来看看代码
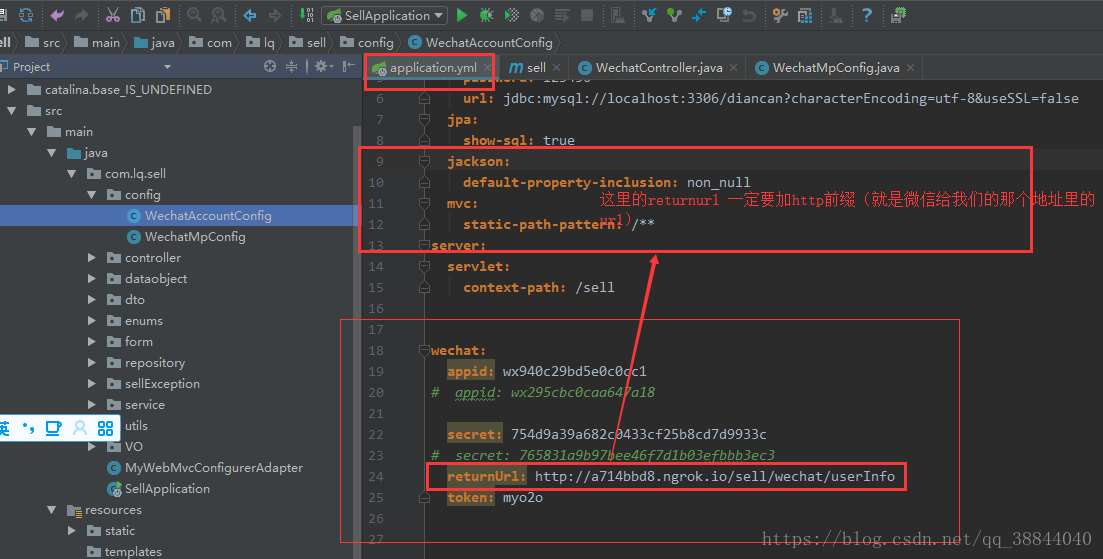
为了灵活性和解耦合,我们把一些东西单独放在配置文件里(让它从apllication.yml中读取)
package com.lq.sell.config;


import lombok.Data;
import org.springframework.boot.context.properties.ConfigurationProperties;
import org.springframework.stereotype.Component;

@Component
@Data
@ConfigurationProperties(prefix = "wechat")
public class WechatAccountConfig {

    private  String appid;
    private  String secret;
    private  String returnUrl;
    private  String token;
}
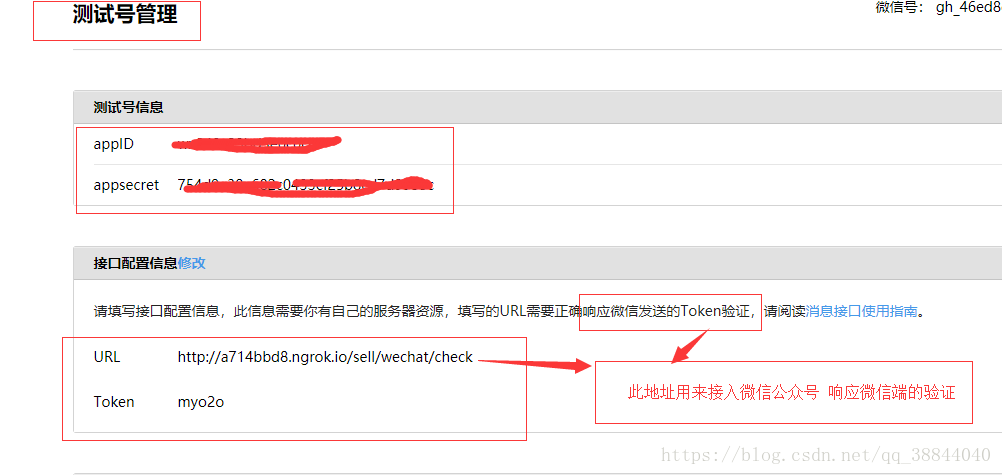
上图中的接口配置信息地址在下面的类中验证
 @RequestMapping("/check")
    public void check(ServletResponse response, String timestamp, String nonce, String signature, String echostr) {
        if (!wxMpService.checkSignature(timestamp, nonce, signature)) {
            log.error("不合法");
            throw new SellException(ResultEnum.WECHAT_ERROR);
        }
        PrintWriter o = null;
        try {
            o = new PrintWriter(response.getWriter());
            o.print(echostr);
        } catch (IOException e) {
            log.error("写回微信端错误{}", e.getMessage());
        } finally {
            o.close();
        }
    }
微信将请求这个地址来验证接口信息(就是上图中的地址)
这个方法的五个参数作用分别是:
response 将echostr原样写回微信告诉它通过验证;
微信端验证时传过来的参数—时间戳;
微信端验证时传过来的参数—随机数;
微信端验证时传过来的参数—签名;
这里checkSignature()方法会具体去检验是否合法。
通过后返回echostr;验证通过。(我们的token呢???? 别急 后面会出现的)
这个sdk的使用在mp模块主要有两个类(不清楚的可以上github看文档)
WxMpService;WxMpConfigStorage;
下面是在springboot里的配置
package com.lq.sell.config;

import me.chanjar.weixin.mp.api.WxMpConfigStorage;
import me.chanjar.weixin.mp.api.WxMpInMemoryConfigStorage;
import me.chanjar.weixin.mp.api.WxMpService;
import me.chanjar.weixin.mp.api.impl.WxMpServiceImpl;
import org.springframework.beans.factory.annotation.Autowired;
import org.springframework.context.annotation.Bean;
import org.springframework.stereotype.Component;

@Component
public class WechatMpConfig {
    @Autowired
    private WechatAccountConfig wechatAccountConfig;


    @Bean
    public WxMpService wxMpService() {
        WxMpService wxMpService = new WxMpServiceImpl();
        wxMpService.setWxMpConfigStorage(wxMpConfigStorage());
        return wxMpService;
    }

    @Bean
    public WxMpConfigStorage wxMpConfigStorage() {
        WxMpInMemoryConfigStorage wxMpInMemoryConfigStorage = new WxMpInMemoryConfigStorage();
        wxMpInMemoryConfigStorage.setAppId(wechatAccountConfig.getAppid());
        wxMpInMemoryConfigStorage.setSecret(wechatAccountConfig.getSecret());
        wxMpInMemoryConfigStorage.setToken(wechatAccountConfig.getToken());
//        wxMpInMemoryConfigStorage.setAesKey("m8lg6owoQN2xK79ku5JW0JJXxz7QepX2BWlj5NHFsi8");
        return wxMpInMemoryConfigStorage;
    }
}
上面的代码setToken实际上是去做了我们第一步的checkSignature();
当我们通过验证后
就编写对应的controller就好了
看看我们的代码
package com.lq.sell.controller;

import com.lq.sell.config.WechatAccountConfig;
import com.lq.sell.config.WechatMpConfig;
import com.lq.sell.enums.ResultEnum;
import com.lq.sell.sellException.SellException;
import lombok.extern.slf4j.Slf4j;
import me.chanjar.weixin.common.api.WxConsts;
import me.chanjar.weixin.common.exception.WxErrorException;
import me.chanjar.weixin.mp.api.WxMpService;
import me.chanjar.weixin.mp.bean.result.WxMpOAuth2AccessToken;
import org.springframework.beans.factory.annotation.Autowired;
import org.springframework.stereotype.Controller;
import org.springframework.web.bind.annotation.GetMapping;
import org.springframework.web.bind.annotation.RequestMapping;
import org.springframework.web.bind.annotation.RequestParam;

import javax.servlet.ServletResponse;
import java.io.IOException;
import java.io.PrintWriter;
import java.net.URLEncoder;

@Controller
@RequestMapping("/wechat")
@Slf4j
public class WechatController {

    @Autowired
    private WxMpService wxMpService;

    @Autowired
    private WechatAccountConfig wechatAccountConfig;

    @RequestMapping("/authorize")
    public String authorize(@RequestParam("returnUrl") String returnUrl) {

        String redirectUrl = wxMpService.oauth2buildAuthorizationUrl(wechatAccountConfig.getReturnUrl(), WxConsts.OAUTH2_SCOPE_USER_INFO, URLEncoder.encode(returnUrl));
        log.info("获得code redirectUrl{}", redirectUrl);

        return "redirect:" + redirectUrl;
    }

    @RequestMapping("/userInfo")
    public String userInfo(@RequestParam("code") String code, @RequestParam("state") String returnUrl) {
        log.info("redirect code{}  state{}", code, returnUrl);
        WxMpOAuth2AccessToken wxMpOAuth2AccessToken = null;
        try {
            wxMpOAuth2AccessToken = wxMpService.oauth2getAccessToken(code);
        } catch (WxErrorException e) {
            log.error("wechat  error{}", e.getError().getErrorMsg());
            throw new SellException(e.getError().getErrorMsg());
        }
        String openId = wxMpOAuth2AccessToken.getOpenId();
        log.info("openid{}", openId);
        log.info("enter");
        log.info("return url{}", returnUrl);
        return "redirect:" + "https://www.imooc.com/" + "?openid=" + openId;
    }


    @RequestMapping("/check")
    public void check(ServletResponse response, String timestamp, String nonce, String signature, String echostr) {
        if (!wxMpService.checkSignature(timestamp, nonce, signature)) {
            log.error("不合法");
            throw new SellException(ResultEnum.WECHAT_ERROR);
        }
        PrintWriter o = null;
        try {
            o = new PrintWriter(response.getWriter());
            o.print(echostr);
        } catch (IOException e) {
            log.error("写回微信端错误{}", e.getMessage());
        } finally {
            o.close();
        }
    }
}
注意 这里的bean名 路径 controller名 方法名(authorize())要一致,这个sdk文档有说明的。
authorize()我们去请求微信
userInfo()这个方法我们就可以去做我们想做的事了 比如得到openid ,获取用户信息 ,重定向到某个网页(上面就是)等。
下图是一些步骤 和注意的地方(坑)
务必小心!
有问题可以给我留言。