
SpringBoot内置嵌入式Tomcat启动原理
1.引言
现在JavaEE开发基本离不开spring全家桶,spring面世以来极大地简化了开发过程和代码量,但是随着spring版本迭代,功能越来越丰富和强大,带来的问题就是有大量的配置文件需要去开发人员去编写 ,所以springboot 应运而生,springboot 的理念是约定大于配置,极大地缩减了配置文件的量,借助springboot的自动配置甚至可以实现0配置,快速搭建项目,同时另外一个亮点就是内置servlet容器,不用再将代码打成war包,然后再去部署到tomcat,再启动tomcat,直接将项目打成jar包启动,也是特别方便。
2.内置servlet容器的使用方法
(1)使用约定的也就是默认的容器。默认使用的是tomcat,只需要引入web的依赖就可以自动使用Tomcat作为默认的servlet容器启动项目
<dependency>
    <groupId>org.springframework.boot</groupId>
    <artifactId>spring-boot-starter-web</artifactId>
</dependency>
(2)使用其他的内置容器
除了tomcat ,springboot 还支持Undertow 和 Jetty,并且可以快速切换成任意一个。做法是排除tomcat,引入想要用的容器jar包
<dependency>
            <groupId>org.springframework.boot</groupId>
            <artifactId>spring-boot-starter-web</artifactId>
            <exclusions>
                <exclusion>
                    <groupId>org.springframework.boot</groupId>
                    <artifactId>spring-boot-starter-tomcat</artifactId>
                </exclusion>
            </exclusions>
        </dependency>

        <dependency>
            <groupId>org.springframework.boot</groupId>
            <artifactId>spring-boot-starter-undertow</artifactId>
        </dependency>
<dependency>
            <groupId>org.springframework.boot</groupId>
            <artifactId>spring-boot-starter-web</artifactId>
            <exclusions>
                <exclusion>
                    <groupId>org.springframework.boot</groupId>
                    <artifactId>spring-boot-starter-tomcat</artifactId>
                </exclusion>
            </exclusions>
        </dependency>
        <dependency>
            <groupId>org.springframework.boot</groupId>
            <artifactId>spring-boot-starter-jetty</artifactId>
        </dependency>
(3)不使用内置容器
<dependency>
    <groupId>org.springframework.boot</groupId>
    <artifactId>spring-boot-starter-web</artifactId>
    <!-- 移除嵌入式tomcat插件 -->
    <exclusions>
        <exclusion>
            <groupId>org.springframework.boot</groupId>
            <artifactId>spring-boot-starter-tomcat</artifactId>
        </exclusion>
    </exclusions>
</dependency>
<!--添加servlet-api依赖--->
<dependency>
    <groupId>javax.servlet</groupId>
    <artifactId>javax.servlet-api</artifactId>
    <version>3.1.0</version>
    <scope>provided</scope>
</dependency>
3.Tomcat 基本结构及其用
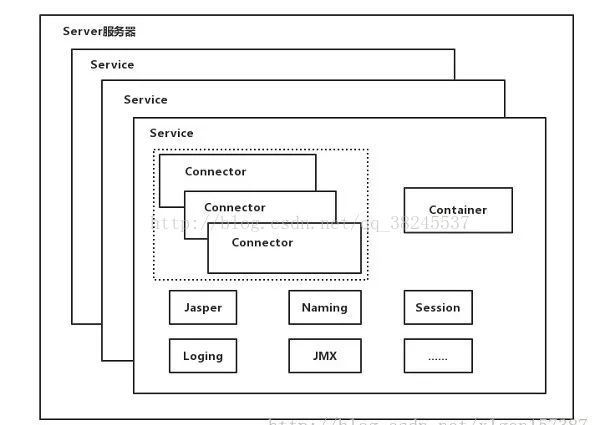
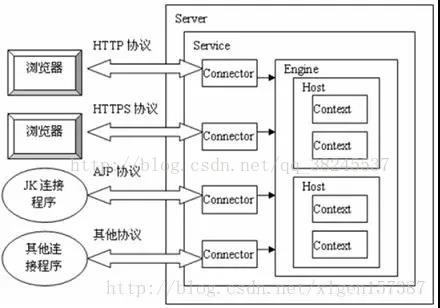
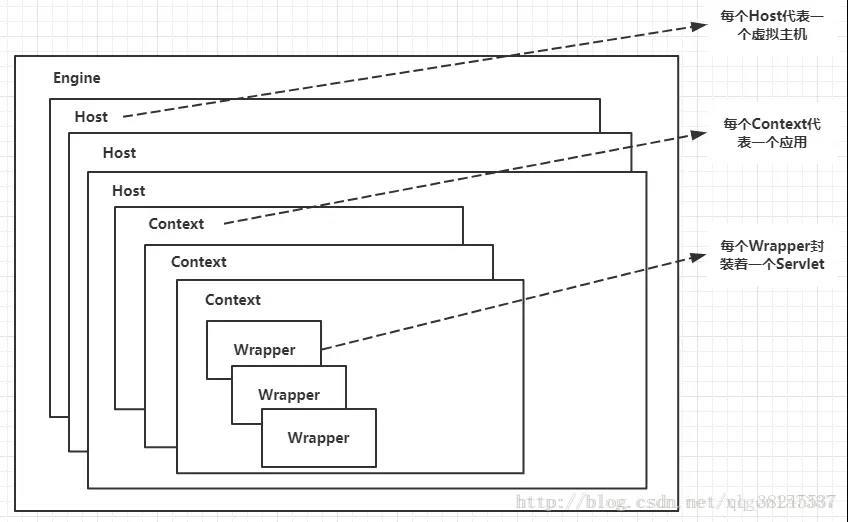
Tomcat中最顶层的容器是Server,代表着整个服务器,从上图中可以看出,一个Server可以包含至少一个Service,用于具体提供服务。Service主要包含两个部分:Connector和Container,是tomcat的核心。Connector用于处理连接相关的事情,并提供Socket与Request和Response相关的转化,Container用于封装和管理Servlet,以及具体处理Request请求。
一个Tomcat中只有一个Server,一个Server可以包含多个Service,一个Service只有一个Container,但是可以有多个Connectors,这是因为一个服务可以有多个连接,如同时提供Http和Https链接,也可以提供向相同协议不同端口的连接
多个 Connector 和一个 Container 就形成了一个 Service,有了 Service 就可以对外提供服务了,但是 Service必须依赖server 生存,所以整个 Tomcat 的生命周期由 Server 控制。
4.内置Tomcat启动流程
tomcat 的启动需要从main 函数入手,main 函数的run方法实际调用的是 SpringApplication 的run 方法
public ConfigurableApplicationContext run(String... args) {
        StopWatch stopWatch = new StopWatch();
        stopWatch.start();
        ConfigurableApplicationContext context = null;
        Collection<SpringBootExceptionReporter> exceptionReporters = new ArrayList<>();
        configureHeadlessProperty();
        //获取应用启动的事件监听器
        SpringApplicationRunListeners listeners = getRunListeners(args);
        // 发布了一个spring应用启动事件
        listeners.starting();
        try {
            ApplicationArguments applicationArguments = new DefaultApplicationArguments(args);
            // 准备应用启动环境(StandardServletEnviroment)
            ConfigurableEnvironment environment = prepareEnvironment(listeners, applicationArguments);
            configureIgnoreBeanInfo(environment);
            //打印启动banner
            Banner printedBanner = printBanner(environment);
            // 根据条件创建applicationContext,这里创建的是AnnotationConfigServletWebServerApplicationContext
            context = createApplicationContext();
            exceptionReporters = getSpringFactoriesInstances(SpringBootExceptionReporter.class,
                    new Class[] { ConfigurableApplicationContext.class }, context);
            prepareContext(context, environment, listeners, applicationArguments, printedBanner);
            //刷新上下文
            refreshContext(context);
            //再次刷新上下文
            afterRefresh(context, applicationArguments);
            stopWatch.stop();
            if (this.logStartupInfo) {
                new StartupInfoLogger(this.mainApplicationClass).logStarted(getApplicationLog(), stopWatch);
            }
            listeners.started(context);
            callRunners(context, applicationArguments);
        }
        catch (Throwable ex) {
            handleRunFailure(context, ex, exceptionReporters, listeners);
            throw new IllegalStateException(ex);
        }

        try {
            listeners.running(context);
        }
        catch (Throwable ex) {
            handleRunFailure(context, ex, exceptionReporters, null);
            throw new IllegalStateException(ex);
        }
        return context;
    }
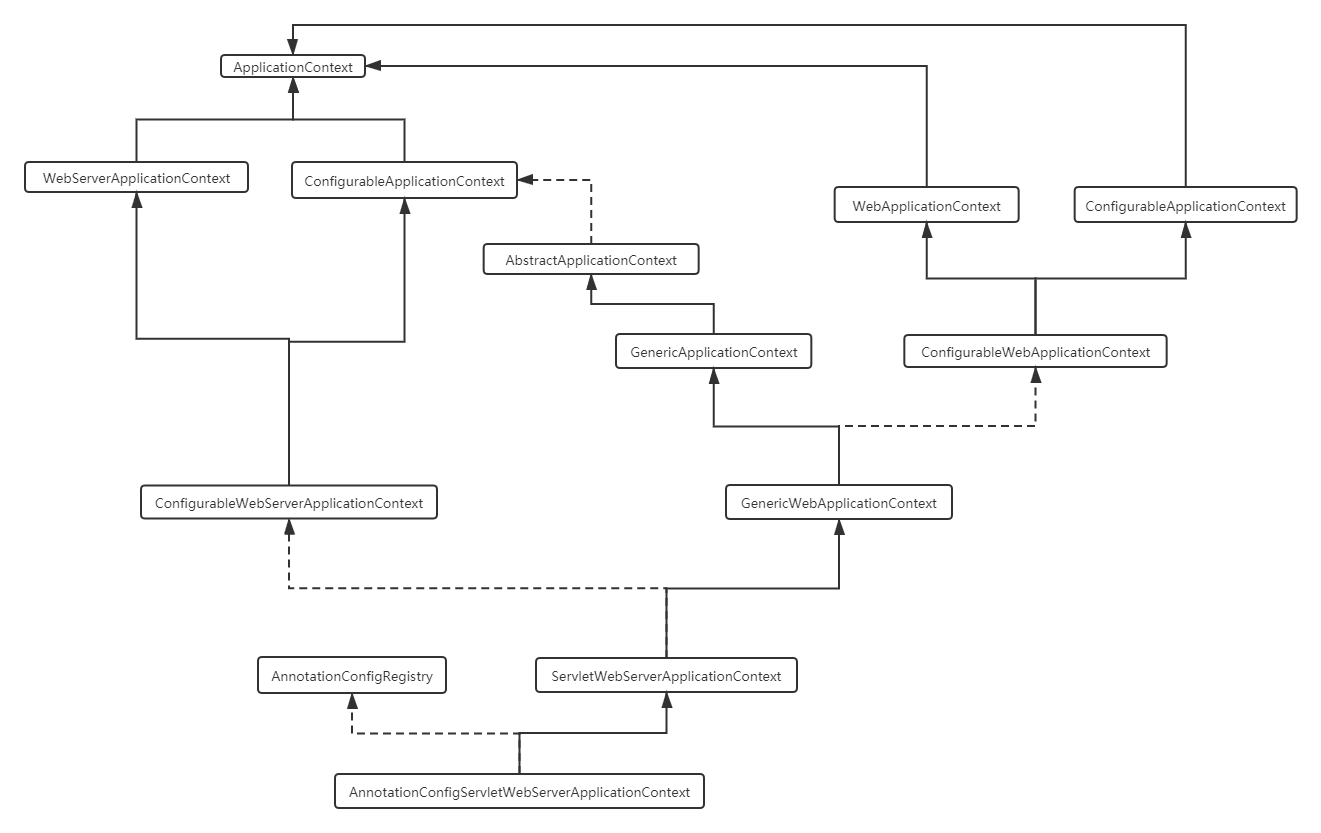
createApplicationContext(); 创建了一个 AnnotationConfigServletWebServerApplicationContext 这个context 是注解版的servletContext ,它的本质还是applicationContext,继承和实现关系如下
接下来执行refreshContext,刷新上下文,调用的是AbstractApplicationContext的refresh,这个方法已经不是在springboot 的包内了,而是在spring 中了,这个启动流程是一个模板方法
  public void refresh() throws BeansException, IllegalStateException {
        synchronized(this.startupShutdownMonitor) {
            this.prepareRefresh();
            // 获取beanFactory,这个就是springIoc容器的祖先
            ConfigurableListableBeanFactory beanFactory = this.obtainFreshBeanFactory();
            this.prepareBeanFactory(beanFactory);

            try {
                //为容器子类添加特殊的postprocess
                this.postProcessBeanFactory(beanFactory);
                //执行postprocess
                this.invokeBeanFactoryPostProcessors(beanFactory);
                // 为Bean 添加后置处理器
                this.registerBeanPostProcessors(beanFactory);
                // 初始化国际化信息源
                this.initMessageSource();
                //初始化时间传播器
                this.initApplicationEventMulticaster();
                // 刷新,这个方法是留给子类扩展使用的,tomcat的启动就在这里执行
                this.onRefresh();
                //注册时间监听器
                this.registerListeners();
                //初始化单实例Bean,循环依赖,后置处理器,initMethod,awear 接口的实现,自动装配,都在这里完成,boot 在这里加载了一些默认的bean,mvc相关的,条件注解相关的,共26个
                this.finishBeanFactoryInitialization(beanFactory);
                //初始化和发布Bean的生命周期事件
                this.finishRefresh();
            } catch (BeansException var9) {
                if (this.logger.isWarnEnabled()) {
                    this.logger.warn("Exception encountered during context initialization - cancelling refresh attempt: " + var9);
                }

                this.destroyBeans();
                this.cancelRefresh(var9);
                throw var9;
            } finally {
                this.resetCommonCaches();
            }

        }
    }
接下来重点看onRefresh如何启动tomcat,子类ServletWebServerApplicationContext 复写了这个方法
protected void onRefresh() {
   super.onRefresh();
   try {
      createWebServer();
   }
   catch (Throwable ex) {
      throw new ApplicationContextException("Unable to start web server", ex);
   }
}
createWebServer
private void createWebServer() {
   WebServer webServer = this.webServer;
   ServletContext servletContext = getServletContext();
   if (webServer == null && servletContext == null) {
      ServletWebServerFactory factory = getWebServerFactory();
      this.webServer = factory.getWebServer(getSelfInitializer());
   }
   else if (servletContext != null) {
      try {
         getSelfInitializer().onStartup(servletContext);
      }
      catch (ServletException ex) {
         throw new ApplicationContextException("Cannot initialize servlet context", ex);
      }
   }
   initPropertySources();
}
先获取ServletWebServerFactory,然后通过工厂获取具体的webServer,此时获取的是TomcatServletWebServerFactory,同时这个接口的实现还有undertow和jetty的工厂。getWebServer 实现如下
public WebServer getWebServer(ServletContextInitializer... initializers) {
   if (this.disableMBeanRegistry) {
      Registry.disableRegistry();
   }
   Tomcat tomcat = new Tomcat();
   File baseDir = (this.baseDirectory != null) ? this.baseDirectory : createTempDir("tomcat");
   tomcat.setBaseDir(baseDir.getAbsolutePath());
   Connector connector = new Connector(this.protocol);
   connector.setThrowOnFailure(true);
   tomcat.getService().addConnector(connector);
   customizeConnector(connector);
   tomcat.setConnector(connector);
   tomcat.getHost().setAutoDeploy(false);
   configureEngine(tomcat.getEngine());
   for (Connector additionalConnector : this.additionalTomcatConnectors) {
      tomcat.getService().addConnector(additionalConnector);
   }
   prepareContext(tomcat.getHost(), initializers);
   return getTomcatWebServer(tomcat);
}
主要就是创建tomcat 的server,service,connector,engine 这些核心组件,然后调用 getTomcatWebServer,初始化和启动tomcat,
private void initialize() throws WebServerException {
   logger.info("Tomcat initialized with port(s): " + getPortsDescription(false));
   synchronized (this.monitor) {
      try {
         addInstanceIdToEngineName();

         Context context = findContext();
         context.addLifecycleListener((event) -> {
            if (context.equals(event.getSource()) && Lifecycle.START_EVENT.equals(event.getType())) {
               // Remove service connectors so that protocol binding doesn't
               // happen when the service is started.
               removeServiceConnectors();
            }
         });

         // Start the server to trigger initialization listeners
         this.tomcat.start();

         // We can re-throw failure exception directly in the main thread
         rethrowDeferredStartupExceptions();

         try {
            ContextBindings.bindClassLoader(context, context.getNamingToken(), getClass().getClassLoader());
         }
         catch (NamingException ex) {
            // Naming is not enabled. Continue
         }

         // Unlike Jetty, all Tomcat threads are daemon threads. We create a
         // blocking non-daemon to stop immediate shutdown
         startDaemonAwaitThread();
      }
      catch (Exception ex) {
         stopSilently();
         destroySilently();
         throw new WebServerException("Unable to start embedded Tomcat", ex);
      }
   }
}
最后执行模板方法的最后一步finishRefresh,这个方法也被子类ServletWebServerApplicationContext复写了,
protected void finishRefresh() {
   super.finishRefresh();
   WebServer webServer = startWebServer();
   if (webServer != null) {
      publishEvent(new ServletWebServerInitializedEvent(webServer, this));
   }
}
private WebServer startWebServer() {
   WebServer webServer = this.webServer;
   if (webServer != null) {
      webServer.start();
   }
   return webServer;
}
此时tomcat 还没有真正启动,当执行webServer.start()时会找到context ,并且load,此时才算项目启动了
public void start() throws WebServerException {
   synchronized (this.monitor) {
      if (this.started) {
         return;
      }
      try {
         addPreviouslyRemovedConnectors();
         Connector connector = this.tomcat.getConnector();
         if (connector != null && this.autoStart) {
            performDeferredLoadOnStartup();
         }
         checkThatConnectorsHaveStarted();
         this.started = true;
         logger.info("Tomcat started on port(s): " + getPortsDescription(true) + " with context path '"
               + getContextPath() + "'");
      }
      catch (ConnectorStartFailedException ex) {
         stopSilently();
         throw ex;
      }
      catch (Exception ex) {
         if (findBindException(ex) != null) {
            throw new PortInUseException(this.tomcat.getConnector().getPort());
         }
         throw new WebServerException("Unable to start embedded Tomcat server", ex);
      }
      finally {
         Context context = findContext();
         ContextBindings.unbindClassLoader(context, context.getNamingToken(), getClass().getClassLoader());
      }
   }
}
最后再到main函数的
listeners.started(context);
callRunners(context, applicationArguments);
这两个方法,分别执行容器启动的监听器的回调,和执行 ApplicationRunner 和 ApplicationRunner 这些类型Bean的调用。至此基本描述了springboot 中tomcat 的启动过程,顺带些了一下spring Ioc容器的启动流程。
