使用Glimpse 监测ASP.NET MVC网站
使用MiniProfiler调试ASP.NET MVC网站性能,MiniProfiler可以很好的处理网站后端每个处理时间的事件,但是MiniProfiler是无法远程做监测的动作,MiniProfiler只能够监测本地端的动作,所以MiniProfier比较适合开发期间使用。
在开发ASP.NET WebFrom时,如果想要追踪每个页面的执行状况与效能的话,其实是可以使用“Trace”功能,如此一来就可以在每个页面的下方显示页面执行时的完整详细信息,包括前端传送的Http Request、所有的Session、Cookie等,对于开发时期来说,这些信息可以帮助我们在除错时候可以掌握确切的信息,然而系统上线之后,Trace功能势必要关闭,而单靠ELMAH记录错误讯息也无法完全掌握,因为有的时候执行正常并不表示功能正常,例如运行时间过慢、路径错误等,
接下来就来介绍“Glimpse”,除了具有Trace的功能外,也可以结合Forms Authentication的登入认证,让我们在系统上线之后,一样可以实时让开发人员追踪页面执行的各项信息。
Glimpse是一款.NET下的性能测试工具,支持asp.net 、asp.net mvc, EF等等,优势在于,不需要修改原项目任何代码,且能输出代码执行各个环节的执行时间 ,安装方式非常简单,通过nuget直接安装即可。
Glimpse
http://nuget.org/List/Packages/Glimpse
What is Glimpse
At its core Glimpse allows you to debug your web site or web service right in the browser. Glimpse allows you to "Glimpse" into what's going on in your web server. In other words what Firebug is to debugging your client side code, Glimpse is to debugging your server within the client.
Fundamentally Glimpse is made up of 3 different parts, all of which are extensible and customizable for any platform:
- Glimpse Server Modules – Code on the web server that collects meta data and sends it to the client.
- Glimpse Protocol – A specification of that meta data.
- Glimpse Client Side Viewer – Code on the web page or in the browser that takes the meta data from the server and displays it to the user.
在官网上的说明,目前Glimpse支持ASP.NET WebForm与ASP.NET MVC。
Glimpse有着类似Firefox的Firebug的外观,可以在执行功能后随时的展开或是收阖,但是Glimpse不是任何浏览器的插件,Glimpse是一个依赖jQuery所建立的plugin,所以你的网站必须要引入使用jQuery,而浏览器则是不限定,根据官网所显示的信息,Glimpse可以支持多种的浏览器:Chrome 12, Firefox 4 and IE9。
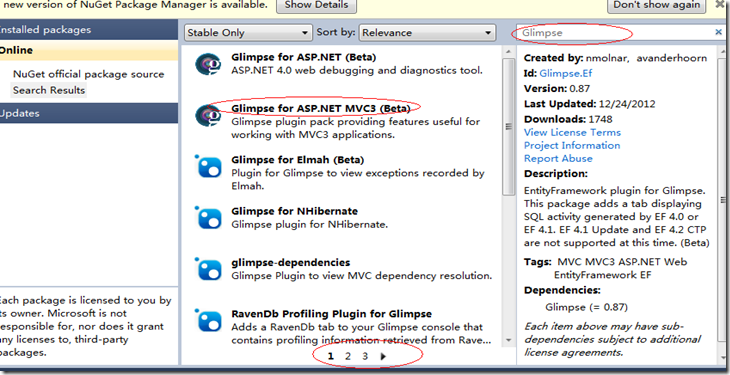
使用NuGet安装Glimpse
NuGet上面的Glimpse package目前只有支持ASP.NET MVC3
安装完成后,也会一并安装Glimpse for ASP.NET Beta(),安装完成之后会在方案中新建一个文件夹“App_Readme”,里面有两个Readme文件,其中“glimpse.readme.txt” 的档案内容里有详细说明,说明如何修改Web.Config以及功能介绍
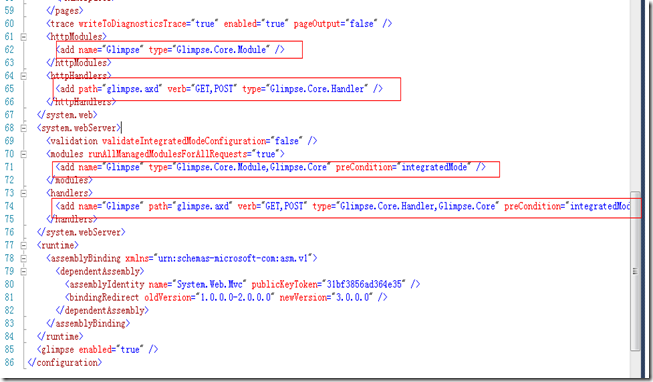
通过NugGet安装Glimpse,在Web.Config加了哪些东西
基本上安装完成后就可以使用了,但在使用之前,先来看看Web.Config有多了什么,在一开始的configSections中增加了「glimpse」的设定
然后在system.web的httpModules与httpHandlers都有增加,另外在system.webServer的modules与handlers中也有增加
而在Web.Config的最后面有多了一个glimpse的section,在这个Section中,可以针对不同的情境去改变设定,默认的设置是enabled=”true”,默认是把Glimpse的功能给开启
在glimpse.readme.txt中就有说明,glimpse的Section如何做设定:
The following configuration values are allowed for Glimpse in your web.config:

<glimpse enabled="true"
    requestLimit="5"
    loggingEnabled="false"
    ipForwardingEnabled="false"
    cacheEnabled="true">
    <!--
        set enabled to false to completely turn off Glimpse.
        requestLimit specifies the max number of requests Glimpse will save.
        enableLogging (false by default) if you experience problems with Glimpse
        ipForwardingEnabled (false by default) will force Glimpse to validate IP addresses based on the value in the HTTP_X_FORWARDED_FOR header. Useful if your server is behind a proxy or load balancer.
        cacheEnabled (true by default) Glimpse will tell browsers to cache static files by default
    -->
    <ipAddresses> <!-- List of IP addresses allowed to get Glimpse data. Optional. localhost (IPv4 & IPv6) by default -->
        <add address="127.0.0.1" />
        <add address="::1" />
    </ipAddresses>
    <contentTypes><!-- List of content types Glimpse will provide data for. Optional  text/html and application/json by default -->
        <add contentType="text/html"/>
    </contentTypes>
    <pluginBlacklist><!-- List of plugins for Glimpse to ignore. Optional. By default all plugins will load -->
        <add plugin="Glimpse.Core.Plugin.Request"/>
        <add plugin="Glimpse.Core.Plugin.MetaData"/>
    </pluginBlacklist>
    <environments><!-- List of environments your application runs in. Used for the new environment switcher feature. Optional. By default environment information will no be shown -->
        <add name="Dev" authority="localhost:33333" />
        <add name="Prod" authority="getglimpse.com" />
    </environments>
    <urlBlacklist><!-- Glimpse will ignore all requests made to URI's that match any regular expression in this list. Optional. By default all URI's will be considered for Glimpse inspection. -->
        <add url="{regex}"/>
        <add url="{regex}"/>
    </urlBlacklist>
</glimpse>
要开启使用Glimpse相当简单,只要输入「http://你的网站网址/Glimpse.axd」就可以了,就会进入到下面的页面
接着回到网站的页面,可以看到页面的右下角出现一个图标,直接点击图标
其中会比较常用的有Ajax, Config, Enviroment, Execution, Request, Server, Trace, Views。
与ELMAH所遇到的问题是一样的,那就是预设安装后,都是可以匿名浏览,对于网站的安全性来说是个相当大的威胁,尤其是Glimpse的Config,会把Web.Config的所有信息都完整呈现,所以这一篇文章就要来说明如何让Glimpse在登入后才可以使用。
更改Web.Config的glimpse配置
在Glimpse所提供的readme.txt中就已经有说明如何修改,让启用Glimpse是必须要登入后才可以,
<glimpse enabled="true" loggingEnabled="true" />
可以加上loggingEnabled=”true”,但是这样还是不够,必须要再进一步去阻止匿名用户直接进入,所以修改如下:
<glimpse enabled="true" loggingEnabled="true" />
<location path="Glimpse.axd">
<system.web>
<authorization>
<deny users="*" />
</authorization>
</system.web>
</location>
如果说要再进一步防护的话,可以指定哪些使用者才能使用或是限定哪些角色权限的使用者才能够使用,于是我的修改如下:
<glimpse enabled="true" loggingEnabled="true" />
<location path="Glimpse.axd">
<system.web>
<authorization>
<allow roles="Admin"/>
<deny users="*" />
</authorization>
</system.web>
</location>
如此一来就阻止匿名用户使用Glimpse功能,而且也只限定用有Admin角色权限的使用者才能够使用,不是Admin角色的使用者进入「http://你的网址/Glimpse.axd」时就会直接导回首页。详细的Glimpse Section的设定,我建议要详读官网的说明:
glimpse – Document – Configuration
http://getglimpse.com/Help/Configuration
另外要说明的是,如果你只希望在开发环境去启用glimpse的功能,而在正式环境不希望去启用glimpse时,并不需要上线前把glimpse给移除,只需要去更改glimpse Section的设定就可以,<glimpse enabled="false" loggingEnabled="true" />把原本enabled=”true” 改成 enabled=”false” 就可以。
其实glimpse可以结合ELMAH,让ELMAH所记录到的错误讯息于glimpse中显示,在系统的登入认证后,只要启用glimpse就可以去看ELMAH的纪录数据,不必再另外进入ELMAH,
接下来介绍如何透过NuGet安装Elmah plugin for Glimpse以及部分的修改设定。
请记得,你的网站必须示已经安装了 ELMAH 以及 Glimpse,NuGet中搜索 Glimpse就可以找到「Elmah plugin for Glimpse」
安装完成之后,在你的网站上开启glimpse后就可以在glimpse的功能窗口中看到「Elmah」的页签.
相关链接:
http://www.hanselman.com/blog/NuGetPackageOfTheWeek5DebuggingASPNETMVCApplicationsWithGlimpse.aspx
http://stackoverflow.com/questions/5746444/should-i-deploy-glimpse-to-the-production-site


