springBoot中的任务处理实现(异步任务、邮件任务、定时执行任务)
一、异步任务(主要涉及两个注解@EnableAsync--开启和@Async--指定方法为异步方法):
1、首先SpringBoot开启异步运行环境,通过注解@EnableAsync开启
package com.liu;

import org.springframework.boot.SpringApplication;
import org.springframework.boot.autoconfigure.SpringBootApplication;
import org.springframework.scheduling.annotation.EnableAsync;


@SpringBootApplication
@EnableAsync
public class SpringBootAsynchronousMissionApplication {

    public static void main(String[] args) {
        SpringApplication.run(SpringBootAsynchronousMissionApplication.class, args);
    }

}
2、service层
package com.liu.service;

import org.springframework.scheduling.annotation.Async;
import org.springframework.stereotype.Service;
import org.springframework.web.bind.annotation.RequestMapping;

@Service
public class AsyncService {
    //告诉spring这是一个异步方法
    @Async
    public void time(){
        try {
            Thread.sleep(3000);
        } catch (InterruptedException e) {
            e.printStackTrace();
        }
    }
}
3、controller层
package com.liu.controller;

import com.liu.service.AsyncService;
import org.springframework.beans.factory.annotation.Autowired;
import org.springframework.web.bind.annotation.RequestMapping;
import org.springframework.web.bind.annotation.RestController;

@RestController
public class ControllerTest {
//注入service层
    @Autowired
    AsyncService asyncService;
    @RequestMapping("/hello")
    public String hello(){
//调用方法
        asyncService.time();
        return "ok";
    }
}
4、进入页面进行测试,如果不开启异步方法,需要等待3s,开启则不需要等待,页面将直接显示ok
二、邮件任务(qq邮箱为例)
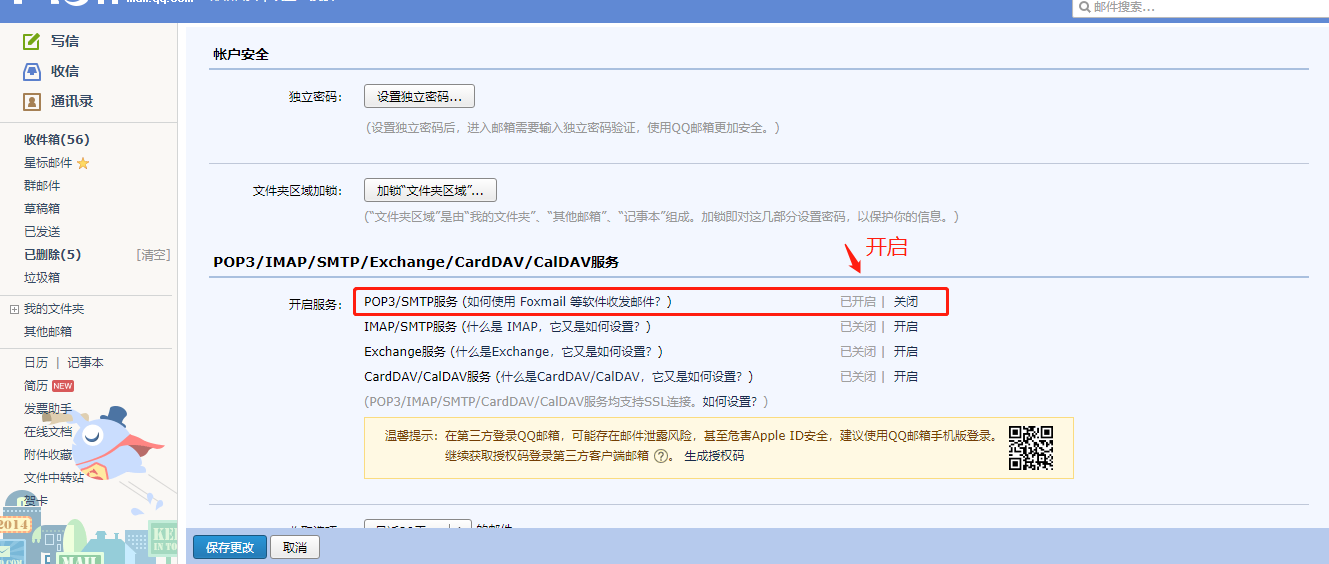
1、开启POP3/SMTP服务

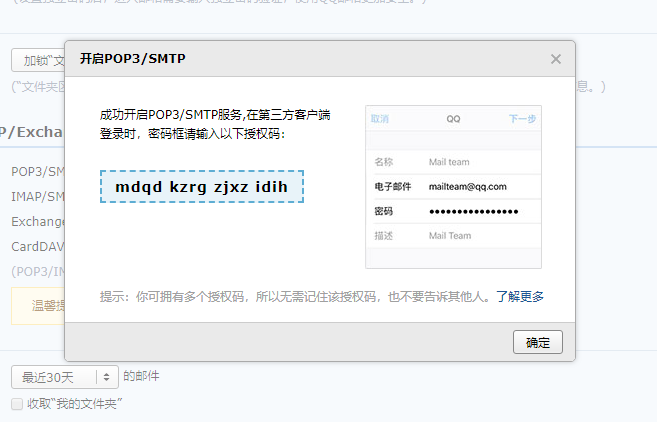
2、获取授权码

3、导入对应的dependce依赖
        <dependency>
            <groupId>org.springframework.boot</groupId>
            <artifactId>spring-boot-starter-mail</artifactId>
        </dependency>
4、application.properties中的配置
spring.mail.username=1216688798@qq.com
spring.mail.password=mdqdkzrgzjxzidih
spring.mail.host=smtp.qq.com
spring.mail.properties.mail.smtp.ssl.enble=true
5、在测试类中,写方法进行测试
package com.liu;

import org.junit.jupiter.api.Test;
import org.springframework.beans.factory.annotation.Autowired;
import org.springframework.boot.test.context.SpringBootTest;
import org.springframework.mail.SimpleMailMessage;
import org.springframework.mail.javamail.JavaMailSenderImpl;
import org.springframework.mail.javamail.MimeMessageHelper;

import javax.mail.MessagingException;
import javax.mail.internet.MimeMessage;
import java.io.File;

@SpringBootTest
class SpringBootAsynchronousMissionApplicationTests {
//简单邮件
    @Autowired
    JavaMailSenderImpl javaMailSender;
    @Test
    void contextLoads() {
        SimpleMailMessage simpleMailMessage = new SimpleMailMessage();
        simpleMailMessage.setSubject("你好");
        simpleMailMessage.setText("谢谢你");
        simpleMailMessage.setTo("**********@qq.com");
        simpleMailMessage.setFrom("**********@qq.com");
        javaMailSender.send(simpleMailMessage);
    }
//复杂邮件
    @Test
    void contextLoads1() throws MessagingException {

        MimeMessage mimeMessage = javaMailSender.createMimeMessage();
//      组装
        MimeMessageHelper helper = new MimeMessageHelper(mimeMessage,true,"utf-8");
        helper.setSubject("你好~");
        helper.setText("<h1>你好</h1>",true);
        helper.addAttachment("1.png",new File("C:\\Users\\Lenovo\\Desktop\\1.png"));
        helper.setTo("**********@qq.com");
        helper.setFrom("**********@qq.com");
        javaMailSender.send(mimeMessage);
    }
//  后期可以封装成为一个工具类,进行调用
}
三、定时执行任务(主要为两个注解@EnableScheduling和@Scheduled)
1、@EnableScheduling 开启定时
package com.liu;

import org.springframework.boot.SpringApplication;
import org.springframework.boot.autoconfigure.SpringBootApplication;
import org.springframework.scheduling.annotation.EnableScheduling;

@SpringBootApplication
@EnableScheduling
public class SpringBootAsynchronousMissionApplication {

    public static void main(String[] args) {
        SpringApplication.run(SpringBootAsynchronousMissionApplication.class, args);
    }

}
2、设定时间执行
package com.liu.service;

import org.springframework.scheduling.annotation.Scheduled;
import org.springframework.stereotype.Service;

@Service
public class ScheduledService {
    @Scheduled(cron = "20 19 * * * ?")
    public void test(){
        System.out.println("系统执行了");
    }
}
完~~~
