身份认证授权IdentityServer4
1. 引言
随着应用类型的多样化,基于浏览器的Web应用,各种App,桌面应用,微信公众号,小程序等各种应用层出不穷,在这种背景下,身份认证和授权是每个应用必不可少的的一部分。而现在的互联网,信息安全是不得不考虑的问题,所以拥有一套统一的身份认证和授权机制就显得格外重要。
Identity Server正是这样的一个框架,它是为ASP.NET CORE量身定制的实现了OpenId Connect和OAuth2.0协议的认证授权中间件,包括单点登录,身份认证和授权。
那么既然Identity Server 4是实现了OpenId Connect和OAuth2.0协议的认证授权中间件,我们就有必要先来了解一下什么是OAuth2.0和OpenId Connect。
2. OAuth2.0
简单的来说,OAuth 2.0是目前行业内标准的授权(Authorization)协议,其专注于客户端开发人员的简单性,同时为Web应用程序,桌面应用程序,移动电话和客厅设备提供特定的授权流程。OAuth2.0允许用户授权第三方应用访问其服务器上存储的私密的资源(如照片,视频,联系人列表),而无需将用户名和密码提供给第三方应用。像我们熟悉的微信授权认证、微博认证也都是使用的OAuth2.0协议。
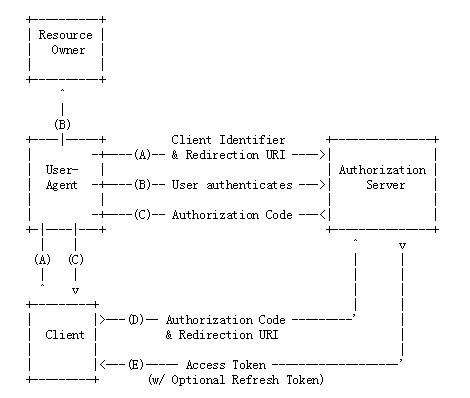
OAuth2.0的授权流程如下图所示:

OAuth2.0定义了四种授权模式,分别为:
1. 授权码模式(authorization code)

其具体的流程为:
   (A)  用户访问客户端,客户端将用户导向Identity Server。

   (B)  授权服务器对资源所有者(可理解为用户)进行验证并且确定资源所有者是否授权或拒绝客户端的访问请求。

   (C)  假设资源所有者授予访问权限,授权服务器会根据客户端请求中的redirect_url,返回一个授权码Authorization Code给客户端

   (D)  客户端根据Authorization Code向授权服务器请求Access Token。

   (E)  授权服务器验证客户端,校验Authrization Code,并且确定客户端请求中的redirect URI是否和之前(C)中的redirect URI一致,如果校验通过,返回Access Token给客户端(可选择是否返回refresh token)。
2. 简化模式(implicit)

简化模式是相对于授权码模式而言,其不再需要Client参与,所有的认证和授权都是通过浏览器来完成,在此模式下,需要提供一个页面给用户确认是否授权给客户端,类似第三方用户使用QQ登录时需要跳转到QQ登录页面一样,如果授权,则会返回Access Token给客户端。
3. 密码模式(resource owner password credentials)

通过User的用户名和密码向Identity Server申请访问令牌。这种模式下要求客户端不得储存密码。但我们并不能确保客户端是否储存了密码,所以该模式仅适用于受信任的客户端。否则会发生密码泄露的危险。
4. 客户端模式(client credentials)

客户端凭证模式应该是最简单的授权模式,此模式的适用场景为服务器与服务器之间的通信。比如在微服务中,对于一个电子商务网站,将订单和物流系统分拆为两个服务分别部署。订单系统需要访问物流系统进行物流信息的跟踪,物流系统需要访问订单系统的快递单号信息进行物流信息的定时刷新。而这两个系统之间服务的授权就可以通过这种模式来实现。
关于OAutho2.0的更多信息可以参考官方提供的文档 https://tools.ietf.org/html/rfc6749 或博客园阮一峰写的博客 http://www.ruanyifeng.com/blog/2014/05/oauth_2_0.html 。
3. OpenID & OpenID Connect
OpenID 是一个以用户为中心的数字身份识别框架,它具有开放、分散性。OpenID 的创建基于这样一个概念:我们可以通过 URI 或称为URL来认证一个网站的唯一身份,同理,我们也可以通过这种方式来作为用户的身份认证(Authentication)。
OpenID Connect 1.0 是OAuth 2.0协议之上的简单身份层。它允许客户端根据授权服务器执行的身份验证来验证最终用户的身份,以及以可互操作和类似REST的方式获取有关最终用户的基本配置文件信息,简单来说 OpenID Connect 即 OIDC 是认证(Authentication)+ 授权( Authorization)+ OAuth 2.0。其详细介绍可参考 https://openid.net/connect/ 。
4. IdentityServer4
IdentityServer4是ASP.NET Core的OpenID Connect和OAuth 2.0框架,关于其详细的说明请参考官方文档 https://identityserver4.readthedocs.io/en/latest/ 。中文文档可参考:https://www.cnblogs.com/stulzq/p/8119928.html
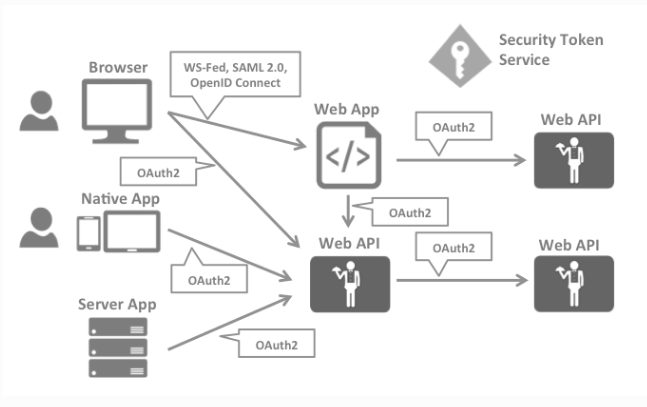
目前大多数应用被设计成如下图,这种设计将安全问题分为两部分:认证和API访问授权。

我们相信OpenID Connect和OAuth 2.0的结合是在可预见的未来保护现代应用程序的最佳方法。而IdentityServer4正是这两种协议的实现,经过高度优化,可以解决当今移动,本机和Web应用程序的典型安全问题。关于IdentityServer4的更多详细信息就请自行查阅官方文档。
这里介绍下涉及到的一些概念:

- Identity Server : 身份认证服务器
- User:使用注册客户端访问资源的人
- Client:从IdentityServer请求令牌的应用
- Resource:使用IdentityServer保护资源 - 用户的身份数据或API。每个资源都有一个唯一的名称 - 客户端使用此名称来指定他们希望访问哪些资源。Identity Data身份数据关于用户的身份信息(也称为声明),例如姓名或电子邮件地址。API资源表示客户端要调用的功能 - 通常建模为Web API,但不一定。
- Identity Token:身份令牌表示身份验证过程的结果,它至少包含用户的标识符(称为sub aka subject声明)以及有关用户如何以及何时进行身份验证的信息。它可以包含其他身份数据
- Access Token:访问令牌允许访问API资源。客户端请求访问令牌并将其转发给API。访问令牌包含有关客户端和用户(如果存在)的信息。 API使用该信息来授权访问其数据。
5. 集成IdentityServer4
通过上面对OAuth 2.0和OpenId Connect的简单介绍,应该大体能够知道IdentityServer4具体可以做什么了,那么,怎么集成IdentityServer4到我们的项目中呢,接下来我们就正式进入.Net Core如何集成IdentityServer4的介绍。
我们知道IdentityServer4主要涉及的概念是认证服务器IdentityServer,Client客户端和Resource资源,所以集成的重点就放在这三个上面。
新建一个Asp.Net Core 2.2 API项目IdentityServer,需要引入Nuget包 IdentityServer4。
Install-Package IdentityServer4
接下来就是怎么配置和启用IdentityServer了,我们知道,作为一个认证服务器,它必须要知道保护哪些资源,必须知道哪些客户端能够允许访问,这是配置的基础。所以IdentityServer中间件配置的核心就是:配置受保护的资源列表和配置允许验证的客户端。
所以我们在项目当中定义了一个Config.cs类来对Resource和Client进行配置。
下面我们来看下客户端凭证和密码模式授权的Config如何配置。
using IdentityServer4.Models;
using IdentityServer4.Test;
using System.Collections.Generic;

namespace IdentityServerCenter
{
    /// <summary>
    /// Resource API和Client配置
    /// </summary>
    public class Config
    {
        /// <summary>
        /// 指定Resource API 的名称,在ResourceApi的startup中需要配置哪个名称
        /// </summary>
        /// <returns></returns>
        public static IEnumerable<ApiResource> GetResource()
        {
            return new List<ApiResource> {
                new ApiResource("api","My api")
            };
        }

        /// <summary>
        /// 给客户端的信息,客户端访问需要携带这些信息
        /// </summary>
        /// <returns></returns>
        public static IEnumerable<Client> GetClients()
        {
            return new List<Client>
            {
                new Client()
                {
                    ClientId = "client", //客户端Id
                    AllowedGrantTypes = GrantTypes.ClientCredentials, //授权类型
                    ClientSecrets = { new Secret("secret".Sha256()) }, //密钥
                    AllowedScopes = { "api" } //指定客户端可以访问Resource为api的资源
                },

                new Client()
                {
                    ClientId = "pwdClient", //客户端Id
                    AllowedGrantTypes = { GrantType.ResourceOwnerPassword }, //授权类型
                    ClientSecrets = { new Secret("secret".Sha256()) }, //密钥

                    RequireClientSecret = false, //如果将RequireClientSecret设为false,则客户端访问不需要传递secret

                    AllowedScopes = { "api" } //指定客户端可以访问Resource为api的资源
                }

            };
        }


        /// <summary>
        /// 密码模式需要用户
        /// </summary>
        /// <returns></returns>
        public static List<TestUser> GetTestUsers()
        {
            return new List<TestUser> { new TestUser()
            {
                 SubjectId = "1",
                  Username="jesen",
                   Password = "123456"
            }
            };
        }

    }
}
接着我们需要在Startup中注入IdentityServer,并且将其添加到 pipeline当中。
public void ConfigureServices(IServiceCollection services)
{
    services.AddIdentityServer().AddDeveloperSigningCredential()
        .AddInMemoryApiResources(Config.GetResource()) // 配置API资源
        .AddInMemoryClients(Config.GetClients()) // 配置允许验证的客户端
        .AddTestUsers(Config.GetTestUsers()); // ResourceOwnerPasswordCredentials模式需要指定用户


    services.AddMvc().SetCompatibilityVersion(CompatibilityVersion.Version_2_2);
}
public void Configure(IApplicationBuilder app, IHostingEnvironment env)
{
    if (env.IsDevelopment())
    {
        app.UseDeveloperExceptionPage();
    }

    app.UseIdentityServer(); // 添加IdentityServer
}
这样,IdentityServer就配置好了,它所保护的资源为api,所以我们需要创建一个Asp.Net Core Api项目,名称就叫 Api 吧。需要引入 IdentityServer4.AccessTokenValidation 的Nuget包。然后在Startup中我们需要如下配置:
public void ConfigureServices(IServiceCollection services)
{
    services.AddAuthentication("Bearer") // 指定认证方案
        .AddIdentityServerAuthentication(options => // 添加Token验证服务到依赖注入容器
        {
            options.Authority = "http://localhost:5000"; // 指定授权地址,即上面IdentityServer的Url
            options.RequireHttpsMetadata = false; // 是否需要Https
            options.ApiName = "api"; // 对应IdentityServer的ApiResource名称
        });

    services.AddMvc().SetCompatibilityVersion(CompatibilityVersion.Version_2_2);
}

// This method gets called by the runtime. Use this method to configure the HTTP request pipeline.
public void Configure(IApplicationBuilder app, IHostingEnvironment env)
{
    if (env.IsDevelopment())
    {
        app.UseDeveloperExceptionPage();
    }
    app.UseAuthentication(); // 添加认证
    app.UseMvc();
}
而在我们的controller上,我们需要为其指定[Authorize]属性。
[Route("api/[controller]")]
[Authorize]
public class ValuesController : ControllerBase
{
    [HttpGet]
    public ActionResult<IEnumerable<string>> Get()
    {
        return new string[] { "value1", "value2" };
    }
}
这样我们的IdentityServer和它所保护的资源就已经配置好了,接下来我们需要定义我们的Client来验证授权是否成功,在此我们使用控制台程序来验证。我们先来看一下使用客户端凭证的Client
using IdentityModel.Client;
using System;
using System.Net.Http;

namespace ThirdPartyClient
{
    class Program
    {
        static void Main(string[] args)
        {
            var client = new HttpClient();

            var disco = client.GetDiscoveryDocumentAsync("http://localhost:5000").Result;
            // var disco = DiscoveryClient.GetAsync("http://localhost:5000").Result; //DiscoveryClient 已经过时

            if (disco.IsError)
            {
                Console.WriteLine(disco.Error);
            }

            //var tokenClient = new TokenClient(disco.TokenEndpoint, "client", "secret"); //ToKenClient已经过时
            //var tokenResponse = tokenClient.RequestClientCredentialsAsync("api").Result;
            var tokenResponse = client.RequestTokenAsync(new TokenRequest
            {
                Address = disco.TokenEndpoint,
                GrantType = "client_credentials",

                ClientId = "client",
                ClientSecret = "secret",

                Parameters =
                {
                    { "custom_parameter", "custom value"},
                    { "scope", "api1" }
                }
            }).Result;

            if (tokenResponse.IsError)
            {
                Console.WriteLine(tokenResponse.Error);
            }
            else
            {
                Console.WriteLine(tokenResponse.Json);
            }

            client.SetBearerToken(tokenResponse.AccessToken);

            var response = client.GetAsync("http://localhost:5001/api/values").Result;
            if (response.IsSuccessStatusCode)
            {
                Console.WriteLine(response.Content.ReadAsStringAsync().Result);
            }
        }
    }
}
运行三个项目,可以看到授权成功获取到Access Token

再来看下用户密码模式的Client,代码如下
using IdentityModel.Client;
using System;
using System.Net.Http;

namespace PwdClient
{
    /// <summary>
    /// oauth 2.0密码模式 客户带
    /// </summary>
    class Program
    {
        static void Main(string[] args)
        {

            var client = new HttpClient();

            var disco = client.GetDiscoveryDocumentAsync("http://localhost:5000").Result;
            // var disco = DiscoveryClient.GetAsync("http://localhost:5000").Result; //DiscoveryClient 已经过时

            if (disco.IsError)
            {
                Console.WriteLine(disco.Error);
            }

            //var tokenClient = new TokenClient(disco.TokenEndpoint, "client", "secret"); //ToKenClient已经过时
            //var tokenResponse = tokenClient.RequestResourceOwnerPasswordAsync("jesen", "123456");

            var tokenResponse = client.RequestTokenAsync(new TokenRequest
            {
                Address = disco.TokenEndpoint,
                GrantType = "password",

                ClientId = "pwdClient",
                ClientSecret = "secret",

                Parameters =
                {
                    { "username","jesen" },
                    {"password","123456" }
                    //{ "custom_parameter", "custom value"},
                    { "scope", "api1" }
                }
            }).Result;


            if (tokenResponse.IsError)
            {
                Console.WriteLine(tokenResponse.Error);
            }
            else
            {
                Console.WriteLine(tokenResponse.Json);
            }

            client.SetBearerToken(tokenResponse.AccessToken);

            var response = client.GetAsync("http://localhost:5001/api/values").Result;
            if (response.IsSuccessStatusCode)
            {
                Console.WriteLine(response.Content.ReadAsStringAsync().Result);
            }


        }
    }
}
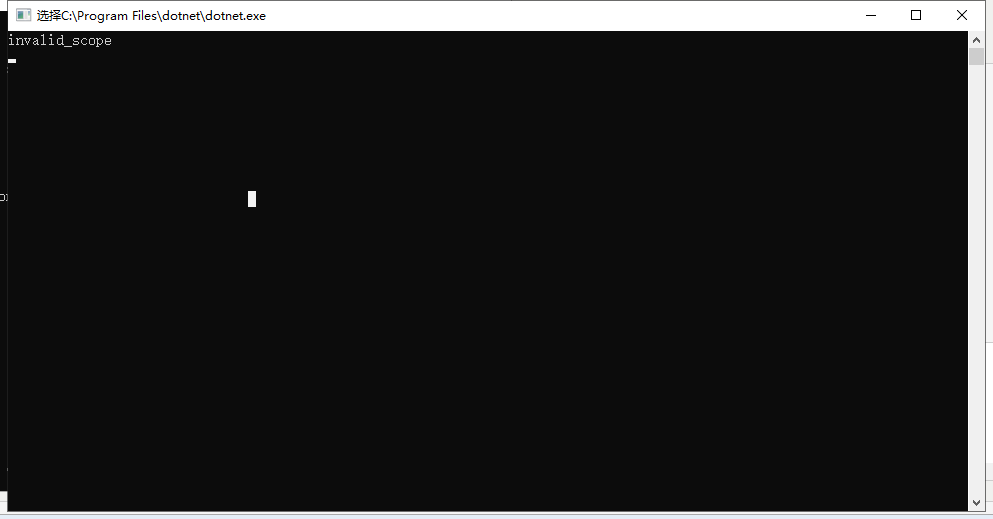
运行三个项目会看到下面的invalid_scope错误,原因是在我们的IdentityServer中并没有指定api1的Resource可以被访问,将scope改为api后,可以看到运行后与客户端凭证模式一样的结果。

看完客户端凭证模式和用户密码模式后,接下来来看下更复杂的简化模式 Implicit 和 混合模式Hybrid,简化模式下ID Token和Access Token都是通过浏览器的前端通道传递的,而混合模式是简化模式和授权码模式的组合。混合模式下ID Token通过浏览器的前端通道传递,而Access Token和Refresh Token通过后端通道取得。而在这两个模式中我将Resource和Client等之前在Config中配置的静态数据保存到数据库中,因为在实际项目中,配置总是需要通过界面维护来添加或删减,而不应该每次都去修改代码。
由于代码量较多,源代码已经上传在github上,感兴趣的可以下载学习,附github项目地址:https://github.com/jesen20160925/IdentityServer4Sample 。
好了,这篇文档花了我一天的时间,希望以此巩固自己的知识体系,但写文档真的是一件很耗时的事情,希望可以坚持下来吧。

