
1、ssm的集成
ssm的集成
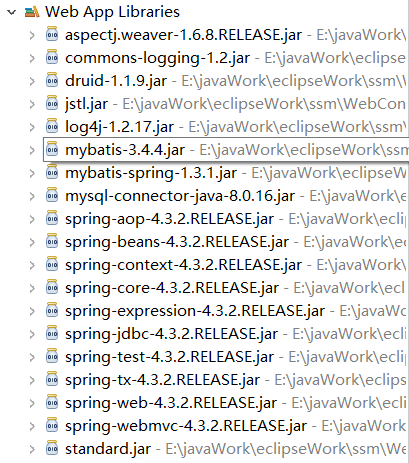
所用到的jar:
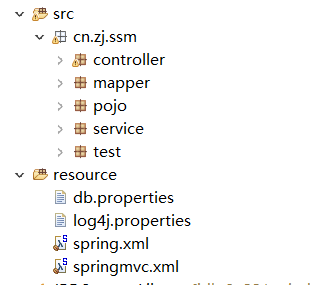
包结构:
spring.xml的配置文件:
<?xml version="1.0" encoding="UTF-8"?>
<beans xmlns="http://www.springframework.org/schema/beans"
	xmlns:xsi="http://www.w3.org/2001/XMLSchema-instance"
	xmlns:aop="http://www.springframework.org/schema/aop"
	xmlns:context="http://www.springframework.org/schema/context"
	xmlns:tx="http://www.springframework.org/schema/tx"
	xsi:schemaLocation="http://www.springframework.org/schema/beans http://www.springframework.org/schema/beans/spring-beans.xsd
		http://www.springframework.org/schema/context http://www.springframework.org/schema/context/spring-context-4.3.xsd
		http://www.springframework.org/schema/aop http://www.springframework.org/schema/aop/spring-aop-4.3.xsd
		http://www.springframework.org/schema/tx http://www.springframework.org/schema/tx/spring-tx-4.3.xsd">
    <!-- 配置包扫描 -->
    <context:component-scan base-package="cn.zj.ssm"/>
    <!-- 读出配置文件 -->
    <context:property-placeholder location="classpath:db.properties"/>

     <!-- 配置连接池 -->
    <bean id="dataSource" class="com.alibaba.druid.pool.DruidDataSource">
        <!-- 数据库配置 -->
        <property name="driverClassName" value="${jdbc.driverClassName}"/>
        <property name="url" value="${jdbc.url}"/>
        <property name="username" value="${jdbc.username}"/>
        <property name="password" value="${jdbc.password}"/>
        <property name="maxActive" value="10"/>
    </bean>

    <!-- 配置sqlSessionFactory对象 -->
    <bean id="sqlSessionFactory" class="org.mybatis.spring.SqlSessionFactoryBean">
        <!-- 配置数据源 -->
        <property name="dataSource" ref="dataSource"/>
        <!-- 配置别名 -->
        <property name="typeAliasesPackage" value="cn.zj.ssm.pojo"/>
    </bean>
    <!-- 创建xxx.mapper接口的代理对象 -->
    <bean class="org.mybatis.spring.mapper.MapperScannerConfigurer" >
        <!-- 使用包扫描的方式 -->
        <property name="basePackage" value="cn.zj.ssm.mapper"/>
    </bean>


    <!-- 配置事务管理器 -->
    <bean id="transactionManager"
          class="org.springframework.jdbc.datasource.DataSourceTransactionManager">
        <!-- 注入数据源 -->
        <property name="dataSource" ref="dataSource"/>
    </bean>

    <!-- 配置通知 -->
    <tx:advice id="txManager" transaction-manager="transactionManager">
        <tx:attributes>
             <!-- 配置切入方式 -->
             <!-- DQL -->
             <tx:method name="select*" read-only="true"/>
             <!-- DML -->
             <tx:method name="*"/>
        </tx:attributes>
    </tx:advice>

    <!-- 配置切面 -->
    <aop:config>
        <aop:advisor advice-ref="txManager"
                     pointcut="execution(* cn.zj.ssm.service..*.*(..))"/>
    </aop:config>

</beans>
springmvc.xml:
?xml version="1.0" encoding="UTF-8"?>
<beans xmlns="http://www.springframework.org/schema/beans"
	xmlns:xsi="http://www.w3.org/2001/XMLSchema-instance"
	xmlns:mvc="http://www.springframework.org/schema/mvc"
	xsi:schemaLocation="http://www.springframework.org/schema/mvc http://www.springframework.org/schema/mvc/spring-mvc-4.3.xsd
		http://www.springframework.org/schema/beans http://www.springframework.org/schema/beans/spring-beans.xsd">
    <!-- 开启springmvc的注解 -->
    <mvc:annotation-driven/>

    <!-- 解决两个配置文件或多个配置文件需要读,方式一: -->
    <!-- <import resource="classpath:spring.xml"/> -->

    <!-- 配置请求的前缀后缀 -->
    <bean class="org.springframework.web.servlet.view.InternalResourceViewResolver">
        <!-- 配置前缀 -->
        <property name="prefix" value="/WEB-INF/view/"/>
        <!-- 配置后缀 -->
        <property name="suffix" value=".jsp"/>
    </bean>

</beans>
web.xml
<?xml version="1.0" encoding="UTF-8"?>
<web-app xmlns:xsi="http://www.w3.org/2001/XMLSchema-instance" xmlns="http://xmlns.jcp.org/xml/ns/javaee" xsi:schemaLocation="http://xmlns.jcp.org/xml/ns/javaee http://xmlns.jcp.org/xml/ns/javaee/web-app_3_1.xsd" id="WebApp_ID" version="3.1">

    <!-- 配置前端控制器(总控) -->
    <servlet>
        <servlet-name>MVC</servlet-name>
        <servlet-class>org.springframework.web.servlet.DispatcherServlet</servlet-class>
        <!-- 初始化 -->
        <init-param>
            <param-name>contextConfigLocation</param-name>
            <!-- 要读取两个配置文件,可以使用通配符* -->
            <param-value>classpath:spring*.xml</param-value>
        </init-param>
        <!-- 让tomcat启动加载 -->
        <load-on-startup>1</load-on-startup>
    </servlet>
    <servlet-mapping>
        <servlet-name>MVC</servlet-name>
        <url-pattern>*.do</url-pattern>
    </servlet-mapping>

</web-app>
db.properties
#数据库连接四要素
jdbc.driverClassName = com.mysql.cj.jdbc.Driver
jdbc.url = jdbc:mysql://localhost:3306/mybatis?useUnicode=true&characterEncoding=utf-8&useSSL=false&serverTimezone=GMT
jdbc.username = root
jdbc.password = root
#最大连接数
jdbc.maxActive = 10
log4j.properties
# Global logging configuration
log4j.rootLogger=ERROR, stdout
# MyBatis logging configuration...
#配置:log4j.logger+所要监听的日志= 日志的等级
#日志的等级(5个):TRACE/ALL(任何时候),info(普通信息),warn (报警告),debug(调试模式,项目没有上线开发),error(错误)
log4j.logger.cn.zj.ssm.mapper=TRACE
# Console output...
log4j.appender.stdout=org.apache.log4j.ConsoleAppender
log4j.appender.stdout.layout=org.apache.log4j.PatternLayout
log4j.appender.stdout.layout.ConversionPattern=%5p [%t] - %m%n

 浙公网安备 33010602011771号