python接口自动化框架零代码极限封装之流程用例和DDT数据驱动
1.流程用例
1.1 什么是流程用例
工具:
- postman
- jmeter
每个接口就是一个用例,称之为单接口用例
自动化:
- pytest
- unittest
- yaml
每个用例,可以包含多个接口,称之为流程用例
需要多个接口配合才能完成
例子:
- 微信上传功能:
- 获取token
- 上传文件
- 商城购物功能
- 选择商品加入购物车
- 提交订单
- 在线支付
- 确认收货
- 商品评论
1.2 流程用例该如何实现
在python中,在用例中继续增加测试步骤,即可增加接口请求,完成流程用例
1 def test_abc():
2     resp=session.get('https://www.baidu.com')
3
4     resp=sessiom.get('https://qq.com')
在yaml中,在用例中继续增加测试步骤,即可增加接口请求,完成流程用例
 1 test_name: 访问首页
 2
 3 steps:
 4   - request:
 5       method: GET
 6       url: http://www.baidu.com
 7
 8   - request:
 9       method: GET
10       url: http://www.qq.com
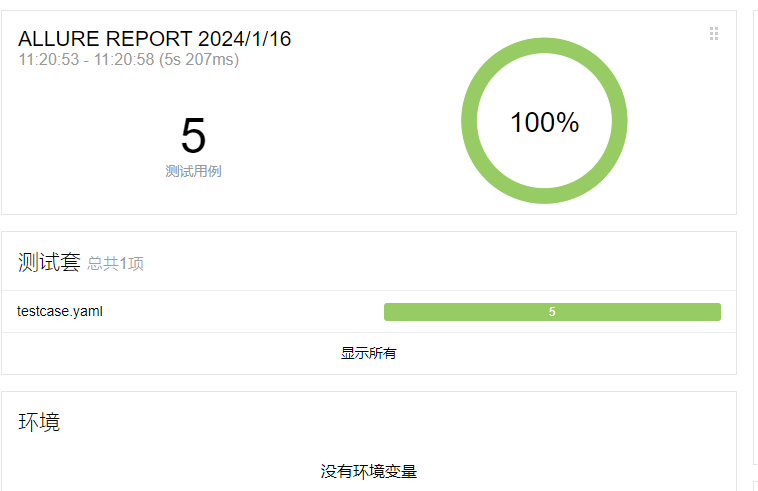
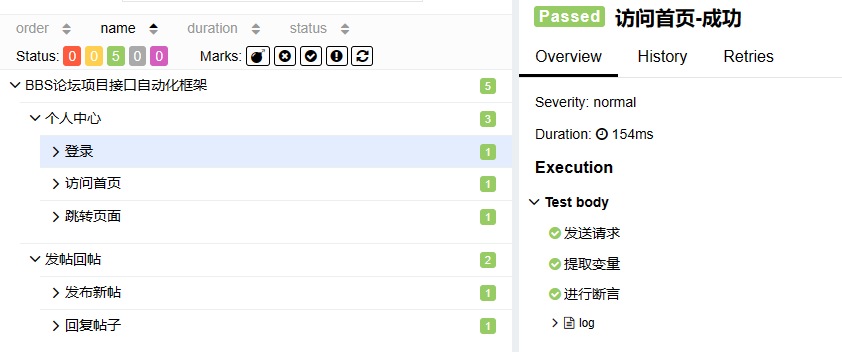
单接口用例报告


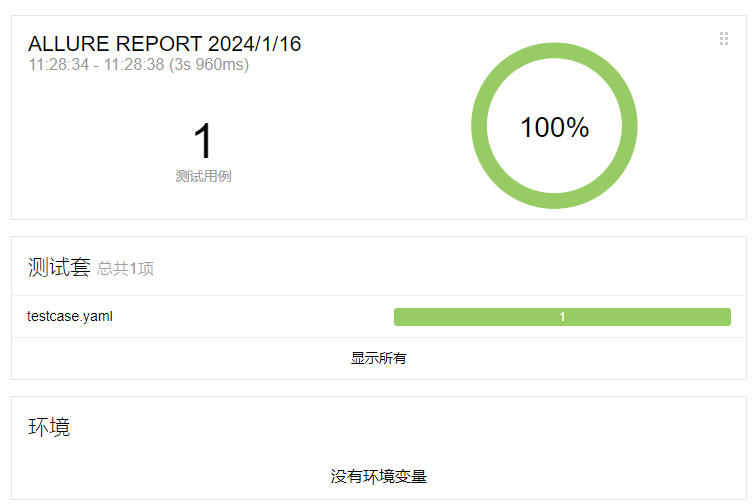
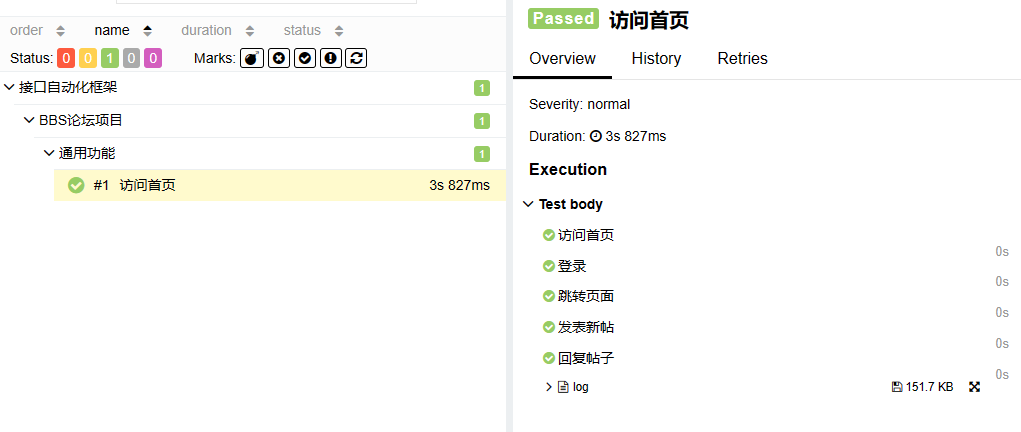
流程用例报告


用例直接彼此隔离
多个单接口用例 vs 一个流程用例
- 单接口用例可以筛选用例,可能导致部分用例没有机会执行
- 流程用例可以打包接口,确保所有接口一起请求
- 业务关系
- 测试报告
2.数据驱动测试
python原生支持参数化测试,配合数据文件(json,yaml),轻松实现数据驱动测试
yaml零代码极限封装,本身就是yaml数据文件,原生支持数据驱动测试
2.1 复习pytest中参数化测试
 1 import pytest
 2
 3
 4 @pytest.mark.parametrize(
 5     "n",  # 参数
 6     [
 7         1, 2, 3  # 一组数据,分别修改参数
 8     ]
 9 )
10 def test_abc(n):
11     print(n)  # 使用参数
多个参数
 1 import pytest
 2
 3
 4 @pytest.mark.parametrize(
 5     "x,y",  # 参数
 6     [
 7         [1, 3],
 8         [2, 4],
 9         [5, 8]
10     ]
11 )
12 def test_abc(x, y):
13     print(x, y)  # 使用参数
重点:
- 使用注解parametrize
- 注解中提供参数
- 用例中使用参数
- 传递列表数据[1,2,3]
2.2 改造成数据驱动测试
 1 import pytest
 2 import yaml
 3
 4
 5 # data=yaml.safe_load(open("data/ddt.yaml",encoding="utf-8")) #加载数据
 6
 7 # print('data',data)
 8
 9
10 @pytest.mark.parametrize(
11     "x,y",  # 参数
12     yaml.safe_load(open("data/ddt.yaml", encoding="utf-8"))
13 )
14 def test_abc(x, y):
15     print(x, y)  # 使用参数
2.3 yaml用例使用参数化
重点:
- 使用注解parametrize
- 注解中提供参数
- 用例中使用参数
- 传递列表数据[1,2,3]
 1 test_name: test_abc
 2
 3 mark:
 4   - parametrize:
 5       keys:
 6         - n
 7       vals:
 8         - 1
 9         - 2
10         - 3
11 steps:
12   - request:
13       method: get
14       url: https://www.baidu.com/?wd=${n}
多个参数
 1 test_name: test_abc
 2
 3 mark:
 4   - parametrize:
 5       keys:
 6         - x
 7         - y
 8       vals:
 9         - [1,2]
10         - [3,5]
11         - [6,8]
12 steps:
13   - request:
14       method: get
15       url: https://www.baidu.com/?wd=${x}-${y}
2.4 yaml用例加载数据文件
 1 test_name: test_abc
 2
 3 mark:
 4   - parametrize:
 5       keys:
 6         - x
 7         - y
 8       vals:  !include ddt.yaml
 9 steps:
10   - request:
11       method: get
12       url: https://www.baidu.com/?wd=${x}-${y}
!include不是pyyaml标准命令
如果单纯编写yaml,谨慎使用
!include加载文件途径:
- 绝对路径
- 相对路径,相对于谁
- 测试用例本身:支持上级目录,也支持下级目录
3.DDT项目实战
对同一个接口需要反复传参,反复测试的场景中
经典场景:
- 登录
- 账号正确
- 账号错误
- 空参数
- 查询数据
- 存在的数据
- 不存在的数据
- 空参数
- 组件参数
- 地址:三级联动(省市区)
3.1 创建普通的单个用例
 1 test_name: 获取微信token
 2
 3 steps:
 4   - request:
 5       method: GET
 6       url: https://api.weixin.qq.com/cgi-bin/token
 7       params:
 8         grant_type: client_credential
 9         appid: wx0f6d68f21b3e5fde
10         secret: 3b0740791899c3ec2a97dec67f134afc
11   #提取变量
12   #  token=(res.json(),'access_token')[0]
13   #  token:变量名 json:数据来源 access_token:jsonpath  0 结果索引
14   - extract:
15       code: [status_code,(.*),0]
16       expires_in: [json,expires_in,0]
17
18   #断言
19   - validate: #断言
20       equals:
21         状态码等于200: [ '${code}' , 200 ]  #相等
22         有效期等于7200: [ '${expires_in}' , 7200 ]
3.2 构建数据,作为参数传递
[
    ['wx0f6d68f21b3e5fde','3b0740791899c3ec2a97dec67f134afc',7200],
    ['1245678899123','3b0740791899c3ec2a97dec67f134afc',None]
]
 1 test_name: 获取微信token
 2 mark:
 3   - parametrize:
 4       keys:
 5         - appid
 6         - secret
 7         - my_expires
 8         - my_errcode
 9       vals:
10         - ['wx0f6d68f21b3e5fde','3b0740791899c3ec2a97dec67f134afc',7200,no_data]
11         - ['1245678899123','3b0740791899c3ec2a97dec67f134afc',no_data,40013]
12
13 steps:
14   - request:
15       method: GET
16       url: https://api.weixin.qq.com/cgi-bin/token
17       params:
18         grant_type: client_credential
19         appid: ${appid}
20         secret: ${secret}
21   #提取变量
22   #  token=(res.json(),'access_token')[0]
23   #  token:变量名 json:数据来源 access_token:jsonpath  0 结果索引
24   - extract:
25       code: [status_code,(.*),0]
26       expires_in: [json,expires_in,0]
27       errcode: [json,errcode,0]
28
29   #断言
30   - validate: #断言
31       equals:
32         状态码等于200: [ '${code}' , 200 ]  #相等
33         有效期等于7200: [ '${expires_in}' , '${my_expires}' ]
34         错误代码: ['${errcode}','${my_errcode}']
分类:
python接口自动化测试
标签:
自动化测试


【推荐】国内首个AI IDE,深度理解中文开发场景,立即下载体验Trae
【推荐】编程新体验,更懂你的AI,立即体验豆包MarsCode编程助手
【推荐】抖音旗下AI助手豆包,你的智能百科全书,全免费不限次数
【推荐】轻量又高性能的 SSH 工具 IShell:AI 加持,快人一步
· 震惊!C++程序真的从main开始吗?99%的程序员都答错了
· 别再用vector<bool>了!Google高级工程师:这可能是STL最大的设计失误
· 【硬核科普】Trae如何「偷看」你的代码?零基础破解AI编程运行原理
· 单元测试从入门到精通
· 上周热点回顾(3.3-3.9)