pytest测试框架入门(一)运行,mark标记
1.pytest框架
1.1.测试框架
常用单元测试框架介绍
python内置测试框架:unittest
python第三方测试框架:pytest
为什么要使用测试框架:
1.测试发现:从不同的目录,文件中收集测试用例
2.用例执行:执行用例、并且收集测试结果(报告)
3.报告输出:用例数量、执行时长、失败原因、通过率
1.2 安装pytest
- pip install pytest
- pip:python包管理器
- install 进行安装的命令
- uninstall卸载的命令
- pytest 第三方库名字
验证安装就绪:pytest
1.3 编写用例
pytest充分的应用了python的特色:
- 函数
- 装饰器
- 生成器
pytest的用例要求:
- 创建test_开头的文件
- 创建test_开头的函数
- 使用assert断言
1 def test_ok():
2     assert 1 == 1
3
4
5 def test_fail():
6     assert 1 == 2
1.4 执行测试用例
1.命令行
pytest
2.代码
import pytest

pytest.main()
1.5 查看运行结果

运行文件目录

windows系统版本--python版本-pytest版本-python插件系统

用例根目录(项目路径)
找到多少个用例

结果缩写
| 缩写 | 含义 |
| . | 通过 |
| F | 失败 |
| E | 出错 |
| s | 跳过 |
| X | 预期外的通过 |
| x | 预期内的失败 |
1.6 pytest发现规则
- 遍历所有的目录(特殊目录除外,比如venv)
- 打开test_开头、_test结尾的python文件
- 寻找Test开头的类,并且没有__init__方法的类
- 从类中按照函数的要求寻找方法
- 寻找test开头的函数:
- 不能拥有参数
- 不能拥有返回值
重点:在pytest中,只有函数和方法,才会被视为测试用例
用例不能拥有参数,因为pytest调用的时候,不知道如何传参
用例不能当做普通函数去调用,因为会违背用例的执行规则
典型现象:用例A调用用例B
用例自始至终,是供框架调用的,用例之间相互隔离,不能直接传递参数
2 pytest高级用法
2.1 配置
改变pytest默认的行事规则,有两种方式:
- 命令行选项
- ini配置文件
查看所有配置
pytest -h
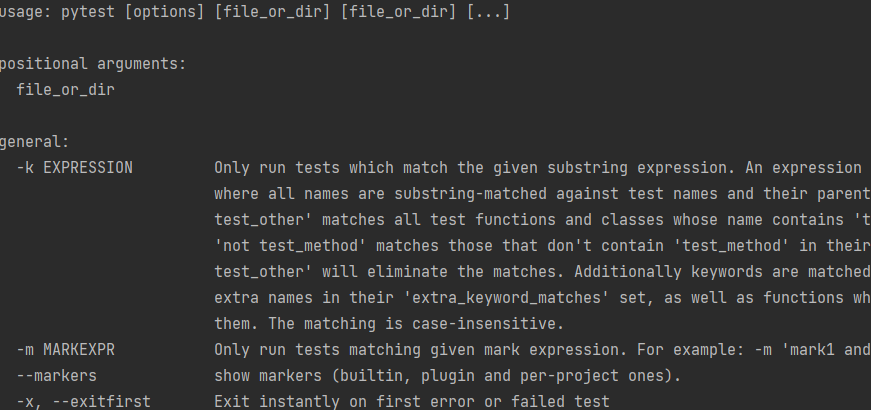
例子1: pytest --capture=no
配置文件选项
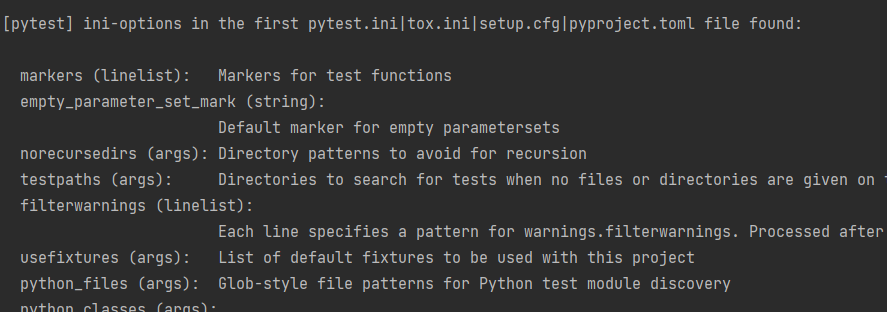
例子2:
常用配置
addopts= --capture=no
- s:简化版 --capture=no
- v:详细显示执行情况
- q:简化显示执行情况
- x:快速退出
约定大于配置:对于成熟的工具来说,默认的配置或许就是最好的配置,如非必要,请勿修改
2.2 标记mark
mark主要用途:让用例之间显得不同,实现用例的筛选
2.2.1 用户自定义标记
1.注册标记
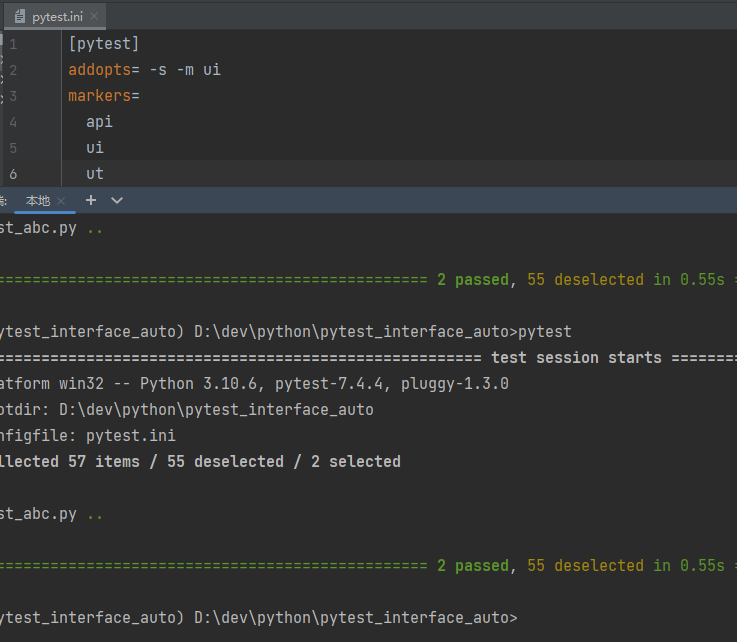
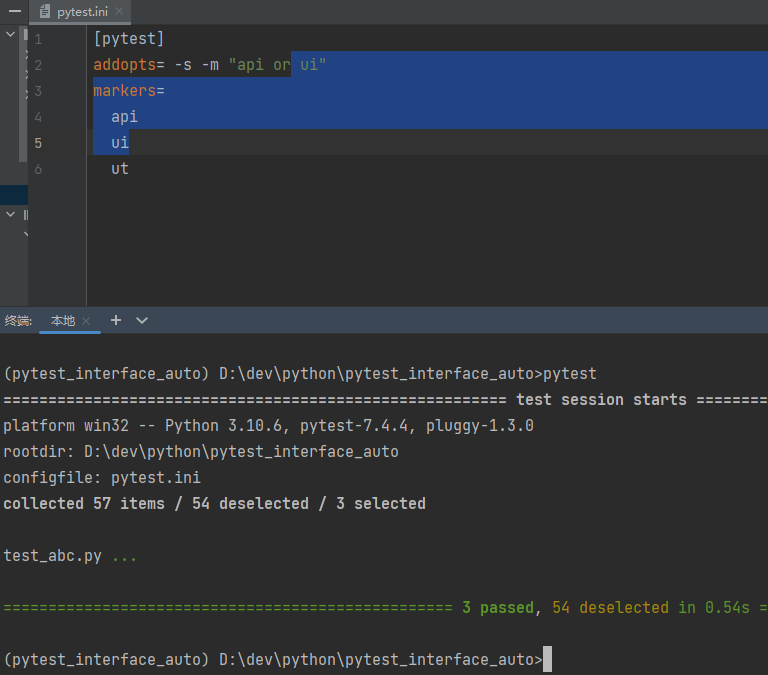
[pytest]
addopts= --capture=no
markers=
  api
  ui
  ut
2.使用标记
(python装饰器)
 1 class TestABC:
 2     @pytest.mark.ut
 3     def test_ok(self):
 4         assert 1 == 1
 5
 6     @pytest.mark.ut
 7     def test_fail(self):
 8         assert 1 == 2
 9
10     @pytest.mark.ui
11     def test_web(self):
12         assert 1
13
14     @pytest.mark.api
15     def test_api(self):
16         assert 2
17
18     @pytest.mark.ui
19     def test_UI(self):
20         assert 3
3.筛选标记
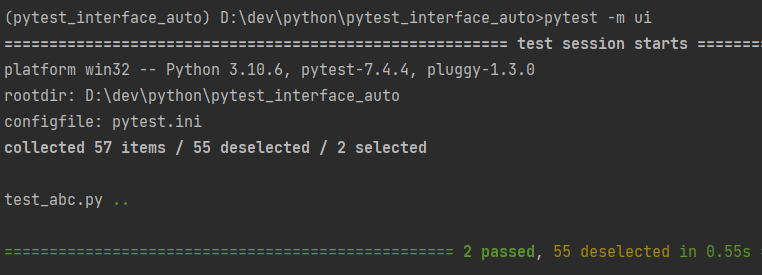
pytest -m 标记
pytest -m ui
pytest -m "api or ui"
pytest -m "api and ui"
2.2.1 框架预定义标记
- 不需要注册
- 不仅用于筛选,还有特殊的效果
- 不同的标记,有不同的效果
- skip:无条件跳过
- skipif:有条件跳过
- xfail:预期失败
- parametrize:参数化测试
- usefixture:使用fixture
 1 import pytest
 2
 3 class TestABC:
 4     @pytest.mark.ut
 5     def test_ok(self):
 6         assert 1 == 1
 7
 8     @pytest.mark.ut
 9     def test_fail(self):
10         assert 1 == 2
11
12     @pytest.mark.skip #无条件跳过
13     @pytest.mark.ui
14     def test_web(self):
15         assert 1==3
16
17     @pytest.mark.api
18     def test_api(self):
19         assert 2
20
21     @pytest.mark.skipif(True,reason='为真时跳过') #无条件跳过
22     @pytest.mark.ui
23     def test_UI(self):
24         assert 3
25
26     @pytest.mark.ui
27     @pytest.mark.xfail #预期失败
28     def test_app(self):
29         assert 4
3.参数化测试
在实际测试活动中,为了尽可能的发现不同情况下的bug,应该尽可能增加测试覆盖率
增加更多的用例,就会增加更多的代码量
不增加代码量,但是增加测试覆盖率的方法:参数化测试
使用步骤:
- 找到不同用例中,差异的部分
- 把差异部分,创建为参数
- 只保留第一个用例
- 使用parametrize,为用例提供参数
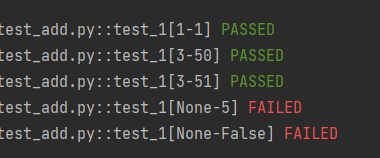
 1 import pytest
 2
 3
 4 def add(a, b):  # 计算a+b的结果
 5     return a + b
 6
 7
 8 @pytest.mark.parametrize(
 9     "a,b",
10     [
11         (1, 1),
12         (3, 5),
13         ('3', '5'),
14         (None, '5'),
15         (None, False)
16     ]
17 )
18 def test_1(a, b):
19     # a = 1
20     # b = 1
21     c = add(a, b)
22     assert c == a + b
23
24 # def test_2(a, b):
25 #     # a = 2
26 #     # b = 5
27 #     c = add(a, b)
28 #     assert c == a + b
29 #
30 #
31 # def test_3(a, b):
32 #     # a = None
33 #     # b = False
34 #     c = add(a, b)
35 #     assert c == a + b
36 #
37 #
38 # def test_4(a, b):
39 #     # a = 3
40 #     # b = '4'
41 #     c = add(a, b)
42 #     assert c == a + b

注意事项:
- 使用参数、标记参数、标记数据,长度应该一致
数据驱动测试=参数化测试+数据文件

 浙公网安备 33010602011771号