UIApplication、UIView、UIWindow、UIScreen、UIViewController、UINavigationController 介绍
转载自 https://blog.csdn.net/ppdyhappy/article/details/46518993
1. 前言
我们先看一下这几个概念的类继承图:

ios中,所有显示在界面上的对象都是从 UIResponder 直接或间接继承的。
2. 应用程序(UIApplication)
一个 UIApplication 对象就代表一个应用程序。一个IOS程序启动后创建的第一个对象就是 UIApplication 对象(只有一个),而且是单例的。如果有需要,可以通过如下代码获得该单例对象:
let app = UIApplication.sharedApplication()
利用 UIApplication 对象,可以进行一些应用级别的操作
(1) 设置应用图标右上角的红色提醒数字
app.applicationIconBadgeNumber = 3
(2) 设置联网指示器的可见性
app.networkActivityIndicatorVisible = true
(3) 管理状态栏
app.setStatusBarStyle(UIStatusBarStyle.Default, animated: true)
app.setStatusBarHidden(false, withAnimation: UIStatusBarAnimation.Fade)
(4) openURL方法
// 发信息
app.openURL(NSURL(string: "sms://10010")!)

// 发邮件
app.openURL(NSURL(string: "mailto://jinnchang@126.com")!)

// 打开一个网页
app.openURL(NSURL(string: "http://blog.csdn.net/jinnchang")!)

// 跳转到 AppStore
app.openURL(NSURL(string: "https://itunes.apple.com/cn/app/qq/id444934666?mt=8")!)
3. 视图(UIView)
UIView 的实例即视图,负责在屏幕上定义一个矩形区域,同时处理该区域的绘制和触屏事件。视图可以嵌套,也可以像图层一样进行叠加。
import UIKit

class ViewController: UIViewController {

    override func viewDidLoad() {
        super.viewDidLoad()
        // Do any additional setup after loading the view, typically from a nib.

        // 添加一个黑色 view
        let view = UIView(frame: CGRectMake(40, 40, self.view.frame.size.width - 80, self.view.frame.size.height - 80))
        view.backgroundColor = UIColor.blackColor()

        self.view.addSubview(view)
    }

    override func didReceiveMemoryWarning() {
        super.didReceiveMemoryWarning()
        // Dispose of any resources that can be recreated.
    }

}
4. 窗口(UIWindow)
UIWindow 管理和协调应用程序的显示,虽然 UIWindow 继承自 UIView,但通常不直接操作 UIWindow 对象中与视图相关的属性变量。
IOS程序启动完毕后,创建的第一个视图控件就是 UIWindow(创建的第一个对象是 UIApplication),接着创建控制器的view,最后将控制器的view加到window上,于是控制器的view就显示在屏幕上了。一般情况下,应用程序只有一个UIWindow对象。即使有多个,也只有一个可以接受到用户的触屏事件。
(1) 自定义一个 myWindow
let myWindow = UIWindow(frame: UIScreen.main.bounds)
(2) 设置 myWindow为主窗口并显示出来(view 不能凭空显示,必须依赖 window)
myWindow.makeKeyAndVisible()
UIWindow 和 UIView 之间的关系也可以想象成这样一个场景:首先会有一个空的画框(UIWindow),我们在画框上放置一块画布(UIView),然后可以在这个画布上进行绘画。画布上可能会被画上各种元素,例如 UILabel、UIButton 等,这些元素其实也是一个又一个 UIView,它们会有一个层级关系管理,有点类似于 Photoshop 中图层的概念,层级高的元素会覆盖住层级低的元素,从而导致层级低的元素被部分或完全遮挡。
5. 屏幕(UIScreen)
通过这个类,我们可以获取一些关于屏幕的信息,通常用来获取屏幕尺寸。
复制代码
// 返回带有状态栏的 Rect
let screen = UIScreen.main.bounds

// 返回不含状态栏的 Rect
// 'applicationFrame' was deprecated
let screen2 = UIScreen.main.applicationFrame
6. 视图控制器(UIViewController)
视图控制器管理 UIView 实例的生命周期及资源的加载与释放、处理由于设备旋转导致的界面旋转,以及和构建复杂应用界面的高级导航对象进行交互。
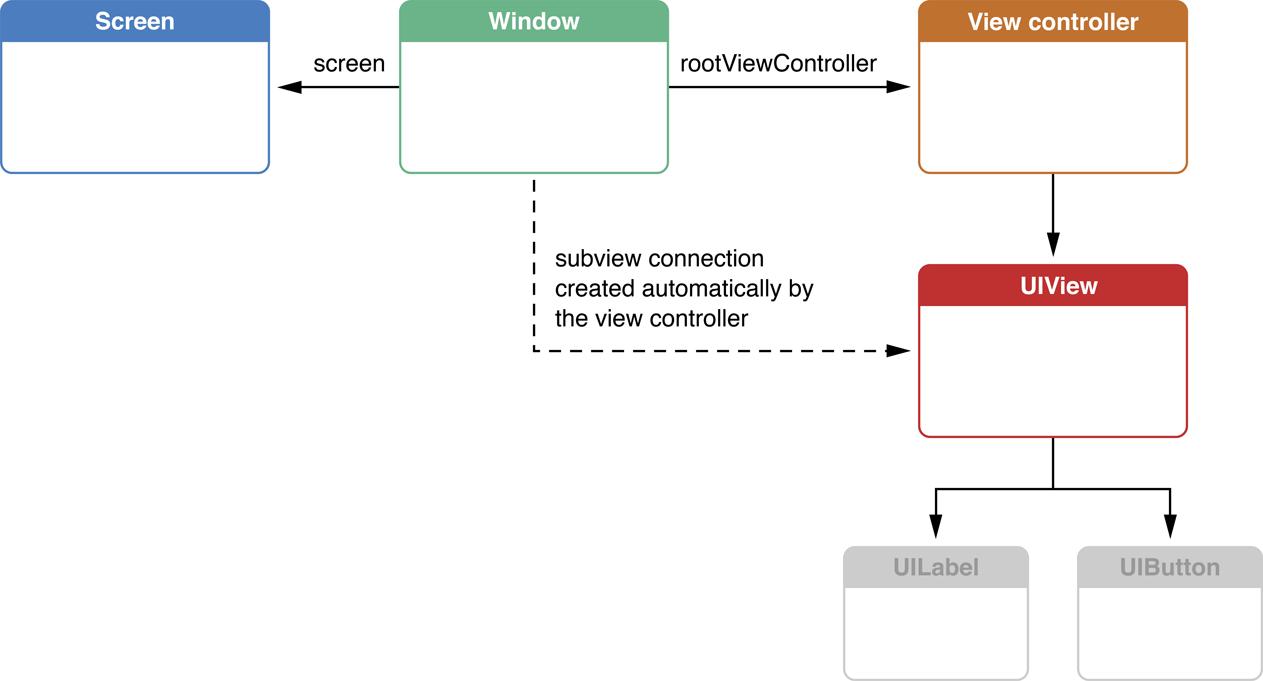
下图展示了 UIView、UIWindow、UIScreen、UIViewController 之间的层级关系:

7. 导航控制器(UINavigationController)
在介绍 UINavigationController 之前先介绍另一个概念:容器(Container)。一个app可能有很多的 UIViewController 组成,这时候需要一个容器来对这些 UIViewController 进行管理。大部分的容器也是一个 UIViewController,如 UINavigationController、UITabBarController,也有少数不是 UIViewController,比如 UIPopoverController 等。
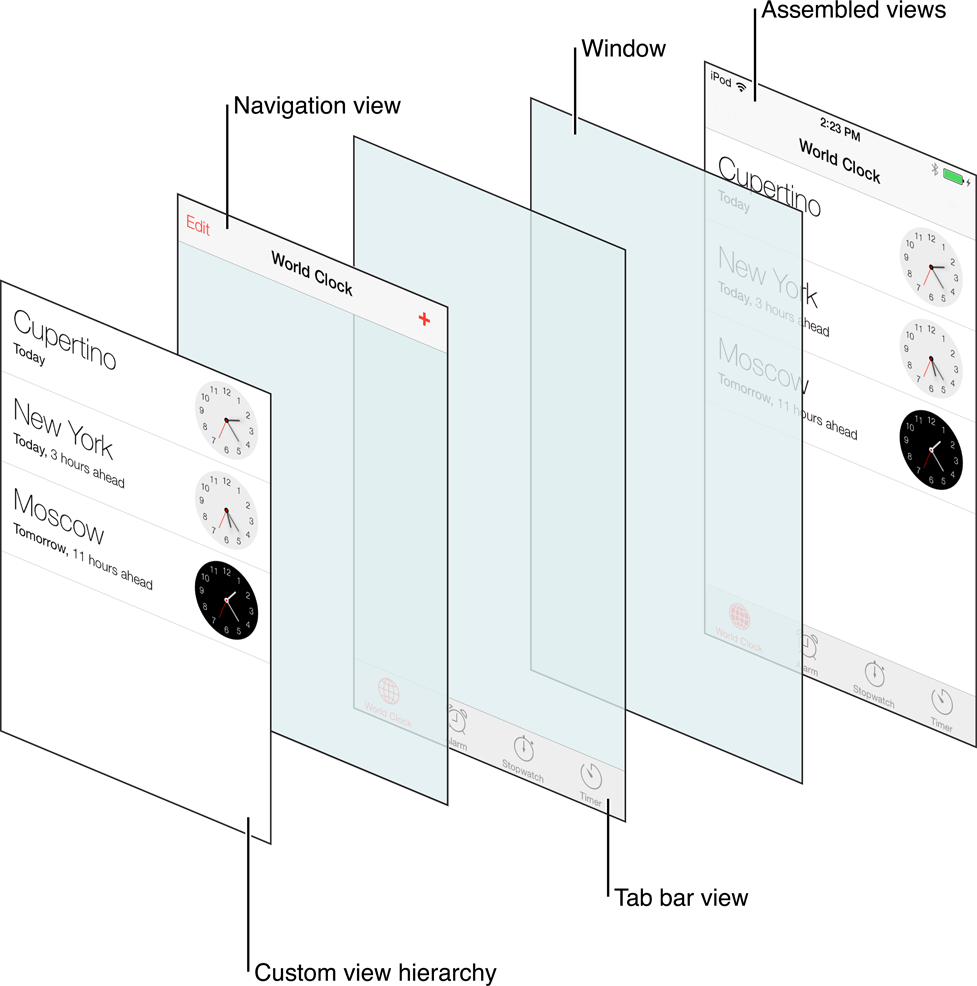
UINavigationController 继承于 UIViewController,通常我们新建的工程是直接将视图控制器添加到 window 上,如果添加了 navigation 以后就多了一层。
import UIKit

@UIApplicationMain
class AppDelegate: UIResponder, UIApplicationDelegate {

    var window: UIWindow?


    func application(application: UIApplication, didFinishLaunchingWithOptions launchOptions: [NSObject: AnyObject]?) -> Bool {
        // Override point for customization after application launch.

        // 初始化 window
        window = UIWindow(frame: UIScreen.mainScreen().bounds)
        window?.backgroundColor = UIColor.grayColor()

        // 初始化 navigationController
        let viewController = ViewController(nibName: nil, bundle: nil)
        let navigationController = UINavigationController(rootViewController: viewController)

        // 设置 window 的根控制器为 navigationController
        window?.rootViewController = navigationController

        // 设置 window 为主窗口并显示出来
        window?.makeKeyAndVisible()

        return true
    }

    func applicationWillResignActive(application: UIApplication) {
        // Sent when the application is about to move from active to inactive state. This can occur for certain types of temporary interruptions (such as an incoming phone call or SMS message) or when the user quits the application and it begins the transition to the background state.
        // Use this method to pause ongoing tasks, disable timers, and throttle down OpenGL ES frame rates. Games should use this method to pause the game.
    }

    func applicationDidEnterBackground(application: UIApplication) {
        // Use this method to release shared resources, save user data, invalidate timers, and store enough application state information to restore your application to its current state in case it is terminated later.
        // If your application supports background execution, this method is called instead of applicationWillTerminate: when the user quits.
    }

    func applicationWillEnterForeground(application: UIApplication) {
        // Called as part of the transition from the background to the inactive state; here you can undo many of the changes made on entering the background.
    }

    func applicationDidBecomeActive(application: UIApplication) {
        // Restart any tasks that were paused (or not yet started) while the application was inactive. If the application was previously in the background, optionally refresh the user interface.
    }

    func applicationWillTerminate(application: UIApplication) {
        // Called when the application is about to terminate. Save data if appropriate. See also applicationDidEnterBackground:.
    }

}
以下是 UINavigationController 的结构图:

通过 UINavigationController 进行视图切换的两种常用方式:
(1) presentViewController
(2) pushViewController
原编辑时间 2020-12-3


 浙公网安备 33010602011771号