安装并配置Next主题
一、更换主题
如我用的主题是next,只需要解压缩到Hexo/themes/next目录下即可,
当然你也可以直接在Hexo目录下执行git clone https://github.com/theme-next/hexo-theme-next themes/next,
解压完成后,修改_config.yaml文件中的theme属性,默认是landscape,修改为next:
# Extensions
## Plugins: https://hexo.io/plugins/
## Themes: https://hexo.io/themes/
theme: next                          #注意:“theme:”后要带一个空格
每次修改主题后,都需要通过hexo clean清理一下,
然后通过hexo g重新生成,
最后也不要忘了通过hexo d重新部署。
二、Hexo的_config.yaml配置
_config.yaml文件是Hexo项目的全局配置文件,常用的属性有:
# Hexo Configuration
## Docs: https://hexo.io/docs/configuration.html
## Source: https://github.com/hexojs/hexo/

# Site
title: Rogn`s Blog            //博客的标题
subtitle: ''                  //副标题
description: '越努力越幸运'     //站点描述
keywords:
author: 刘大小                  //作者
language: zh-CN              //官方语言包不再支持简体中文zh-Hans,而是同一采用zh-CN
timezone: ''                 //时区默认是本地时区

# URL
## If your site is put in a subdirectory, set url as 'http://yoursite.com/child' and root as '/child/'
url: https://rogn.top        //站点地址
root: /
permalink: :year/:month/:day/:title/    //生成固定链接的格式
permalink_defaults:
pretty_urls:
  trailing_index: true # Set to false to remove trailing 'index.html' from permalinks
  trailing_html: true # Set to false to remove trailing '.html' from permalinks

# Directory
source_dir: source                       //源码位置
public_dir: public                       //生成的文件位置
tag_dir: tags                            //标签文件位置
archive_dir: archives                    //归档文件位置
category_dir: categories                 //分类文件位置
code_dir: downloads/code
i18n_dir: :lang
skip_render:

# Writing
new_post_name: :title.md # File name of new posts
default_layout: post
titlecase: false # Transform title into titlecase
external_link:
  enable: true # Open external links in new tab
  field: site # Apply to the whole site
  exclude: ''
filename_case: 0
render_drafts: false
post_asset_folder: false
relative_link: false
future: true
highlight:                 //高亮
  enable: true
  line_number: true
  auto_detect: false
  tab_replace: ''
  wrap: true
  hljs: false

# Home page setting
# path: Root path for your blogs index page. (default = '')
# per_page: Posts displayed per page. (0 = disable pagination)
# order_by: Posts order. (Order by date descending by default)
index_generator:
  path: ''
  per_page: 10          //每页10篇文章
  order_by: -date       //按日期排序

# Category & Tag
default_category: uncategorized
category_map:
tag_map:

# Metadata elements
## https://developer.mozilla.org/en-US/docs/Web/HTML/Element/meta
meta_generator: true

# Date / Time format
## Hexo uses Moment.js to parse and display date
## You can customize the date format as defined in
## http://momentjs.com/docs/#/displaying/format/
date_format: YYYY-MM-DD
time_format: HH:mm:ss
## Use post's date for updated date unless set in front-matter
use_date_for_updated: false

# Pagination
## Set per_page to 0 to disable pagination
per_page: 10          //每页文章数,关闭分页:0
pagination_dir: page

# Include / Exclude file(s)
## include:/exclude: options only apply to the 'source/' folder
include:
exclude:
ignore:

# Extensions
## Plugins: https://hexo.io/plugins/
## Themes: https://hexo.io/themes/
theme: next    //主题,默认是landspace,这里已替换

# Deployment
## Docs: https://hexo.io/docs/deployment.html
deploy:       //部署配置
  type: git
  repo: https://github.com/growvv/growvv.github.io.git   //你的github.io的网址
  branch: master                                         //“type:”、“repo:”和“branch:”后都要带一个空格
三、Next主题的_config.yml文件
在next目录下,也有一个_config,yml文件,这个文件是配置next主题的。
menu:           //next主题菜单
  home: / || home
  about: /about/ || user
  tags: /tags/ || tags
  categories: /categories/ || th
  archives: /archives/ || archive
  #schedule: /schedule/ || calendar
  #sitemap: /sitemap.xml || sitemap
  #commonweal: /404/ || heartbeat
# Schemes     //主题类型
#scheme: Muse
#scheme: Mist
scheme: Pisces   //我选的这个
#scheme: Gemini
social:
  GitHub: https://github.com/growvv || github
  E-Mail: mailto:2092876368@qq.com || envelope
  #Weibo: https://weibo.com/yourname || weibo
  #Google: https://plus.google.com/yourname || google
  Twitter: https://twitter.com/rogn01700270 || twitter
  #FB Page: https://www.facebook.com/yourname || facebook
  #StackOverflow: https://stackoverflow.com/yourname || stack-overflow
  #YouTube: https://youtube.com/yourname || youtube
  #Instagram: https://instagram.com/yourname || instagram
  #Skype: skype:yourname?call|chat || skype
  #RSS: /atom.xml || rss
上面都是一些基本配置,下面我们对博客进行更多的美化。
三、美化
自定义域名
假设你已经拥有域名并且配置域名解析,值得注意的是,直接在github pages设置域名是不够的,因为本地没有CNAME文件,本地文件部署到github后域名绑定又没了。正确的做法是:
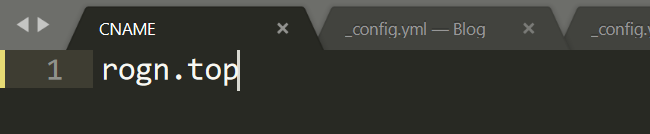
在博客source目录下,新建一个CNAME文件。
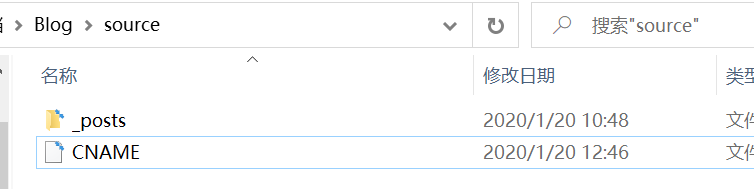
编辑此文件,将你的新域名输入进去:
然后执行 hexo g -d重新部署。
等待一段时间后,你就可以用新域名访问你的博客了。
添加本地搜索插件
安装hexo-generator-searchdb:
npm install hexo-generator-searchdb
在hexo的_config.yml里配置如下参数:
# Local_search
search:
  path: search.xml
  field: post
  format: html
  limit: 10000
同时在next的_config.yml中配置:
local_search:
  enable: true
  # If auto, trigger search by changing input.
  # If manual, trigger search by pressing enter key or search button.
  trigger: auto
  # Show top n results per article, show all results by setting to -1
  top_n_per_article: 1
  # Unescape html strings to the readable one.
  unescape: false
  # Preload the search data when the page loads.
  preload: false
添加评论插件Valine
Valine插件需要leancloud支持,请先去leancloud官网注册,创建应用并成功拿到App ID和App key。然后在主题配置文件中配置:
valine:
  enable: true
  appid: T4y1doOhI3dmbSAq3vSnBV1T-gzGzoHsz
  appkey: poLzVJBLoYkuCQQfdwmlWku4
  notify: true # Mail notifier
  verify: true # Verification code
  placeholder: Just do it # Comment box placeholder
在设置下右键提醒,官方文档很详细。
还支持6种有趣的头像:https://github.com/xCss/Valine/wiki/avatar-setting-for-valine
开启访客统计
同样需要注册leancloud,可以跟评论区使用同一个应用。但是需要手动创建一个数据库(Class)并命名为 Counter 。没有这一步,前端请求的时候会报接口404。这个教程值得推荐。
leancloud_visitors:
  enable: true
  app_id: xxx
  app_key: xxx
重新部署,就能在页面上看到博客的访客数量。
启用RSS订阅博客更新
什么是RSS?
RSS(Really Simple Syndication,简易信息聚合)是一种描述和同步网站内容的格式,是使用最广泛的XML应用。RSS搭建了信息迅速传播的一个技术平台,使得每个人都成为潜在的信息提供者。发布一个RSS文件后,这个RSS Feed中包含的信息就能直接被其他站点调用,而且由于这些数据都是标准的XML格式,所以也能在其他的终端和服务中使用,是一种描述和同步网站内容的格式。
1. 安装hexo-generator-feed插件
npm install hexo-generator-feed --save
2. 在站点的配置文件_config.yaml文件中配置RSS feed
在_config.yaml文件末尾添加:
# RSS feed
feed:
  type: atom
  path: atom.xml
  limit: 0
  plugins:
    - hexo-generator-feed
3. 修改主题配置文件theme/_config.yaml的rss属性为:rss: /atom.xml
运行hexo g,如果提示INFO Generated: atom.xml,且在Hexo/public/目录下生成了atom.xml文件,则说明RSS设置成功。
这样你的博客就可以被别人订阅了,点击主页的RSS按钮即可看到。
iOS可以在App Store搜索SSReader,下载后配置 https://rogn.top/atom.xml即可。
fancybox:图片显示
cd Hexo/themes/next/source/lib
git clone https://github.com/theme-next/theme-next-fancybox3 fancybox
在next/_config.yml中搜索fancybox,将false改为true。
回到顶部按钮显示百分比
back2top:
  # 回到顶部按钮
  enable: true
  # true,按钮显示在侧边栏;false,按钮显示在右下角
  sidebar: false
  # 按钮上显示百分比
  scrollpercent: true
头像
修改theme/_config.yaml文件下的avatar属性,可以使用本地图片,或是在avatar: url属性中传入网络图片。
Live2d看板娘
1. 安装hexo-helper-live2d
在博客根目录下,执行npm install hexo-helper-live2d --save
2. 修改站点配置文件或主题配置文件
官方已有的看板娘名称请点这里查看,部分看板娘的模型预览请看CSDN某博客。
我修改的是站点配置文件Hexo/_config.yaml,添加如下代码:
live2d:
  enable: true
  scriptFrom: local
  pluginRootPath: live2dw/
  pluginJsPath: lib/
  pluginModelPath: assets/
  model:
    # 填写你所需要的看板娘名称
    use: live2d-widget-model-hijiki
  display:
    position: right
    width: 150
    height: 300
  mobile:
    show: true
3. 通过npm安装依赖的看板娘文件
npm install live2d-widget-model-name,其中name是你选择的官方看板娘的名字,如我选择的是haruto,则为npm install live2d-widget-model-hijiki。
重新运行hexo clean && hexo d -g则可在主页看到了。
设置文章封面图片
\themes\next\layout\_macro\post.swig中加以下代码:
# {% if is_index %}标签后

{% if post.summary_img  %}
  <div class="out-img-topic">
    <img src={{ post.summary_img }} class="img-topic">
  </div>
{% endif %}

# {% if post.description and theme.excerpt_description %}标签前
在帖子头部(即.md文件头部)加summary_img: url,即可显示文章封面图片(但是现在好像失效了)
不蒜子统计UV(访客数)和PV(访问量)
将主题配置文件theme/_config.yaml文件中busuanzi_count标签下的enable改为true。配置如下:
busuanzi_count:
  enable: true
  # 访客数
  site_uv: true
  # 访问量
  site_pv: true
  # 文章阅读次数
  page_pv: true
加载条效果
首先通过git clone https://github.com/theme-next/theme-next-pace Hexo/themes/next/source/lib/pace命令,将加载条所需要依赖的js下载到Hexo/themes/next/source/lib目录下,然后将主题配置文件theme/_config.yaml文件中pace标签改为true,在Themes list中选用对应主题即可启用。
pace:
  enable: false
  theme: minimal
minimal是最简单的,页面顶部蓝色细线线进度条。
去掉顶部黑线
next主题顶部的黑线让我看着实在是不舒服,去掉它的办法就是将next/layout/_layout.swig文件中的如下语句注释掉就可以了。
<div class="headband"></div>
instant本加速
prefetch技术是一项预加载技术,当用户有意向访问某个页面之前,浏览器首先对此页面进行预加载,当用户真正点击链接后,会从预加载的缓存中直接读取页面内容,缩短页面的加载时间。
访问https://instant.page得到一段JS脚本,这段脚本会根据用户鼠标在链接上的停留时间进行判断,当达到65ms,用户有一半的概率会打开此链接,instant.page会对此页面进行预加载:
<script src="//instant.page/3.0.0" type="module" defer integrity="sha384-OeDn4XE77tdHo8pGtE1apMPmAipjoxUQ++eeJa6EtJCfHlvijigWiJpD7VDPWXV1"></script>
增加网站运行时间统计
修改位于在next/layout/_partials目录下的footer.swig,在 {{- next_inject('footer') }} 之前添加:
<span>
  <span class="post-meta-divider">|</span>
  本站已运行
  <span id="showDays"></span>
</span>
<script>
  var seconds = 1000;
  var minutes = seconds * 60;
  var hours = minutes * 60;
  var days = hours * 24;
  var years = days * 365;
  var birthDay = Date.UTC(2019,01,20,14,00,00); // 这里设置建站时间
  setInterval(function() {
    var today = new Date();
    var todayYear = today.getFullYear();
    var todayMonth = today.getMonth()+1;
    var todayDate = today.getDate();
    var todayHour = today.getHours();
    var todayMinute = today.getMinutes();
    var todaySecond = today.getSeconds();
    var now = Date.UTC(todayYear,todayMonth,todayDate,todayHour,todayMinute,todaySecond);
    var diff = now - birthDay;
    var diffYears = Math.floor(diff/years);
    var diffDays = Math.floor((diff/days)-diffYears*365);
    var diffHours = Math.floor((diff-(diffYears*365+diffDays)*days)/hours);
    var diffMinutes = Math.floor((diff-(diffYears*365+diffDays)*days-diffHours*hours)/minutes);
    var diffSeconds = Math.floor((diff-(diffYears*365+diffDays)*days-diffHours*hours-diffMinutes*minutes)/seconds);
      document.getElementById('showDays').innerHTML=""+diffYears+"年"+diffDays+"天"+diffHours+"小时"+diffMinutes+"分钟"+diffSeconds+"秒";
  }, 1000);
</script>
文末添加版权信息
Hexo的next(v7.1.0)主题默认就集成了该功能,只需要在设置中启用即可。
修改next主题的配置文件(./themes/next/_config.yml),搜索到creative_commons:标签, sidebar参数表示在侧边栏有一个版权的图片链接,post参数表示在每一篇文章末尾自动增加本文作者、本文链接、版权声明三个信息,language参数表示点击链接后显示的版权信息的语言。
creative_commons:
  license: by-nc-sa
  sidebar: false
  post: true
  language: deed.zh
如果想个性化配置版权信息,可修改配置文件(./themes/next/layout/_partials/post/post-copyright.swig),如果想修改显示的样式可修改配置文件(./themes/next/source/css/_common/components/post/post-copyright.styl) 。
设置主页文章折叠
next默认主页的文章是完全展开的,这不利于迅速浏览。
有两种方法:
第一种:在主题配置文件设置 excerpt_description: true,然后在文章前添加 description 属性。
第二种:在写文章的时候添加 <!--more-->,在这之后的都会被折叠。
当第一种设置好会优先使用第一种,不过推荐使用第二种,因为这样预览部分还是带CSS的。
特定文章关闭评论
只要在markdown的题头加入 comments: false 即可。记得带s。
设置网站favicon图标
通过网站favicon在线制作得到favicon图片,最好是32*32的;
将图片放在next主题source/images目录下,
在next主题的_config.yml文件,修改新的图片作为favicon:
favicon:
  small: /images/favicon16.ico
  medium: /images/favicon32.ico
添加友链
# Blog rolls
links_settings:
  icon: link
  title: 友情链接
  # Available values: block | inline
  layout: block

links:
  半岛铁酱: https://blog.befovy.com/
参考链接:
2. https://www.sakuratears.top/blog...
3. http://www.dragonbaby308.com/hexo-theme-next/
4. http://www.amdoing.com/the-post-copyright-in-hexo-next/
5. https://itwalking.top/page/a92117.html
6. 文章折叠-官方文档

 浙公网安备 33010602011771号