Arduino教程 模拟输入输出以及电机和舵机控制
一、模拟输入输出
0x01、输入:
Arduino采用analogRead(analogInPin)函数读取0~5V的模拟信号,返回0~1023的整数
如:读入为500,那么测得电压为5×(500/1023) ≈ 2.44V
0x02、输出:
Arduino通过PWM波实现模拟电压输出
采用analogWrite(analogOutPin, val)函数输出模拟信号,val范围为0~255,对应输出0%~100%的占空比。
如:输出val=51,占空比为51/(255-0)×100%=20%,有效电压为5V×20%=1V
analogRead和analogWrite函数已经内部调用pinMode,无需外部调用
二、直流电机的控制
直流电机驱动器采用L298N双H桥驱动模块
0x01、模块接线图
0x02、直流电机驱动逻辑真值表
0x03、模块参数
1.双路H桥电机驱动,可以同时驱动两路直流电机或者1个4线两相式步进电机;
2.模块供电电压2V-10V;
3.信号端输入电压1.8-7V;
4.单路工作电流1.5A,峰值电流可达2.5A,低待机电流 (小于 0.1uA);
5.内置防共态导通电路,输入端悬空时,电机不会误动作;
6.内置带迟滞效应的过热保护电路 (TSD),无需担心电机堵转;
7.尺寸: 24.7*21*5mm (长宽高),超小体积,适合组装和车载;
8.安装孔直径:2 mm。
9.重量:5g
0x04、Arduino控制程序
const int analogOutPin1 = A0;
const int analogOutPin2 = A1;

void setup() {
}

void loop() {
  analogWrite(analogOutPin1, 255);
  analogWrite(analogOutPin2, 0);
  delay(3000);
  analogWrite(analogOutPin1, 0);
  analogWrite(analogOutPin2, 255);
  delay(3000);
  analogWrite(analogOutPin1, 255);
  analogWrite(analogOutPin2, 255);
  delay(3000);
}
A0接IN1、A1接IN2。程序功能为控制电机正转3秒,反转3秒,停止3秒如此循环。
二、舵机控制
0x01、控制原理
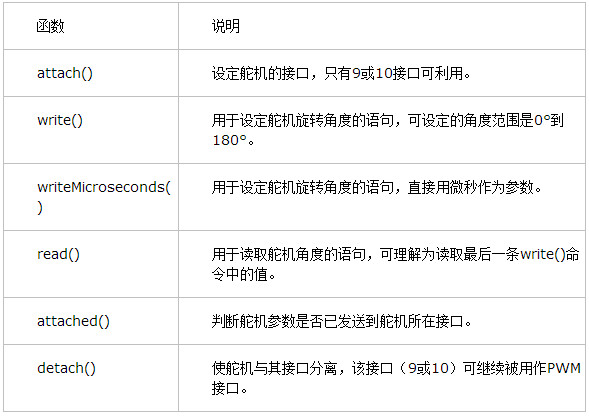
舵机本质上也是通过PWM波占空比控制,不过Arduino有封装好的Serve函数库,也自带了示例代码
此处引用一张网络上的函数说明图片,这篇文章对舵机控制也有很好的说明摘自
Arduino—舵机控制

用Arduino剖析PWM脉宽调制
0x02、注意事项
- Arduino控制舵机接线注意共地、忘记共地会浪费很多不必要的时间
- Arduino引脚不能直接给舵机供电,否则舵机电流过大会烧坏Arduino
0x03、Arduino舵机控制程序
这里就直接引用官方示例了,只是为了有个直观感受
示例程序1
#include <Servo.h>
Servo myservo;  // create servo object to control a servo
int potpin = 0;  // analog pin used to connect the potentiometer
int val;    // variable to read the value from the analog pin

void setup() {
  myservo.attach(9);  // attaches the servo on pin 9 to the servo object
}

void loop() {
  val = analogRead(potpin);            // reads the value of the potentiometer (value between 0 and 1023)
  val = map(val, 0, 1023, 0, 180);     // scale it to use it with the servo (value between 0 and 180)
  myservo.write(val);                  // sets the servo position according to the scaled value
  delay(15);                           // waits for the servo to get there
}
示例程序2
#include <Servo.h>
Servo myservo;  // create servo object to control a servo
int pos = 0;    // variable to store the servo position

void setup() {
  myservo.attach(9);  // attaches the servo on pin 9 to the servo object
}

void loop() {
  for (pos = 0; pos <= 180; pos += 1) { // goes from 0 degrees to 180 degrees
    // in steps of 1 degree
    myservo.write(pos);              // tell servo to go to position in variable 'pos'
    delay(15);                       // waits 15ms for the servo to reach the position
  }
  for (pos = 180; pos >= 0; pos -= 1) { // goes from 180 degrees to 0 degrees
    myservo.write(pos);              // tell servo to go to position in variable 'pos'
    delay(15);                       // waits 15ms for the servo to reach the position
  }
}
【转载请注明出处: http://blog.csdn.net/leytton/article/details/79408845】
PS:如果本文对您有帮助,请点个赞让我知道哦~


