
uwsgi和nginx部署Django服务
先用测试方式启动服务
1.配置好数据库
2.配置setting文件:数据库地址、静态文件地址、debug设置为True
3.数据库迁移
4.启动服务:python manage.py runserver 0.0.0.0:8000
用uwsgi的方式启动
1.安装uwsgi,参考链接:https://www.runoob.com/python3/python-uwsgi.html
解决3个问题:

yum install python-devel
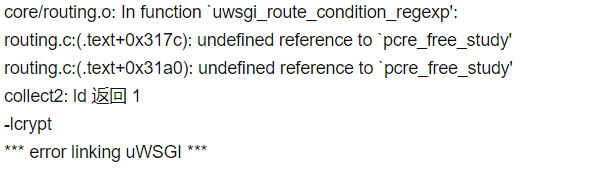
yum remove pcre-devel
执行uwsgi启动服务时,用的是python2解释器,就用python3的解释器重新装了,解决参考文档:https://www.cnblogs.com/zoujl/p/11011041.html
2.建立软链接:ln -s /home/yiqian/uwsgi/uwsgi-2.0.18/uwsgi /usr/bin/uwsgi
3.用命令启动:uwsgi --http :8000 --module requestnew.wsgi --py-autoreload=1
4.根目录下配置uwsgi.ini文件,执行命令uwsgi --ini uwsgi.ini
[uwsgi]
chdir=/home/yiqian/pj/requestnew
module = requestnew.wsgi
processes = 5
threads=4
enable-threads=true
lazy-apps=true
http = 0.0.0.0:8000
#socket  = 0.0.0.0:8000
vacuum = true
nginx和uwsgi的方式启动
1.安装nginx,参考链接:https://blog.csdn.net/t8116189520/article/details/81909574
2.setting文件debug设置为False,新加STATIC_ROOT='/home/yiqian/pj/requestnew/tmp/'
3.执行python3 manage.py collectstatic,在根目录下将静态文件都打到tmp下
4.uwsgi启动,跟换socket启动方式,执行nohup uwsgi --ini uwsgi.ini ../log/uwsgi.log &
[uwsgi]
chdir=/home/yiqian/pj/requestnew
module = requestnew.wsgi
processes = 5
threads=4
enable-threads=true
lazy-apps=true
#http = 0.0.0.0:8000
socket  = 0.0.0.0:8000
vacuum = true
5.配置nginx.conf文件
user  root;
worker_processes  1;

error_log  /var/log/nginx/error.log warn;
pid        /var/run/nginx.pid;


events {
    worker_connections  1024;
}


http {
    #文件扩展名与文件类型映射表
    include mime.types;
    #默认文件类型
    default_type application/octet-stream;
    upstream requestnew{
        server 127.0.0.1:8000;
	}

    server {
       listen 8090;
       server_name  localhost;
       # 将nginx入口的请求,直接反向代理给uwsgi
       location / {
         uwsgi_pass  requestnew;
         include /etc/nginx/uwsgi_params;
		}
    # 通过nginx处理nbcrm的静态文件
		location /static {
			alias /home/yiqian/pj/requestnew/tmp;
        }
    }
}
6.nginx -t检测nginx文件
7.nginx -c /usr/local/nginx/conf/nginx.conf,指定启动配置文件
8.nginx -s reload启动nginx
整体参考文档:https://www.cnblogs.com/zouzou-busy/p/11625994.html

 浙公网安备 33010602011771号