C++调用pytorch,LibTorch在win10下的vs配置和cmake的配置
最近有个项目需要使用C++调用训练好的模型。刚好pytorch1.0版本的发布,加入了对C++的支持,准备试一试pytorch对C++的支持怎么样。这里是官方文档和教程。
https://pytorch.org/docs/master/jit.htmlhttps://pytorch.org/tutorials/advanced/cpp_export.html
总的来说,现在可以用python版的pytorch快速实现和训练,使用相应的API导出模型供C++版的pytorch读取,给C++版本相应输入会生成和python版本一样的预测结果。
开发环境
- VS2015(VS2017亲测也能通过)
- win10
- cmake>=3.0
转换模型
pytorch的C++版本用的是Torch Script,官方给了两种将pytorch模型转成Torch Script的方法。
第一种方法,Tracing:
这种方法比较简单,不需要添加代码到模型中。只需要传一个输入给torch.jit.trace函数,让它输出一次,然后save。
import Image
import torch
import torchvision.models as models
from torchvision import transforms as transform

model_resnet = models.resnet50()
#model_resnet.load_state_dict(torch.load("resnet_Epoch_4_Top1_99.75845336914062.pkl"))
model_resnet.eval()

image = Image.open("your image path").convert('RGB')

transforms = transform.Compose([
        transform.Resize((224,224)),
        transform.ToTensor(),
        transform.Normalize(mean=[0.5]*3, std=[0.5]*3)
])

input = centre_crop_val(image)
input = input.unsqueeze(0)

traced_script_module_resnet = torch.jit.trace(model_resnet, input)

output = traced_script_module_resnet(input)
#print(output)
traced_script_module_resnet.save("model_resnet_jit.pt")
使用什么做输出都无所谓,为了方便比较python版和C++版是否输出一样,建议使用一个样本来测试下,不然给对方使用的时候发现结果不一样就尴尬了(逃。需要和训练的size以及channel保持一致,同时要保证用于测试的样本和用于训练的样本的transform要一致,不然输出也不一样 。使用torch.rand或者torch.ones也是可行的,不会影响已经训练好的模型权重。
#使用torch.rand
input = torch.ones(1, 3, 224, 224)
traced_script_module_resnet = torch.jit.trace(model_resnet, input)

output = traced_script_module_resnet(input)
#print(output)
traced_script_module_resnet.save("model_resnet_jit.pt")
第二种方法,Annotation:
第二种适合有控制流的模型,比如你的forward方法中有if/else语句,可能就需要使用这种方法。比如用官方的例子做展示:
import torch

class MyModule(torch.nn.Module):
    def __init__(self, N, M):
        super(MyModule, self).__init__()
        self.weight = torch.nn.Parameter(torch.rand(N, M))

    def forward(self, input):
        if input.sum() > 0:
          output = self.weight.mv(input)
        else:
          output = self.weight + input
        return output
对于这种模型,可以在forward方法前加一个修饰器@torch.jit.script_method。
import torch

class MyModule(torch.jit.ScriptModule):
    def __init__(self, N, M):
        super(MyModule, self).__init__()
        self.weight = torch.nn.Parameter(torch.rand(N, M))

    @torch.jit.script_method
    def forward(self, input):
        if bool(input.sum() > 0):
          output = self.weight.mv(input)
        else:
          output = self.weight + input
        return output

my_script_module = MyModule(2, 3)
my_script_module.save("your_model.pt")
不管哪种方法得到的model.pt(也就是Torch Script),就可以使用C++调用它了。
准备工作
确定有>=3.0版本的cmake和比较高的vs版本。cmake下载。
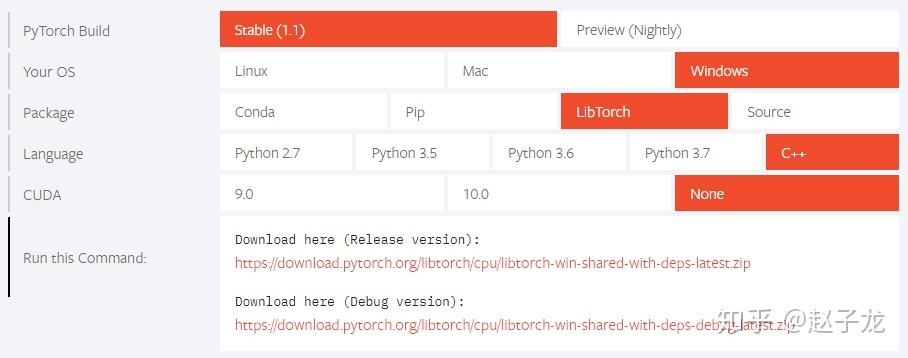
在pytorch官网下载对应的LibTorch。有GPU版CP官网下载对应的LibTorch。有GPU版CPU版、有DEBUG和RELEASE版。
然后解压。
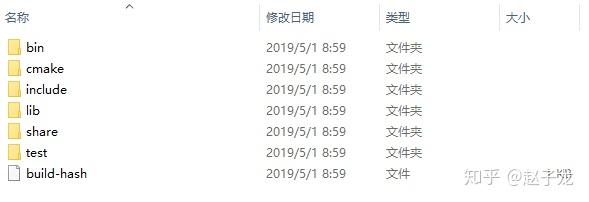
有include有lib,跟其他库结构差不多。
VS配置
官方和其他很多都是用的cmake,其实vs也能用。新建一个空项目,然后和VS配置opencv一样,把LibTorch的include和lib添加到“包含目录”和“库目录”中就行,还需要在链接器中加入:
torch.lib
c10.lib
caffe2.lib
一般来说3个就足够,以防万一可以把所有lib都加上:
c10.lib
caffe2.lib
caffe2_detectron_ops.lib
caffe2_module_test_dynamic.lib
clog.lib
cpuinfo.lib
foxi_dummy.lib
foxi_loader.lib
libprotobuf.lib
libprotobuf-lite.lib
libprotoc.lib
onnx.lib
onnx_proto.lib
onnxifi_dummy.lib
onnxifi_loader.lib
torch.lib
还有两个地方需要修改:
第一项:属性->C/C++ ->常规->SDL检查->否。
第二项:属性->C/C++ ->语言->符号模式->否。
编写C++代码
新建一个example.cpp,选几张测试的图片,用opencv读入然后转成tensor。训练网络的时候Tensor的shape是N x C x H x W,所以还需要把opencv转成的tensor(H x W x C)用permute转换一下,然后unsqueeze添加一维变成N x C x H x W。同时要保证测试样本和训练样本有一样的transform。
#include <torch/script.h> // One-stop header.
#include <opencv2/opencv.hpp>
#include <iostream>
#include <memory>

//https://pytorch.org/tutorials/advanced/cpp_export.html

std::string image_path = "your image folder path";

int main(int argc, const char* argv[]) {

    // Deserialize the ScriptModule from a file using torch::jit::load().
    std::shared_ptr<torch::jit::script::Module> module = torch::jit::load("your model path");

    assert(module != nullptr);
    std::cout << "ok\n";

    //输入图像
    auto image = cv::imread(image_path +"/"+ "your image name",cv::ImreadModes::IMREAD_IMREAD_COLOR);
    cv::Mat image_transfomed;
    cv::resize(image, image_transfomed, cv::Size(70, 70));

    // 转换为Tensor
    torch::Tensor tensor_image = torch::from_blob(image_transfomed.data,
                            {image_transfomed.rows, image_transfomed.cols,3},torch::kByte);
    tensor_image = tensor_image.permute({2,0,1});
    tensor_image = tensor_image.toType(torch::kFloat);
    tensor_image = tensor_image.div(255);
    tensor_image = tensor_image.unsqueeze(0);

    // 网络前向计算
    at::Tensor output = module->forward({tensor_image}).toTensor();
	//std::cout << "output:" << output << std::endl;

	auto prediction = output.argmax(1);
	std::cout << "prediction:" << prediction << std::endl;

	int maxk = 3;
	auto top3 = std::get<1>(output.topk(maxk, 1