Windows下编译TensorFlow1.3 C++ library及创建一个简单的TensorFlow C++程序
由于最近比较忙,一直到假期才有空,因此将自己学到的知识进行分享。如果有不对的地方,请指出,谢谢!目前深度学习越来越火,学习、使用tensorflow的相关工作者也越来越多。最近在研究tensorflow线下采用 python 脚本训练出模型, 利用freeze_graph工具输出.pb图文件,之后再线上生产环境windows平台上用C++代码直接调用预先训练好的模型完成预测的工作。因为目前tensorflow提供的C++的API比较少,所以参考了以上几篇已有的日志,做个总结。这里编译出TensorFlow C++ library,遇到的坑进行填埋。之后的调用C++library相对比较简单,可以参考链接部分。
Step1:Windows 10必备环境准备
1.1安装VS2015
1.2安装Swigwin-3.0.12,其可执行文件地址为 D:/lib/swigwin-3.0.12/swig.exe
1.4安装python3.5,安装时注意选择将路径添加到环境变量。
1.5安装CMake-3.8.0 ,安装时注意选择将路径添加到环境变量。
1.6安装Git,用于在编译过程中从GitHub上下载依赖项。
1.7 将GitHub上TensorFlow的master分支 下载并解压到文件夹D:\tf中,编辑文件tensorflow/tensorflow/contrib/cmake/CMakeLists.txt,将第87行至93行修改如下:
|
1
2
3
4
5
6
7
8
9
10
11
12
|
if (tensorflow_OPTIMIZE_FOR_NATIVE_ARCH) include(CheckCXXCompilerFlag) CHECK_CXX_COMPILER_FLAG("-march=native" COMPILER_OPT_ARCH_NATIVE_SUPPORTED) if (COMPILER_OPT_ARCH_NATIVE_SUPPORTED) set(CMAKE_CXX_FLAGS "${CMAKE_CXX_FLAGS} -march=native") else() CHECK_CXX_COMPILER_FLAG("/arch:AVX" COMPILER_OPT_ARCH_AVX_SUPPORTED) if(COMPILER_OPT_ARCH_AVX_SUPPORTED) set(CMAKE_CXX_FLAGS "${CMAKE_CXX_FLAGS} /arch:AVX") endif() endif()endif() |
总结下这一部分的三个重要地址:
Python可执行文件地址为:D:/lib/Python35/python.exe;
Python库文件地址为:D:/lib/Python35/libs/python35.lib(release版本), D:/lib/Python35/libs/python35_d.lib(Debug版本);
Swigwin可执行文件地址:D:/lib/swigwin-3.0.12/swig.exe。
Step2:编译 TensorFlow shared lib
2.1 打开文件夹 D:\tf\tensorflow-master\tensorflow\contrib\cmake, 新建文件夹\build。以管理员身份运行 开始 \ 所有程序 \ Visual Studio 2015\Visual Studio Tools\ Developer Command Prompt for VS 2015,输入powershell,使用命令切换到新建的build文件夹下。使用指令1用于build编译项目。可以看到,使用的就是上一部分保存的三个路径。当命令行中出现Generating done,说明build成功。
|
1
2
3
4
5
|
# 指令1(release)cmake .. -A x64 -DCMAKE_BUILD_TYPE=Release -DSWIG_EXECUTABLE=D:/lib/swigwin-3.0.12/swig.exe-DPYTHON_EXECUTABLE=D:/lib/Python35/python.exe -DPYTHON_LIBRARIES=D:/lib/Python35/libs/python35.lib -Dtensorflow_BUILD_SHARED_LIB=ON# 指令1(debug)cmake .. -A x64 -DCMAKE_BUILD_TYPE=Debug -DSWIG_EXECUTABLE=D:/lib/swigwin-3.0.12/swig.exe-DPYTHON_EXECUTABLE=D:/lib/Python35/python.exe -DPYTHON_LIBRARIES=D:/lib/Python35/libs/python35_d.lib-Dtensorflow_BUILD_SHARED_LIB=ON |
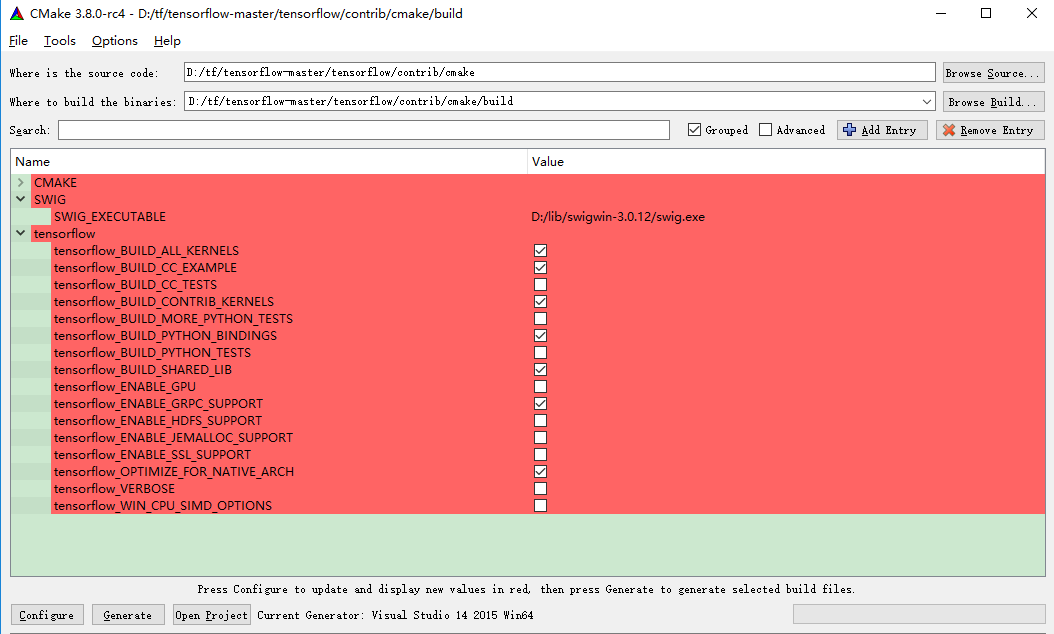
或者,这里我用cmake-gui界面进行cmake编译出release和debug版本,如下图所示:
2.2 命令行中输入指令2开始编译,在编译过程中保持网络畅通,有15个依赖库需要下载。编译过程中可能出现一些警告,不用担心,只要没有错误编译就可以通过。
# 指令2(release)
MSBuild /p:Configuration=Release ALL_BUILD.vcxproj
# 指令2(debug)
MSBuild /p:Configuration=Debug ALL_BUILD.vcxproj
2.3 但是,我在自己的电脑上编译失败,并出现了90个错误,这些错误都指向了两文件:
D:\tf\tensorflow-master\tensorflow\contrib\cmake\build\re2\src\re2\re2\testing\re2_test.cc
D:\tf\tensorflow-master\tensorflow\contrib\cmake\build\re2\src\re2\re2\testing\search_test.cc
re2包提供了正则表达式的功能,文件夹testing中是测试文件,在TensorFlow运行过程中其实不需要这些测试功能,所以可以通过禁止编译re2的测试部分来移除这些错误。
Step3:排除错误
3.1对出错的工程文件夹下,修改文件D:\tf\tensorflow-master\tensorflow\contrib\cmake\build\re2\src\re2\CMakeLists.txt(一定要FQ下载到),将第16行修改为:
option(RE2_BUILD_TESTING “enable testing for RE2” OFF)
,并保存。
3.2 重新进行编译(步骤2.2)。在编译过程中,会出现错误:
C:\Program Files (x86)\MSBuild\Microsoft.Cpp\v4.0\V140\Microsoft.CppCommon.targets(171,5): error MSB6006: “cmd.exe”已退
出,代码为 1。 [D:\tensorflow-master\tensorflow\contrib\cmake\build\grpc.vcxproj]
这个应该是没有成功下载grpc,这个应该是个bug,给的链接不对(多次编译都编不过去),百度了下grpc对我现在的应用暂时用不多(不了解可以百度gprc)因此,暂时不需要grpc,也就不下载,编辑文件tensorflow/tensorflow/contrib/cmake/CMakeLists.txt,将第23行修改如下:
option(tensorflow_ENABLE_GRPC_SUPPORT "Enable gRPC support" OFF)
3.3重新cmake 和Build编译项目,并重新进行编译,重复步骤2.1,2.2和3.1。可能会出现错误:
fatal error C1060: compiler is out of heap space
这应该是跟自己的硬件相关,我自己的电脑配置不太好。出现这个错误,首先等待编译过程的完成,然后重复运行指令2。大概重复运行两三次这个问题就没有了。每次重复运行前,需等待整个编译过程完成。
也可能会出现这样的错误(Debug编译出现这样的错误):

这可能在实际中编译采用的是x86,并没有真正采用x64的环境进行编译,因此打开命令窗口Developer Command Prompt for VS 2015,输入powershell,使用命令切换到新建的build文件夹下,输入指令3,然后在输入指令2。
# 指令3
set PreferredToolArchitecture=x64
3.4 编译到最后会出现错误(debug版本比较严格)符号重载的错误,如下图所示:
error C2678: binary '<': no operator found which takes a left-hand operand of type IndicesRowIterator

修改对应的文件夹下的文件,我这里是D:\tf\tensorflow-master-ngrpc\tensorflow\contrib\boosted_trees\lib\utils\sparse_column_iterable.cc,增加到文件中,增加的内容如下所示:
bool operator<( const IndicesRowIterator& other ) const {
QCHECK_LT( iter_, other.iter_ );
return ( row_idx_ < other.row_idx_ );
}
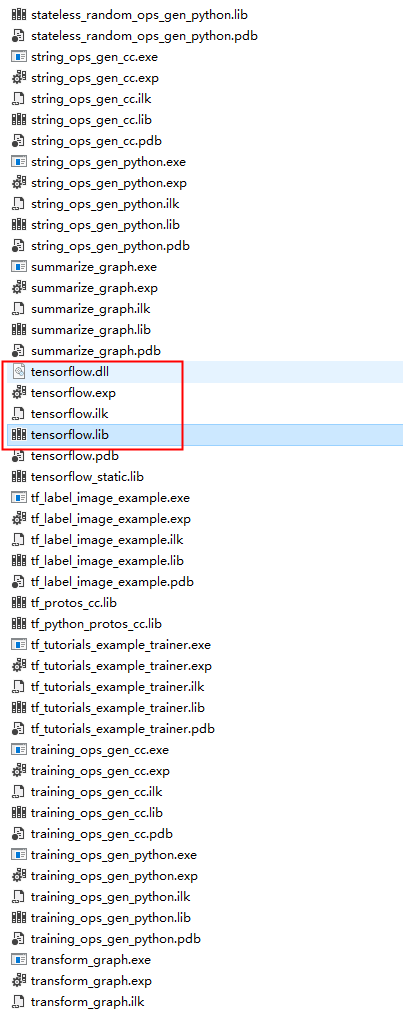
最终编译成功。出现需要的相应的release和debug版本的lib和动态链接库
Step4:在Windows上编译和运行一个简单的TensorFlow C++ 程序
4.1在vs2015中创建一个新的工程solution,并在对应的文件中输入如下:

#include <vector>
#include <eigen/Dense>

#include "matmul.h"
#include "tensorflow/core/public/session.h"
#include "tensorflow/cc/ops/standard_ops.h"

using namespace tensorflow;

// Build a computation graph that takes a tensor of shape [?, 2] and
// multiplies it by a hard-coded matrix.
GraphDef CreateGraphDef()
{
  Scope root = Scope::NewRootScope();

  auto X = ops::Placeholder(root.WithOpName("x"), DT_FLOAT,
                            ops::Placeholder::Shape({ -1, 2 }));
  auto A = ops::Const(root, { { 3.f, 2.f },{ -1.f, 0.f } });

  auto Y = ops::MatMul(root.WithOpName("y"), A, X,
                       ops::MatMul::TransposeB(true));

  GraphDef def;
  TF_CHECK_OK(root.ToGraphDef(&def));

  return def;
}

int main()
{
  GraphDef graph_def = CreateGraphDef();

  // Start up the session
  SessionOptions options;
  std::unique_ptr<Session> session(NewSession(options));
  TF_CHECK_OK(session->Create(graph_def));

  // Define some data.  This needs to be converted to an Eigen Tensor to be
  // fed into the placeholder.  Note that this will be broken up into two
  // separate vectors of length 2: [1, 2] and [3, 4], which will separately
  // be multiplied by the matrix.
  std::vector<float> data = { 1, 2, 3, 4 };
  auto mapped_X_ = Eigen::TensorMap<Eigen::Tensor<float, 2, Eigen::RowMajor>>
                     (&data[0], 2, 2);
  auto eigen_X_ = Eigen::Tensor<float, 2, Eigen::RowMajor>(mapped_X_);

  Tensor X_(DT_FLOAT, TensorShape({ 2, 2 }));
  X_.tensor<float, 2>() = eigen_X_;

  std::vector<Tensor> outputs;
  TF_CHECK_OK(session->Run({ { "x", X_ } }, { "y" }, {}, &outputs));

  // Get the result and print it out
  Tensor Y_ = outputs[0];
  std::cout << Y_.tensor<float, 2>() << std::endl;

  session->Close();
  getchar();
}
4.2在对应的头文件中输入如下:
#pragma once

#define COMPILER_MSVC
#define NOMINMAX
4.3在vs2015中,属性配置界面中,include Directories:
D:\tf\tensorflow-master-ngrpc\tensorflow\contrib\cmake\build\Debug
D:\tf\tensorflow-master-ngrpc\tensorflow\contrib\cmake\build\external\nsync\public
D:\tf\tensorflow-master-ngrpc\tensorflow\contrib\cmake\build\protobuf\src\protobuf\src
D:\tf\tensorflow-master-ngrpc\tensorflow\contrib\cmake\build\external\eigen_archive
D:\tf\tensorflow-master-ngrpc\tensorflow\contrib\cmake\build
D:\tf\tensorflow-master-ngrpc
D:\tf\tensorflow-master-ngrpc\third_party\eigen3
4.4在vs2015中,属性配置界面中,Additional Library Directories(release版本):
D:\tf\tensorflow-master-ngrpc\tensorflow\contrib\cmake\build\Release
4.5在vs2015中,属性配置界面中,Linker Settings(release版本):
tensorflow.lib
4.6编译和运行程序,运行结果如下所示:
 7 17
-1 -3
参考:
https://joe-antognini.github.io/machine-learning/build-windows-tf
http://blog.csdn.net/longji/article/details/72760409
http://blog.csdn.net/rockingdingo/article/details/75452711
https://github.com/tensorflow/tensorflow/issues
https://github.com/tensorflow/tensorflow/tree/master/tensorflow/contrib/cmake
每一个不曾起舞的日子,都是对生命的辜负。
But it is the same with man as with the tree. The more he seeks to rise into the height and light, the more vigorously do his roots struggle earthward, downward, into the dark, the deep - into evil.
其实人跟树是一样的,越是向往高处的阳光,它的根就越要伸向黑暗的地底。----尼采

 浙公网安备 33010602011771号