Fuzzing101
AFL++配置
如果过程中出现问题,很可能是网络不通畅导致
# 安装依赖 sudo apt-get update sudo apt-get install -y build-essential python3-dev automake cmake git flex bison libglib2.0-dev libpixman-1-dev python3-setuptools cargo libgtk-3-dev sudo apt-get install -y lld-12 llvm-12 llvm-12-dev clang-12 sudo apt-get install -y gcc-$(gcc --version|head -n1|sed 's/\..*//'|sed 's/.* //')-plugin-dev libstdc++-$(gcc --version|head -n1|sed 's/\..*//'|sed 's/.* //')-dev sudo apt-get install -y ninja-build # for QEMU mode # 构建并安装AFLplusplus git clone https://github.com/AFLplusplus/AFLplusplus cd AFLplusplus LLVM_CONFIG=llvm-config-12 make distrib sudo make install
Exercise2
https://www.cnblogs.com/unr4v31/p/15247691.html
完整流程
# 创建目录结构 cd $HOME mkdir fuzzing_libexif && cd fuzzing_libexif/ # 下载目标库 wget https://github.com/libexif/libexif/archive/refs/tags/libexif-0_6_14-release.tar.gz tar -xzvf libexif-0_6_14-release.tar.gz # 插桩编译目标库 cd libexif-libexif-0_6_14-release/ sudo apt-get install autopoint libtool gettext libpopt-dev export LLVM_CONFIG="llvm-config-12" autoreconf -fvi CC=afl-clang-lto ./configure --enable-shared=no --prefix="$HOME/fuzzing_libexif/install/" make make install # 插桩安装一个使用目标库的应用程序 wget https://github.com/libexif/exif/archive/refs/tags/exif-0_6_15-release.tar.gz tar -xzvf exif-0_6_15-release.tar.gz cd $HOME/fuzzing_libexif/exif-exif-0_6_15-release export LLVM_CONFIG="llvm-config-12" autoreconf -fvi CC=afl-clang-lto ./configure --enable-shared=no --prefix="$HOME/fuzzing_libexif/install/" PKG_CONFIG_PATH=$HOME/fuzzing_libexif/install/lib/pkgconfig make make install # 下载输入用例 cd $HOME/fuzzing_libexif wget https://github.com/ianare/exif-samples/archive/refs/heads/master.zip unzip exif-samples-master.zip ## 测试该应用能否正常运行 $HOME/fuzzing_libexif/install/bin/exif $HOME/fuzzing_libexif/exif-samples-master/jpg/Canon_40D_photoshop_import.jpg # 执行fuzz afl-fuzz -i $HOME/fuzzing_libexif/exif-samples-master/jpg/ -o $HOME/fuzzing_libexif/out/ -s 123 -- $HOME/fuzzing_libexif/install/bin/exif @@
部分问题解决
-
fuzz报错
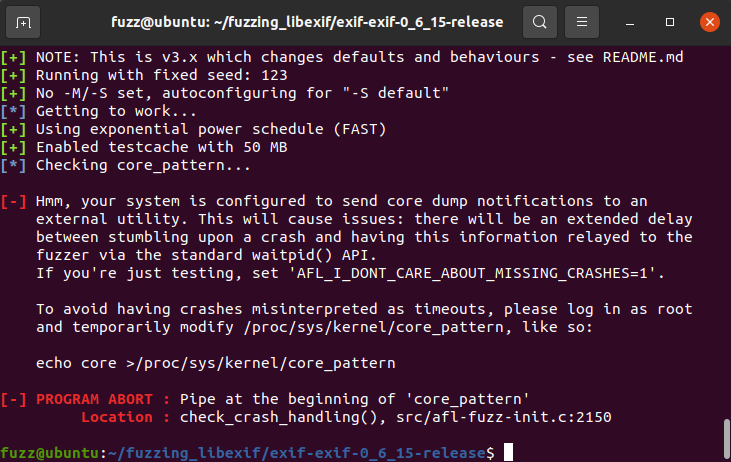
解决:将coredumps输出为文件
sudo bash -c 'echo core >/proc/sys/kernel/core_pattern'
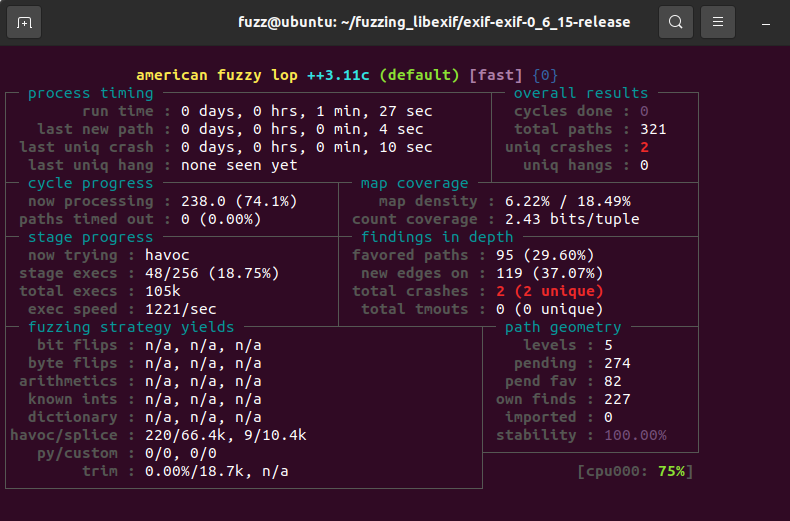
结果
Exercise4
完整流程
# 创建目录结构 cd $HOME mkdir fuzzing_tiff && cd fuzzing_tiff/ # 下载目标库 wget https://download.osgeo.org/libtiff/tiff-4.0.4.tar.gz tar -xzvf tiff-4.0.4.tar.gz # 使用--coverage标志编译目标库 cd tiff-4.0.4/ CFLAGS="--coverage" LDFLAGS="--coverage" ./configure --prefix="$HOME/fuzzing_tiff/install/" --disable-shared make make install # 执行自带的tiffinfo应用程序并查看代码覆盖率 sudo apt install lcov cd $HOME/fuzzing_tiff/tiff-4.0.4/ ## 重置计数器 lcov --zerocounters --directory ./ ## 记录原始代码覆盖 lcov --capture --initial --directory ./ --output-file app.info ## 执行一次tiffinfo $HOME/fuzzing_tiff/install/bin/tiffinfo -D -j -c -r -s -w $HOME/fuzzing_tiff/tiff-4.0.4/test/images/palette-1c-1b.tiff ## 统计执行后的代码覆盖率 lcov --no-checksum --directory ./ --capture --output-file app2.info ## 生成html输出 genhtml --highlight --legend -output-directory ./html-coverage/ ./app2.info # 清除上次使用--coverage标志的编译结果 rm -r $HOME/fuzzing_tiff/install cd $HOME/fuzzing_tiff/tiff-4.0.4/ make clean # 重新进行插桩编译并开启ASAN(快速内存错误检测) export LLVM_CONFIG="llvm-config-12" CC=afl-clang-lto ./configure --prefix="$HOME/fuzzing_tiff/install/" --disable-shared AFL_USE_ASAN=1 make -j4 # 表示可以使用4核 AFL_USE_ASAN=1 make install # 进行fuzz afl-fuzz -m none -i $HOME/fuzzing_tiff/tiff-4.0.4/test/images/ -o $HOME/fuzzing_tiff/out/ -s 123 -- $HOME/fuzzing_tiff/install/bin/tiffinfo -D -j -c -r -s -w @@
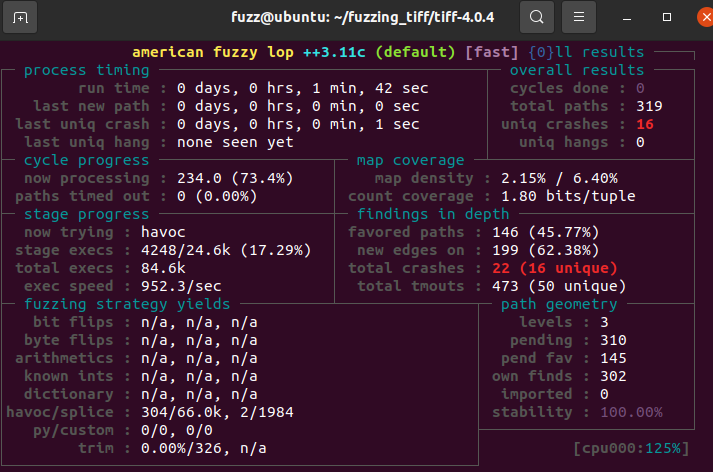
结果
Exercise6
完整流程
# 创建目录结构 cd $HOME mkdir Fuzzing_gimp && cd Fuzzing_gimp # 安装依赖 sudo apt-get install build-essential libatk1.0-dev libfontconfig1-dev libcairo2-dev libgudev-1.0-0 libdbus-1-dev libdbus-glib-1-dev libexif-dev libxfixes-dev libgtk2.0-dev python2.7-dev libpango1.0-dev libglib2.0-dev zlib1g-dev intltool libbabl-dev wget https://download.gimp.org/pub/gegl/0.2/gegl-0.2.0.tar.bz2 tar xvf gegl-0.2.0.tar.bz2 && cd gegl-0.2.0 sed -i 's/CODEC_CAP_TRUNCATED/AV_CODEC_CAP_TRUNCATED/g' ./operations/external/ff-load.c sed -i 's/CODEC_FLAG_TRUNCATED/AV_CODEC_FLAG_TRUNCATED/g' ./operations/external/ff-load.c ./configure --enable-debug --disable-glibtest --without-vala --without-cairo --without-pango --without-pangocairo --without-gdk-pixbuf --without-lensfun --without-libjpeg --without-libpng --without-librsvg --without-openexr --without-sdl --without-libopenraw --without-jasper --without-graphviz --without-lua --without-libavformat --without-libv4l --without-libspiro --without-exiv2 --without-umfpack make -j$(nproc) # 这两步有一些报错,导致后续gimp跑不起来 sudo make install ## 上面gegl-0.2.0的安装有些问题,直接使用仓库提供的0.4版本 sudo apt-get install libgegl-0.4-0 # 安装GIMP cd .. wget https://mirror.klaus-uwe.me/gimp/pub/gimp/v2.8/gimp-2.8.16.tar.bz2 tar xvf gimp-2.8.16.tar.bz2 && cd gimp-2.8.16/ ## 根据https://github.com/antonio-morales/Fuzzing101/tree/main/Exercise%206中Persistent mode修改源代码 CC=afl-clang-lto CXX=afl-clang-lto++ PKG_CONFIG_PATH=$PKG_CONFIG_PATH:$HOME/Fuzzing_gimp/gegl-0.2.0/ CFLAGS="-fsanitize=address" CXXFLAGS="-fsanitize=address" LDFLAGS="-fsanitize=address" ./configure --disable-gtktest --disable-glibtest --disable-alsatest --disable-nls --without-libtiff --without-libjpeg --without-bzip2 --without-gs --without-libpng --without-libmng --without-libexif --without-aa --without-libxpm --without-webkit --without-librsvg --without-print --without-poppler --without-cairo-pdf --without-gvfs --without-libcurl --without-wmf --without-libjasper --without-alsa --without-gudev --disable-python --enable-gimp-console --without-mac-twain --without-script-fu --without-gudev --without-dbus --disable-mp --without-linux-input --without-xvfb-run --with-gif-compression=none --without-xmc --with-shm=none --enable-debug --prefix="$HOME/Fuzzing_gimp/gimp-2.8.16/install" make -j$(nproc) make install # 下载输入用例 mkdir afl_in && cd afl_in wget https://github.com/antonio-morales/Fuzzing101/blob/main/Exercise%206/SampleInput.xcf # 执行fuzz ## 删除一些不需要的插件 cd .. rm ./install/lib/gimp/2.0/plug-ins/* ASAN_OPTIONS=detect_leaks=0,abort_on_error=1,symbolize=0 afl-fuzz -i './afl_in' -o './afl_out' -D -t 100 -- ./install/bin/gimp-console-2.8 --verbose -d -f @@
部分问题解决
-
缺少共享库文件导致fuzz跑不起来
原因:GIMP依赖的gegl-0.2编译有些问题,导致缺少libgegl-0.2.so.0文件
解决:不手动编译gegl-0.2,使用apt安装gegl-0.4→
sudo apt-get install libgegl-0.4-0 -
输入用例超时
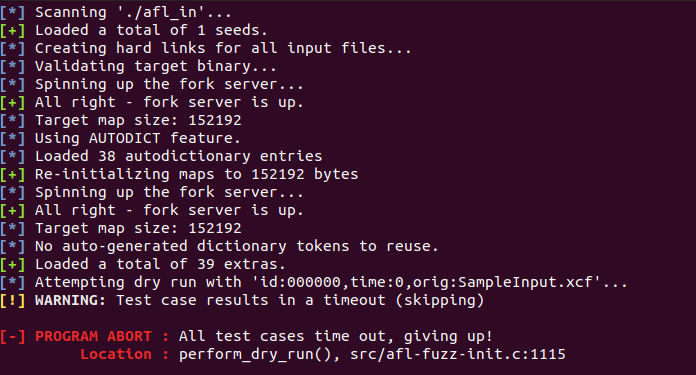
原因:输入用例的问题
解决:自己使用gimp创建几个新项目,涂涂改改然后保存到afl++的输入文件夹中
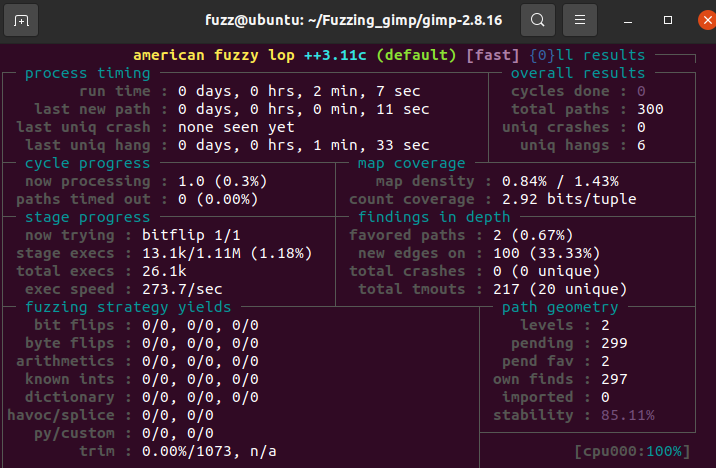
结果
Exercise8
- fuzz没能跑起来
完整流程
# 安装依赖 sudo apt-get install libxml2:i386 # 安装目标软件 wget ftp://ftp.adobe.com/pub/adobe/reader/unix/9.x/9.5.1/enu/AdbeRdr9.5.1-1_i386linux_enu.deb sudo dpkg -i AdbeRdr9.5.1-1_i386linux_enu.deb ## 测试是否安装成功 /opt/Adobe/Reader9/bin/acroread # 获取输入用例 wget https://corpora.tika.apache.org/base/packaged/pdfs/archive/pdfs_202002/libre_office.zip unzip libre_office.zip -d extracted mkdir -p $HOME/fuzzing_adobe/afl_in find ./extracted -type f -size -2k \ -exec cp {} $HOME/fuzzing_adobe/afl_in \; # 启用persistent mode sudo apt-get install valgrind sudo apt-get install kcachegrind # 执行fuzz ACRO_INSTALL_DIR=/opt/Adobe/Reader9/Reader ACRO_CONFIG=intellinux LD_LIBRARY_PATH=$LD_LIBRARY_PATH:'/opt/Adobe/Reader9/Reader/intellinux/lib' afl-fuzz -Q -i ./afl_in/ -o ./afl_out/ -t 2000 -- /opt/Adobe/Reader9/Reader/intellinux/bin/acroread -toPostScript @@
部分问题解决
-
Adobe Reader安装报错
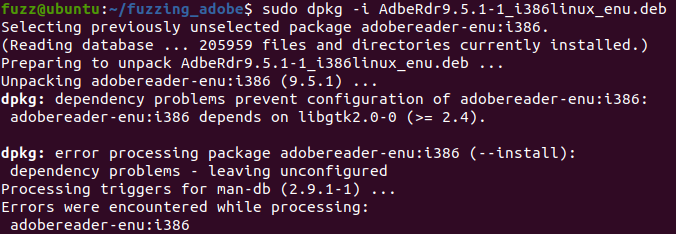
原因:软件依赖损坏
解决:执行下列指令后重新安装
sudo apt-get install libgtk2.0 sudo apt --fix-broken install -
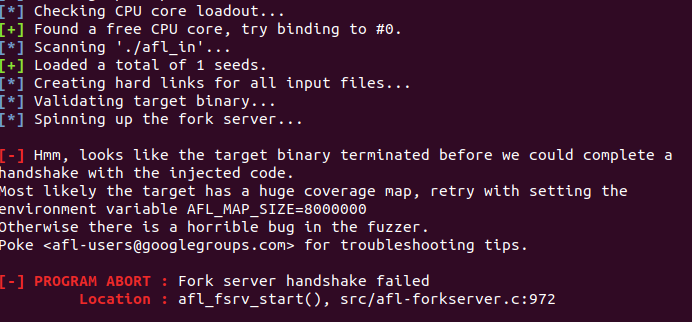
fuzz报错:
Fork server handshake failed原因:未知,尝试过设置
AFL_MAP_SIZE无果,且程序本身可以单独运行
Exercise10
- 环境搭建过程中有些问题没有解决
完整流程
# 安装依赖 sudo apt --yes install clang libpython2.7 libpython2.7-dev libcurl4 git cd $HOME wget https://swift.org/builds/swift-4.2.1-release/ubuntu1804/swift-4.2.1-RELEASE/swift-4.2.1-RELEASE-ubuntu18.04.tar.gz tar xzvf swift-4.2.1-RELEASE-ubuntu18.04.tar.gz sudo mv swift-4.2.1-RELEASE-ubuntu18.04 /usr/share/swift echo "export PATH=/usr/share/swift/usr/bin:$PATH" >> ~/.bashrc source ~/.bashrc # 安装Fuzzilli cd $HOME wget https://github.com/googleprojectzero/fuzzilli/archive/refs/tags/v0.9.zip unzip v0.9.zip cd fuzzilli-0.9/ swift build -c release -Xlinker='-lrt' # 安装depot-tools cd $HOME mkdir depot_tools && cd depot_tools git clone https://github.com/yzgyyang/depot-tools echo "export PATH=`pwd`/depot-tools:$PATH" >> ~/.bashrc source ~/.bashrc # 获取V8源码 cd $HOME mkdir Fuzzing_v8_75 && cd Fuzzing_v8_75 fetch v8 cd v8 git checkout 1ca088652d3aad04caceb648bcffef100bc4abc0 gclient sync
部分问题解决
-
libcur13无法安装
Reading package lists... Done Building dependency tree Reading state information... Done Package libcurl3 is not available, but is referred to by another package. This may mean that the package is missing, has been obsoleted, or is only available from another source However the following packages replace it: libcurl4 libcurl4:i386 E: Package 'libcurl3' has no installation candidate 原因:libcurl3与libcurl4存在冲突
解决:不安装libcurl3
-
fetch v8报错
原因:下载的depot_tools有问题
解决:更换depot_tools来源,使用https://github.com/yzgyyang/depot-tools提供的depot-tools
-
fetch v8克隆googlesource仓库连接失败原因:访问不到google
解决:使用proxychains代理访问
-
gclient sync可能出现了问题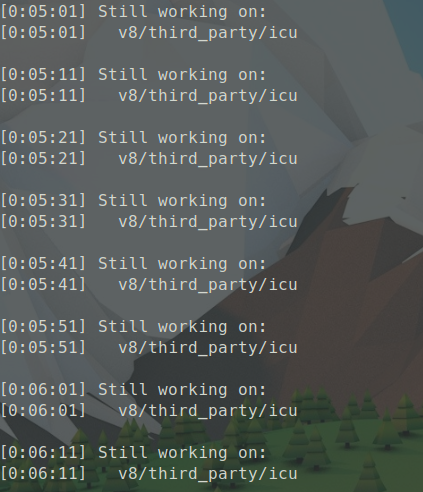
原因:未知,在此处等40分钟也无法通过
本文作者:lentikr
本文链接:https://www.cnblogs.com/lentikr/p/fuzzing101-z1mspwk.html
版权声明:本作品采用CC-BY-NC-SA 4.0许可协议进行许可。


【推荐】国内首个AI IDE,深度理解中文开发场景,立即下载体验Trae
【推荐】编程新体验,更懂你的AI,立即体验豆包MarsCode编程助手
【推荐】抖音旗下AI助手豆包,你的智能百科全书,全免费不限次数
【推荐】轻量又高性能的 SSH 工具 IShell:AI 加持,快人一步