flutter 基础 —— CustomPaint 解析
基础介绍
实现自定义组件大致有三种方式,第一种是组合现有的组件;第二种是直接构建 RenderObject,比如 ColoredBox 组件;第三种就是下面介绍的,CustomPaint,它与第二种类似,都是通过 canvas 去绘制图形。
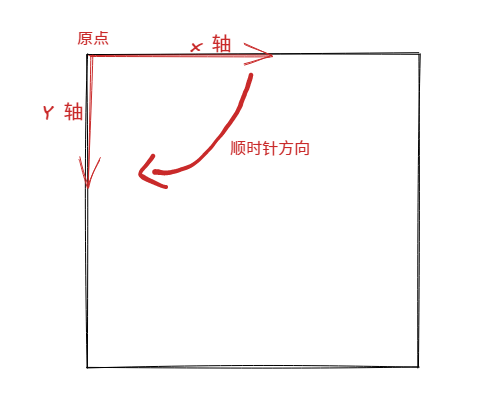
坐标
(注意Y轴正方向是向下,数学中是向上)
CustomPaint
三层结构
CustomPaint(
  // 事件区域,如 GestureDetector 事件只能作用在 size 范围内
  size: Size.infinite,
  // 背景层
  painter: MyPainter(),
  // 中间层
  child: Text("hello"),
  // 前景层
  foregroundPainter: null,
)
核心方法
class MyPainter extends CustomPainter {

  /// [size] 为 [CustomPaint] 构造方法传入的 size
  @override
  void paint(Canvas canvas, Size size) {

  }

  @override
  bool shouldRepaint(MyPainter oldDelegate) => this != oldDelegate;
}
各类图形的绘制
声明引入的包
import 'dart:math';
import 'dart:ui' as ui;

import 'package:flutter/material.dart';
import 'package:flutter/services.dart';
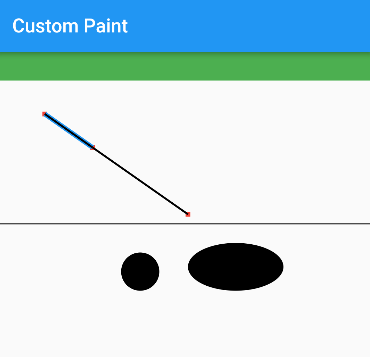
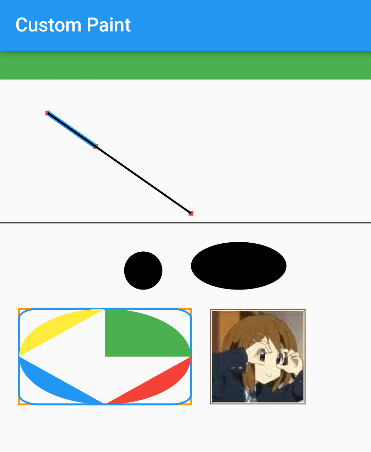
绘制点
示例:

代码
class HomePage extends StatefulWidget {
  const HomePage({Key? key}) : super(key: key);

  @override
  _HomePageState createState() => _HomePageState();
}

class _HomePageState extends State<HomePage> {
  @override
  Widget build(BuildContext context) {
    return SafeArea(
      child: Scaffold(
          appBar: AppBar(
            title: Text("Custom Paint"),
          ),
          body: SingleChildScrollView(
            child: Column(
              crossAxisAlignment: CrossAxisAlignment.start,
              children: [
                Container(
                  height: 30,
                  color: Colors.green,
                ),
                CustomPaint(
                  // 事件区域,如 GestureDetector 事件只能作用在 size 范围内
                  size: Size(100, 70),
                  // 背景层
                  painter: BasePainter(context),
                ),
              ],
            ),
          )),
    );
  }
}

class BasePainter extends CustomPainter {
  BasePainter(this.context);

  final BuildContext context;

  /// [size] 为 [CustomPaint] 构造方法传入的 size
  @override
  void paint(Canvas canvas, Size size) {
    var points1 = [
      Offset(size.width / 2, size.height / 2),
      Offset(size.width, size.height),
      Offset(size.width * 2, size.height * 2),
    ];
    //画点
    canvas.drawPoints(
        ui.PointMode.points,
        points1,
        Paint()
          ..strokeWidth = 5
          ..color = Colors.red);

    //点连成线(只有前2个点会连,后面的点不连)
    canvas.drawPoints(
        ui.PointMode.lines,
        points1,
        Paint()
          ..strokeWidth = 5
          ..color = Colors.blue);

    //多点连成线
    canvas.drawPoints(ui.PointMode.polygon, points1, Paint()..strokeWidth = 2);

    //默认画笔
    Paint _paint = Paint()..strokeWidth = 1;

    //分割线
    var separate1 = [
      Offset(0, 150),
      Offset(MediaQuery.of(context).size.width, 150),
    ];
    _paint.color = Colors.black;
    canvas.drawPoints(ui.PointMode.lines, separate1, _paint);
  }

  @override
  bool shouldRepaint(BasePainter oldDelegate) => this != oldDelegate;
}
绘制形状
绘制圆与椭圆
示例:
代码
//圆
canvas.drawCircle(Offset(150, 200), 20, _paint..style = ui.PaintingStyle.fill);
//椭圆(左上与右下,2个点确定)
canvas.drawOval(Rect.fromLTRB(200, 170, 300, 220), _paint);
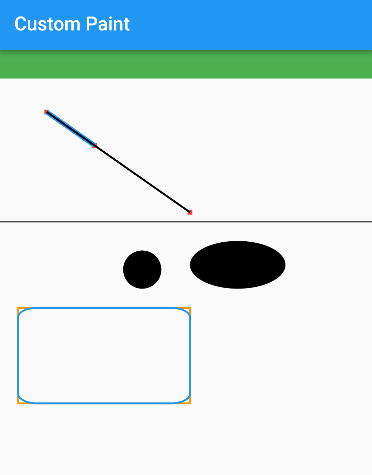
绘制矩形
示例:

代码
//确定矩形的几种方式:
//中心点 + 宽高
// Rect.fromCenter(center: Offset(60, 200), width: 80, height: 100);
//中心点+ 半径(正方形)
// Rect.fromCircle(center: Offset(60, 250), radius: 40);
//左上 + 右下
// Rect.fromLTRB(20, 200, 100, 300);
//左上 + 右下
// Rect.fromPoints(Offset(20, 200), Offset(100, 300));
//左上 + 宽高
// Rect.fromLTWH(20, 200, 80, 100);
//左上 + 宽高
Rect rect = Offset(20, 240) & Size(180, 100);
canvas.drawRect(
    rect,
    Paint()
      ..strokeWidth = 2
      ..color = Colors.orange
      ..style = PaintingStyle.stroke);
绘制圆角矩形
示例:
代码
// 圆角矩形几种方式
// fromLTRBR/fromRectAndRadius:最后一个参数是圆角半径
// RRect rRect = RRect.fromLTRBR(120, 230, 160, 300, Radius.circular(10));
// RRect rRect = RRect.fromRectAndRadius(Rect.fromLTRB(120, 230, 160, 300), Radius.circular(10));
// fromLTRBAndCorners:可以分别设置四个角的半径
// RRect rRect = RRect.fromLTRBAndCorners(120, 230, 160, 300, topLeft: Radius.circular(10),);
// fromLTRBXY:最后两个参数XY确定的是椭圆弧度,不是半径相同的圆弧
// RRect rRect = RRect.fromLTRBXY(120, 230, 160, 300, 20, 10);
var rRect = RRect.fromRectAndRadius(rect, Radius.elliptical(20, 10));
canvas.drawRRect(
    rRect,
    Paint()
      ..strokeWidth = 2
      ..color = Colors.blue
      ..style = PaintingStyle.stroke);
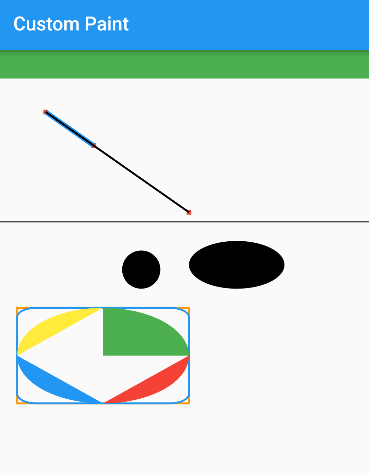
绘制圆弧
示例:
代码
// 绘制圆弧
// drawArc(Rect rect, double startAngle, double sweepAngle, bool useCenter, Paint paint)
// rect:跟椭圆一样,以矩形中心为原点画圆弧,其中 startAngle 开始角度,sweepAngle 为绘制多少角度,useCenter:是否和中心相连
canvas.drawArc(rect, pi / 2, pi / 2, false, Paint()..color = Colors.blue);
canvas.drawArc(rect, pi / 2, -pi / 2, false, Paint()..color = Colors.red);
canvas.drawArc(rect, -pi / 2, -pi / 2, false, Paint()..color = Colors.yellow);
canvas.drawArc(rect, -pi / 2, pi / 2, true, Paint()..color = Colors.green);
绘制图片
示例:
代码
class _HomePageState extends State<HomePage> {
  ui.Image? _image;

  @override
  void initState() {
    super.initState();
    //图片
    loadImage("images/test1.jpg").then((img) {
      setState(() {
        _image = img;
      });
    });
  }

  Future<ui.Image> loadImage(String path) async {
    ByteData data = await rootBundle.load(path);
    ui.Codec codec = await ui.instantiateImageCodec(data.buffer.asUint8List());
    ui.FrameInfo fi = await codec.getNextFrame();
    return fi.image;
  }

  @override
  Widget build(BuildContext context) {
    return SafeArea(
      child: Scaffold(
          appBar: AppBar(
            title: Text("Custom Paint"),
          ),
          body: SingleChildScrollView(
            child: Column(
              crossAxisAlignment: CrossAxisAlignment.start,
              children: [
                Container(
                  height: 30,
                  color: Colors.green,
                ),
                CustomPaint(
                  // 事件区域,如 GestureDetector 事件只能作用在 size 范围内
                  size: Size(100, 70),
                  // 背景层
                  painter: BasePainter(context, _image),
                ),
              ],
            ),
          )),
    );
  }
}

//绘制图片
if (image != null) {
  canvas.drawImage(image!, Offset(220, 240), _paint);
}
绘制路径
示例:

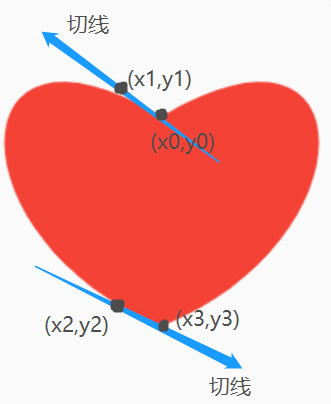
3阶贝赛尔曲线
代码
//绘制路径
var path = Path()
  ..moveTo(30, 350)
  ..lineTo(80, 400)
  ..lineTo(30, 400)
  ..close();
canvas.drawPath(
    path,
    Paint()
      ..strokeWidth = 2
      ..style = PaintingStyle.stroke);

path.reset();

//二阶贝赛尔曲线 arcTo(跟圆弧类似)
//arcTo(Rect rect, double startAngle, double sweepAngle, bool forceMoveTo)
//移动到点
path.moveTo(100, 380);
var rect1 = Rect.fromCircle(center: Offset(80, 450), radius: 60);
//由上点移动到圆弧,并连起来
path.arcTo(rect1, 0, pi, false);
var rect2 = Rect.fromCircle(center: Offset(80, 450), radius: 30);
//画一个圆,且不与上面的路径相连
path.arcTo(rect2, 0, 3.14*2, true);
canvas.drawPath(
    path,
    Paint()
      ..strokeWidth = 2
      ..style = PaintingStyle.stroke);


path.reset();

//三阶贝塞尔曲线 cubicTo
//cubicTo(double x1, double y1, double x2, double y2, double x3, double y3)
path.reset();
//确定桃心顶部中间点
path.moveTo(200, 400);
//画桃心左半边
path.cubicTo(150, 370, 150, 430, 200, 450);
//回到桃心顶部中间点
path.moveTo(200, 400);
//画桃心右半边
path.cubicTo(250, 370, 250, 430, 200, 450);
//上色填充
_paint.style = PaintingStyle.fill;
_paint.color = Colors.red;
canvas.drawPath(path, _paint);
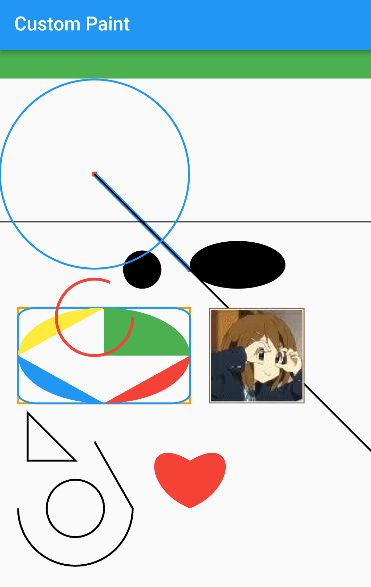
完整版(包括动画层)
示例:
代码
import 'dart:math';
import 'dart:ui' as ui;

import 'package:flutter/material.dart';
import 'package:flutter/services.dart';

void main() {
  runApp(const MyApp());
}

class MyApp extends StatelessWidget {
  const MyApp({Key? key}) : super(key: key);

  // This widget is the root of your application.
  @override
  Widget build(BuildContext context) {
    return MaterialApp(
      theme: ThemeData(
        primaryColor: Colors.blue,
      ),
      home: HomePage(),
    );
  }
}

class HomePage extends StatefulWidget {
  const HomePage({Key? key}) : super(key: key);

  @override
  _HomePageState createState() => _HomePageState();
}

class _HomePageState extends State<HomePage> with SingleTickerProviderStateMixin {
  ui.Image? _image;

  late AnimationController _controller;

  late Offset _center;

  late double _radius;

  bool _inner = false;

  @override
  void initState() {
    //圆心
    _center = Offset(100, 250);
    //半径
    _radius = 40;
    //动画
    _controller = AnimationController(vsync: this, duration: Duration(seconds: 1));
    _controller.repeat();
    //图片
    loadImage("images/test1.jpg").then((img) {
      setState(() {
        _image = img;
      });
    });
    super.initState();
  }

  @override
  void dispose() {
    _controller.dispose();
    super.dispose();
  }

  Future<ui.Image> loadImage(String path) async {
    ByteData data = await rootBundle.load(path);
    ui.Codec codec = await ui.instantiateImageCodec(data.buffer.asUint8List());
    ui.FrameInfo fi = await codec.getNextFrame();
    return fi.image;
  }

  @override
  Widget build(BuildContext context) {
    print("${MediaQuery.of(context).size}");

    return SafeArea(
      child: Scaffold(
          appBar: AppBar(
            title: Text("Custom Paint"),
          ),
          body: Column(
            crossAxisAlignment: CrossAxisAlignment.start,
            children: [
              Container(
                height: 30,
                color: Colors.green,
              ),
              Expanded(
                  child: AnimatedBuilder(
                      animation: _controller,
                      builder: (context, child) {
                        return Stack(
                          children: [
                            //由于 CustomPaint 的事件作用域只限于 Size 框选的区域,所以不能把 GestureDetector 直接包在 CustomPaint 上
                            //而是通过 Stack 进行包装
                            GestureDetector(
                              behavior: HitTestBehavior.translucent,
                              onPanDown: (DragDownDetails details) {
                                //判断手指点击位置是否在圆内,在圆内即可拖动
                                var range =
                                    sqrt(pow(details.localPosition.dx - _center.dx, 2) + pow(details.localPosition.dy - _center.dy, 2));
                                if (range <= _radius) {
                                  _inner = true;
                                }
                              },
                              onPanUpdate: (DragUpdateDetails details) {
                                if (_inner) {
                                  setState(() {
                                    _center = details.localPosition;
                                  });
                                }
                              },
                              onPanEnd: (DragEndDetails details) {
                                _inner = false;
                              },
                            ),
                            CustomPaint(
                              // 事件区域,如 GestureDetector 事件只能作用在 size 范围内
                              size: Size(100, 70),
                              // 背景层
                              painter: BasePainter(context, _image),
                              foregroundPainter: CirclePainter(_controller.value, _center, _radius),
                              child: Container(
                                width: 200,
                                height: 200,
                                decoration: BoxDecoration(
                                  border: Border.all(width: 2, color: Colors.blue),
                                  // shape: BoxShape.circle,
                                  borderRadius: BorderRadius.circular(200),
                                  color: Colors.transparent,
                                ),
                              ),
                            )
                          ],
                        );
                      })),
            ],
          )),
    );
  }
}

class BasePainter extends CustomPainter {
  BasePainter(this.context, this.image);

  final BuildContext context;

  final ui.Image? image;

  /// [size] 为 [CustomPaint] 构造方法传入的 size
  @override
  void paint(Canvas canvas, Size size) {
    var points1 = [
      Offset(size.width / 2, size.height / 2),
      Offset(size.width, size.height),
      Offset(size.width * 2, size.height * 2),
    ];
    //画点
    canvas.drawPoints(
        ui.PointMode.points,
        points1,
        Paint()
          ..strokeWidth = 5
          ..color = Colors.red);

    //点连成线(只有前2个点会连,后面的点不连)
    canvas.drawPoints(
        ui.PointMode.lines,
        points1,
        Paint()
          ..strokeWidth = 5
          ..color = Colors.blue);

    //多点连成线
    canvas.drawPoints(ui.PointMode.polygon, points1, Paint()..strokeWidth = 2);

    //默认画笔
    Paint _paint = Paint()..strokeWidth = 1;

    //分割线
    var separate1 = [
      Offset(0, 150),
      Offset(MediaQuery.of(context).size.width, 150),
    ];
    _paint.color = Colors.black;
    canvas.drawPoints(ui.PointMode.lines, separate1, _paint);

    //圆
    canvas.drawCircle(Offset(150, 200), 20, _paint..style = ui.PaintingStyle.fill);
    //椭圆(左上与右下,2个点确定)
    canvas.drawOval(Rect.fromLTRB(200, 170, 300, 220), _paint);

    //确定矩形的几种方式:
    //中心点 + 宽高
    // Rect.fromCenter(center: Offset(60, 200), width: 80, height: 100);
    //中心点+ 半径(正方形)
    // Rect.fromCircle(center: Offset(60, 250), radius: 40);
    //左上 + 右下
    // Rect.fromLTRB(20, 200, 100, 300);
    //左上 + 右下
    // Rect.fromPoints(Offset(20, 200), Offset(100, 300));
    //左上 + 宽高
    // Rect.fromLTWH(20, 200, 80, 100);
    //左上 + 宽高
    Rect rect = Offset(20, 240) & Size(180, 100);
    canvas.drawRect(
        rect,
        Paint()
          ..strokeWidth = 2
          ..color = Colors.orange
          ..style = PaintingStyle.stroke);

    // 圆角矩形几种方式
    // fromLTRBR/fromRectAndRadius:最后一个参数是圆角半径
    // RRect rRect = RRect.fromLTRBR(120, 230, 160, 300, Radius.circular(10));
    // RRect rRect = RRect.fromRectAndRadius(Rect.fromLTRB(120, 230, 160, 300), Radius.circular(10));
    // fromLTRBAndCorners:可以分别设置四个角的半径
    // RRect rRect = RRect.fromLTRBAndCorners(120, 230, 160, 300, topLeft: Radius.circular(10),);
    // fromLTRBXY:最后两个参数XY确定的是椭圆弧度,不是半径相同的圆弧
    // RRect rRect = RRect.fromLTRBXY(120, 230, 160, 300, 20, 10);
    var rRect = RRect.fromRectAndRadius(rect, Radius.elliptical(20, 10));
    canvas.drawRRect(
        rRect,
        Paint()
          ..strokeWidth = 2
          ..color = Colors.blue
          ..style = PaintingStyle.stroke);

    // 绘制圆弧
    // drawArc(Rect rect, double startAngle, double sweepAngle, bool useCenter, Paint paint)
    // rect:跟椭圆一样,以矩形中心为原点画圆弧,其中 startAngle 开始角度,sweepAngle 为绘制多少角度,useCenter:是否和中心相连
    canvas.drawArc(rect, pi / 2, pi / 2, false, Paint()..color = Colors.blue);
    canvas.drawArc(rect, pi / 2, -pi / 2, false, Paint()..color = Colors.red);
    canvas.drawArc(rect, -pi / 2, -pi / 2, false, Paint()..color = Colors.yellow);
    canvas.drawArc(rect, -pi / 2, pi / 2, true, Paint()..color = Colors.green);

    //绘制图片
    if (image != null) {
      canvas.drawImage(image!, Offset(220, 240), _paint);
    }

    //绘制路径
    var path = Path()
      ..moveTo(30, 350)
      ..lineTo(80, 400)
      ..lineTo(30, 400)
      ..close();
    canvas.drawPath(
        path,
        Paint()
          ..strokeWidth = 2
          ..style = PaintingStyle.stroke);

    path.reset();

    //二阶贝赛尔曲线 arcTo(跟圆弧类似)
    //arcTo(Rect rect, double startAngle, double sweepAngle, bool forceMoveTo)
    //移动到点
    path.moveTo(100, 380);
    var rect1 = Rect.fromCircle(center: Offset(80, 450), radius: 60);
    //由上点移动到圆弧,并连起来
    path.arcTo(rect1, 0, pi, false);
    var rect2 = Rect.fromCircle(center: Offset(80, 450), radius: 30);
    //画一个圆,且不与上面的路径相连
    path.arcTo(rect2, 0, 3.14 * 2, true);
    canvas.drawPath(
        path,
        Paint()
          ..strokeWidth = 2
          ..style = PaintingStyle.stroke);

    path.reset();

    //三阶贝塞尔曲线 cubicTo
    //cubicTo(double x1, double y1, double x2, double y2, double x3, double y3)
    path.reset();
    //确定桃心顶部中间点
    path.moveTo(200, 400);
    //画桃心左半边
    path.cubicTo(150, 370, 150, 430, 200, 450);
    //回到桃心顶部中间点
    path.moveTo(200, 400);
    //画桃心右半边
    path.cubicTo(250, 370, 250, 430, 200, 450);
    //上色填充
    _paint.style = PaintingStyle.fill;
    _paint.color = Colors.red;
    canvas.drawPath(path, _paint);
  }

  @override
  bool shouldRepaint(BasePainter oldDelegate) => this != oldDelegate;
}

class CirclePainter extends CustomPainter {
  CirclePainter(this._controller, this._center, this._radius);

  final double _controller;

  final Offset _center;

  final double _radius;

  Paint _paint = Paint()
    ..color = Colors.red
    ..strokeWidth = 3
    ..style = PaintingStyle.stroke;

  @override
  void paint(Canvas canvas, Size size) {
    var rect = Rect.fromCircle(center: _center, radius: _radius);
    canvas.drawArc(rect, .0, _controller * 2 * pi, false, _paint);
  }

  @override
  bool shouldRepaint(CirclePainter oldDelegate) => this != oldDelegate;
}
233
参考文章
https://blog.csdn.net/Gold_brick/article/details/117370461

 浙公网安备 33010602011771号