Beginning Silverlight 4 in C#-Silverlight的布局管理-学习笔记
布局管理
Silverlight提供了一个非常灵活的布局管理系统让你指定控件怎样在你的应用程序中出现.你可以使用静态的布局,也可以使用自适应浏览器的动态的布局.
5个布局控件中,每一个都有优点和缺点,见下面表格:
| 控件 | 描述 | 优点 | 缺点 |
| Canvas | 基于绝对位置的控件 | 非常简单的控件 | 需要每个控件都有Canvas.Top 和Canvas.Left 属性来定义控件在Canvas中的位置 |
| StackPanel | 基于水平和垂直"栈"的控件 | 允许一个快速的动态布局.使 用StackPanel可以做一些很 有趣的布局. | 布局的子项被限制入栈中.间距 被限制为为单个控件添加 margins和调整对齐方式 (使用VerticalAlignment和 HorizontalAlignment属性) |
| Grid | 模仿在HTML中使用table元素 布局控件 | 最灵活和强大的布局控件.你 可以使用Grid控件定义任何 类型的布局. | Grid的定义有时会变得复杂. Grid组件可能会令人困惑的. |
| WrapPanel | 基于水平或者垂直"栈"的控件, 当宽度或者高 度达到时,换行(列)到第二行 或者列. | 与StackPanel很相似,除了 WrapPanel会自动换行(列) 它的子项到第二行或者列, 所有它适合布局一些不知 道控件数量的情况. | 当子项到达最大的宽或者高时, 限制布局控件只能自动换行(列). |
| DockPanel | 基于"停靠"到垂直或水平容器的布局控件 | 提供一个简单的方法创建 一个基础布局,用水平或垂直 的容器消耗应用程序的空间. | 布局被限制为水平或垂直的"填充" 容器,通常联合其它布局控件使用. |
Canvas控件
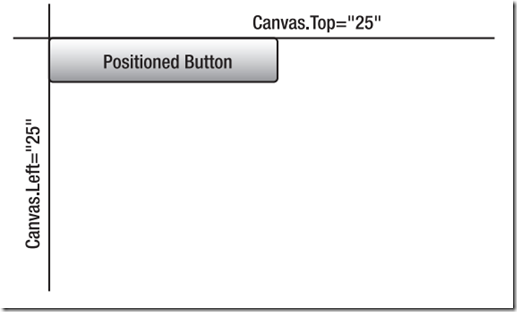
Canvas控件是一个允许你使用明确的坐标关系放置Silverlight对象到Canvas位置的基础控件,你可以使用Canvas容器的两个XAML属性防止对象:Canvas.Left和Canvas.Top.下图显示这些属性对对象的位置有什么影响.
在Canvas容器里的对象没有布局策略,同时当浏览器调整大小时,对象不会自动调整大小.
使用Canvas容器
让我们尝试一个使用Canvas容器的快速例子.
- 用VS2010构建一个叫CanvasPanel的Silverlight应用程序,允许VS创建Web应用程序项目来托管Silverlight应用程序.
- 创建后,你应该会看到MainPage.xaml文件.如果你没有看到这个xaml的源码,转换到视图去编辑XAML.在Grid元素里,添加一个Canvas元素.如下所示:
<Grid x:Name="LayoutRoot" Background="White">
    <Canvas Background="Green" Width="300" Height="200">
    </Canvas>
</Grid>
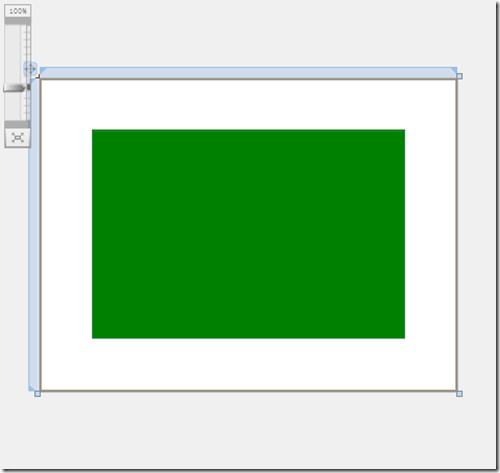
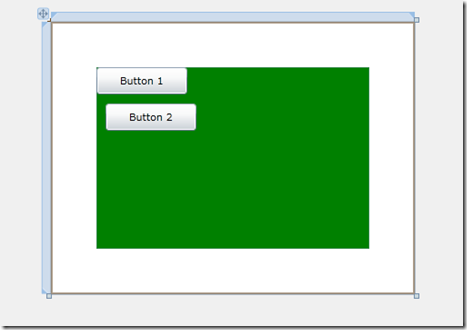
到这里,你的Silverlight应用程序看起来不怎么样,它只是在你的应用程序中有一个绿色的长方形如下所示:
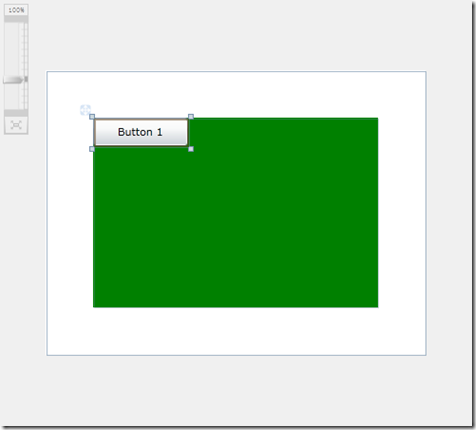
- 添加一个button到Canvas容器,,Width属性100,Height属性30,如下所示:
<Button Width="100" Height="30" Content="Button 1" />
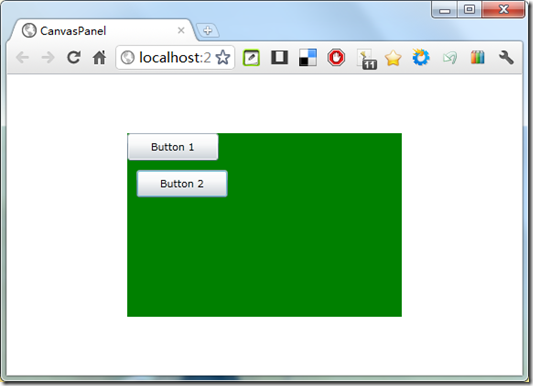
- 添加另一个button到Canvas,但这次设置它们的Canvas.Top和Canvas.Left属性把它们放在第一个button的下面和偏右的位置:
<Grid x:Name="LayoutRoot" Background="White">
    <Canvas Background="Green" Width="300" Height="200">
        <Button Width="100" Height="30" Content="Button 1" />
        <Button Width="100" Height="30" Content="Button 2" Canvas.Left="10" Canvas.Top="40" />
    </Canvas>
</Grid>
为你的应用程序填充整个浏览器窗体
默认新建的Silverlight项目,根对象UserControl设置了Width为400和Height为300.在某些情况,你可能打算设置你的Silverlight应用程序为浏览器的宽和高.另外一些情况,你想你的Silverlight应用程序暂满整个浏览器的同时,随浏览器的改变而改变.在Silverlight中实现这个功能非常容易.当你想把高度设为100%,只需删除Height和Width属性.
作为例子,下面的代码会调整Canvas容器和Silverlight应用程序来暂满整个浏览器:
<UserControl x:Class="CanvasPanel.MainPage"
    xmlns="http://schemas.microsoft.com/winfx/2006/xaml/presentation"
    xmlns:x="http://schemas.microsoft.com/winfx/2006/xaml"
    xmlns:d="http://schemas.microsoft.com/expression/blend/2008"
    xmlns:mc="http://schemas.openxmlformats.org/markup-compatibility/2006"
    mc:Ignorable="d">
<Grid x:Name="LayoutRoot" Background="White">
    <Canvas Background="Green">
        <Button Width="100" Height="30" Content="Button 1" />
        <Button Width="100" Height="30" Content="Button 2" Canvas.Left="10" Canvas.Top="40" />
    </Canvas>
</Grid>
</UserControl>
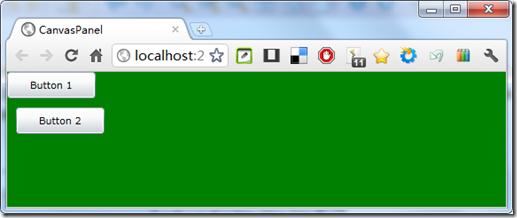
删除了UserControl和Canvas的Height和Width属性,当运行这个Silverlight应用程序时,你会看到Canvas占浏览器窗体的100%,如下:
如你所见,Canvas容器是一个简单的布局控件,在固定布局是非常有效.但是,在大多数情况,你会为你的应用程序使用静态布局.StackPanel控件提供更流畅的布局方式.
StackPanel控件
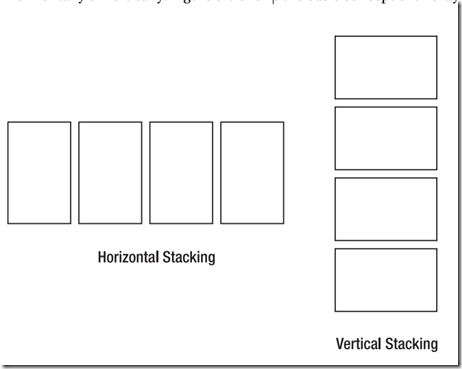
StackPanel控件为开发者提供快速的布局选项来布置对象.StackPanel控件允许你用流式布置Silverlight对象,堆放成水平或垂直,如下图所示:
使用StackPanel控件
为了更好理解StackPanel控件,让做一个练习.
- 使用VS2010创建一个新的Silverlight应用程序
在主Grid元素中,添加一个StackPanel控件还有三个按钮.三个按钮都是Width为100,Height为30.如下所示:<Grid x:Name="LayoutRoot" Background="White"> <StackPanel>
<Button Width="100" Height="30" Content="Button 1"></Button>
<Button Width="100" Height="30" Content="Button 2"></Button>
<Button Width="100" Height="30" Content="Button 3"></Button>
</StackPanel>
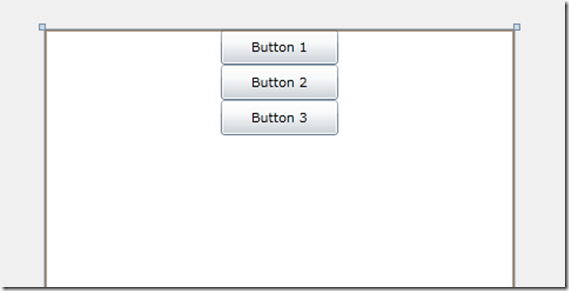
</Grid到这里,你的应用程序应该如下图所示,注意按钮是垂直堆放的.这是因为StackPanel控件默认是垂直的.
通过设置Orientation属性为Horizontal可以改变StackPanel控件的排列方向为水平的,如下:<Grid x:Name="LayoutRoot" Background="White"> <StackPanel Orientation="Horizontal"> <Button Width="100" Height="30" Content="Button 1"></Button> <Button Width="100" Height="30" Content="Button 2"></Button> <Button Width="100" Height="30" Content="Button 3"></Button> </StackPanel> </Grid>
这细小的改变,按钮们现在变为水平堆放,如下: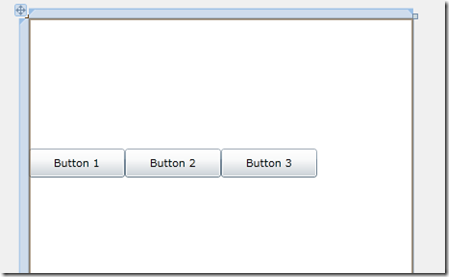
-
注意,现在所有按钮都是相互接触的,这样是不美观的.你可以简单地使用Margin属性间隔开它们.另外,你可以设置StackPanel控件的HorizontalAlignment使其居中.HorizontalAlignment另外的一些选项包括左,右和拉伸(拉伸内容到左和右).如下:
<Grid x:Name="LayoutRoot" Background="White">
    <StackPanel Orientation="Horizontal" HorizontalAlignment="Center">
        <Button Width="100" Height="30" Content="Button 1" Margin="5"></Button>
        <Button Width="100" Height="30" Content="Button 2" Margin="5"></Button>
        <Button Width="100" Height="30" Content="Button 3" Margin="5"></Button>
    </StackPanel>
</Grid>
做了这几个改变后,你的按钮会在程序中居中间隔开,如下所示: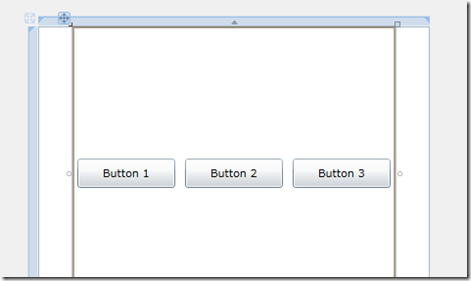
使用嵌套的StackPanel控件
Microsoft设计的控件框架能够是任何的对象包含进另一个对象.一个增强布局的方法是用一个布局控件嵌套另一个布局控件.在这个Simple里,你会嵌套一个StackPanel控件到另一个StackPanel控件中.
- 用VS创建一个NestedStackPanel的Silverlight应用程序
- 在MainPage.xaml文件里,添加下列项:
- 根Grid下添加一个StackPanel,Orientation属性设为Horizontal,HorizontalAlignment设为Center
- 在这个StackPanel里,添加两个按钮,
- 在这两个按钮之间,添加另一个StackPanel,Orientation属性设为Vertical,VerticalAlignment设为Center.
- 在嵌套的StackPanel里,添加三个按钮
- 所有的按钮设置Margin属性为5,Height为30,Width为
如下所示:<Grid x:Name="LayoutRoot" Background="White"> <StackPanel Orientation="Horizontal" HorizontalAlignment="Center"> <Button Width="100" Height="30" Content="Button Left" Margin="5" /> <StackPanel Background="Green" VerticalAlignment="Center"> <Button Width="100" Height="30" Content="Button Middle 1" Margin="5"></Button> <Button Width="100" Height="30" Content="Button Middle 2" Margin="5"></Button> <Button Width="100" Height="30" Content="Button Middle 3" Margin="5"></Button> </StackPanel> <Button Width="100" Height="30" Content="Button Right" Margin="5"></Button> </StackPanel> </Grid>
结果如下图所示:
- 运行程序查看结果
正如你在这两个练习所看到的,StackPanel控件是一个非常有用的布局选择,同时,你可能会在Silverlight应用程序中经常使用它.通过嵌套Silverlight控件,你拥有更大的灵活性去设计你的应用程序.
Grid控件
Grid控件为Silverlight应用程序提供更多的"微调布局".打个比喻,你可以把使用Grid布局控件想象为在HTML中使用table元素,只是更加灵活.使用Grid控件,你可以定义行和列,来创建单元格,然后添加对象到Grid的单独的或复合的(使用Spanning)单元格中.
通过使用Grid.Column和Grid.Row属性,来指定那一个单元格放置对象.注意,这些属性从0开始的,所以最顶,最左的单元格是row为0和column为0.如下所示:
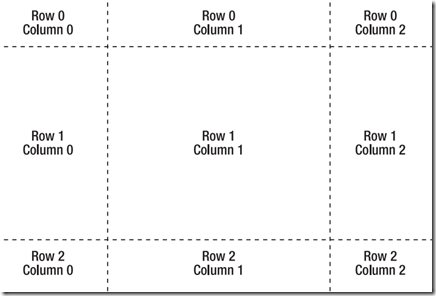 大部分的开发者,Grid控件是他们最喜欢的布局选择,因为它非常灵活.同时意味着Grid控件比其它控件更复杂,你会在接下来的练习看到.
使用表格控件
- 使用VS2010创建一个名为GridPanel的Silverlight应用程序
- 在MainPage.xaml文件中,改变UserControl的DesignWidth为600,DesignHeight为400.
你会注意到默认地一个表格控件已经添加到页面.为了更好的看怎么回事,设置表格的ShowGridLines属性为true.记住,因为你没有定义表格的size,它会自动占满父容器,在这里是整个Silverlight应用程序. - 接下来,为表格定义行和列.使用XAML属性元素Grid.RowDefinitions和Grid.ColumnDefinitions.如下所示:
<UserControl x:Class="GridPanel.MainPage"
    xmlns="http://schemas.microsoft.com/winfx/2006/xaml/presentation"
    xmlns:x="http://schemas.microsoft.com/winfx/2006/xaml"
    xmlns:d="http://schemas.microsoft.com/expression/blend/2008"
    xmlns:mc="http://schemas.openxmlformats.org/markup-compatibility/2006"
    mc:Ignorable="d"
    d:DesignHeight="400" d:DesignWidth="600">

    <Grid ShowGridLines="True" x:Name="LayoutRoot" Background="White">
        <Grid.RowDefinitions>
            <RowDefinition Height="70" />
            <RowDefinition Height="*" />
            <RowDefinition Height="70" />
        </Grid.RowDefinitions>

        <Grid.ColumnDefinitions>
            <ColumnDefinition Width="150" />
            <ColumnDefinition Width="*" />
            <ColumnDefinition Width="150" />
        </Grid.ColumnDefinitions>
    </Grid>
</UserControl>
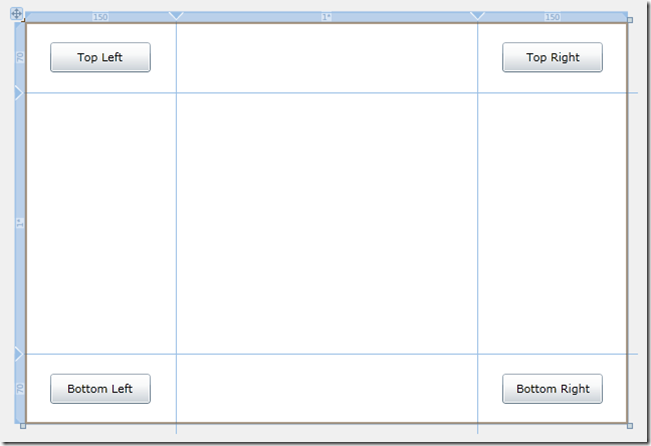
注意,这里为中心行和列设置Height和Width属性为"*",这个星号表明行和列占满所有可用空间.如果表格控件随着浏览器窗体调整大小,这些列就会就会调整为固定列剩下的空间.如下图所示:
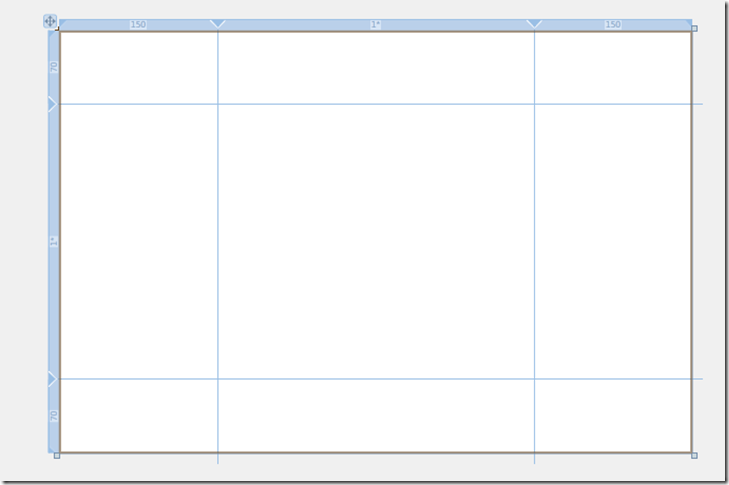
-
现在你可以添加对象到不同的单元格中.各放置一个按钮到四个角的单元格中.
<Button Width="100" Height="30" Content="Top Left" Margin="5" Grid.Row="0" Grid.Column="0"></Button>
<Button Width="100" Height="30" Content="Top Right" Margin="5" Grid.Row="0" Grid.Column="2"></Button>
<Button Width="100" Height="30" Content="Bottom Left" Margin="5" Grid.Row="2" Grid.Column="0"></Button>
<Button Width="100" Height="30" Content="Bottom Right" Margin="5" Grid.Row="2" Grid.Column="2"></Button>
嵌套一个表格和跨列
接下来,你会在中心单元格嵌套另一个表格控件.这样会使得应用程序变得稍微复杂.
-
在MainPage.xaml中,添加下列项:
-
一个放置在Grid.Column=1和Grid.Row=1的表格控件
-
三个RowDefinition和两个ColumnDefinition元素
-
在新表格控件的四个角中个放置一个按钮,就像刚才一样
现在代码如下所示:<UserControl x:Class="GridPanel.MainPage" xmlns="http://schemas.microsoft.com/winfx/2006/xaml/presentation" xmlns:x="http://schemas.microsoft.com/winfx/2006/xaml" xmlns:d="http://schemas.microsoft.com/expression/blend/2008" xmlns:mc="http://schemas.openxmlformats.org/markup-compatibility/2006" mc:Ignorable="d" d:DesignHeight="400" d:DesignWidth="600"> <Grid ShowGridLines="True" x:Name="LayoutRoot" Background="White"> <Grid.RowDefinitions> <RowDefinition Height="70" /> <RowDefinition Height="*" /> <RowDefinition Height="70" /> </Grid.RowDefinitions> <Grid.ColumnDefinitions> <ColumnDefinition Width="150" /> <ColumnDefinition Width="*" /> <ColumnDefinition Width="150" /> </Grid.ColumnDefinitions> <Button Width="100" Height="30" Content="Top Left" Margin="5" Grid.Row="0" Grid.Column="0"></Button> <Button Width="100" Height="30" Content="Top Right" Margin="5" Grid.Row="0" Grid.Column="2"></Button> <Button Width="100" Height="30" Content="Bottom Left" Margin="5" Grid.Row="2" Grid.Column="0"></Button> <Button Width="100" Height="30" Content="Bottom Right" Margin="5" Grid.Row="2" Grid.Column="2"></Button> <Grid Background="Red" Grid.Column="1" Grid.Row="1" ShowGridLines="True"> <Grid.RowDefinitions> <RowDefinition Height="*" /> <RowDefinition Height="*" /> <RowDefinition Height="*" /> </Grid.RowDefinitions> <Grid.ColumnDefinitions> <ColumnDefinition Width="*" /> <ColumnDefinition Width="*" /> </Grid.ColumnDefinitions> <Button Width="100" Height="30" Content="Nested Top Left" Margin="5" Grid.Row="0" Grid.Column="0"></Button> <Button Width="100" Height="30" Content="Nested Top Right" Margin="5" Grid.Row="0" Grid.Column="2"></Button> <Button Width="100" Height="30" Content="Nested B. Left" Margin="5" Grid.Row="2" Grid.Column="0"></Button> <Button Width="100" Height="30" Content="Nested B. Right" Margin="5" Grid.Row="2" Grid.Column="2"></Button> </Grid> </Grid> </UserControl>
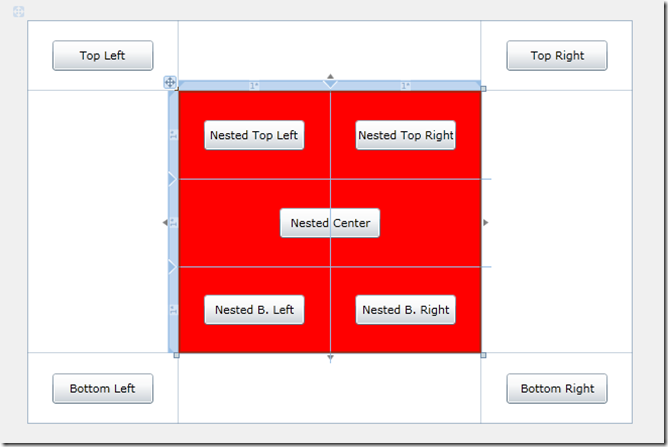
到这里,你的应用程序应该如下图所示: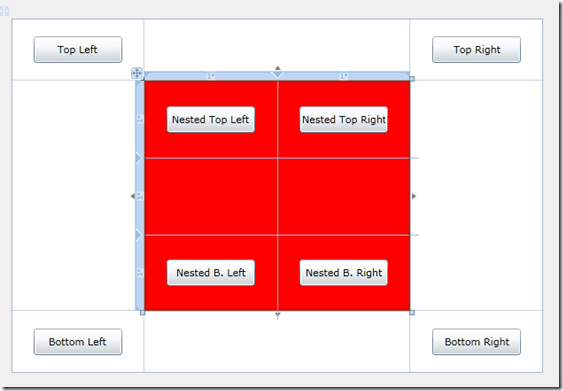 注意你没有为新的表格的中间行中的两列放置任何对象.这里你会添加一个占据两列的按钮,这样按钮就会呈现在两汉的中间.添加一个按钮到这个表格控件,Grid.ColumnSpan属性设为2,如下所示:
<Button Width="100" Height="30" Content="Nested Center" Margin="5" Grid.Row="1" Grid.Column="0" Grid.ColumnSpan="2"></Button>
现在你的应用程序看起来如下所示,注意按钮是怎样占据两列和呈现在中间的.作为有经验的使用表格布局表单的HTML开发者,这个方式非常亲切,因为它与<TD>标记的colspan属性非常相似.
-
WrapPanel控件
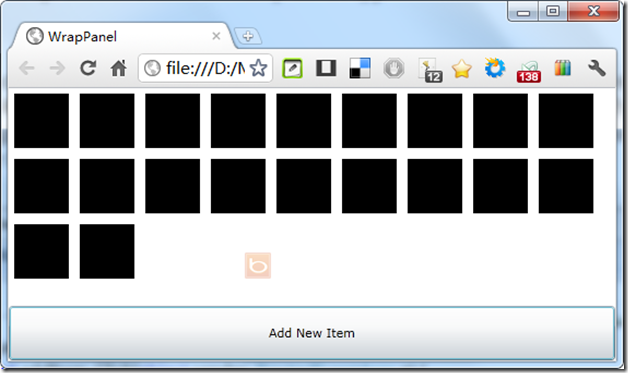
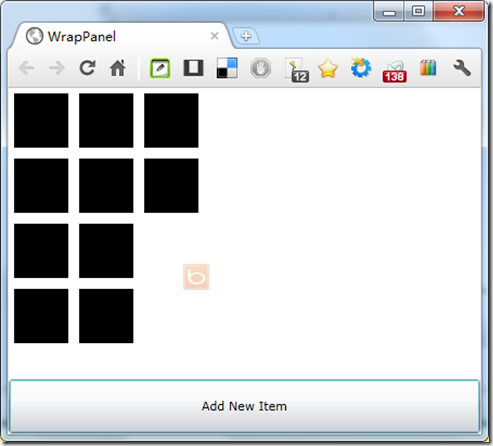
WrapPanel控件第一次出现在Silverlight 3的Silverlight ToolKit里.它与StackPanel控件非常相似,但有一个主要的差异:当WrapPanel的子项超出它的宽和高时,它会自动转到新的一行或列.这使得WrapPanel是布局不知道数量子项时的理想选择.原理如下所示:
使用WrapPanel控件
在这个练习里,我们会研究WrapPanel控件是怎样显示不知数量子项的.
- 使用VS2010新建一个WrapPanel的Silverlight应用程序
- 为根Grid控件添加两行,第一行放置一个WrapPanel控件,第二行放一个按钮
WrapPanel不是Silverlight控件集合的一部分,属于Silverlight Toolkit.所以,你必须确保你已下载Toolkit和已安装.为了得到WrapPanel的合适的命名空间,通过双击VS工具箱的控件来添加WrapPanel.这样VS会自动添加命名空间到页面.
当WrapPanel第一次添加时,你会注意到它包含一些我们不想要的属性.<toolkit:WrapPanel Height="100" HorizontalAlignment="Left" Margin="10,10,0,0" Name="wrapPanel1" VerticalAlignment="Top" Width="200" />
我们是想让WrapPanel占满表格的第一行.我们不需要HorizontalAlignment, Margin, VerticalAlignment或Width属性,所以我们可以在源码中手动删除这些属性,或者使用VS2010新的特性来辅助.在设计视图,右击WrapPanel控件选择"重置布局"=>"全部",如下所示: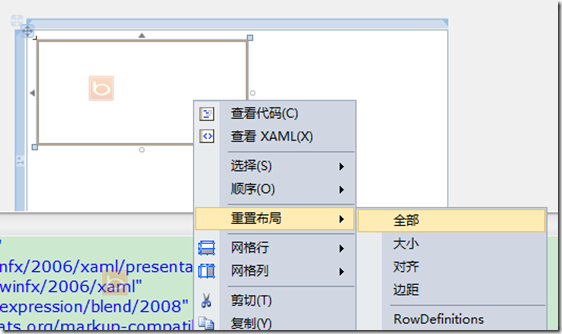 你会发现Wrap控件变成如下:
<toolkit:WrapPanel Name="wrapPanel1" />
到这里,你的XAML源码如下:<UserControl x:Class="WrapPanel.MainPage" xmlns="http://schemas.microsoft.com/winfx/2006/xaml/presentation" xmlns:x="http://schemas.microsoft.com/winfx/2006/xaml" xmlns:d="http://schemas.microsoft.com/expression/blend/2008" xmlns:mc="http://schemas.openxmlformats.org/markup-compatibility/2006" mc:Ignorable="d" d:DesignHeight="300" d:DesignWidth="400" xmlns:toolkit="http://schemas.microsoft.com/winfx/2006/xaml/presentation/toolkit"> <Grid x:Name="LayoutRoot" Background="White"> <Grid.RowDefinitions> <RowDefinition /> <RowDefinition Height="50" /> </Grid.RowDefinitions> <toolkit:WrapPanel Name="wrapPanel1" /> <Button x:Name="addItem" Content="Add New Item" Grid.Row="1" /> </Grid> </UserControl>
-
现在我们需要添加按钮的单击事件,在按钮原来中输入Click,选择"新建事件处理程序":

到后置代码中添加如下代码:
private void addItem_Click(object sender, RoutedEventArgs e) {
    Rectangle newRect = new Rectangle();
    newRect.Width = 50;
    newRect.Height = 50;
    newRect.Margin = new Thickness(5);
    newRect.Fill = new SolidColorBrush(Color.FromArgb(255, 0, 0, 0));

    wrapPanel1.Children.Add(newRect);
}
DockPanel控件
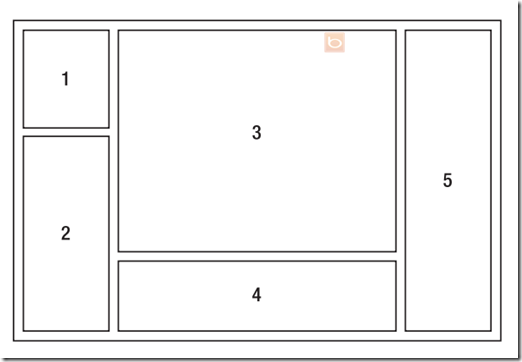
DockPanel控件第一次出现在Silverlight 3的Silverlight Toolkit里.它提供把控件停靠到四个方向的能力:上,下,左,右.参考下图.包含5个控件使用DockPanel布局.第一和第二个控件停靠在left容器,第三停靠在top-Center容器,第四停靠在bottom-Center容器,第五停靠在right容器.
如果不用DockPanel控件实现,就要嵌套布局控件或者实现一个复杂的表格控件.关键是DockPanel在某些情况下是非常有效的布局控件.
使用DockPanel控件
- 使用VS2010创建一个名为DockPanel的Silverlight应用程序
- 双击VS2010工具箱的DockPanel控件添加一个DockPanel到根表格控件,就像前面WrapPanel所做的一样,会自动添加一个xml命名空间和程序集引用到页面.然后添加按钮停靠在不同的方向.
默认的停靠方向是左边.然而你可以使用Dock的扩展属性改变这个行为.例如想把一个控件停靠在右边,只需要添加一个属性controls:DockPanel.Dock="Right"给这个控件.
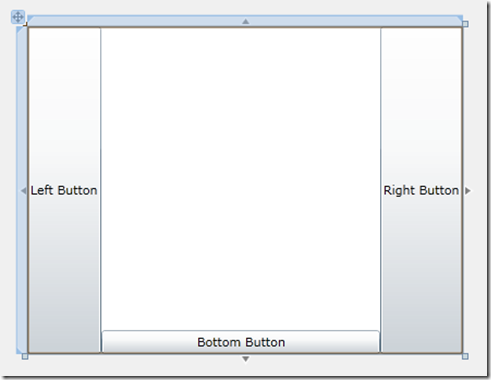
现在,你的XAML看起来是这样的:<Grid x:Name="LayoutRoot" Background="White"> <toolkit:DockPanel Name="dockPanel1" > <Button Content="Left Button" toolkit:DockPanel.Dock="Left" /> <Button Content="Right Button" toolkit:DockPanel.Dock="Right" /> <Button Content="Bottom Button" toolkit:DockPanel.Dock="Bottom" /> </toolkit:DockPanel> </Grid>
看起来如下: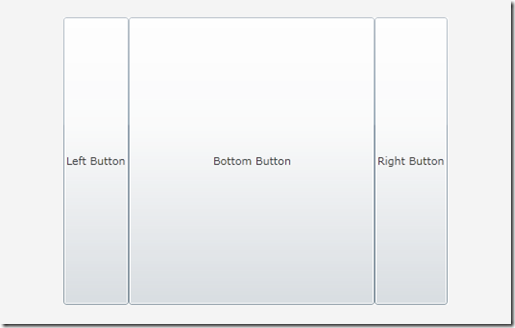
- 注意最后的按钮会自动填满剩余的空间.这是DockPanel的默认行为.设置LastChildFill属性为false可以改变这个行为.
<toolkit:DockPanel Name="dockPanel1" LastChildFill="False">
- 你在DockPanel中放置控件的顺序决定了它们是如何同其它控件停靠的.例如,Bottom按钮是围绕左右按钮停靠的,这是因为左右按钮在DockPanel中更早添加.如果我们给DockPanel添加另一个按钮到第一,同时把停靠属性设为Top,这样,这个按钮就会占满整个DockPanel的宽度.
<toolkit:DockPanel Name="dockPanel1" LastChildFill="False">
    <Button Content="Top Button" toolkit:DockPanel.Dock="Top" />
    <Button Content="Left Button" toolkit:DockPanel.Dock="Left" />
    <Button Content="Right Button" toolkit:DockPanel.Dock="Right" />
    <Button Content="Bottom Button" toolkit:DockPanel.Dock="Bottom" />
</toolkit:DockPanel>
如下所示: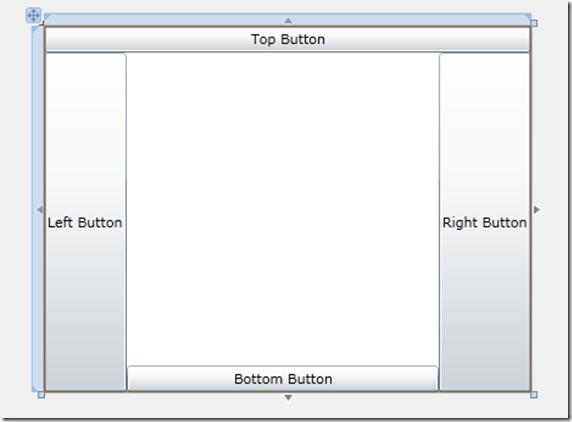
结语
这一章,我们研究了Silverlight应用程序中的5个布局控件.Canvas, StackPanel , 和Grid, WrapPanel, 和DockPanel.下一章,我们会深入研究与Silverlight捆绑在一起的控件.





【推荐】国内首个AI IDE,深度理解中文开发场景,立即下载体验Trae
【推荐】编程新体验,更懂你的AI,立即体验豆包MarsCode编程助手
【推荐】抖音旗下AI助手豆包,你的智能百科全书,全免费不限次数
【推荐】轻量又高性能的 SSH 工具 IShell:AI 加持,快人一步
· 如何编写易于单元测试的代码
· 10年+ .NET Coder 心语,封装的思维:从隐藏、稳定开始理解其本质意义
· .NET Core 中如何实现缓存的预热?
· 从 HTTP 原因短语缺失研究 HTTP/2 和 HTTP/3 的设计差异
· AI与.NET技术实操系列:向量存储与相似性搜索在 .NET 中的实现
· 周边上新:园子的第一款马克杯温暖上架
· Open-Sora 2.0 重磅开源!
· .NET周刊【3月第1期 2025-03-02】
· 分享 3 个 .NET 开源的文件压缩处理库,助力快速实现文件压缩解压功能!
· [AI/GPT/综述] AI Agent的设计模式综述