vue项目中使用bpmn-流程图json属性转xml(七篇更新完成)
内容概述
本系列“vue项目中使用bpmn-xxxx”分为七篇,均为自己使用过程中用到的实例,手工原创,目前陆续更新中。主要包括vue项目中bpmn使用实例、应用技巧、基本知识点总结和需要注意事项,具有一定的参考价值,需要的朋友可以参考一下。如果转载或通过爬虫直接爬的,格式特别丑,请来原创看:我是作者原文
前情提要
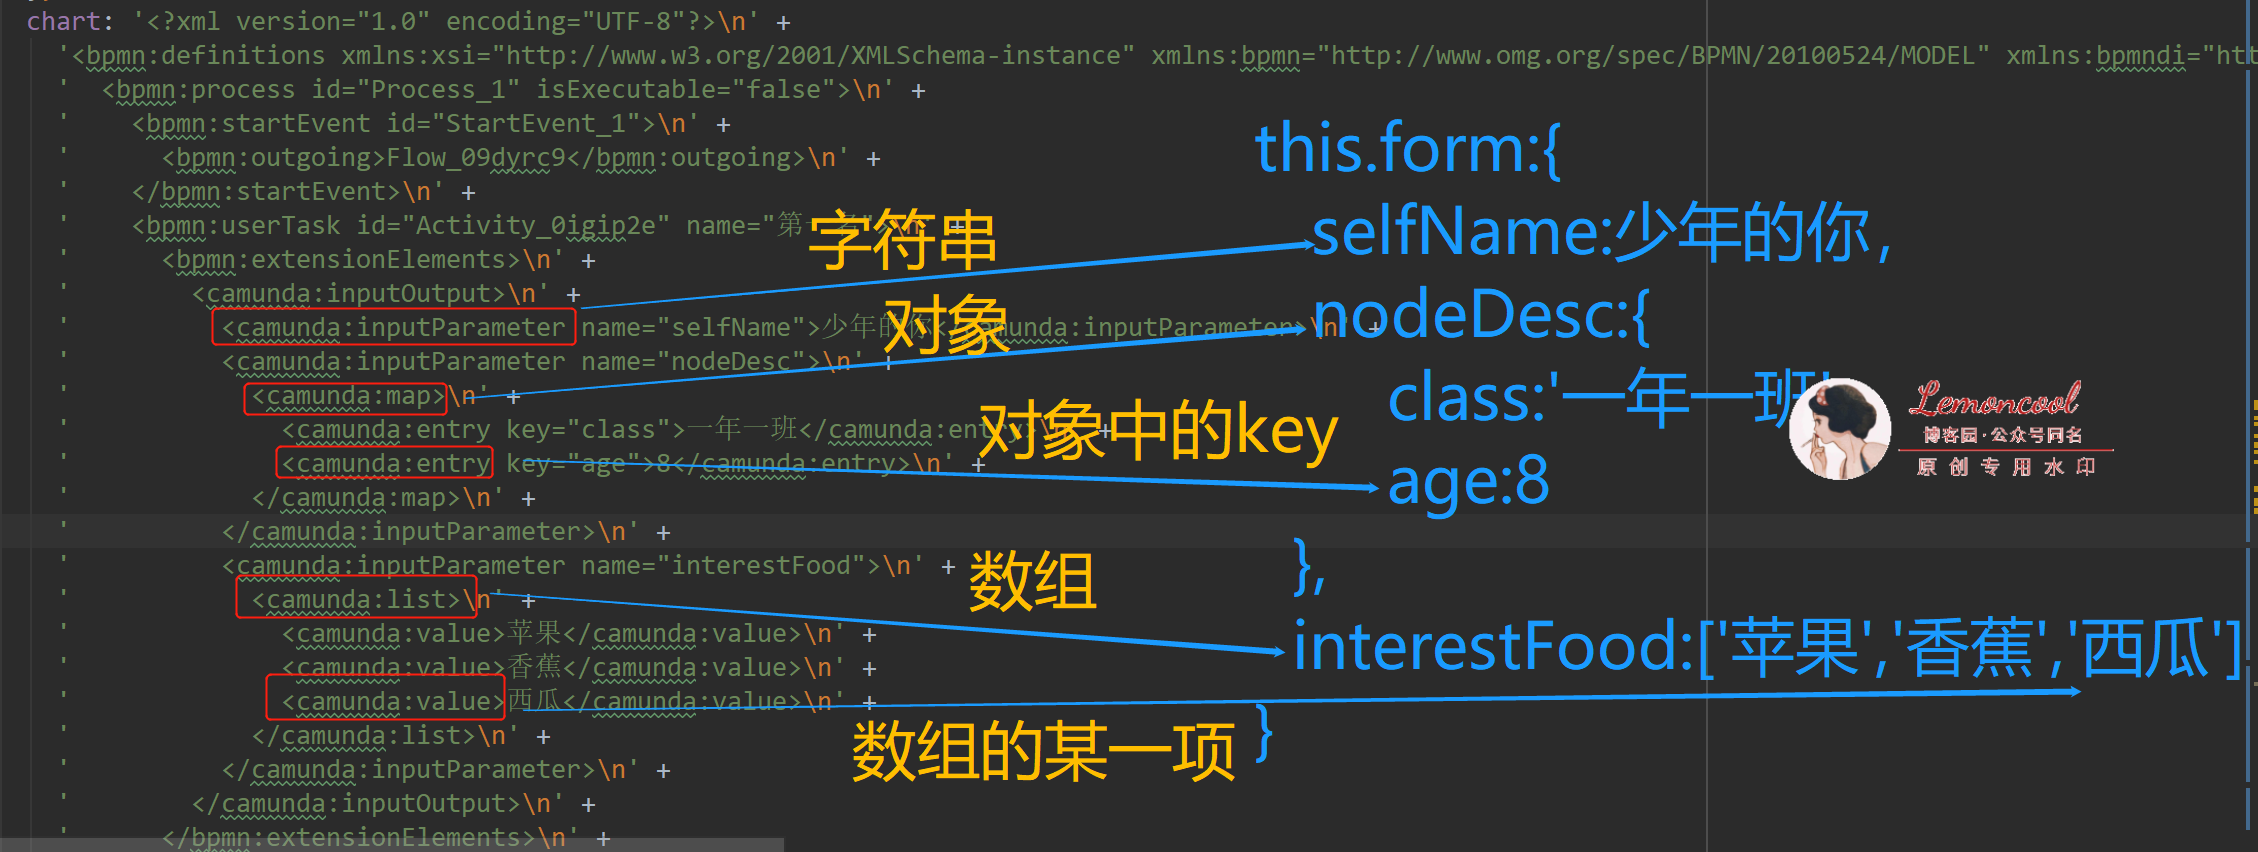
上一节我们讨论了将xml中的节点属性,转成前端常用的json格式。这一篇,我们来讨论更改了json后,如何写入到xml中去。首先,我们通过一张图看看流程图xml和json结构的对应关系。一定要仔细看,这张图理解了,这篇文章就理解一半了。

思路分析
xlm中,属性包裹在<bpmn:extensionElements>中,下一层分别是<camunda:inputOutput>和<camunda:inputParameter>,inputParameter的下一层,会有三种格式。上一节我们读取属性也是按照这个顺序,层层遍历拿到的属性值。
所以,我们本次的出发点,是根据json各字段的属性类型,从里向外为<bpmn:extensionElements>添加内容。步骤如下:
1.elementRegistry.get 和节点id找到节点实例element,因为写入xml的时候需要知道为哪个节点写属性
2.bpmnFactory.create ,顾名思义,作用为创建标签。通过该方法创建<bpmn:extensionElements>元素,并通过对this.form的遍历,不断为其添加子元素。
3.通过modeling.updateProperties(element, {extensionElements});更新business中的节点xml。参数1 步骤1中提到的节点实例element,参数2是步骤2生成的<bpmn:extensionElements>
代码实现
代码核心主要集中在生成<bpmn:extensionElements>,并为其添加子元素。
上张图片中的this.form,属性值分为三种数据类型
1.单一值:字符串(string),数字(Number)或布尔(boolean),对应生成一个<camunda:inputParameter>,且没有子元素
2.Object:
2.1 数组,对应生成一个<camunda:inputParameter>,且有子元素<camunda:list>,<camunda:list>包含多个<camunda:value>
2.2 对象,对应生成一个<camunda:inputParameter>,且有子元素<camunda:map>,<camunda:list>包含多<camunda:entry>
核心如下:
for (const nodeKey in this.form) {
     let inputParameter = null;
     // 1、属性值为单个值,即布尔、字符串、数字
      if (
      (typeof this.form[nodeKey] === 'string' && this.form[nodeKey] !== '') ||
        typeof this.form[nodeKey] === 'boolean' ||
        typeof this.form[nodeKey] === 'number'
       ) {
          inputParameter = bpmnFactory.create('camunda:InputParameter', {
             name: nodeKey,
             // 布尔值和数字影响生成xml,都要转成字符串
              value: typeof this.form[nodeKey] === 'string' ? this.form[nodeKey] : JSON.stringify(this.form[nodeKey])
             }
         );
        //  2.属性值为数组或对象
       } else if (typeof this.form[nodeKey] === 'object') {
         // 2.1 属性值为数组,对应案例中 '爱吃'字段,checkbox多选
           if (this.form[nodeKey] instanceof Array) {
                if (this.form[nodeKey].length) {
                inputParameter = bpmnFactory.create('camunda:InputParameter', {name: nodeKey});
                  const list = bpmnFactory.create('camunda:List');
                  list.items = [];
                  this.form[nodeKey].forEach((item) => {
                    const itemValue = bpmnFactory.create('camunda:Value', {value: item});
                    list.items.push(itemValue);
                  });
                  inputParameter.definition = list;
                }
          } else {
             // 2.2 此时属性值是对象,对应案例中 '详细信息'
             if (JSON.stringify(this.form[nodeKey]) === '{}') continue;
             inputParameter = bpmnFactory.create('camunda:InputParameter', {name: nodeKey});
                const map = bpmnFactory.create('camunda:Map');
                map.entries = [];
                for (const mapKey in this.form[nodeKey]) {
                  if (this.form[nodeKey][mapKey] !== '') {
                    const itemValue = bpmnFactory.create('camunda:Entry', {
                      key: mapKey,
                      value: this.form[nodeKey][mapKey]
                    });
                    map.entries.push(itemValue);
                  }
                  inputParameter.definition = map;
                }
              }
            }
     inputParameter !== null && inputOutput.inputParameters.push(inputParameter);
}
modeling.updateProperties(element, {extensionElements});
成果验证
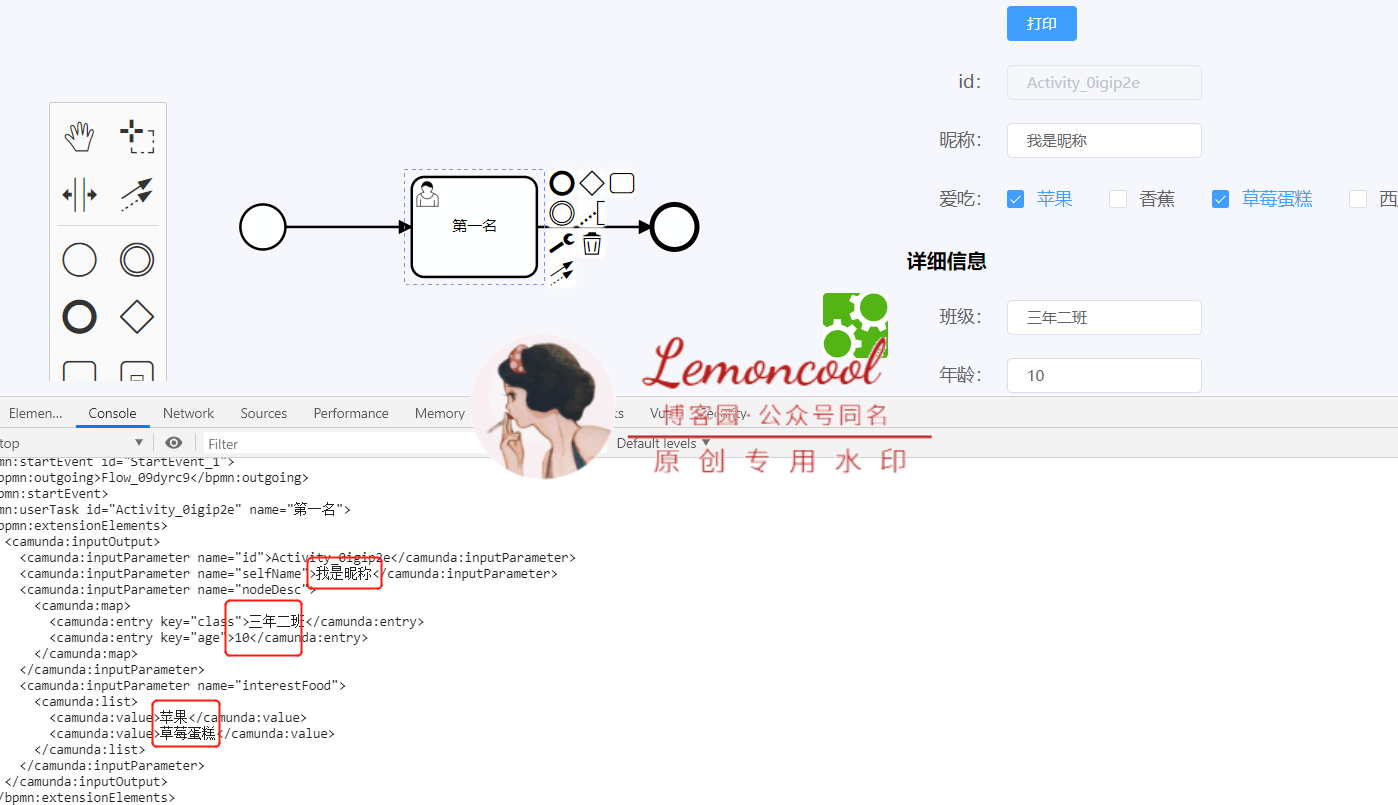
此时,我们修改一下表单属性,通过控制台看一下最新的xml:

可以看到,xml已经被更新,且值和页面中表单项的值完全一致。完成!七篇文章的整个项目源码是个文件夹,我太笨了,不知道怎样传到博客里。所以,想要获取bpmn完整源码的小伙伴, 可以公众号联系我,扫下面二维码或公众号搜“前端便利贴”,即可获取~
后续
直到现在,本系列“vue项目中使用bpmn-xxxx”七篇文章已经更新完成。都是总结自己开发中遇到的疑惑和知识点,不是很系统。还有很多小的知识点,不太成体系的,就没有纳入文章内,如果需要的话,后面可能会在公众号更新。
也欢迎使用bpmn的小伙伴,通过博客或公众号与我交流,大家一起爬坑,共同进步!


【推荐】国内首个AI IDE,深度理解中文开发场景,立即下载体验Trae
【推荐】编程新体验,更懂你的AI,立即体验豆包MarsCode编程助手
【推荐】抖音旗下AI助手豆包,你的智能百科全书,全免费不限次数
【推荐】轻量又高性能的 SSH 工具 IShell:AI 加持,快人一步
· AI与.NET技术实操系列:向量存储与相似性搜索在 .NET 中的实现
· 基于Microsoft.Extensions.AI核心库实现RAG应用
· Linux系列:如何用heaptrack跟踪.NET程序的非托管内存泄露
· 开发者必知的日志记录最佳实践
· SQL Server 2025 AI相关能力初探
· 震惊!C++程序真的从main开始吗?99%的程序员都答错了
· 单元测试从入门到精通
· 【硬核科普】Trae如何「偷看」你的代码?零基础破解AI编程运行原理
· 上周热点回顾(3.3-3.9)
· winform 绘制太阳,地球,月球 运作规律