阅读《计算机图形学编程(使用OpenGL和C++)》9 - 画球体
前面有了太阳系,模型用的立方体和金字塔,现在我们来构建球体。
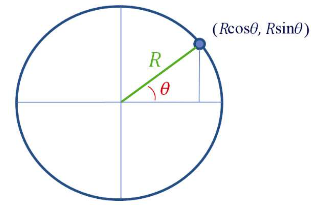
对于半径为R的圆,围绕其圆周的点的坐标可以被很好地定义。
我们可以系统地使用圆的几何知识来通过算法建立球体模型。我们的策略如下。
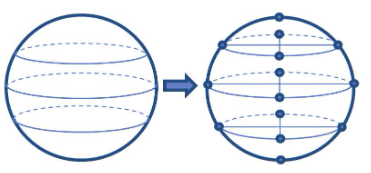
(1)在整个球体上,选择表示一系列圆形“水平切片”的精度。
(2)将每个圆形切片的圆周细分为若干个点。更多的点和水平切片可以生成更精确、更平滑的球体模型。在我们的模型中,每个切片将具有相同数量的点。
(3)将顶点分组为三角形。一种方法是逐步遍历顶点,在每一步构建两个三角形。
(4)根据纹理图像的性质选择纹理坐标。在球体的情况下,存在许多地形纹理图像,假设我们选择这种纹理图像,想象一下,让这个图像围绕球体“包裹”,我们可以根据图像中纹素的最终对应位置为每个顶点指定纹理坐标。
(5)对于每个顶点,通常还希望生成法向量(Normal Vector)——垂直于模型表面的向量。从球体中心指向顶点的向量恰好等于该顶点的法向量!
一些模型使用索引定义三角形。每个顶点出现在多个三角形中,这将导致每个顶点被多次指定。我们不希望这样做,而是会存储每个顶点一次,然后为三角形的每个角指定索引,引用所需的顶点。我们需要存储每个顶点的位置、纹理坐标和法向量,因此这么做可以为大型模型节省内存。
顶点存储在一维数组中,从最下面的水平切片中的顶点开始。使用索引时,关联的索引数组包括每个三角形角的条目。其内容是顶点数组中的整型引用(具体地说,是下标)。假设每个切片包含n个顶点,顶点数组以及相应索引数组的示例部分。
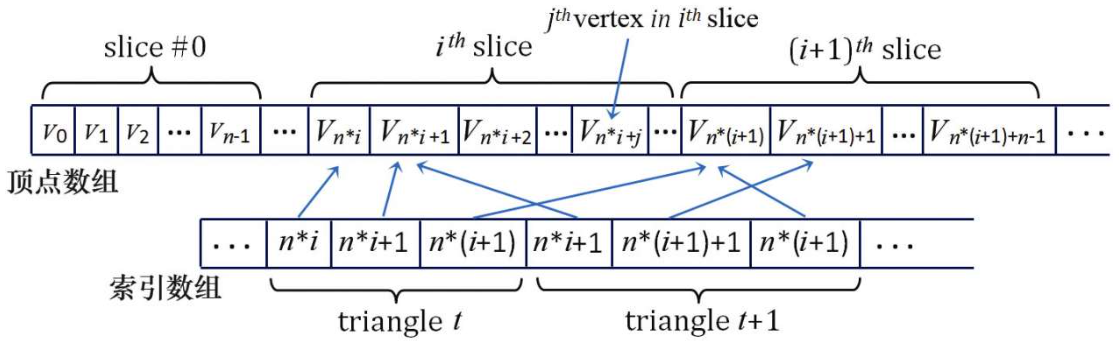
然后,我们可以从球体底部开始,围绕每个水平切片以圆形方式遍历顶点。当我们访问每个顶点时,我们构建两个三角形,在其右上方形成一个方形区域。
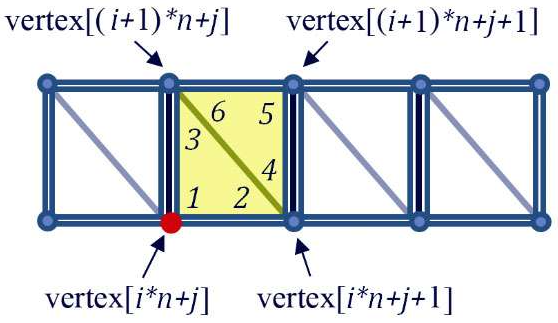
如图中红色的顶点,它的索引序号是i*n+j,其中i是当前正在处理的切片,j是当前正在该切片中处理的顶点,n是每个切片的顶点数。然后使用这4个顶点构建为此(红色)顶点生成的两个三角形(以黄色显示)。这两个三角形的索引表中的6个条目在图中以数字1~6的顺序表示。注意,条目3和6都指向相同的顶点,对于条目2和4也是如此。当我们到达以红色突出显示的顶点(即vertex[i*n+j])时由此定义的两个三角形是由这6个顶点构成的——其中一个三角形的条目标记为1、2、3,引用的顶点包括vertex[i*n+j]、vertex[i*n+j+1]和vertex[(i+1)*n+j];另一个三角形的条目标记为4、5、6,引用的顶点包括vertex[i*n+j+1]、vertex[(i+1)*n+j+1]和vertex[(i+1)*n+j]。
下面代码中变量“prec(precision)”指的是“精度”,在这里它被用来确定球形切片的数量和每个切片中的顶点数量。因为纹理贴图完全包裹在球体周围,所以在纹理贴图的左右边缘相交的每个点处需要一个额外的重合顶点。因此,顶点的总数是(prec+1)*(prec+1)。由于每个顶点生成6个三角形索引,因此索引的总数是prec*prec*6。
Sphere.h
 1 #pragma once
 2 #include <vector>
 3 #include <glm\glm.hpp>
 4 // 球体
 5 class Sphere
 6 {
 7 private:
 8     int numVertices;
 9     int numIndices;
10     std::vector<int> indices;
11     std::vector<glm::vec3> vertices;
12     std::vector<glm::vec2> texCoords;
13     std::vector<glm::vec3> normals;
14     void init(int);
15     float toRadians(float degrees);
16
17 public:
18     Sphere();
19     ~Sphere();
20     Sphere(int prec);
21     int getNumVertices();
22     int getNumIndices();
23     std::vector<int> getIndices();
24     std::vector<glm::vec3> getVertices();
25     std::vector<glm::vec2> getTexCoords();
26     std::vector<glm::vec3> getNormals();
27 };
Sphere.cpp
  1 #include "Sphere.h"
  2 #include <iostream>
  3 using namespace std;
  4
  5 Sphere::Sphere()
  6 {
  7     init(48);
  8 }
  9
 10
 11 Sphere::Sphere(int prec) // prec是精度,也就是切片的数量
 12 {
 13     init(prec);
 14 }
 15
 16 Sphere::~Sphere()
 17 {
 18 }
 19
 20 int Sphere::getNumVertices()
 21 {
 22     return numVertices;
 23 }
 24
 25 int Sphere::getNumIndices()
 26 {
 27     return numIndices;
 28 }
 29
 30 std::vector<int> Sphere::getIndices()
 31 {
 32     return indices;
 33 }
 34
 35 std::vector<glm::vec3> Sphere::getVertices()
 36 {
 37     return vertices;
 38 }
 39
 40 std::vector<glm::vec2> Sphere::getTexCoords()
 41 {
 42     return texCoords;
 43 }
 44
 45 std::vector<glm::vec3> Sphere::getNormals()
 46 {
 47     return normals;
 48 }
 49
 50 float Sphere::toRadians(float degrees)
 51 {
 52     float res = (degrees * 2.0f * 3.14159f) / 360.0f;
 53     cout << degrees << endl;
 54     cout << "toRadians=" << "(" << degrees << " * 2.0f * 3.14159f) / 360.0f = " << res << endl;
 55     return res;
 56 }
 57
 58 void Sphere::init(int prec)
 59 {
 60     numVertices = (prec + 1) * (prec + 1); // 顶点总数
 61     numIndices = prec * prec * 6; // 索引总数
 62     // std::vector::push_back() 在向量的末尾增加一个新元素,并为向量长度加1
 63     for (int i = 0; i < numVertices; i++)
 64     {
 65         vertices.push_back(glm::vec3());
 66         texCoords.push_back(glm::vec2());
 67         normals.push_back(glm::vec3());
 68     }
 69     for (int i = 0; i < numIndices; i++)
 70     {
 71         indices.push_back(0);
 72     }
 73     // 计算三角形顶点
 74     cout << "prec:" << prec << endl;
 75     for (int i = 0; i <= prec; i++)
 76     {
 77         for (int j = 0; j <= prec; j++)
 78         {
 79             cout << "i:" << i << " j:" << j << endl;
 80             cout << "degrees: 180.0f - i * 180.0f / prec=";
 81             float y = (float)cos(toRadians(180.0f - i * 180.0f / prec));
 82             cout << "y:" << "(float)cos(toRadians)=" << y << endl;
 83
 84             cout << "degrees: j * 360.0f / prec=";
 85             float x = -(float)cos(toRadians(j * 360.0f / prec)) * (float)abs(cos(asin(y)));
 86             cout << "asin(y)=" << asin(y) << endl;
 87             cout << "x:" << "-(float)cos(toRadians) * (float)abs(cos(asin(y)))=" << x << endl;
 88
 89             cout << "degrees: j * 360.0f / prec=";
 90             float z = (float)sin(toRadians(j * 360.0f / prec)) * (float)abs(cos(asin(y)));
 91             cout << "z:" << "(float)sin(toRadians) * (float)abs(cos(asin(y)))=" << z << endl;
 92
 93             vertices[i * (prec + 1) + j] = glm::vec3(x, y, z);
 94             cout << "vertices[" << i * (prec + 1) + j << "]=glm::vec3(x, y, z)="
 95                  << "glm::vec3(" << x << "," << y << "," << z << ")" << endl;
 96
 97             texCoords[i * (prec + 1) + j] = glm::vec2(((float)j / prec), ((float)i / prec));
 98             cout << "texCoords[" << i * (prec + 1) + j << "]=glm::vec2(((float)j / prec), ((float)i / prec))="
 99                  << "glm::vec2(" << (float)j / prec << "," << (float)i / prec << ")" << endl;
100
101             normals[i * (prec + 1) + j] = glm::vec3(x, y, z);
102             cout << "normals[" << i * (prec + 1) + j << "]=glm::vec3(x, y, z)=" << "glm::vec3(" << x << ","
103                  << y << "," << z << ")" << endl;
104             cout << endl;
105         }
106     }
107     // 计算三角形索引
108     for (int i = 0; i < prec; i++)
109     {
110         for (int j = 0; j < prec; j++)
111         {
112             indices[6 * (i * prec + j) + 0] = i * (prec + 1) + j;
113             indices[6 * (i * prec + j) + 1] = i * (prec + 1) + j + 1;
114             indices[6 * (i * prec + j) + 2] = (i + 1) * (prec + 1) + j;
115             indices[6 * (i * prec + j) + 3] = i * (prec + 1) + j + 1;
116             indices[6 * (i * prec + j) + 4] = (i + 1) * (prec + 1) + j + 1;
117             indices[6 * (i * prec + j) + 5] = (i + 1) * (prec + 1) + j;
118         }
119     }
120 }
main.cpp
 1 ...
 2 #include "Sphere.h"
 3 ...
 4 Sphere mySphere(48);
 5 ...
 6
 7 void setupVertices(void)
 8 {
 9     std::vector<int> ind = mySphere.getIndices(); //索引
10     std::vector<glm::vec3> vert = mySphere.getVertices(); //顶点
11     std::vector<glm::vec2> tex = mySphere.getTexCoords(); //纹理
12     std::vector<glm::vec3> norm = mySphere.getNormals(); //法向量
13
14     std::vector<float> pvalues; //顶点位置
15     vector<float> tvalues;        //纹理坐标
16     vector<float> nvalues;        //法向量
17
18     int numIndices = mySphere.getNumIndices();
19     for (int i = 0; i < numIndices; i++)
20     {
21         pvalues.push_back((vert[ind[i]]).x);
22         pvalues.push_back((vert[ind[i]]).y);
23         pvalues.push_back((vert[ind[i]]).z);
24
25         tvalues.push_back((tex[ind[i]]).s);
26         tvalues.push_back((tex[ind[i]]).t);
27
28         nvalues.push_back((norm[ind[i]]).x);
29         nvalues.push_back((norm[ind[i]]).y);
30         nvalues.push_back((norm[ind[i]]).z);
31     }
32
33     glGenVertexArrays(1, vao); // 创建一个vao,并返回它的整数型ID存进数组vao中
34     glBindVertexArray(vao[0]); // 激活vao
35     glGenBuffers(numVBOs, vbo);// 创建三个vbo,并返回它们的整数型ID存进数组vbo中
36
37     // 把顶点放入缓冲区 #0
38     glBindBuffer(GL_ARRAY_BUFFER, vbo[0]);
39     glBufferData(GL_ARRAY_BUFFER, pvalues.size()*4, &pvalues[0], GL_STATIC_DRAW);
40     // 把纹理坐标放入缓冲区 #1
41     glBindBuffer(GL_ARRAY_BUFFER, vbo[1]);
42     glBufferData(GL_ARRAY_BUFFER, tvalues.size() * 4, &tvalues[0], GL_STATIC_DRAW);
43     // 把法向量放入缓冲区 #2
44     glBindBuffer(GL_ARRAY_BUFFER, vbo[2]);
45     glBufferData(GL_ARRAY_BUFFER, nvalues.size() * 4, &nvalues[0], GL_STATIC_DRAW);
46 }
47 ...
48 void display(GLFWwindow* window, double currentTime)
49 {
50 ...
51
52     glBindBuffer(GL_ARRAY_BUFFER, vbo[0]);
53     glVertexAttribPointer(0, 3, GL_FLOAT, GL_FALSE, 0, 0);
54     glEnableVertexAttribArray(0);
55
56     glBindBuffer(GL_ARRAY_BUFFER, vbo[1]);
57     glVertexAttribPointer(1, 2, GL_FLOAT, GL_FALSE, 0, 0);
58     glEnableVertexAttribArray(1);
59
60     glBindBuffer(GL_ARRAY_BUFFER, vbo[2]);
61     glVertexAttribPointer(2, 3, GL_FLOAT, GL_FALSE, 0, 0);
62     glEnableVertexAttribArray(2);
63
64     glActiveTexture(GL_TEXTURE0);
65     glBindTexture(GL_TEXTURE_2D, brickTexture);
66
67     glEnable(GL_DEPTH_TEST);
68     glDepthFunc(GL_LEQUAL);
69
70     glDrawArrays(GL_TRIANGLES, 0, mySphere.getNumIndices());    // 绘制太阳
71     mvStack.pop();  // 从堆栈中移除太阳的轴旋转
72 ...
73     mvStack.top() *= glm::scale(glm::mat4(1.0f), glm::vec3(0.5f, 0.5, 0.5));
74 ...
75 }
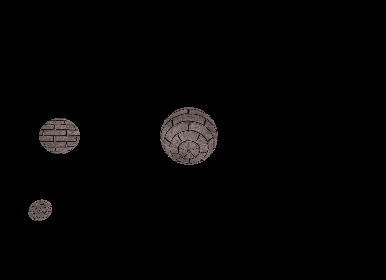
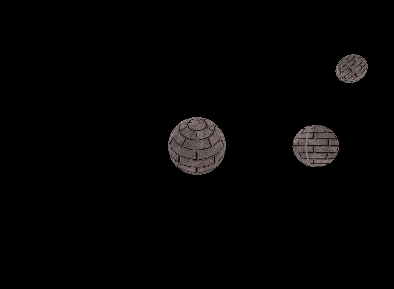
贴图仍然是之前的砖块图像,效果如下所示,模型都换成了球体,现在是三个球互相围绕旋转啦。

 浙公网安备 33010602011771号