
从零到一k8s(五)网络模型讲解(cilium,calico,flannel)
calico
默认提供三种网络模式(这里只讲解基础部分,关于ebpf,custom cni 等暂时不考虑)
overlay 网络两种
vxlan
crossubnet 子网内不封装
always
ipip tunnel (可以支持BGP)
crossubnet 子网内不封装
always
underlay 网络
BGP:
1. full mesh
2. RR + IBGP 需要硬件支持
安装

curl https://projectcalico.docs.tigera.io/manifests/calico.yaml -O
更改podcidr
kubectl apply -f calico.yaml
curl -L https://github.com/projectcalico/calico/releases/download/v3.22.0/calicoctl-linux-amd64 -o calicoctl
chmod +x ./calicoctl
calicoctl node status
root@us-test00:~# ip r
default via 10.160.105.1 dev eth0 proto dhcp src 10.160.105.6 metric 100
10.160.105.0/24 dev eth0 proto kernel scope link src 10.160.105.6
168.63.129.16 via 10.160.105.1 dev eth0 proto dhcp src 10.160.105.6 metric 100
169.254.169.254 via 10.160.105.1 dev eth0 proto dhcp src 10.160.105.6 metric 100
172.17.0.0/16 dev docker0 proto kernel scope link src 172.17.0.1 linkdown
blackhole 172.18.64.0/26 proto bird
172.18.96.128/26 via 10.160.105.8 dev tunl0 proto bird onlink
172.18.101.64/26 via 10.160.105.7 dev tunl0 proto bird onlink
root@us-test00:~# calicoctl node status
Calico process is running.
IPv4 BGP status
+--------------+-------------------+-------+----------+-------------+
| PEER ADDRESS | PEER TYPE | STATE | SINCE | INFO |
+--------------+-------------------+-------+----------+-------------+
| 10.160.105.7 | node-to-node mesh | up | 06:21:43 | Established |
| 10.160.105.8 | node-to-node mesh | up | 06:21:44 | Established |
+--------------+-------------------+-------+----------+-------------+
IPv6 BGP status
No IPv6 peers found.
root@us-test00:~# kubectl get ippool
NAME AGE
default-ipv4-ippool 53s
root@us-test00:~# kubectl get ippool default-ipv4-ippool -o yaml
apiVersion: crd.projectcalico.org/v1
kind: IPPool
metadata:
annotations:
projectcalico.org/metadata: '{"uid":"dac32e37-fcd6-4163-9b33-af6423aea269","creationTimestamp":"2022-03-07T06:21:38Z"}'
creationTimestamp: "2022-03-07T06:21:38Z"
generation: 1
name: default-ipv4-ippool
resourceVersion: "255454"
uid: e4bddd4c-a40a-4edf-9713-78e85ed27086
spec:
allowedUses:
- Workload
- Tunnel
blockSize: 26
cidr: 172.18.64.0/18
ipipMode: Always
natOutgoing: true
nodeSelector: all()
vxlanMode: Never
默认运行在 node-node-mesh 模式下的 full mesh bgp 模型
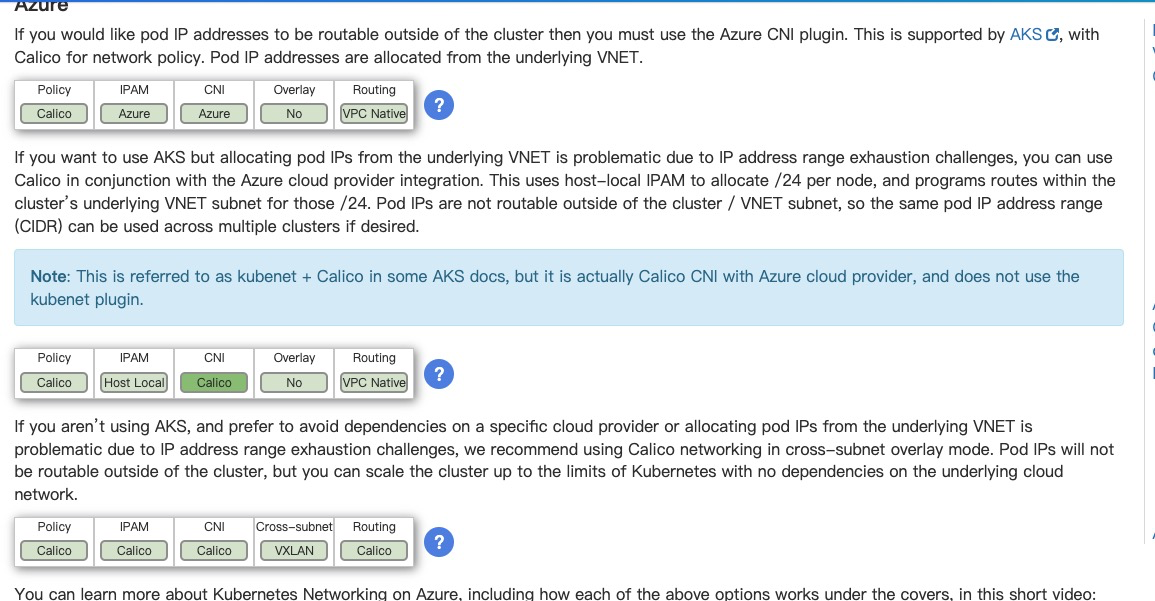
调整为overlay 网络模式(目前使用azure 仅支持vxlan网络访问)
选择最合适的网络模型(https://projectcalico.docs.tigera.io/networking/determine-best-networking)
例如在我的测试环境,是基于azure 来做 only can use vxlan
默认overlay 网络下pod 也就是private 网络想要访问public 网络就要通过snat 或者 masqurade
Chain cali-nat-outgoing (1 references)
 pkts bytes target     prot opt in     out     source               destination
  121  7548 MASQUERADE  all  --  *      *       0.0.0.0/0            0.0.0.0/0            / * cali:Dw4T8UWPnCLxRJiI */ match-set cali40masq-ipam-pools src ! match-set cali40all-ipam-pools dst
cilium
self-manager 的k8s 集群整体安装cilium 的方式类似:
通过 cilium CLI 安装(本次采用)
通过 yml 文件快速创建
通过 helm 进行安装(values 参数列表https://docs.cilium.io/en/v1.10/helm-reference/)
cilium install --config   ipam=kubernetes
# 只需要注意更改ipam 类型为kubernetes 即可,因为我们之前kubeadm 初始化时制定了 pod-netcidr 。默认为的cluster-pool 模式
查看目前的cilium 运行在vxlan 模式下
root@us-test00:~# ip r
default via 10.160.105.1 dev eth0 proto dhcp src 10.160.105.6 metric 100
10.160.105.0/24 dev eth0 proto kernel scope link src 10.160.105.6
168.63.129.16 via 10.160.105.1 dev eth0 proto dhcp src 10.160.105.6 metric 100
169.254.169.254 via 10.160.105.1 dev eth0 proto dhcp src 10.160.105.6 metric 100
172.17.0.0/16 dev docker0 proto kernel scope link src 172.17.0.1 linkdown
172.18.64.0/24 via 172.18.64.165 dev cilium_host src 172.18.64.165
172.18.64.165 dev cilium_host scope link
172.18.65.0/24 via 172.18.64.165 dev cilium_host src 172.18.64.165 mtu 1450
172.18.66.0/24 via 172.18.64.165 dev cilium_host src 172.18.64.165 mtu 1450
#安装hubble 和 ui
cilium hubble enable
cilium hubble enable --ui
配置对应的ingress 访问ui
本文来自博客园,作者:萱乐庆foreverlove,转载请注明原文链接:https://www.cnblogs.com/leleyao/p/15961531.html

【推荐】编程新体验,更懂你的AI,立即体验豆包MarsCode编程助手
【推荐】凌霞软件回馈社区,博客园 & 1Panel & Halo 联合会员上线
【推荐】抖音旗下AI助手豆包,你的智能百科全书,全免费不限次数
【推荐】博客园社区专享云产品让利特惠,阿里云新客6.5折上折
【推荐】轻量又高性能的 SSH 工具 IShell:AI 加持,快人一步