LNMP分离部署
LNMP理论
fastcgi的主要优点:
把动态语言和http服务器分离开来,使nginx可以处理静态请求和向后转发动态请求,而php/php-fpm服务器转移解析PHP动态请求
使用fastcgi的原因:
Nginx 不支持对外部动态程序的直接调用或者解析 ,所有的外部程序(包括PHP)必须通过FastCGI接口来调用。
FastCGI的重要特点总结:
- 是HTTP服务器和动态脚本语言间通信的接口或者工具
- 优点就是把动态语言解析和HTTP服务器分离了开来
- Nginx、Apache、lighttpd以及多数动态语言都支持FastCGI。
- 接口方式采用C/S结构,分为HTTP服务器(客户端)和动态语言解析服务器(服务端)
- PHP动态语言服务端可以启动多个FastCGI的守护进程例如:php-fpm(fastcgi process mangemnt)
- http服务器通过例(Nginx fastgi_pass)FastCGI客户端和动态语言FastCGI服务端通信(例如:php-fpm)
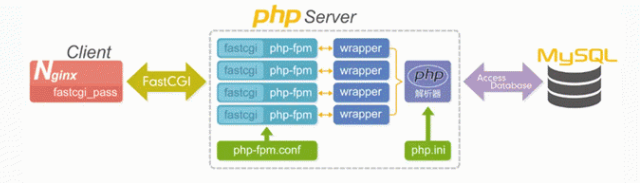
nginx - fastcgi - php - mysql 协同下的 请求的完整访问过程
- 用户发送http请求报文给nginx服务器
- nginx会根据文件url和后缀来判断请求
- 如果请求的是静态内容,nginx会将结果直接返回给用户
- 如果请求的是动态内容,nginx会将请求交给fastcgi客户端,通过fastcgi_pass将这个请求发送给php-fpm
- php-fpm会将请求交给wrapper
- wrapper收到请求会生成新的线程调用php动态程序解析服务器
- 如果用户请求的是博文、或者内容、PHP会请求MySQL查询结果
- 如果用户请求的是图片、附件、PHP会请求nfs存储查询结果
- php会将查询到的结果交给Nginx
- nginx会生成一个响应报文返还给用户
LNMP安装注意事项
-
Nginx + PHP的组合,问题多出在配置上,配置的时候需要仔细
-
PHP测试页面,在创建的时候要注意开头结尾,?不要打错了,或者打反了
#正确示范
<?php
phpinfo();
?>
- 防火墙和selinux一定要关闭,不然是访问不到php测试页面的
- 权限问题,在配置过程中涉及到了很多的文件配置,权限一定要给足,然后根据需求,修改权限
LNMP分离部署的实现
环境说明
| 主机名 | IP地址 | 应用 | 系统版本 |
|---|---|---|---|
| nginx | 192.168.110.11 | nginx | redhat 8 |
| mysql | 192.168.110.12 | mysql | redhat 8 |
| php | 192.168.110.13 | php | redhat 8 |
准备工作
配置网络源(三台机器)
curl -o /etc/yum.repos.d/CentOS-Base.repo https://mirrors.aliyun.com/repo/Centos-8.repo
sed -i -e '/mirrors.cloud.aliyuncs.com/d' -e '/mirrors.aliyuncs.com/d' /etc/yum.repos.d/CentOS-Base.repo
sed -i 's|$releasever|8|' /etc/yum.repos.d/CentOS-Base.repo
yum install -y https://mirrors.aliyun.com/epel/epel-release-latest-8.noarch.rpm
sed -i 's|^#baseurl=https://download.fedoraproject.org/pub|baseurl=https://mirrors.aliyun.com|' /etc/yum.repos.d/epel*
sed -i 's|^metalink|#metalink|' /etc/yum.repos.d/epel*
sed -i 's|$releasever|8|' /etc/yum.repos.d/epel*
关闭防火墙和selinux(三台机器)
systemctl disable --now firewalld
setenforce 0
sed -ri 's/^(SELINUX=).*/\1disabled/g' /etc/selinux/config
准备安装包
//nginx
wget http://nginx.org/download/nginx-1.20.0.tar.gz

//mysql
wget https://downloads.mysql.com/archives/get/p/23/file/mysql-5.7.31-linux-glibc2.12-x86_64.tar.gz
开始部署
安装nginx
//创建nginx用户
[root@nginx ~]# useradd -r -M -s /sbin/nologin nginx
//安装工具包和依赖包
[root@nginx ~]# yum -y install vim pcre-devel openssl openssl-devel gd-devel gcc gcc-c++ make
[root@nginx ~]# yum -y groups mark install 'Development tools'
//创建日志存放目录
[root@nginx ~]# mkdir -p /var/log/nginx
[root@nginx ~]# chown -R nginx.nginx /var/log/nginx
//解压源码包
[root@nginx ~]# tar xf nginx-1.20.0.tar.gz
[root@nginx ~]# ls
anaconda-ks.cfg nginx-1.20.0 nginx-1.20.0.tar.gz
//编译安装
[root@nginx ~]# cd nginx-1.20.0
[root@nginx nginx-1.20.0]# ./configure \
--prefix=/usr/local/nginx \
--user=nginx \
--group=nginx \
--with-debug \
--with-http_ssl_module \
--with-http_realip_module \
--with-http_image_filter_module \
--with-http_gunzip_module \
--with-http_gzip_static_module \
--with-http_stub_status_module \
--http-log-path=/var/log/nginx/access.log \
--error-log-path=/var/log/nginx/error.log
//启用多核心加速安装
[root@nginx nginx-1.20.0]# make -j $(grep 'processor' /proc/cpuinfo | wc -l) && make install
//添加环境变量
[root@nginx nginx-1.20.0]# echo 'export PATH=/usr/local/nginx/sbin:$PATH' > /etc/profile.d/nginx.sh
[root@nginx nginx-1.20.0]# source /etc/profile.d/nginx.sh
//修改配置文件
[root@nginx ~]# vim /usr/local/nginx/conf/nginx.conf
...此处省略n行...
server {
listen 80;
server_name localhost;
location / {
root html;
index index.php index.html index.htm;
}
location ~ \.php$ {
fastcgi_pass 192.168.110.13:9000;
fastcgi_index index.php;
fastcgi_param SCRIPT_FILENAME /var/www/html/$fastcgi_script_name;
include fastcgi_params;
}
//检查配置文件语法是否有误
[root@nginx ~]# nginx -t
nginx: the configuration file /usr/local/nginx/conf/nginx.conf syntax is ok
nginx: configuration file /usr/local/nginx/conf/nginx.conf test is successful
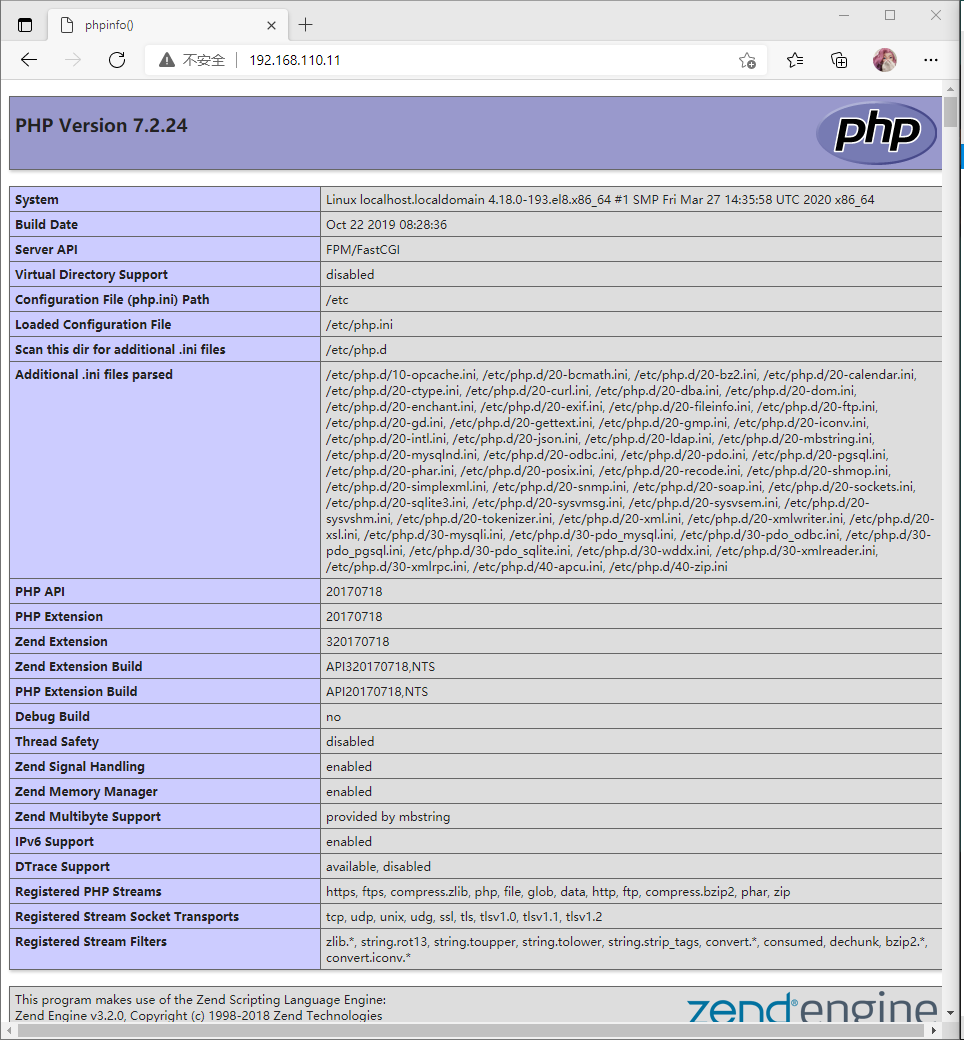
//创建测试页面index.php
[root@nginx ~]# cat > /usr/local/nginx/html/index.php <<EOF
<?php
phpinfo();
?>
EOF
//启动服务
[root@nginx ~]# nginx
//查看端口
[root@nginx ~]# ss -antl
State Recv-Q Send-Q Local Address:Port Peer Address:Port
LISTEN 0 128 0.0.0.0:22 0.0.0.0:*
LISTEN 0 128 0.0.0.0:80 0.0.0.0:*
LISTEN 0 128 [::]:22 [::]:*
安装mysql
//安装依赖包
[root@mysql ~]# yum -y install ncurses-devel openssl-devel openssl cmake mariadb-devel ncurses-compat-libs

//创建mysql的用户和组
[root@mysql ~]# useradd -r -M -s /sbin/nologin mysql

//下载源码包
[root@mysql ~]# wget https://downloads.mysql.com/archives/get/p/23/file/mysql-5.7.31-linux-glibc2.12-x86_64.tar.gz
[root@mysql ~]# ls
anaconda-ks.cfg  mysql-5.7.31-linux-glibc2.12-x86_64.tar.gz

//解压mysql源码包
[root@mysql ~]# tar xf mysql-5.7.31-linux-glibc2.12-x86_64.tar.gz -C /usr/local/

//设置软链接并修改属主和属组
[root@mysql ~]# ln -s  /usr/local/mysql-5.7.31-linux-glibc2.12-x86_64 /usr/local/mysql
[root@mysql ~]# chown -R mysql.mysql /usr/local/mysql*

//添加环境变量
[root@mysql ~]# echo 'export PATH=/usr/local/mysql/bin:$PATH' > /etc/profile.d/mysql.sh
[root@mysql ~]# source /etc/profile.d/mysql.sh
[root@mysql ~]# which mysql
/usr/local/mysql/bin/mysql

//建立数据存放目录
[root@mysql ~]# mkdir /opt/data
[root@mysql ~]# chown -R mysql.mysql /opt/data

//初始化数据库
[root@mysql ~]# mysqld --initialize --user=mysql --datadir=/opt/data
#记住这个密码
root@localhost: HJt_/;L3l>EE

//记住密码,把这个生成的临时密码写到a文件中,方便等下查看
[root@mysql ~]# echo 'HJt_/;L3l>EE' > a
[root@mysql ~]# cat a
HJt_/;L3l>EE

//编辑my.cnf文件
[root@mysql ~]# cat >> /etc/my.cnf <<EOF
[mysqld]
basedir = /usr/local/mysql
datadir = /opt/data
socket = /tmp/mysql.sock
port = 3306
pid-file = /opt/data/mysql.pid
user = mysql
skip-name-resolve
EOF

//配置服务启动脚本
[root@mysql ~]# cp /usr/local/mysql/support-files/mysql.server /etc/init.d/mysqld
[root@mysql ~]# cat >> /etc/init.d/mysqld <<EOF
basedir=/usr/local/mysql
datadir=/opt/data
EOF

//启动mysql
[root@mysql ~]# service mysqld start
[root@mysql ~]# ss -antl
State      Recv-Q     Send-Q          Local Address:Port           Peer Address:Port
LISTEN     0          128                   0.0.0.0:22                  0.0.0.0:*
LISTEN     0          128                      [::]:22                     [::]:*
LISTEN     0          80                          *:3306                      *:*


//查看密码,登录数据库设置密码123456
[root@mysql ~]# cat a
HJt_/;L3l>EE
[root@mysql ~]# mysql -uroot -p'HJt_/;L3l>EE'
mysql: [Warning] Using a password on the command line interface can be insecure.
Welcome to the MySQL monitor.  Commands end with ; or \g.
Your MySQL connection id is 2
Server version: 5.7.31

Copyright (c) 2000, 2020, Oracle and/or its affiliates. All rights reserved.

Oracle is a registered trademark of Oracle Corporation and/or its
affiliates. Other names may be trademarks of their respective
owners.

Type 'help;' or '\h' for help. Type '\c' to clear the current input statement.

mysql> set password = password('123456');    //设置密码123456
Query OK, 0 rows affected, 1 warning (0.00 sec)

mysql> quit
Bye

//设置完后配置
[root@mysql ~]# echo '/usr/local/mysql/lib' > /etc/ld.so.conf.d/mysql.conf
[root@mysql ~]# ldconfig
安装php
//安装开发工具包
[root@php ~]# yum -y groups mark install 'Development Tools'

//安装依赖包
[root@php ~]# yum -y install libxml2 libxml2-devel openssl openssl-devel bzip2 bzip2-devel libcurl libcurl-devel libicu-devel libjpeg libjpeg-devel libpng libpng-devel openldap-devel  pcre-devel freetype freetype-devel gmp gmp-devel libmcrypt libmcrypt-devel readline readline-devel libxslt libxslt-devel mhash mhash-devel php-mysqlnd

//安装php
[root@php ~]# yum -y install php-*

[root@php ~]# vim /etc/php-fpm.d/www.conf
......................
;listen = /run/php-fpm/www.sock #注释此行
listen = 0.0.0.0:9000  #添加监听端口
...........................
...........................
; must be separated by a comma. If this value is left blank, connections will be
; accepted from any ip address.
; Default Value: any
listen.allowed_clients = 192.168.110.30  #搜索allowed把此处的IP该为nginx主机的ip

//创建测试页面index.php
[root@php ~]# cat > /usr/local/nginx/html/index.php <<EOF
<?php
     phpinfo();
?>
EOF
[root@php ~]# chown -R nginx.nginx /var/www/html/

//启动php
[root@php ~]# systemctl start php-fpm
测试