HAProxy搭建HTTP和HTTPS负载均衡
HAProxy搭建HTTP负载均衡
环境说明:
| 主机名称 | IP地址 | 需要安装的应用 | 系统版本 |
|---|---|---|---|
| client | 192.168.110.60 | 无 | redhat 8.2 |
| LB | 192.168.110.11 | haproxy | redhat 8.2 |
| RS1 | 192.168.110.12 | httpd | redhat 8.2 |
| RS2 | 192.168.110.13 | httpd | redhat 8.2 |
准备工作:
//关闭防火墙,selinux
#LB
[root@LB ~]# systemctl disable --now firewalld
Removed /etc/systemd/system/multi-user.target.wants/firewalld.service.
Removed /etc/systemd/system/dbus-org.fedoraproject.FirewallD1.service.
[root@LB ~]# sed -i "s/SELINUX=enforcing/SELINUX=disabled/g" /etc/selinux/config
[root@LB ~]# setenforce 0

#RS1
[root@RS1 ~]# systemctl disable --now firewalld
Removed /etc/systemd/system/multi-user.target.wants/firewalld.service.
Removed /etc/systemd/system/dbus-org.fedoraproject.FirewallD1.service.
[root@RS1 ~]# sed -i "s/SELINUX=enforcing/SELINUX=disabled/g" /etc/selinux/config
[root@RS1 ~]# setenforce 0

#RS2
[root@RS2 ~]# systemctl disable --now firewalld
Removed /etc/systemd/system/multi-user.target.wants/firewalld.service.
Removed /etc/systemd/system/dbus-org.fedoraproject.FirewallD1.service.
[root@RS2 ~]# sed -i "s/SELINUX=enforcing/SELINUX=disabled/g" /etc/selinux/config
[root@RS2 ~]# setenforce 0
开始部署:
安装haproxy
详细安装步骤请见:HAProxy安装与配置
配置各个负载的内核参数
//LB
#添加最后两行
[root@LB ~]# cat /etc/sysctl.conf
# sysctl settings are defined through files in
# /usr/lib/sysctl.d/, /run/sysctl.d/, and /etc/sysctl.d/.
#
# Vendors settings live in /usr/lib/sysctl.d/.
# To override a whole file, create a new file with the same in
# /etc/sysctl.d/ and put new settings there. To override
# only specific settings, add a file with a lexically later
# name in /etc/sysctl.d/ and put new settings there.
#
# For more information, see sysctl.conf(5) and sysctl.d(5).
net.ipv4.ip_nonlocal_bind = 1
net.ipv4.ip_forward = 1

[root@LB ~]# sysctl -p
net.ipv4.ip_nonlocal_bind = 1
net.ipv4.ip_forward = 1
安装HTTPD服务
//RS1
#安装httpd
[root@RS1 ~]# yum -y install httpd

#设置开机自启
[root@RS1 ~]# systemctl enable --now httpd

#添加测试网页
[root@RS1 ~]# echo RS1 > /var/www/html/index.html

//RS2
#安装httpd
[root@RS2 ~]# yum -y install httpd

#设置开机自启
[root@RS2 ~]# systemctl enable --now httpd

#添加测试网页
[root@RS2 ~]# echo RS1 > /var/www/html/index.html
提供配置文件
//LB
#创建目录
[root@LB ~]# mkdir /etc/haproxy

#配置文件
[root@LB ~]# vim /etc/haproxy/haproxy.cfg

global
    daemon
    maxconn 256

defaults
    mode http
    timeout connect 5000ms
    timeout client 50000ms
    timeout server 50000ms

frontend http-in
    bind *:80
    default_backend servers

backend servers
    server web01 192.168.110.12:80
    server web02 192.168.110.13:80

#测试文件
[root@LB ~]# haproxy -f /etc/haproxy/haproxy.cfg -c
Configuration file is valid
启动服务
//LB
方式一:
#通过文件的方式直接启动
[root@LB ~]# haproxy -f /etc/haproxy/haproxy.cfg
[root@LB ~]# ss -antl
State     Recv-Q     Send-Q         Local Address:Port         Peer Address:Port
LISTEN    0          128                  0.0.0.0:22                0.0.0.0:*
LISTEN    0          128                  0.0.0.0:80                0.0.0.0:*
LISTEN    0          128                     [::]:22                   [::]:*

方式二:
#编辑service文件,以守护进程的方式启动
[root@LB ~]# vim /usr/lib/systemd/system/haproxy.service
[Unit]
Description=HAProxy Load Balancer
After=syslog.target network.target

[Service]
ExecStartPre=/usr/local/haproxy/sbin/haproxy -f /etc/haproxy/haproxy.cfg   -c -q
ExecStart=/usr/local/haproxy/sbin/haproxy -Ws -f /etc/haproxy/haproxy.cfg  -p /var/run/haproxy.pid
ExecReload=/bin/kill -USR2 $MAINPID

[Install]
WantedBy=multi-user.target

[root@LB ~]# systemctl daemon-reload
[root@LB ~]# systemctl enable --now haproxy
[root@LB ~]# ss -antl
State     Recv-Q     Send-Q         Local Address:Port         Peer Address:Port
LISTEN    0          128                  0.0.0.0:22                0.0.0.0:*
LISTEN    0          128                  0.0.0.0:80                0.0.0.0:*
LISTEN    0          128                     [::]:22                   [::]:*
client端访问测试
//client
#成功访问
[root@localhost ~]# curl 192.168.110.11
RS1
[root@localhost ~]# curl 192.168.110.11
RS2
[root@localhost ~]# curl 192.168.110.11
RS1
[root@localhost ~]# curl 192.168.110.11
RS2
网页访问测试
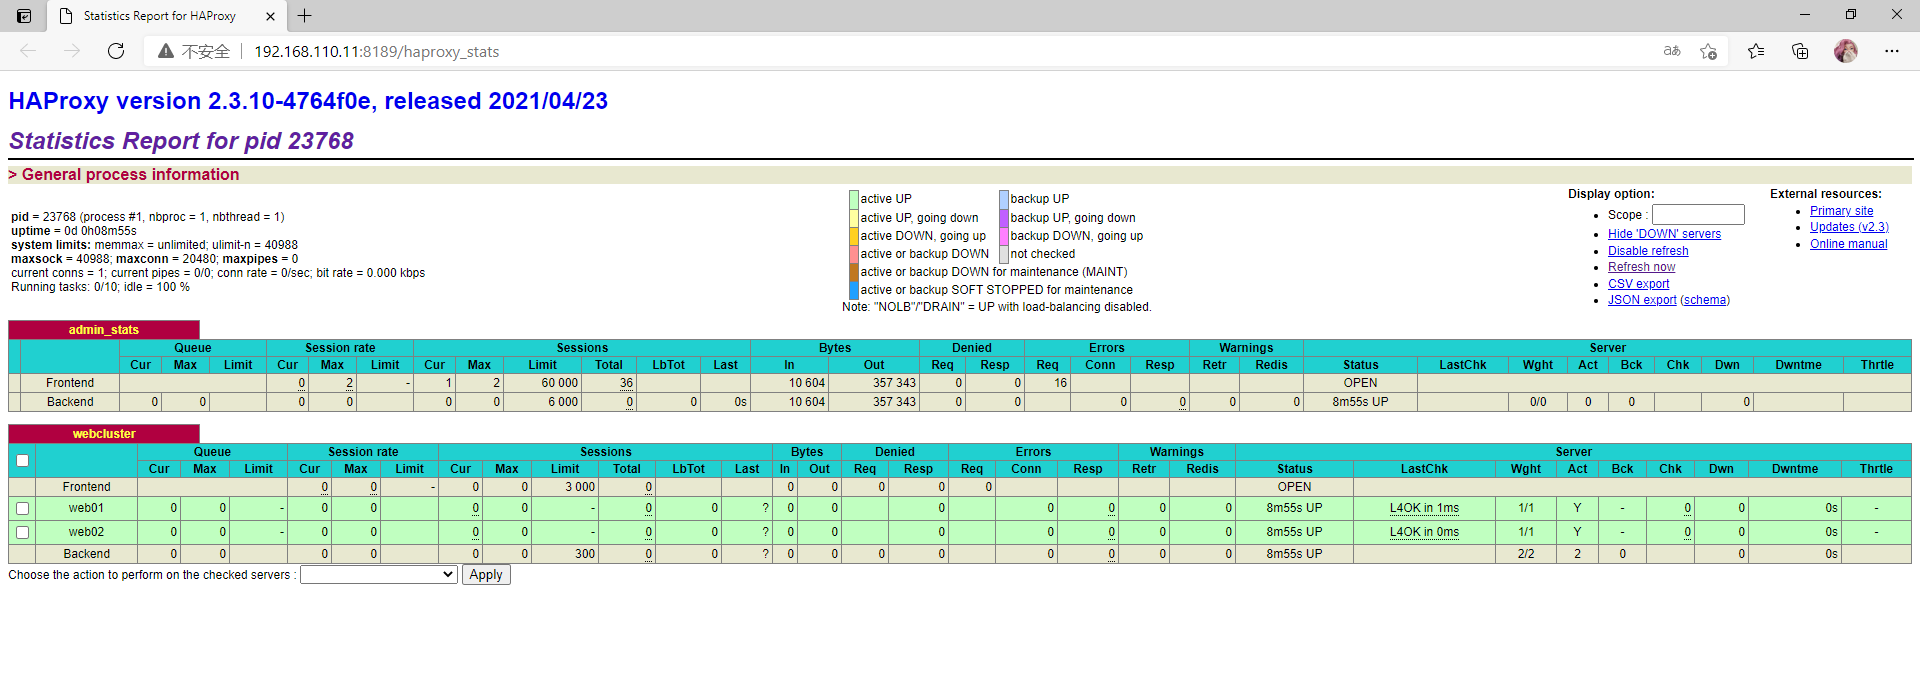
配置haproxy网页界面
//LB
#修改配置文件
[root@LB ~]# vim /etc/haproxy/haproxy.cfg
#--------------全局配置----------------
global
    log 127.0.0.1 local0  info
    #log loghost local0 info
    maxconn 20480
#chroot /usr/local/haproxy
    pidfile /var/run/haproxy.pid
    #maxconn 4000
    user haproxy
    group haproxy
    daemon
#---------------------------------------------------------------------
#common defaults that all the 'listen' and 'backend' sections will
#use if not designated in their block
#---------------------------------------------------------------------
defaults
    mode http
    log global
    option dontlognull
    option httpclose
    option httplog
    #option forwardfor
    option redispatch
    balance roundrobin
    timeout connect 10s
    timeout client 10s
    timeout server 10s
    timeout check 10s
    maxconn 60000
    retries 3
#--------------统计页面配置------------------
listen admin_stats
    bind 0.0.0.0:8189
    stats enable
    mode http
    log global
    stats uri /haproxy_stats            //访问网页后缀URL
    stats realm Haproxy\ Statistics
    stats auth admin:admin              //用户名和密码
    #stats hide-version
    stats admin if TRUE
    stats refresh 30s
#---------------web设置-----------------------
listen webcluster
    bind 0.0.0.0:80
    mode http
    #option httpchk GET /index.html
    log global
    maxconn 3000
    balance roundrobin
    cookie SESSION_COOKIE insert indirect nocache
    server web01 192.168.110.12:80 check inter 2000 fall 5
    server web02 192.168.110.13:80 check inter 2000 fall 5
    #server web01 192.168.80.102:80 cookie web01 check inter 2000 fall 5

//重启haproxy服务
[root@LB]# systemctl restart haproxy
[root@LB]# ss -antl
State     Recv-Q     Send-Q         Local Address:Port         Peer Address:Port
LISTEN    0          128                  0.0.0.0:22                0.0.0.0:*
LISTEN    0          128                  0.0.0.0:8189              0.0.0.0:*
LISTEN    0          128                  0.0.0.0:80                0.0.0.0:*
LISTEN    0          128                     [::]:22                   [::]:*
登录网页(访问LB的IP地址加配置文件网页的URL:192.168.110.11:8189)

输入用户名密码(admin:admin)

HAProxy搭建HTTPS负载均衡
准备工作和环境如上
开始部署:
开启HTTPS
在以上配置基础下进行
//RS1
#安装mod_ssl
[root@RS1 ~]# yum -y install mod_ssl

#重启httpd
[root@RS1 ~]# systemctl restart httpd

#查看443端口
[root@RS1 ~]# ss -antl
State     Recv-Q     Send-Q         Local Address:Port         Peer Address:Port
LISTEN    0          128                  0.0.0.0:22                0.0.0.0:*
LISTEN    0          128                  0.0.0.0:443               0.0.0.0:*
LISTEN    0          128                  0.0.0.0:80                0.0.0.0:*
LISTEN    0          128                     [::]:22                   [::]:*

//RS1
#安装mod_ssl
[root@RS2 ~]# yum -y install mod_ssl

#重启httpd
[root@RS2 ~]# systemctl restart httpd

#查看443端口
[root@RS2 ~]# ss -antl
State     Recv-Q     Send-Q         Local Address:Port         Peer Address:Port
LISTEN    0          128                  0.0.0.0:443               0.0.0.0:*
LISTEN    0          128                  0.0.0.0:80                0.0.0.0:*
LISTEN    0          128                  0.0.0.0:22                0.0.0.0:*
LISTEN    0          128                     [::]:22                   [::]:*
提供配置文件
//LB
#创建目录
[root@LB ~]# mkdir /var/lib/haproxy

#配置文件
[root@LB ~]# vim /etc/haproxy/haproxy.cfg
global
    log 127.0.0.1 local2  info
    maxconn 20480
    chroot /usr/local/haproxy
    pidfile /var/run/haproxy.pid
    stats socket  /var/lib/haproxy/haproxy.sock mode 600 level admin
    user haproxy
    group haproxy
    daemon
    nbproc 1
    nbthread 4
    spread-checks 5

defaults
    mode http
    log global
    option dontlognull
    option httpclose
    option  http-keep-alive
    option redispatch
    balance roundrobin
    timeout connect 60s
    timeout client 30s
    timeout server 30s
    timeout check 10s
    maxconn 60000
    retries 3

listen https
    bind 0.0.0.0:443
    log global
    mode tcp
    balance  roundrobin
    server web01 192.168.110.12:443 check inter 2s fall 3 rise 5
    server web02 192.168.110.13:443 check inter 2s fall 3 rise 5
重启服务
//LB
#测试文件
[root@LB ~]# haproxy -f /etc/haproxy/haproxy.cfg -c
Configuration file is valid

#重启haproxy
[root@LB ~]# systemctl restart haproxy

#查看443端口
[root@LB ~]# ss -antl
State     Recv-Q     Send-Q         Local Address:Port         Peer Address:Port
LISTEN    0          128                  0.0.0.0:22                0.0.0.0:*
LISTEN    0          128                  0.0.0.0:443               0.0.0.0:*
LISTEN    0          128                     [::]:22                   [::]:*
client访问测试
//client
#成功访问
[root@client ~]# curl -k https://192.168.110.11
RS1
[root@client ~]# curl -k https://192.168.110.11
RS2
[root@client ~]# curl -k https://192.168.110.11
RS1
[root@client ~]# curl -k https://192.168.110.11
RS2

