zabbix监控邮箱告警的三种配置方式
zabbix监控邮箱告警的三种配置方式
环境说明:
| 环境 | IP地址 | 主机名 | 需要安装的应用 | 系统版本 |
|---|---|---|---|---|
| 服务端 | 192.168.110.30 | zabbix.example.com | lamp架构 zabbix_server zabbix_agent | redhat 8 |
| 客户端 | 192.168.110.40 | zabbix-agent | zabbix_agent | redhat 8 |
准备工作:
zabbix服务端和客户端的安装详请见:zabbix监控配置流程+实例演示
//关闭防火墙和selinux
#服务端和客户端
systemctl disable --now firewalld
setenforce 0
sed -ri 's/^(SELINUX=).*/\1disabled/g' /etc/selinux/config
通过系统本地邮箱服务发送邮件
安装邮箱服务
//服务端
#安装工具包
#mail命令
[root@zabbix-server ~]# yum -y install mailx
#sendmail命令
[root@zabbix-server ~]# yum -y install postfix

#启动postfix
[root@zabbix-server ~]# systemctl enable --now postfix
Created symlink /etc/systemd/system/multi-user.target.wants/postfix.service → /usr/lib/systemd/system/postfix.service.

#查看25号端口,邮箱服务端口是25
[root@zabbix-server ~]# ss -antl
State     Recv-Q    Send-Q         Local Address:Port          Peer Address:Port
LISTEN    0         128                  0.0.0.0:9000               0.0.0.0:*
LISTEN    0         128                  0.0.0.0:22                 0.0.0.0:*
LISTEN    0         100                127.0.0.1:25                 0.0.0.0:*
LISTEN    0         128                  0.0.0.0:10050              0.0.0.0:*
LISTEN    0         128                  0.0.0.0:10051              0.0.0.0:*
LISTEN    0         80                         *:3306                     *:*
LISTEN    0         128                        *:80                       *:*
LISTEN    0         128                     [::]:22                    [::]:*
LISTEN    0         100                    [::1]:25                    [::]:*
当主机名是zabbix-server时,收到的邮箱会在垃圾箱中
//服务端
#主机名信息
[root@zabbix-server ~]# hostnamectl
   Static hostname: zabbix-server
         Icon name: computer-vm
           Chassis: vm
        Machine ID: 21b555e69eab493c89746e58f36d874b
           Boot ID: 01018fe38c734cf183b66d3ce49d5751
    Virtualization: vmware
  Operating System: Red Hat Enterprise Linux 8.2 (Ootpa)
       CPE OS Name: cpe:/o:redhat:enterprise_linux:8.2:GA
            Kernel: Linux 4.18.0-193.el8.x86_64
      Architecture: x86-64

#发送邮件测试
#echo "邮件内容" | mail -s "邮件标题" 邮箱地址
[root@zabbix-server ~]# echo "test" | mail -s "20210426" 643677729@qq.com
邮件发送到了垃圾箱

此时我们修改主机名,在邮箱设置中加上域名白名单
//服务端
#主机名信息
[root@zabbix ~]# hostnamectl
   Static hostname: zabbix.example.com
         Icon name: computer-vm
           Chassis: vm
        Machine ID: 21b555e69eab493c89746e58f36d874b
           Boot ID: 01018fe38c734cf183b66d3ce49d5751
    Virtualization: vmware
  Operating System: Red Hat Enterprise Linux 8.2 (Ootpa)
       CPE OS Name: cpe:/o:redhat:enterprise_linux:8.2:GA
            Kernel: Linux 4.18.0-193.el8.x86_64
      Architecture: x86-64
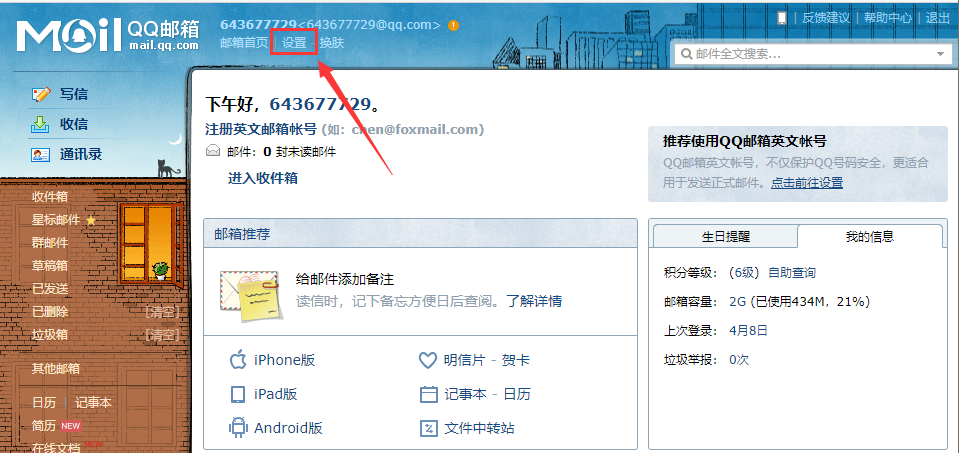
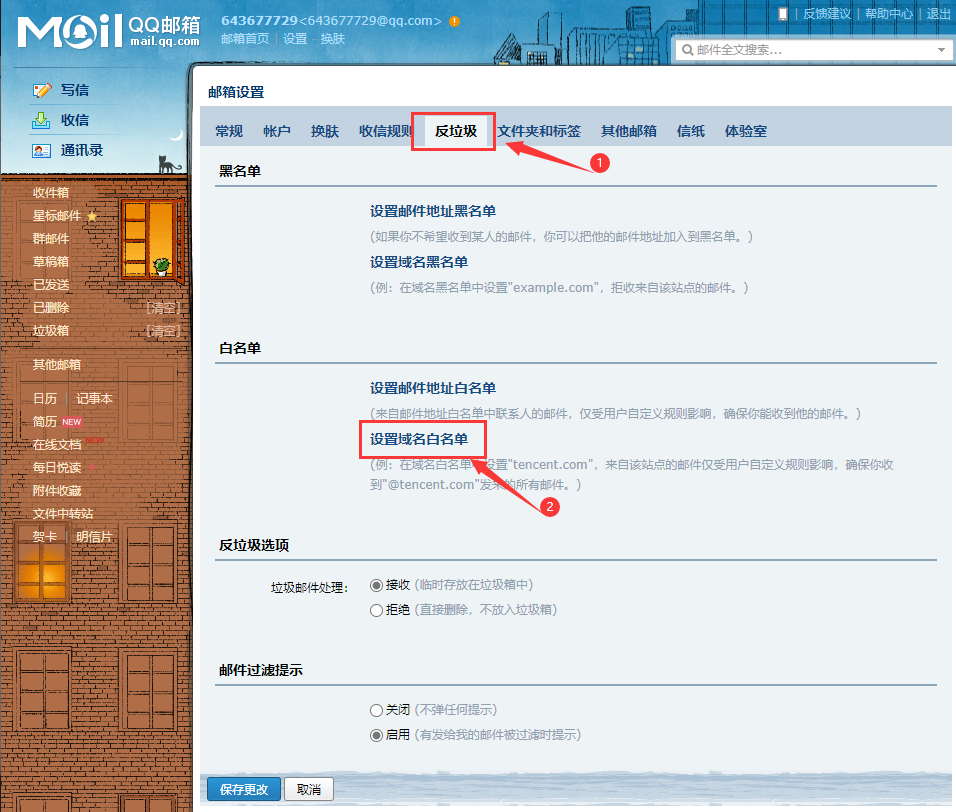
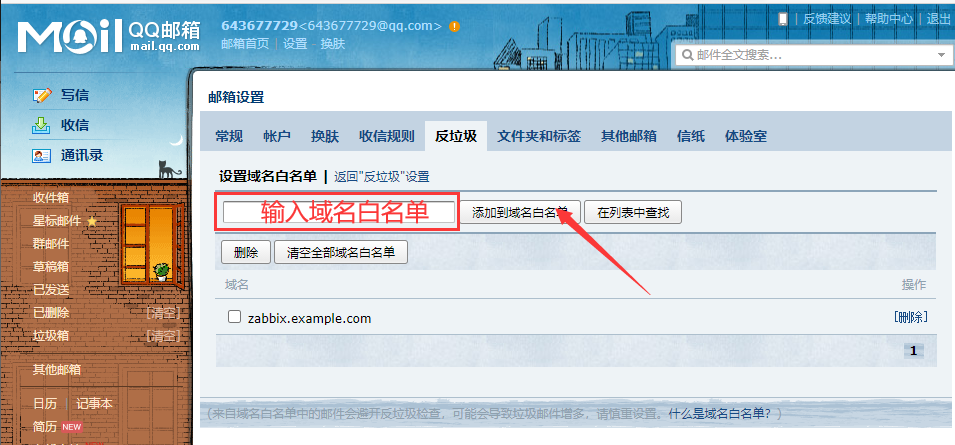
在邮箱中设置白名单
- 点击设置
- 点击反垃圾--->点击设置域名白名单
- 输入域名白名单(zabbix.example.com)--->点击添加域名白名单
发送邮箱测试
//服务端
[root@zabbix ~]# echo 'test1' | mail -s '20210426' 643677729@qq.com
邮箱成功发送到收件箱

方式一:web界面配置第三方邮箱告警
配置详情参考文章:zabbix监控配置流程+实例演示(第三方邮箱告警)
方式二:通过脚本发送报警邮件(本地系统邮箱)
配置告警脚本
本地邮箱告警脚本目录默认时 /usr/local/share/zabbix/alertscripts
//服务端
#设置告警脚本目录
[root@zabbix ~]# vim /usr/local/etc/zabbix_server.conf

### Option: AlertScriptsPath
#       Full path to location of custom alert scripts.
#       Default depends on compilation options.
#       To see the default path run command "zabbix_server --help".
#
# Mandatory: no
# Default:
 AlertScriptsPath=/usr/local/share/zabbix/alertscripts   //取消注释并修改为/usr/local/share/下的绝对路径

#重启zabbix服务
[root@zabbix ~]# pkill zabbix
[root@zabbix ~]# ss -antl
State     Recv-Q     Send-Q         Local Address:Port         Peer Address:Port
LISTEN    0          128                  0.0.0.0:9000              0.0.0.0:*
LISTEN    0          128                  0.0.0.0:22                0.0.0.0:*
LISTEN    0          100                127.0.0.1:25                0.0.0.0:*
LISTEN    0          80                         *:3306                    *:*
LISTEN    0          128                        *:80                      *:*
LISTEN    0          128                     [::]:22                   [::]:*
LISTEN    0          100                    [::1]:25                   [::]:*
[root@zabbix ~]# zabbix_server
[root@zabbix ~]# zabbix_agentd
[root@zabbix ~]# ss -antl
State     Recv-Q    Send-Q         Local Address:Port          Peer Address:Port
LISTEN    0         128                  0.0.0.0:9000               0.0.0.0:*
LISTEN    0         128                  0.0.0.0:22                 0.0.0.0:*
LISTEN    0         100                127.0.0.1:25                 0.0.0.0:*
LISTEN    0         128                  0.0.0.0:10050              0.0.0.0:*
LISTEN    0         128                  0.0.0.0:10051              0.0.0.0:*
LISTEN    0         80                         *:3306                     *:*
LISTEN    0         128                        *:80                       *:*
LISTEN    0         128                     [::]:22                    [::]:*
LISTEN    0         100                    [::1]:25                    [::]:*

#编写脚本
[root@zabbix ~]# vim /usr/local/share/zabbix/alertscripts/sendmail.sh

#!/bin/bash

MASSAGE=$(echo $2 | tr "\r\n" "\n")
SUBJECT=$(echo $3 | tr "\r\n" "\n")
MAILTO=$1

echo "$MESSAGE" | mail -s "$SUBJECT" $MAILTO

#给脚本执行权限
[root@zabbix ~]# chmod +x /usr/local/share/zabbix/alertscripts/sendmail.sh
[root@zabbix ~]# ll /usr/local/share/zabbix/alertscripts/
total 4
-rwxr-xr-x. 1 root root 141 Apr 27 20:20 sendmail.sh

#测试
[root@zabbix ~]# su - zabbix -s /bin/bash
Last login: Tue Apr 27 20:29:47 CST 2021 on pts/1
su: warning: cannot change directory to /home/zabbix: No such file or directory
[zabbix@zabbix root]$ ls /usr/local/share/zabbix/alertscripts/
sendmail.sh

#手动执行脚本,发送邮箱
[zabbix@zabbix root]$ /usr/local/share/zabbix/alertscripts/sendmail.sh 643677729@qq.com "123" "test123"
邮箱成功收到

web界面配置
需要先完成下面三项配置:
- 添加主机
- 自定义监控项
- 触发器
以上三项配置可以参考文档:zabbix监控配置流程+实例演示
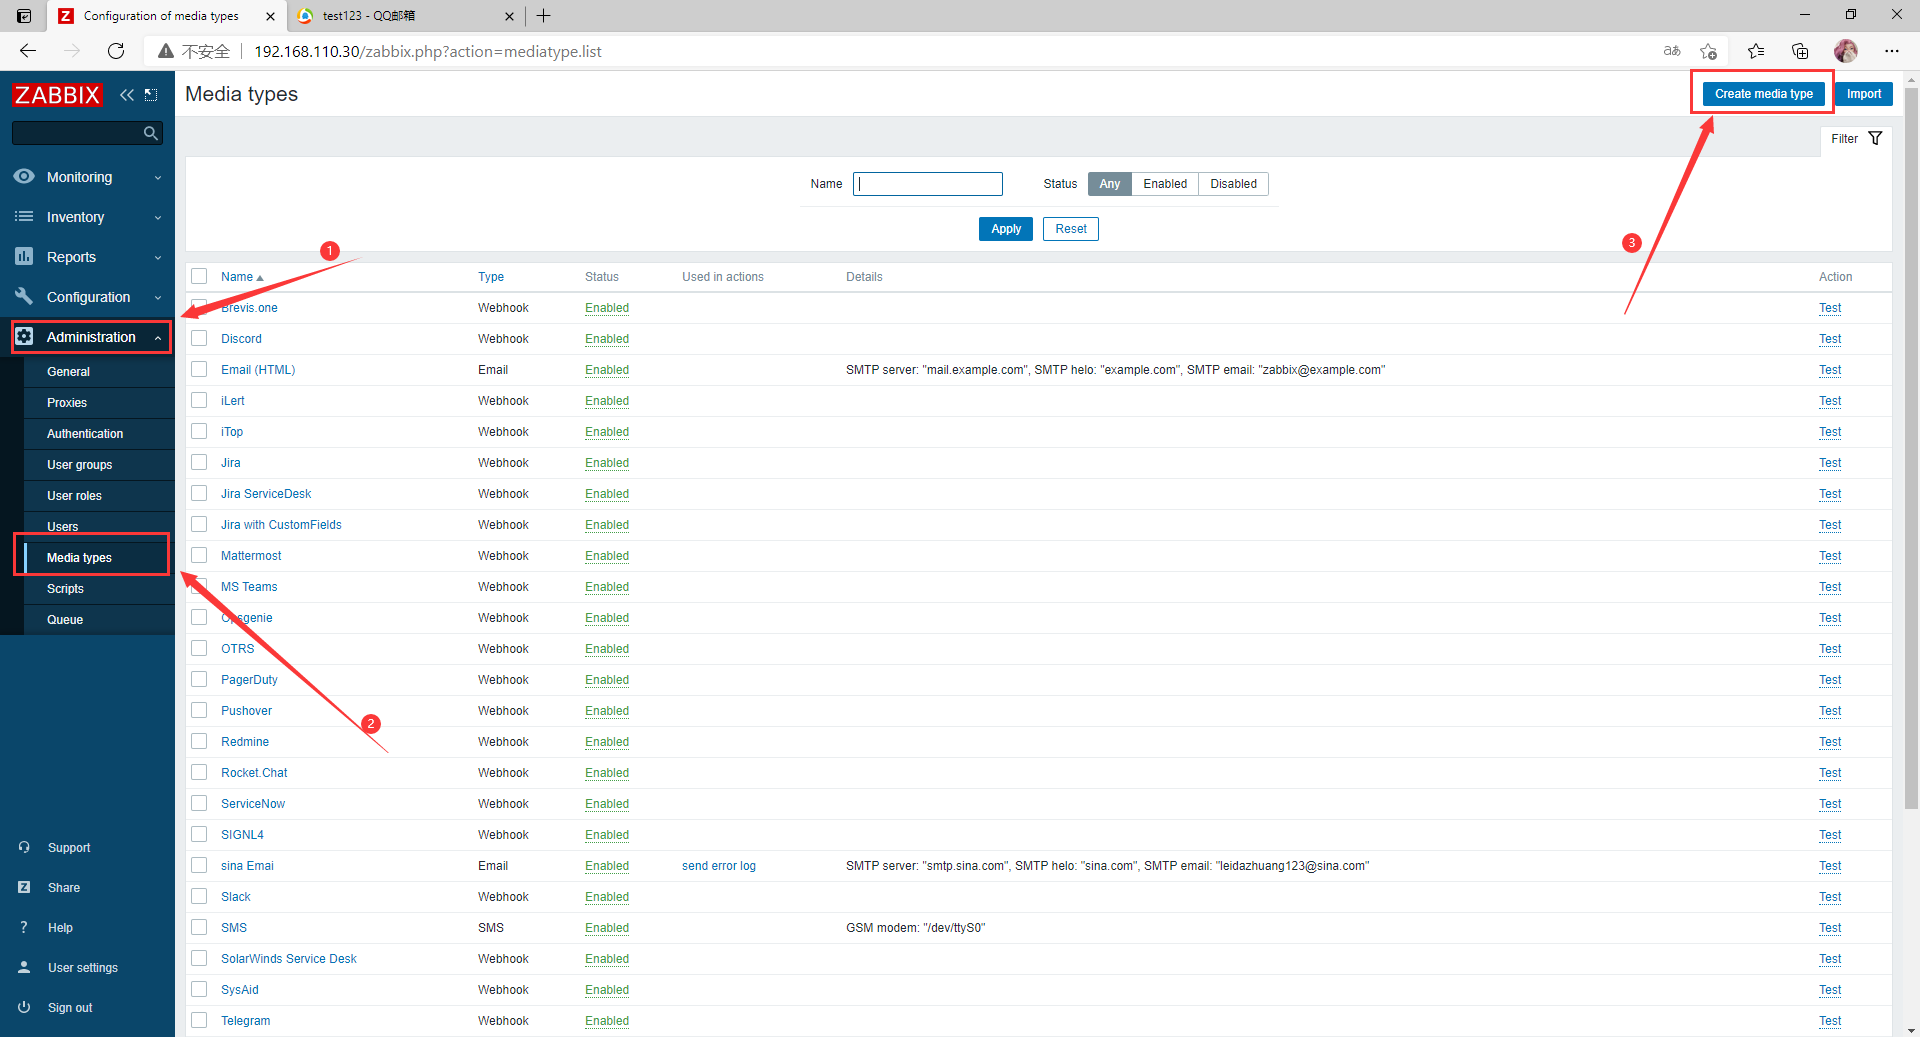
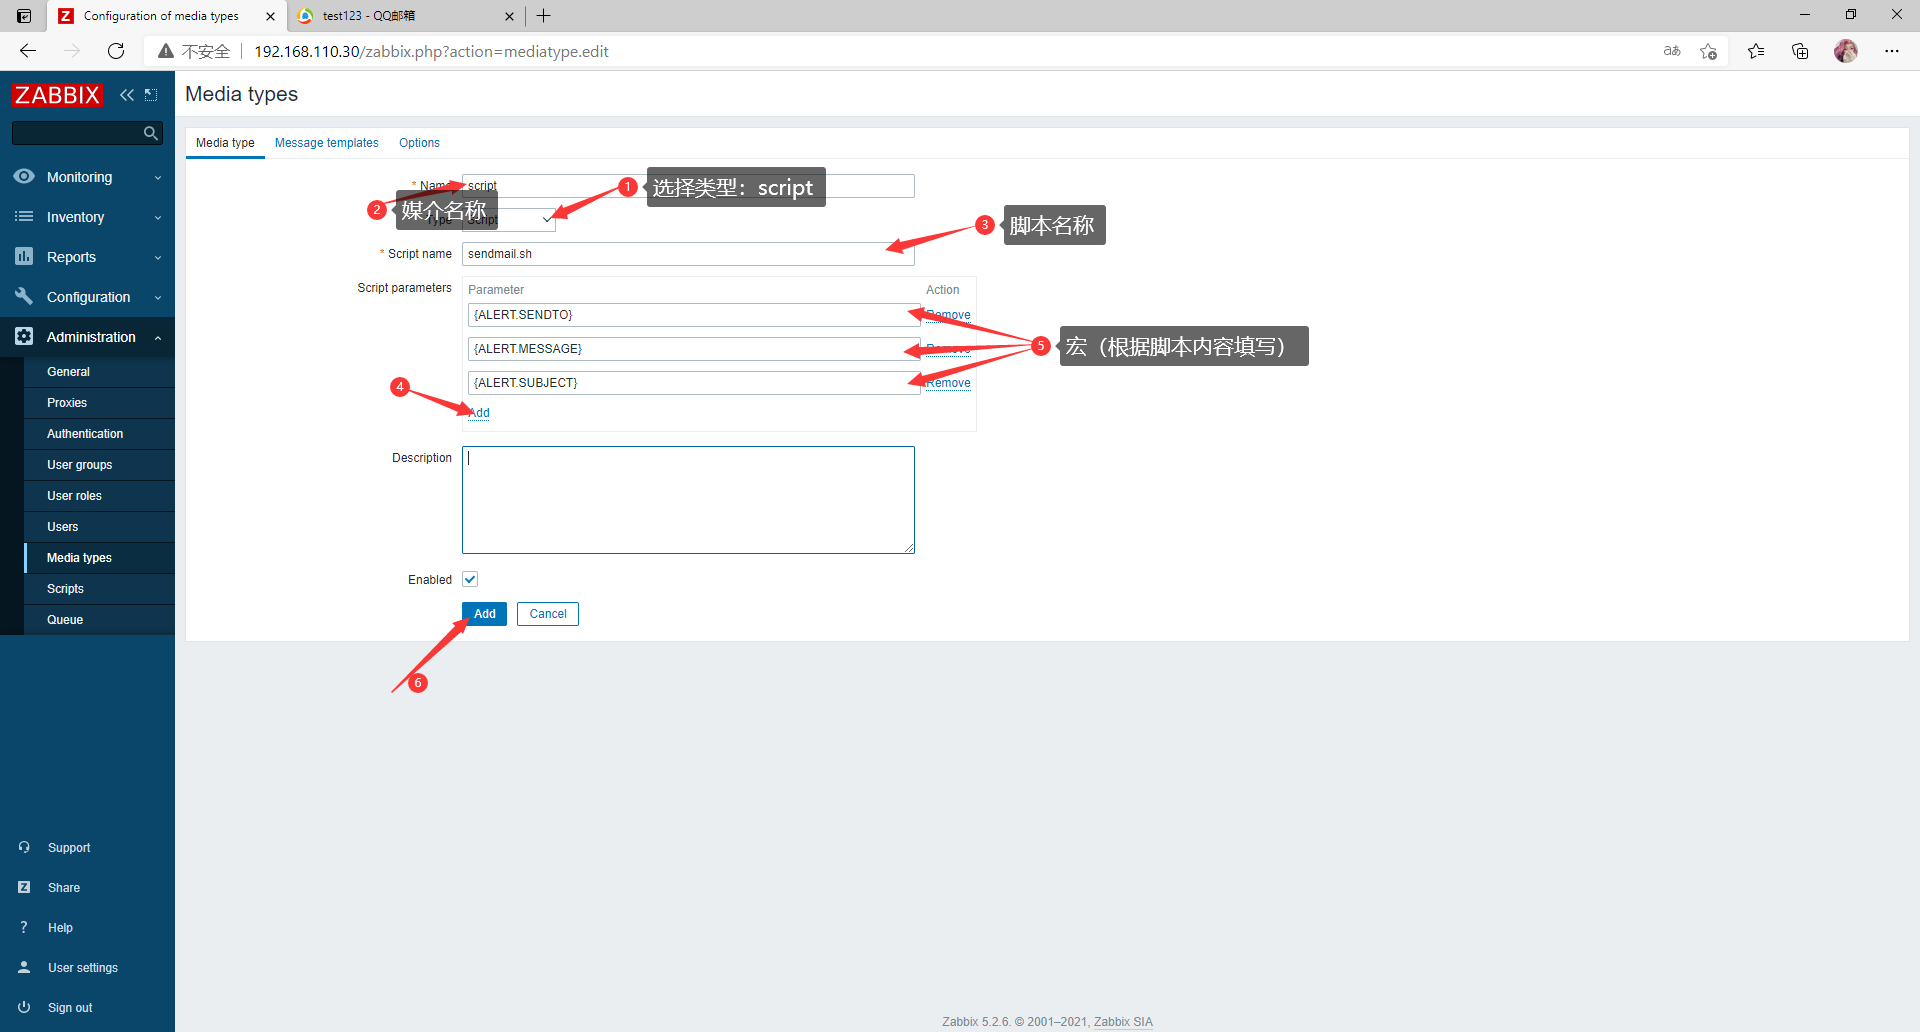
第一步:添加媒介
- 点击 Administration--->Media types--->Ceate media type
- 添入信息
- 添加信息模板
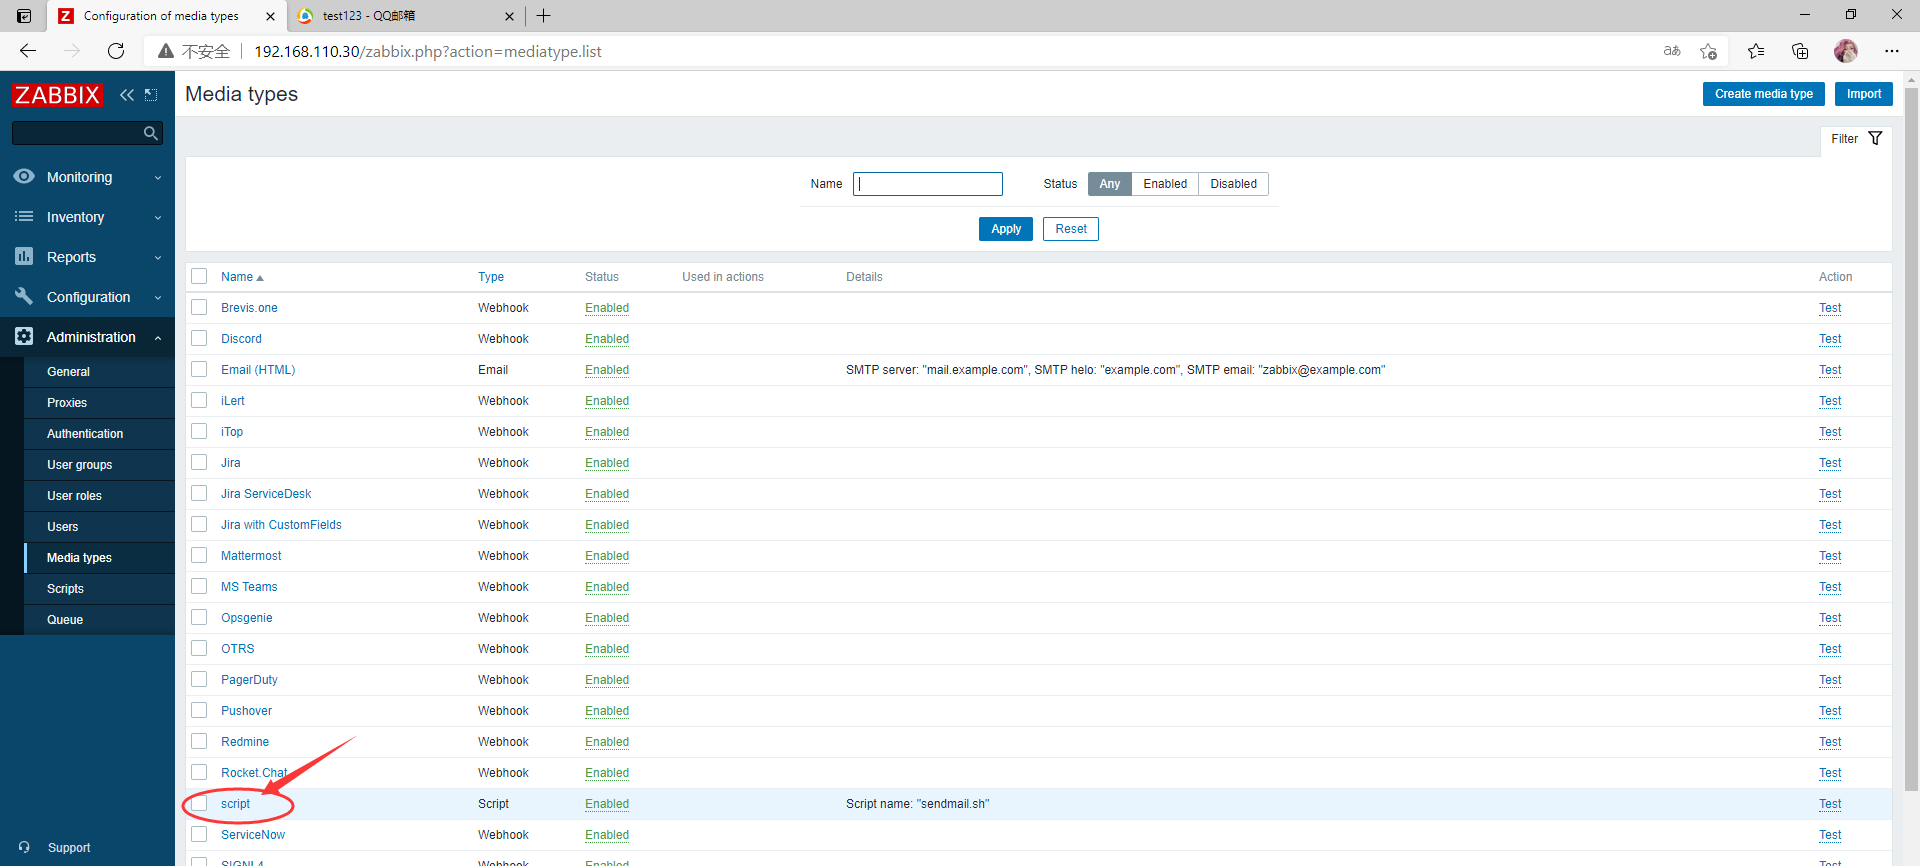
点击媒介script
选择模板信息
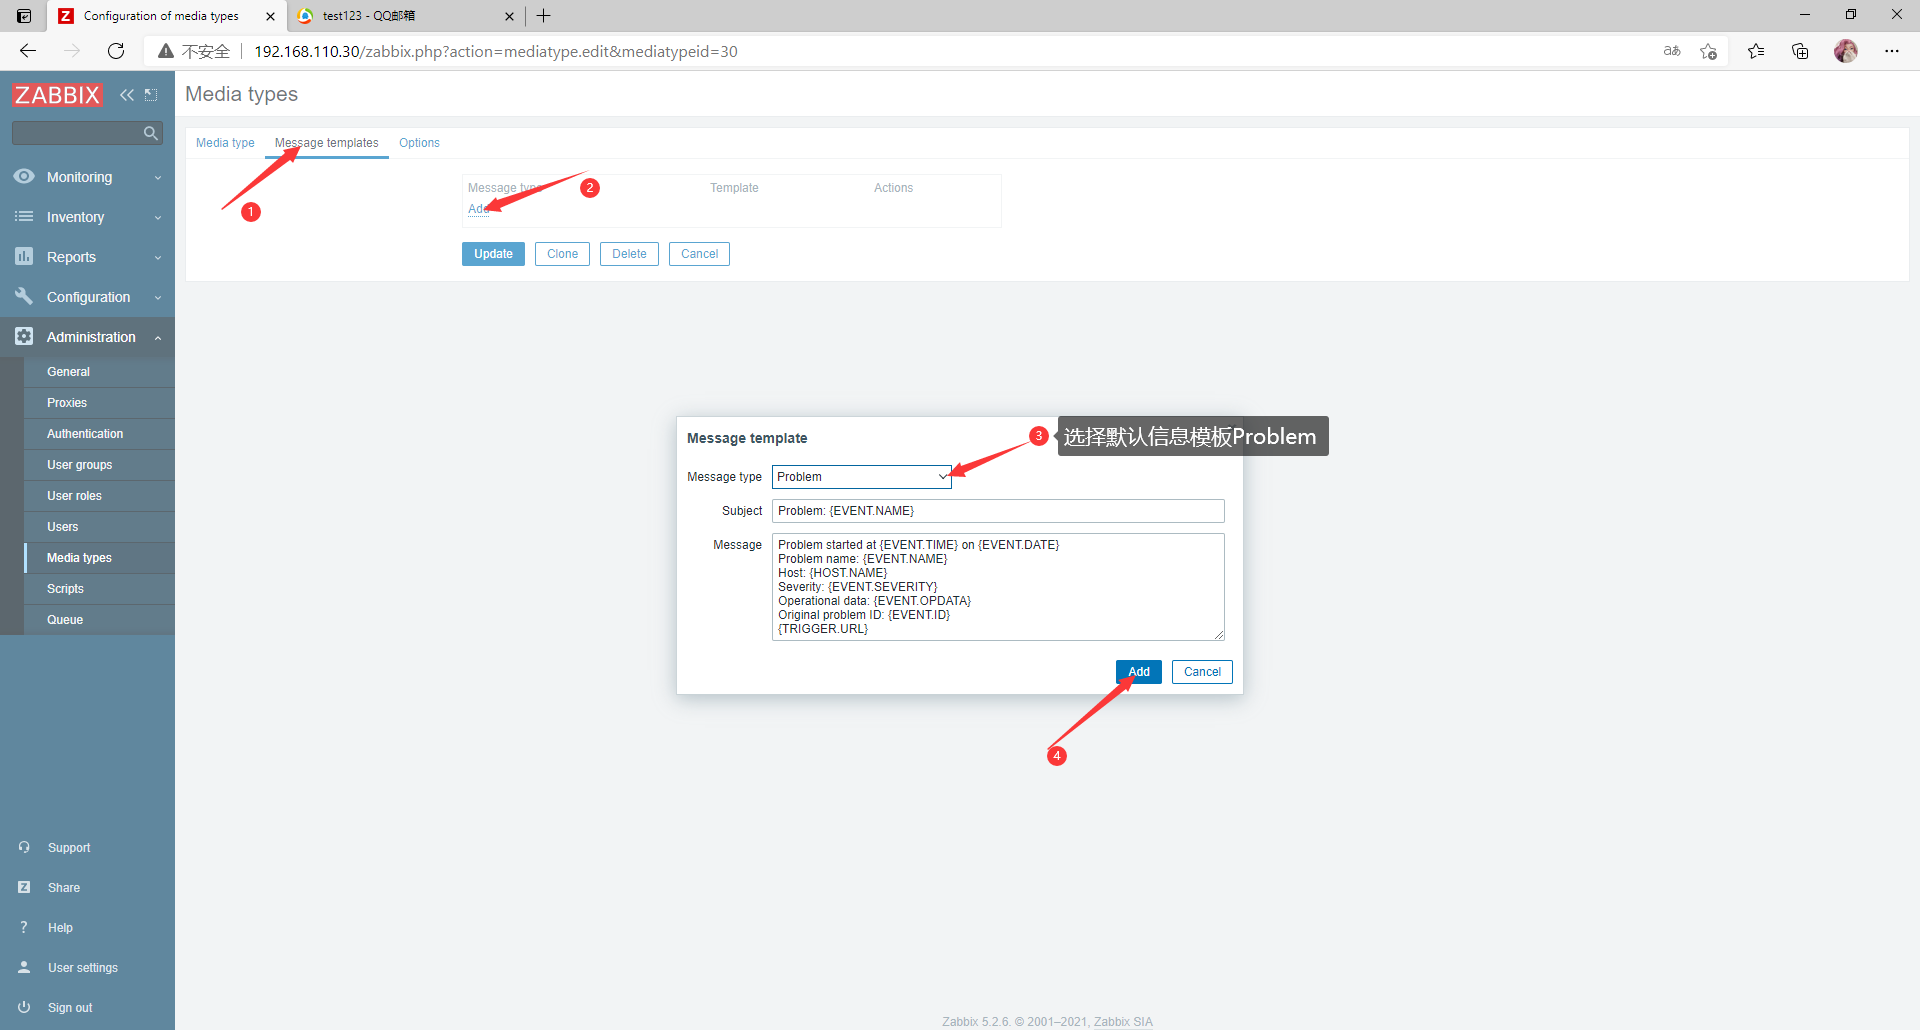
点击update

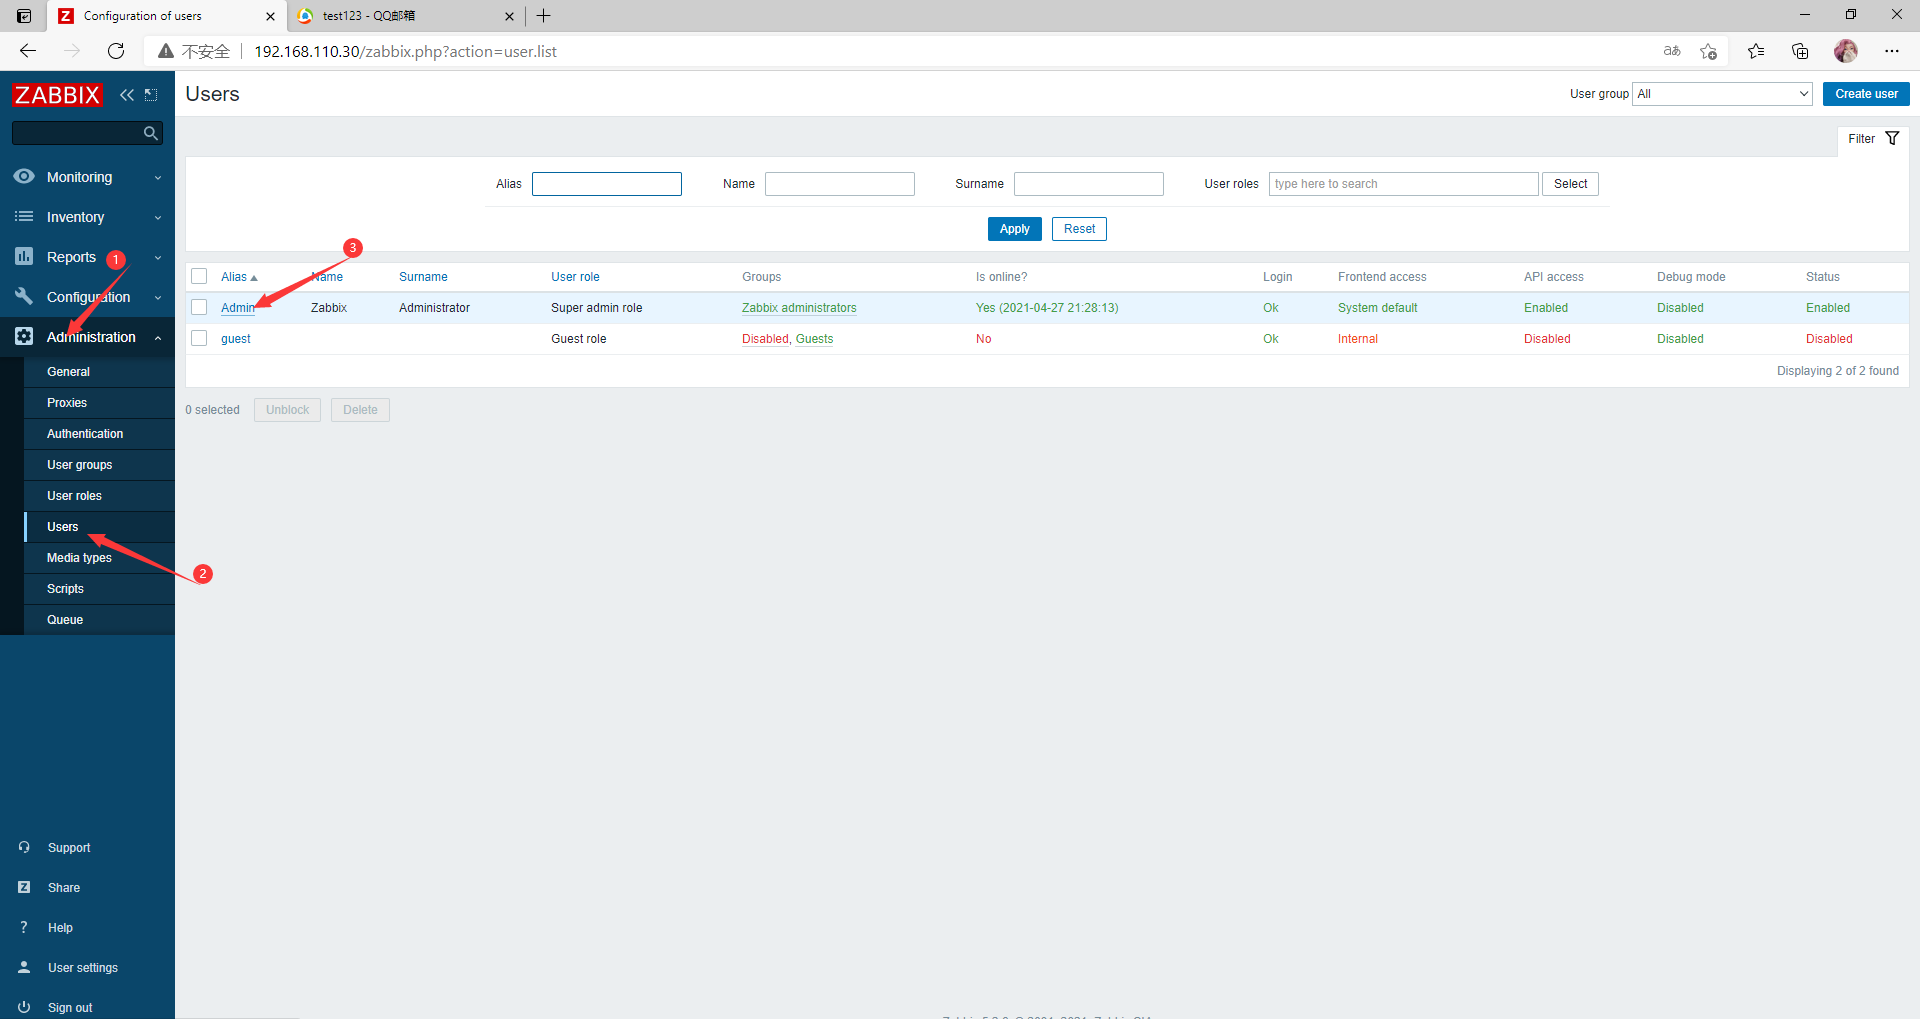
第二步:设置收件人
- 点击 Administration--->Users--->Admin
- 添入信息

- 添加完成

第三步:设置动作
- 点击Configuration--->Actions--->Create action

- 配置动作
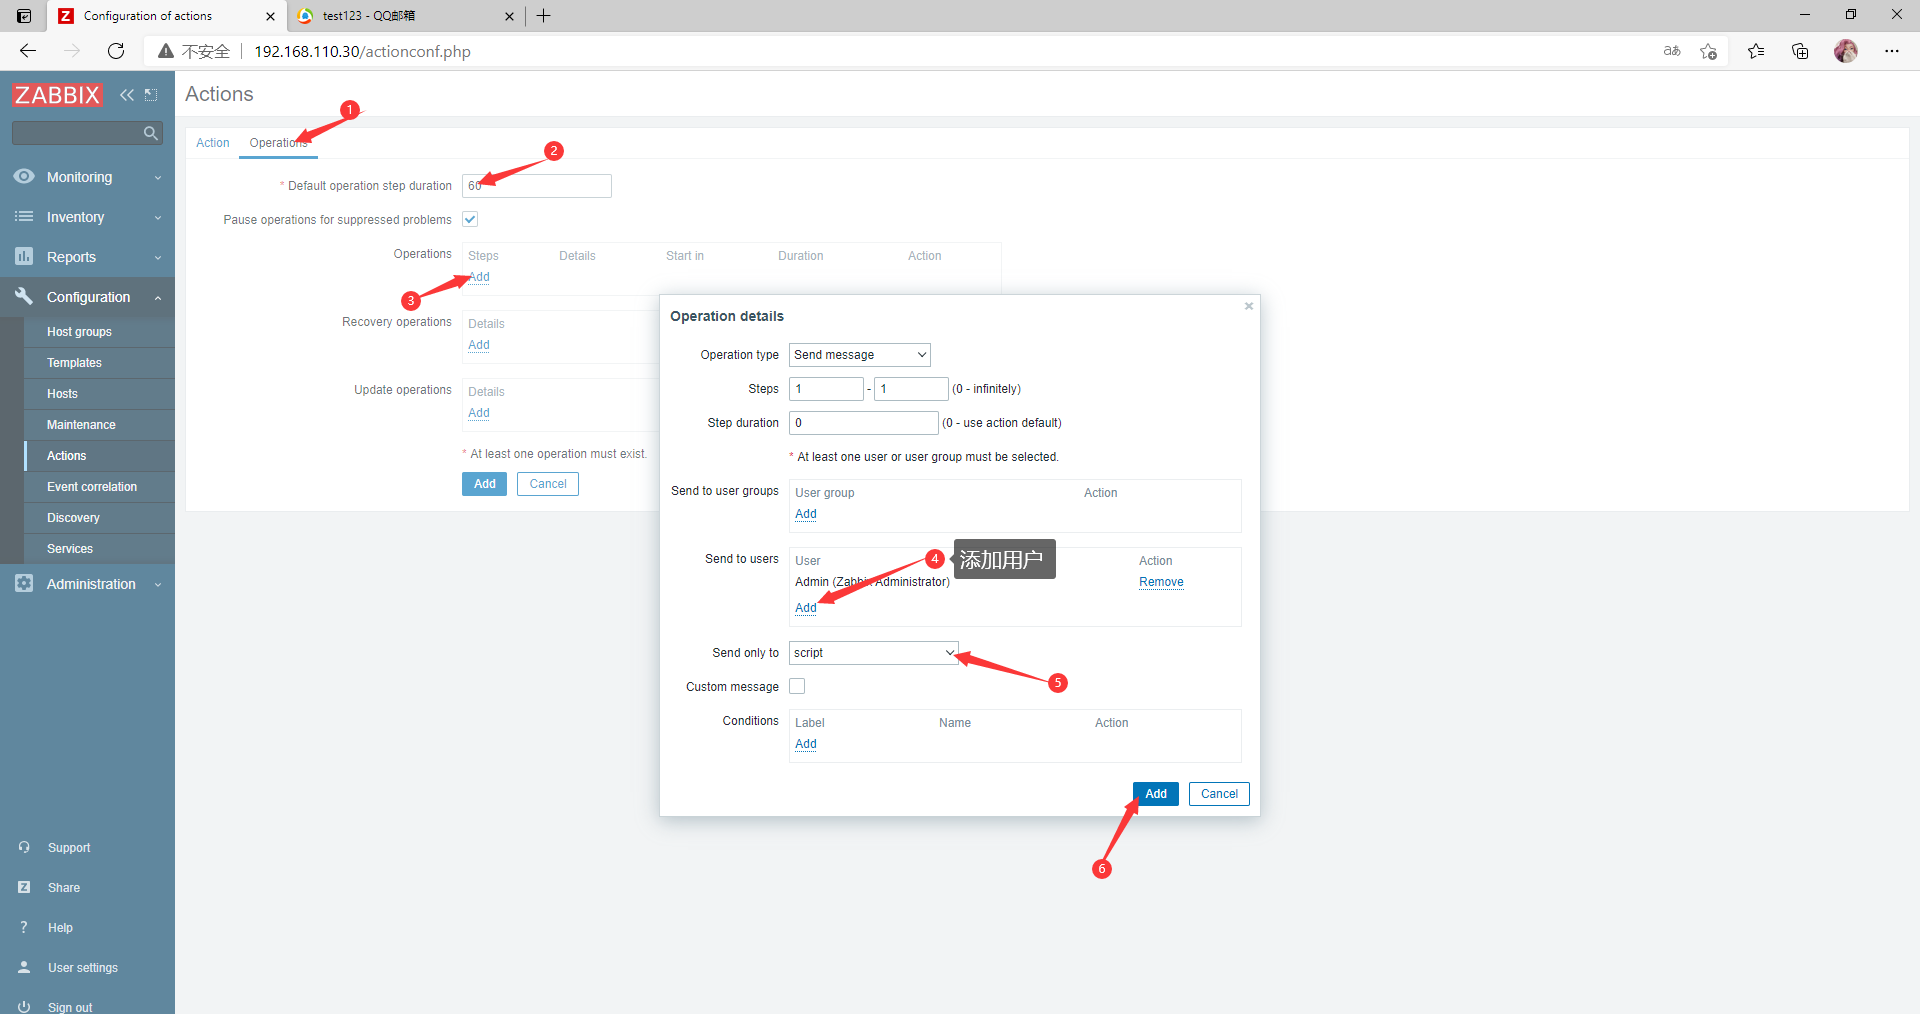
点击Action

创建成功

第四步:验证
触发触发器
[root@zabbix-agent ~]# echo 1231312dsd >> /tmp/abc

方式三:通过脚本发送报警邮件(第三方邮箱)
配置mail.rc
SMTP的主要配置如下:
set smtp=smtps://smtp.xxx.com:465   # 这里填入smtp地址
set smtp-auth=login                 # 认证方式
set smtp-auth-user=user@xxx.com     # 这里输入邮箱账号
set smtp-auth-password=password     # 这里填入密码
set ssl-verify=ignore               # 忽略证书警告
set nss-config-dir=/etc/pki/nssdb   # 证书所在目录
set from=user@xxx.com               # 设置发信人邮箱和昵称
#set smtp-use-starttls=yes          # STARTTLS时使用
文件默认在 /etc/mail.rc 下
//服务端
#配置mail.rc文件,最后一行添加配置
[root@zabbix ~]# vim /etc/mail.rc
set smtp=smtp.163.com
set smtp-auth=login
set smtp-auth-user=leidazhuang123@163.com
set smtp-auth-password=xxxxxxxxxxx          //这里是网易邮箱的授权码
set from=leidazhuang123@163.com
web网页配置
需要先完成下面三项配置:
- 添加主机
- 自定义监控项
- 触发器
以上三项配置可以参考文档:zabbix监控配置流程+实例演示
第一步:添加媒介
- 点击 Administration--->Media types--->Ceate media type

- 添入信息

- 添加信息模板
点击媒介script

选择模板信息

点击update

第二步:设置收件人
- 点击 Administration--->Users--->Admin

- 添入信息
- 添加完成
第三步:设置动作
- 点击Configuration--->Actions--->Create action

- 配置动作

点击Action

创建成功

第四步:测试
触发触发器
[root@zabbix-agent ~]# echo 1231312dsd >> /tmp/abc

