使用Client Credentials保护API
Overview
先借用概念篇里的一副图来说明接下来我们要做什么:
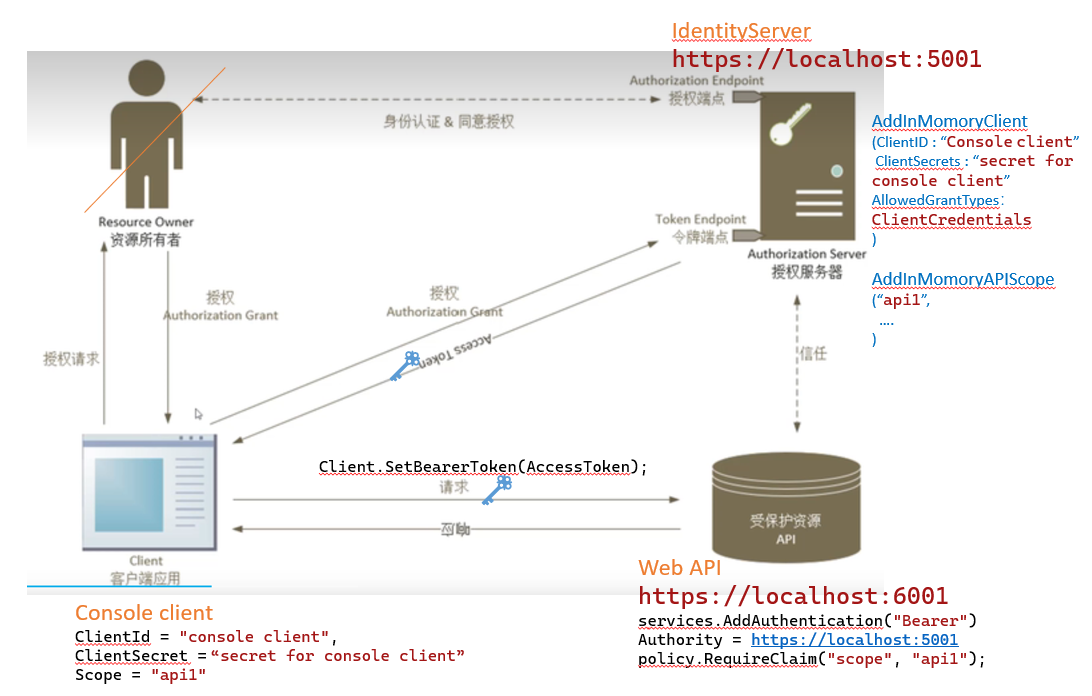
在这个场景中的角色有三个:
- 一个ASP.NET CORE Web API 资源(https://localhost:6001) 需要保护,
- 一个Console client(C# console) 需要访问Web API资源,
- 一个IdentityServer(https://localhost:5001)
注意在这个假设的场景中,没有Interactive User(Resource Owner),

Console Client 不代表用户,
它可能也是一个服务器应用,比如用来获取Web API进行一些数据提取整理,
它可能是一个自动化测试程序,用来对Web API进行集成测试

CrantTypes.ClientCredentials 一般用在服务器对服务器的场景,采用ClientId/ClientSecret方式进行授权,

可以简单认为:Console Client就代表了拥有资源的用户,“ClientID”和"ClientSecret"就相当于登录的用户名和密码,所以这二两个信息千万不能泄露。
相较于用户在互联中使用密码,machine to machine comnunication安全相对有保障。
第一步:添加Web API application
就是一个普通的ASP.NET Core Web API ,有3个地方要注意:
1. 添加Authentication Service和Middleware用来:
- validate the incoming token to make sure it is coming from a trusted issuer
- validate that the token is valid to be used with this api (aka audience)
相关代码如下:


using Microsoft.IdentityModel.Tokens;

var builder = WebApplication.CreateBuilder(args);

// Add services to the container.

builder.Services.AddControllers();
// Learn more about configuring Swagger/OpenAPI at https://aka.ms/aspnetcore/swashbuckle
builder.Services.AddEndpointsApiExplorer();
builder.Services.AddSwaggerGen();

//authentication
builder.Services.AddAuthentication("Bearer")
            .AddJwtBearer("Bearer", options =>
            {
                options.Authority = "https://localhost:5001";

                options.TokenValidationParameters = new TokenValidationParameters
                {
                    ValidateAudience = false
                };
            });


var app = builder.Build();

// Configure the HTTP request pipeline.
if (app.Environment.IsDevelopment())
{
    app.UseSwagger();
    app.UseSwaggerUI();
}


app.UseHttpsRedirection();

app.UseAuthentication();
app.UseAuthorization();

app.MapControllers();

app.Run();
其中,
AddAuthentication把 authentication services 添加到DI,并且配置Bearer作为默认的 scheme.
UseAuthentication添加 authentication 中间件,这样每一次调用都需要做authentication.=> 可以看到,API 端 是通过添加的authentication中间件实现对http request的authentication,只需要引用Microsoft.IdentityModel.Tokens,而不需要依赖任何IdentityServer4的包。
UseAuthorization添加authorization middleware 中间件, 阻止未知client访问我们的 API endpoint.
如果尝试用Postman或者浏览器访问https://localhost:6001/identity,则会返回401.
2. 给要保护的API(Controller)添加Authorize标签
[ApiController]
[Route("[controller]")]
[Authorize] // <--添加标签,以表明当前API资源需要Authorization
public class WeatherForecastController : ControllerBase
3. 添加一个新的Controller—— IdentityController,表示另外一种受保护资源类型(用户身份数据标识信息(Identity Data,aka Claims),比如姓名或邮件地址等)
 [Route("identity")]
    [Authorize]
    public class IdentityController : ControllerBase
    {
        [HttpGet]
        public IActionResult Get()
        {
            return new JsonResult(from c in User.Claims select new { c.Type, c.Value });
        }
    }
最后,我们修改lanchSettings.json把 applicationUrl设置为”https://localhost:6001“。
第二步:搭建授权服务器
选择模板
我们选择IdentityServer提供的 templates 中最基本的“is4empty”模板作为我们的project脚手架:
#事先需要用dotnet new 带 “-i”参数安装IdentityServer4.Templates模板
dotnet new -i IdentityServer4.Templates
dotnet new is4empty -n IdentityServer
当然,你也可以选择新建空的ASP.NET CORE MVC 项目作为脚手架,然后一步步配置服务和Host (本篇中不需要enable MVC)。
配置IdentityServer
配置一个鉴权服务器项目最重要2步是添加Identity Server中间件和相关Services,这也体现了IdentityServer的定义:
IdentityServer is a combination of middleware and services, All configuration is done in your startup class.
1.添加IdentityServer中间件
app.UseIdentityServer();
2.添加和配置IdentityServer相关services 到DI:
var builder = services.AddIdentityServer(options =>
            {
                // see https://identityserver4.readthedocs.io/en/latest/topics/resources.html
                options.EmitStaticAudienceClaim = true;
            })
                .AddInMemoryIdentityResources(Config.IdentityResources)
                .AddInMemoryApiScopes(Config.ApiScopes)
                .AddInMemoryClients(Config.Clients);
在Config配置里定义了Client相关信息信息和ApiSCope:
public static class Config
    {
        public static IEnumerable<IdentityResource> IdentityResources =>
            new IdentityResource[]
            {
                new IdentityResources.OpenId()
            };

        public static IEnumerable<ApiScope> ApiScopes =>
            new ApiScope[]
            { new ApiScope("api1", "My API")};//api1 & 'My API' does not exist.


        public static IEnumerable<Client> Clients =>
            new Client[]
            {
               new Client
               {
                   ClientId = "console client",
                   // no interactive user, use the clientid/secret for authentication
                   AllowedGrantTypes = GrantTypes.ClientCredentials,
                   // secret for authentication
                   ClientSecrets =
                   {
                       new Secret("secret for console client".Sha256())
                   },
                   // scopes that client has access to
                   AllowedScopes = { "api1" }
               }
            };
    }
测试IdentityServer
我们知道一个IdentityServer会包含一系列标准端点,比如:
- Authorize endpoint: 默认url为/connect/authorize,该端点的作用是允许end-user 通过浏览器访问获取access token或者authorization code进行authentication
访问authoriz endpoint 需要提供相应验证字段,举个例子:
GET /connect/authorize?
    client_id=client1&
    scope=openid email api1&
    response_type=id_token token&
    redirect_uri=https://myapp/callback&
    state=abc&
    nonce=xyz
- Token endpoint: 默认url为 /connect/token, 该端点的作用是供各类客户端以编程方式获取 access token
访问Authorize endpoint需要使用GET,耳访问Token endpoint需要用POST,否在会返回400 bad request。
- Discovery endpoint: 默认url为/.well-known/openid-configuration,允许以浏览器或客户端API下载IdentityServer(后面章节会提到) 的metadata配置信息,比如issuer name, key material, supported scopes。
可用浏览器访问Discovery endpoint (也就是https://localhost:5001/.well-known/openid-configuration) 验证搭起来的IdentityServer是否work。
或者直接试试用Postman访问Token endpoint获取token:
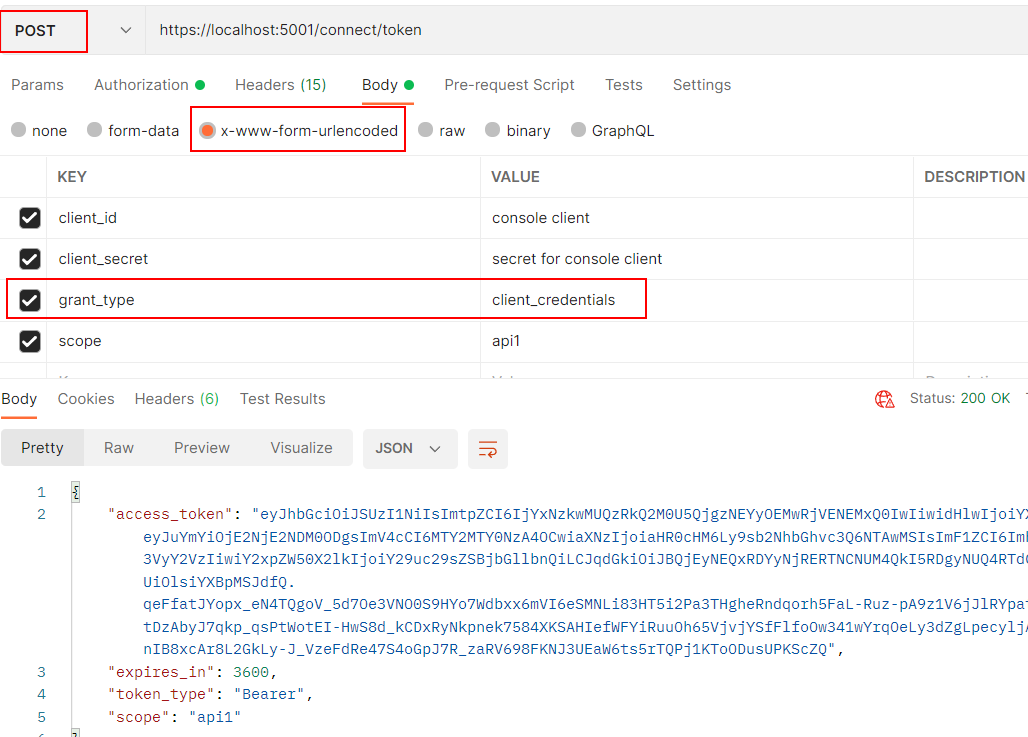
这里需要注意:
- 访问token endpoint需要用POST方式,
- content-type为 application/x-www-form-urlencoded
- body 里面的key-values 写法要注意是以“_"拼接,比如”client_id", "client_secret","grant_type", "client_credentials".
有意思的是,你还可以把access token 黏贴到 jwt.ms decode 里面包含的信息(token algo, token type, claims).
创建Console Client 访问受保护API资源
IdentityServer的token endpoint 作为对OAuth2.0协议的实现,通常我们使用HTTP的方式访问该端点。
IdentityServer也封装了一个Client library(IdentityModel),以帮助legency 传统应用( console, Winform, WPF,...)或服务器端(console, background service)应用获取access token 来访问受保护API资源。
下面以Console app为例,
我们需要知道Identity服务器的base address(也就是"https://localhost:5001"),其他medata信息都可以通过discovery endpoint获取,
如前面章节所述,以ClientCredentials方式访问,还需要知道ClientId以及ClientSecrets,以及需要访问的API资源的 scope。
using IdentityModel.Client;
using Newtonsoft.Json.Linq;

Console.WriteLine("Hello, World!");

// discover endpoints from metadata
var client = new HttpClient();
var disco = await client.GetDiscoveryDocumentAsync("https://localhost:5001");
if (disco.IsError)
{
    Console.WriteLine(disco.Error);
    return;
}

// request token
var tokenResponse = await client.RequestClientCredentialsTokenAsync(new ClientCredentialsTokenRequest
{
    Address = disco.TokenEndpoint,

    ClientId = "console client",
    ClientSecret = "secret for console client",
    Scope = "api1"
});

if (tokenResponse.IsError)
{
    Console.WriteLine(tokenResponse.Error);
    return;
}

Console.WriteLine(tokenResponse.Json);

// call api
var apiClient = new HttpClient();
apiClient.SetBearerToken(tokenResponse.AccessToken);

var response = await apiClient.GetAsync("https://localhost:6001/identity");
if (!response.IsSuccessStatusCode)
{
    Console.WriteLine(response.StatusCode);
}
else
{
    var content = await response.Content.ReadAsStringAsync();
    Console.WriteLine(JArray.Parse(content));
}
通常我们使用HTTP Authorization header来传送access token,可以通过HttpClient的SetBearerToken 扩展方法实现。
API 端 更精细化的权限控制
做到这里,只要是identityserver 颁发的任何valid 的token,都会被Web API 接受。
借助policy,可以做到对特定的controller/actions 进行更精细化的保护,比如下面我们添加代码,检查client 传入的token里是否有要求的scope(claim),
services.AddAuthorization(options =>
{
    options.AddPolicy("ApiScope", policy =>
    {
        policy.RequireAuthenticatedUser();
        policy.RequireClaim("scope", "api1");
    });
});

...
app.MapControllers().RequireAuthorization("ApiScope");
引用
* 文档声明:自由转载-非商用-非衍生-保持署名(创意共享3.0许可证)

 浙公网安备 33010602011771号