
springmvc 精华
Spring Mvc简介:
Spring Web MVC是一种基于Java的实现了Web MVC设计模式的请求驱动类型的轻量级Web框架,即使用了MVC架构模式的思想,将web层进行职责解耦,基于请求驱动指的就是使用请求-响应模型,框架的目的就是帮助我们简化开发,Spring Web MVC也是要简化我们日常Web开发的。
Spring Web MVC也是服务到工作者模式的实现,但进行可优化。前端控制器是DispatcherServlet;应用控制器其实拆为处理器映射器(Handler Mapping)进行处理器管理和视图解析器(View Resolver)进行视图管理;页面控制器/动作/处理器为Controller接口(仅包含ModelAndView handleRequest(request, response) 方法)的实现(也可以是任何的POJO类);支持本地化(Locale)解析、主题(Theme)解析及文件上传等;提供了非常灵活的数据验证、格式化和数据绑定机制;提供了强大的约定大于配置(惯例优先原则)的契约式编程支持。
Spring Mvc处理流程:

(二)
1. 导入需要的架包:

2. 配置web.xml,添加Servlet
<servlet>
<servlet-name>springmvc</servlet-name>
<servlet-class>org.springframework.web.servlet.DispatcherServlet</servlet-class>
<init-param>
<param-name>contextConfigLocation</param-name>
<param-value>classpath:spring-mvc.xml</param-value>
</init-param>
</servlet>
<servlet-mapping>
<servlet-name>springmvc</servlet-name>
<url-pattern>*.do</url-pattern>
</servlet-mapping>
3. 添加spring-mvc.xml文件
<?xml version="1.0" encoding="UTF-8"?>
<beans xmlns="http://www.springframework.org/schema/beans"
xmlns:xsi="http://www.w3.org/2001/XMLSchema-instance"
xmlns:p="http://www.springframework.org/schema/p"
xmlns:context="http://www.springframework.org/schema/context"
xsi:schemaLocation="
http://www.springframework.org/schema/beans
http://www.springframework.org/schema/beans/spring-beans.xsd
http://www.springframework.org/schema/context
http://www.springframework.org/schema/context/spring-context.xsd">
<!-- 使用注解的包,包括子集 -->
<context:component-scan base-package="com.java1234"/>
<!-- 视图解析器 -->
<bean id="viewResolver"
class="org.springframework.web.servlet.view.InternalResourceViewResolver">
<property name="prefix" value="/WEB-INF/jsp/" />
<property name="suffix" value=".jsp"></property>
</bean>
</beans>
4. 在index.jsp中添加如下代码:
<body>
<a href="helloWorld.do">Hello World SpringMvc</a>
</body>
5. 在/WEB-INF/下新建一个jsp文件,在jsp文件夹下建立一个helloword.jsp文件
<%@ page language="java" contentType="text/html; charset=UTF-8"
pageEncoding="UTF-8"%>
<!DOCTYPE html PUBLIC "-//W3C//DTD HTML 4.01 Transitional//EN" "http://www.w3.org/TR/html4/loose.dtd">
<html>
<head>
<meta http-equiv="Content-Type" content="text/html; charset=UTF-8">
<title>Insert title here</title>
</head>
<body>
${message }
</body>
</html>
6. 编写Controller类HelloWorldController.java:
@Controller
public class HelloWorldController {
@RequestMapping("/helloWorld")
public String helloWorld(Model model){
model.addAttribute("message", "StringMvc大爷你好!");
return "helloWorld";
}
}
7. 整个项目图:

8. 测试:http://localhost:8080/SpringMvc01/
(三)
在传统的Spring MVC开发方法中,必须在Bean配置文件中为每个控制器类配置实例和请求映射和让每个控制器类去实现或者扩展特定于框架的接口或者基类,不够灵活。
如果Spring MVC可以自动侦测你的控制器类和请求映射,就能减少配置所需要的工作量。
Spring2.5支持一种基于注解的控制器开发方法。
Spring可以通过@Controller注解自动发现你的控制器类以及@RequestMapping注解中的请求映射,这样就为你免去了在Bean配置文件中配置它们的麻烦。此外,如果使用注解,控制器类和处理程序方法在访问上下文资源(例如请求参数、模型属性和会话属性)时也会更加灵活。
常用到的注解
1、@Controller
2、@RequestMapping
3、@RequestParam, @PathVariable, @CookieValue
@Controller注解能将任意的类标注成控制器类。与传统的控制器相反,被标注的控制器类不需要实现特定于框架的接口,也不必扩展特定于框架的基类。
在控制器类内部,可能有一个或者多个处理程序方法添加了@RequestMapping注解。
处理程序方法的签名非常灵活。你可以为处理程序方法指定任意的名称,并定义以下任意一种类型作为它的方法参数。在这里,只提到了常见的参数类型。关于有效参数类型的完整列表,请参阅有关配置基于注解的控制器的Spring文档。
常见的参数类型
1.HttpServletRequest、HttpServletResponse或HttpSession。
2.添加了@RequestParam注解的任意类型的请求参数
3.添加了@ModelAttribute注解的任意类型的模型属性
4.任意类型的命令对象,供Spring绑定请求参数
5.Map或者ModelMap,供处理程序方法向模型添加属性
6.Errors或者BindingResult,让处理程序方法访问命令对象的绑定和验证结果
7.SessionStatus,让处理程序方法发出会话处理已经完成的通知
常见的返回值类型
处理程序方法的返回类型可以是ModelAndView、Model、Map、String、void
在创建基于注解的控制器之前,必须构建web应用程序上下文来处理注解。
首先,为了让Spring用@Controller注解自动侦测控制器,必须通过<context:component-scan>元素启用Spring的组件扫描特性。
其次Spring MVC还能够根据@RequestMapping将请求映射到控制器类和处理程序方法。
为了使其生效,必须在web应用程序上下文中注册DefaultAnnotationHandlerMapping实例和AnnotationMethodHandlerAdapter实例。
它们分别处理在类级别和方法级别上的@RequestMapping注解。
ModelAndView
这个构造方法构造出来的ModelAndView 不能直接使用,应为它没有指定view,也没有绑定对应的model对象。当然,model对象不是必须的,但是view确实必须的。
用这个构造方法构造的实例主要用来在以后往其中加view设置和model对象。
给ModelAndView实例设置view的方法有两个:setViewName(String viewName) 和 setView(View view)。前者是使用viewName,后者是使用预先构造好的View对象。其中前者比较常用。事实上View是一个接口,而不是一个可以构造的具体类,我们只能通过其他途径来获取View的实例。对于viewname,它既可以是jsp的名字,也可以是tiles定义的名字,取决于使用的ViewNameResolver如何理解这个view name。如何获取View的实例以后再研究。
而对应如何给ModelAndView实例设置model则比较复杂。有三个方法可以使用:
addObject(Object modelObject)
addObject(String modelName, Object modelObject)
addAllObjects(Map modelMap)
ModelAndView可以接收Object类型的对象,ModelAndView将它视为其众多model中的一个。当使用Object类型的对象的时候,必须指定一个名字。ModelAndView也可以接收没有明显名字的对象,原因在于ModelAndView将调用spring自己定义的Conventions 类的.getVariableName()方法来为这个model生成一个名字。显然,对model而言,名字是必须的。
Conventions.getVariableName()生成名字的规则是使用对象的类名的小写模式来作model名字。当这个model是集合或数组的时候,使用集合的第一个元素的类名加s来作model的名字。
ModelAndView也可以接收Map类型的对象,ModelAndView将这个Map中的元素视为model,而不是把这个Map本身视为model。但是其他的集合类可以用本身作为model对象。实际上,ModelAndView对model的支持来自于类ModelMap,这个类继承自HashMap。
DEMO结构图:

Web.xml配置文件:要注意写编码过滤器,否则在请求post的时候会出现中文乱码
<?xml version="1.0" encoding="UTF-8"?>
<web-app xmlns:xsi="http://www.w3.org/2001/XMLSchema-instance"
xmlns="http://java.sun.com/xml/ns/javaee"
xsi:schemaLocation="http://java.sun.com/xml/ns/javaee http://java.sun.com/xml/ns/javaee/web-app_2_5.xsd"
id="WebApp_ID" version="2.5">
<display-name>SpringMvc02</display-name>
<welcome-file-list>
<welcome-file>index.jsp</welcome-file>
</welcome-file-list>
<servlet>
<servlet-name>springmvc</servlet-name>
<servlet-class>org.springframework.web.servlet.DispatcherServlet</servlet-class>
<init-param>
<param-name>contextConfigLocation</param-name>
<param-value>classpath:spring-mvc.xml</param-value>
</init-param>
</servlet>
<servlet-mapping>
<servlet-name>springmvc</servlet-name>
<url-pattern>*.do</url-pattern>
</servlet-mapping>
<filter>
<filter-name>characterEncodingFilter</filter-name>
<filter-class>org.springframework.web.filter.CharacterEncodingFilter</filter-class>
<init-param>
<param-name>encoding</param-name>
<param-value>utf-8</param-value>
</init-param>
</filter>
<filter-mapping>
<filter-name>characterEncodingFilter</filter-name>
<url-pattern>*.do</url-pattern>
</filter-mapping>
</web-app>
spring-mvc.xml配置文件:
<?xml version="1.0" encoding="UTF-8"?>
<beans xmlns="http://www.springframework.org/schema/beans"
xmlns:xsi="http://www.w3.org/2001/XMLSchema-instance"
xmlns:p="http://www.springframework.org/schema/p"
xmlns:context="http://www.springframework.org/schema/context"
xsi:schemaLocation="
http://www.springframework.org/schema/beans
http://www.springframework.org/schema/beans/spring-beans.xsd
http://www.springframework.org/schema/context
http://www.springframework.org/schema/context/spring-context.xsd">
<!-- 使用注解的包,包括子集 -->
<context:component-scan base-package="com"/>
<!-- 视图解析器 -->
<bean id="viewResolver"
class="org.springframework.web.servlet.view.InternalResourceViewResolver">
<!—前缀 -->
<property name="prefix" value="/WEB-INF/jsp/" />
<!—后缀 -->
<property name="suffix" value=".jsp"></property>
</bean>
</beans>
Model类Student.java:
public class Student {
private int id;
private String name;
private int age;
public Student() {
super();
}
public Student(int id, String name, int age) {
super();
this.id = id;
this.name = name;
this.age = age;
}
<!-- 下面的get,set方法省略 -->
}
StudentController:
@Controller
@RequestMapping("/student")
public class StudentController {
private static List<Student> studentList=new ArrayList<Student>();
//只添加一次,用static
static{
studentList.add(new Student(1,"张三",11));
studentList.add(new Student(2,"李四",12));
studentList.add(new Student(3,"王五",13));
}
@RequestMapping("/list")
public ModelAndView list(){
ModelAndView mav=new ModelAndView();
mav.addObject("studentList", studentList);//这里调用的是model的方法,将studentList对象传递到视图上
mav.setViewName("student/list");//这里视图name对应student/list.jsp,调用student/list.do则页面会返回到student/list.jsp
return mav;
}
@RequestMapping("/preSave")
public ModelAndView preSave(@RequestParam(value="id",required=false) String id){//参数id,这里的id就相当于servlet中的request.getPaXXx("id"),required=false,表示不是必须参数,可以没有参数,默认为true,另一个常见的参数是DefaultValue.
ModelAndView mav=new ModelAndView();
if(id!=null){
mav.addObject("student", studentList.get(Integer.parseInt(id)-1));
mav.setViewName("student/update");
}else{
mav.setViewName("student/add");
}
return mav;
}
@RequestMapping("/save")
public String save(Student student){
if(student.getId()!=0){
Student s=studentList.get(student.getId()-1);
s.setName(student.getName());
s.setAge(student.getAge());
}else{
studentList.add(student);
}
// return "redirect:/student/list.do";//地址会变化,在新地址上显示服务器数据
return "forward:/student/list.do";//地址不会变化,把服务器上的数据拿过来,显示在页面上
}
@RequestMapping("/delete")
public String delete(@RequestParam("id") int id){
studentList.remove(id-1);
return "redirect:/student/list.do";
}
}
Jsp页面:
add.jsp
<body>
<form action="${pageContext.request.contextPath}/student/save.do" method="post">
<table>
<tr>
<th colspan="2">学生添加</th>
</tr>
<tr>
<td>姓名</td>
<td><input type="text" name="name"/></td>
</tr>
<tr>
<td>年龄</td>
<td><input type="text" name="age"/></td>
</tr>
<tr>
<td colspan="2">
<input type="submit" value="提交"/>
</td>
</tr>
</table>
</form>
</body>
list.jsp
页面前引用:<%@ taglib prefix="c" uri="http://java.sun.com/jsp/jstl/core"%>
<body>
<a href="${pageContext.request.contextPath}/student/preSave.do">添加学生</a>
<table>
<tr>
<th>编号</th>
<th>姓名</th>
<th>年龄</th>
<th>操作</th>
</tr>
<c:forEach var="student" items="${studentList }">
<tr>
<td>${student.id }</td>
<td>${student.name }</td>
<td>${student.age }</td>
<td><a href="${pageContext.request.contextPath}/student/preSave.do?id=${student.id}">修改</a>
<a href="${pageContext.request.contextPath}/student/delete.do?id=${student.id}">删除</a></td>
</tr>
</c:forEach>
</table>
</body>
update.jsp
<body>
<form action="${pageContext.request.contextPath}/student/save.do" method="post">
<table>
<tr>
<th colspan="2">学生修改</th>
</tr>
<tr>
<td>姓名</td>
<td><input type="text" name="name" value="${student.name }"/></td>
</tr>
<tr>
<td>年龄</td>
<td><input type="text" name="age" value="${student.age }"/></td>
</tr>
<tr>
<td colspan="2">
<input type="hidden" name="id" value="${student.id }"/>
<input type="submit" value="提交"/>
</td>
</tr>
</table>
</form>
</body>
Index.jsp转向页面
<%@ page language="java" contentType="text/html; charset=ISO-8859-1"
pageEncoding="ISO-8859-1"%>
<% response.sendRedirect("student/list.do"); %>
测试:http://localhost:8080/SpringMvc02/


(四)
知识点:
-
REST风格URL简介
-
SpringMvc对rest风格的支持
-
@PathVariable 获取 Url 变量
-
SpringMvc对静态资源的处理
REST风格URL简介:
我们平时看到的spring项目请求都是*.do的,但是像下面这两个网址一样,我们可以去掉.do,这样看起来就比较清爽。第一个是比较明显的REST风格URL,显示的网址没有后缀,第二种其实也算是一种REST风格URL。


SpringMvc对Rest风格的支持:
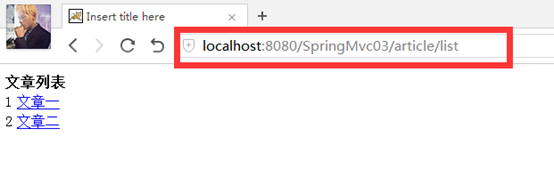
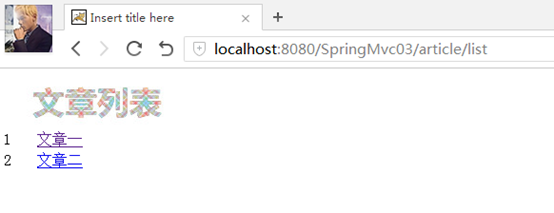
效果预览:可以看到地址栏上的url已经没有.do了。
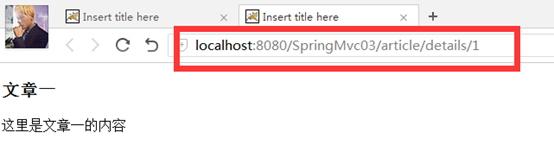
再点击"文章一"可见:直接用文章的id显示文章的地址。
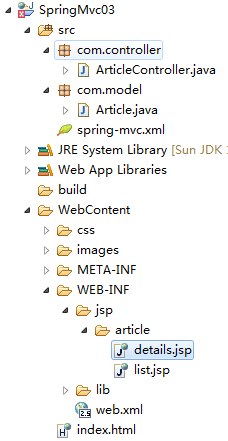
DEMO文件图:
首先配置web.xml文件,为所有的地址请求spring拦截。
Web.xml的配置:
<servlet>
<servlet-name>springmvc</servlet-name>
<servlet-class>org.springframework.web.servlet.DispatcherServlet</servlet-class>
<init-param>
<param-name>contextConfigLocation</param-name>
<param-value>classpath:spring-mvc.xml</param-value>
</init-param>
</servlet>
<servlet-mapping>
<servlet-name>springmvc</servlet-name>
<url-pattern>/</url-pattern>
</servlet-mapping>
Spring-mvc.xml文件代码:
<?xml version="1.0" encoding="UTF-8"?>
<beans xmlns="http://www.springframework.org/schema/beans"
xmlns:xsi="http://www.w3.org/2001/XMLSchema-instance"
xmlns:p="http://www.springframework.org/schema/p"
xmlns:context="http://www.springframework.org/schema/context"
xmlns:mvc="http://www.springframework.org/schema/mvc"
xsi:schemaLocation="
http://www.springframework.org/schema/beans
http://www.springframework.org/schema/beans/spring-beans.xsd
http://www.springframework.org/schema/mvc
http://www.springframework.org/schema/mvc/spring-mvc.xsd
http://www.springframework.org/schema/context
http://www.springframework.org/schema/context/spring-context.xsd">
<!-- 使用注解的包,包括子集 -->
<context:component-scan base-package="com"/>
<!-- 视图解析器 -->
<bean id="viewResolver"
class="org.springframework.web.servlet.view.InternalResourceViewResolver">
<property name="prefix" value="/WEB-INF/jsp/" />
<property name="suffix" value=".jsp"></property>
</bean>
</beans>
Article.java,属性的set和get方法已经省略。

ArticleController代码:
@Controller
@RequestMapping("/article")
public class ArticleController {
@RequestMapping("/list")
public String list(Model model){
return "article/list";
}
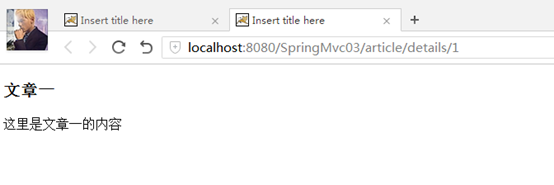
@RequestMapping("/details/{id}")
public ModelAndView details(@PathVariable("id") int id){
ModelAndView mav=new ModelAndView();
if(id==1){
mav.addObject("article", new Article("文章一","这里是文章一的内容"));
}else if(id==2){
mav.addObject("article", new Article("文章二","这里是文章二的内容"));
}
mav.setViewName("article/details");
return mav;
}
}
注解:@PathVariable和@RequestParam,从名字上就可以看出来,他们分别是从路径里面去获取变量,也就是把路径当做变量,后者是从请求里面获取参数。
jsp/article/list.jspBODY代码:
<body>
<table>
<tr>
<th colspan="2">
文章列表
</th>
</tr>
<tr>
<td>1</td>
<td>
<a href="${pageContext.request.contextPath}/article/details/1" target="_blank">文章一</a>
</td>
</tr>
<tr>
<td>2</td>
<td>
<a href="${pageContext.request.contextPath}/article/details/2" target="_blank">文章二</a>
</td>
</tr>
</table>
</body>
注解:这里将文章一的路径写成/details/1,然后controller中就将1这个参数绑定到id上,再通过@PathVariable获取这个1。
Details.jsp代码:
<body>
<p>${article.title }</p>
<p>${article.content }</p>
</body>
测试地址:http://localhost:8080/SpringMvc03/article/list
SpringMvc对静态资源的处理:
上面的DEMO是在没有静态资源的情况下的rest风格,但是实际情况下是有的,一般js,css,img,都会有,在上面的demo中,如果添加图片或者其他东西是行不通的,因为在web.xml中将所有的请求都添加了过滤器。这个时候就需要我们对静态资源做一步处理了。
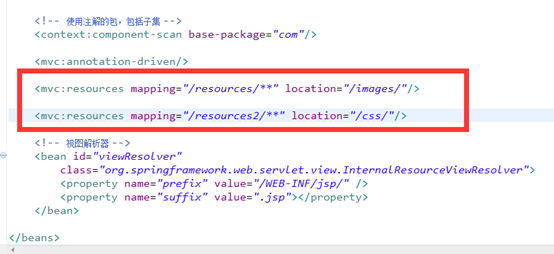
Spring对静态资源的处理是通过<mvc:resources …来处理,具体解释就自己百度。
在上述DEMO的基础上添加如下代码:
<mvc:resources mapping="/resources/**" location="/images/"/>
<mvc:resources mapping="/resources2/**" location="/css/"/>
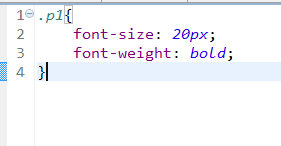
然后添加img和css, 这里我添加一个img图,和一个类css.具体css如下图代码:

然后修改list.jsp。将图片引用过来。

接着为details.jsp的文章内容,添加css.

测试:,
可以看到图片显示出来了,如果没有对静态资源进行处理的话,是不会显示的。然后再点击文章一,也可以看到文章一的标题是有变化了的。
(五)
知识点:
-
SpringMvc单文件上传
-
SpringMvc多文件上传
这里我直接演示多文件上传,单文件的上传就不说了,不过代码都是现成的。
效果预览:


DEMO图:

添加文件上传jar包:

Web.xml配置文件:添加spring Servlet
<servlet>
<servlet-name>springmvc</servlet-name>
<servlet-class>org.springframework.web.servlet.DispatcherServlet</servlet-class>
<init-param>
<param-name>contextConfigLocation</param-name>
<param-value>classpath:spring-mvc.xml</param-value>
</init-param>
</servlet>
<servlet-mapping>
<servlet-name>springmvc</servlet-name>
<url-pattern>*.do</url-pattern>
</servlet-mapping>
Spring-mvc.xml代码:
<?xml version="1.0" encoding="UTF-8"?>
<beans xmlns="http://www.springframework.org/schema/beans"
xmlns:xsi="http://www.w3.org/2001/XMLSchema-instance"
xmlns:p="http://www.springframework.org/schema/p"
xmlns:context="http://www.springframework.org/schema/context"
xsi:schemaLocation="
http://www.springframework.org/schema/beans
http://www.springframework.org/schema/beans/spring-beans.xsd
http://www.springframework.org/schema/context
http://www.springframework.org/schema/context/spring-context.xsd">
<!-- 使用注解的包,包括子集 -->
<context:component-scan base-package="com"/>
<!-- 视图解析器 -->
<bean id="viewResolver"
class="org.springframework.web.servlet.view.InternalResourceViewResolver">
<property name="prefix" value="/WEB-INF/jsp/" />
<property name="suffix" value=".jsp"></property>
</bean>
<bean id="multipartResolver"
class="org.springframework.web.multipart.commons.CommonsMultipartResolver">
<property name="defaultEncoding" value="UTF-8"/>
<property name="maxUploadSize" value="10000000"/>
</bean>
</beans>
FileUploadController
@Controller
public class FileUploadController {
//单文件上传
@RequestMapping("/upload")
public String uploadFile(@RequestParam("file1") MultipartFile file1,HttpServletRequest request)throws Exception{
String filePath=request.getServletContext().getRealPath("/");
System.out.println(filePath);
file1.transferTo(new File(filePath+"upload/"+file1.getOriginalFilename()));//上传到目录下的upload文件夹下。
return "redirect:success.jsp";
}
//多文件上传
@RequestMapping("/upload2")
public String uploadFiles(@RequestParam("file") MultipartFile[] files,HttpServletRequest request)throws Exception{
String filePath=request.getServletContext().getRealPath("/");
System.out.println(filePath);
for(MultipartFile file:files){
file.transferTo(new File(filePath+"upload/"+file.getOriginalFilename()));
}
return "redirect:success.jsp";
}
}
index.jsp:
<body>
<form action="upload2.do" method="post" enctype="multipart/form-data">
<table>
<tr>
<th colspan="2">上传文件</th>
</tr>
<tr>
<td>文件一</td>
<td>
<input type="file" name="file"/>
</td>
</tr>
<tr>
<td>文件二</td>
<td>
<input type="file" name="file"/>
</td>
</tr>
<tr>
<td colspan="2">
<input type="submit" value="上传文件"/>
</td>
</tr>
</table>
</form>
</body>
success.jsp:
<body>
上传成功
</body>

