RPN+RNN车牌识别
1.数据预处理
数据格式为图像数据,标签为图像名称,图像名称中包含车牌位置+车牌号
1.1 图像数据
图像resize相同大小(480*480),并做归一化。
1.2 标签数据
1.2.1 车牌位置
[leftUp, rightDown] = [[int(eel) for eel in el.split('&')] for el in iname[2].split('_')] # [167&523, 472&624]
转化为(x, y, w, h),并转化为(0-1)
1.2.2 车牌号


index = [0,0,5,2,28,5,6]
text = ""
for i in range(len(index)):
    if i == 0:
        text += provinces[index[i]]
    elif i == 1:
        text += alphabets[index[i]]
    else:
        text += ads[index[i]]
class labelFpsDataLoader(Dataset):
   def __getitem__(self, index):
      text
return resizedImage, new_labels, text
train_loader = torch.utils.data.DataLoader(train_dataset, batch_size=params.batchSize)
alphabets =[“-”,"皖", "沪", "津", "渝", "冀", "晋", "蒙", "辽", "吉", "黑", "苏", "浙", "京", "闽", "赣", "鲁", "豫", "鄂", "湘", "粤", "桂",
"琼", "川", "贵", "云", "藏", "陕", "甘", "青", "宁", "新", "警", "学",'A', 'B', 'C', 'D', 'E', 'F', 'G', 'H', 'J', 'K', 'L', 'M', 'N', 'P', 'Q', 'R', 'S', 'T', 'U', 'V', 'W', 'X',
             'Y', 'Z', ’O‘,'0', '1', '2', '3', '4', '5', '6', '7', '8', '9',]
”-“ 代表空白字符
转化为字典形式:
char2index = {} # 编码的时候用, 根据字符转化为index
index2char = {} #解码的时候用, 根据index推测text
    def encode(self, text):
        """Support batch or single str.

        Args:
            text (str or list of str): texts to convert.

        Returns:
            torch.LongTensor [length_0 + length_1 + ... length_{n - 1}]: encoded texts.
            torch.LongTensor [n]: length of each text.
        """

        length = []
        result = []
        for item in text:   # 针对每个batch_size
            length.append(len(item))
            for char in item:  # 针对每个字符
                index = self.char2index[char]
                result.append(index)

        return (torch.LongTensor(result), torch.LongTensor(length))
decode:
    def decode(self, t, length, raw=False):
        """Decode encoded texts back into strs.

        Args:
            torch.LongTensor [length_0 + length_1 + ... length_{n - 1}]: encoded texts.
            torch.LongTensor [n]: length of each text.

        Raises:
            AssertionError: when the texts and its length does not match.

        Returns:
            text (str or list of str): texts to convert.
        """
        if length.numel() == 1:
        # batch_size = 1
            length = length[0]
            assert t.numel() == length, "text with length: {} does not match declared length: {}".format(t.numel(), length)
            if raw:
                return ''.join([self.index2char[i] for i in t])
            else:
                char_list = []
                for i in range(length):
                    if t[i] != 0 and (not (i > 0 and t[i - 1] == t[i])):
                        char_list.append(self.index2char[t[i]])
                return ''.join(char_list)
        else:
            # batch mode
            assert t.numel() == length.sum(), "texts with length: {} does not match declared length: {}".format(t.numel(), length.sum())
            texts = []
            index = 0
            for i in range(length.numel()):
                l = length[i]
                texts.append(
                    self.decode(
                        t[index:index + l], torch.LongTensor([l]), raw=raw))
                index += l
            return texts
2. 模型搭建
2.1 RPN网络
RPN(region proposal net)
RPN 用于找到图片中的车牌的位置,因为每张图片中只有一张车牌
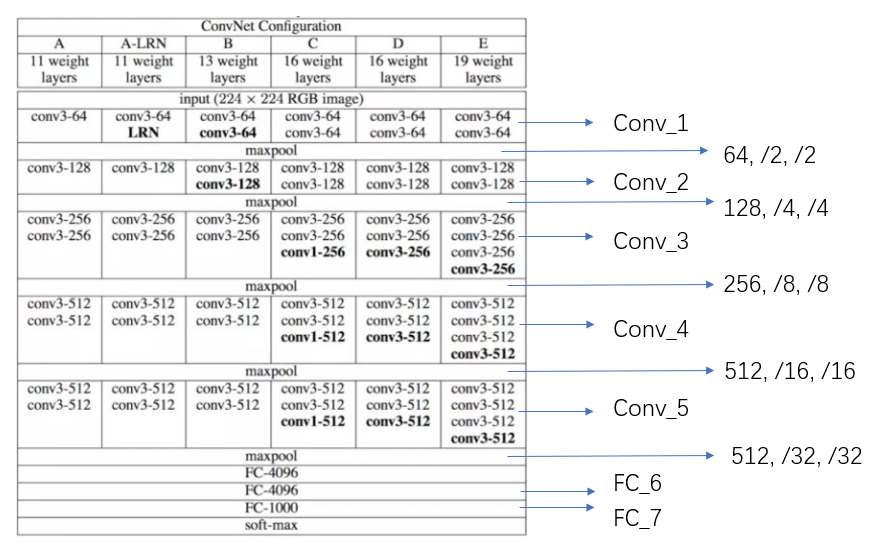
利用VGG网络,对图片中车牌位置进行回归

改造最后一层全连接层,使其输出维度为(b, 4),代表(x, y, w, h)相对于input_shape 的映射(0-1)。
2.2 ROI_pooling
对ROI区域进行pooling,使输出区域大小一致,ROI区域即为上一步求出的region_proposal.与faster_rcnn
的区别是,在faster_rcnn中ROI中每一张图像中有很多ROI区域,且大小不同。而在本例中,每幅图像只有
一个车牌区域,但为了结合浅层和深层特征信息,在不同的feature_map 上均提取ROI,进行pooling,最后
利用concat进行信息融合
def roi_pooling_ims(input, rois, size=(4,16), spatial_scale=1.0):
  assert (rois.dim() == 2)  # (n, 4)
  # 每一幅图都有roi[x_min, y_min, x_max, y_max]
  assert len(input) == len(rois)
  assert (rois.size(1) == 4)

  output = []
  rois = rois.data.float().cuda()

 # batch_size
  num_rois = rois.size(0)

  rois[:, 1:].mul_(spatial_scale)
  rois = rois.long()

  for i in range(num_rois):
    roi = rois[i]
    im = input.narrow(0, i, 1)[..., roi[1]:(roi[3]+1), roi[0]:(roi[2]+1)]

 #adaptive_avg_pool2d

    output.append(F.adaptive_avg_pool2d(im, size))
 #(b, c, 4, 16)
  return torch.cat(output, 0)
# 提取三个特征层的信息
roi1 = roi_pooling_ims(_x1, boxNew.mm(p1), size=(4, 16))
roi2 = roi_pooling_ims(_x3, boxNew.mm(p2), size=(4, 16))
roi3 = roi_pooling_ims(_x5, boxNew.mm(p3), size=(4, 16))
rois = torch.cat((roi1, roi2, roi3), 1)
2.3
CRNN
采用RNN的好处
1. 序列信息,(车牌识别中貌似各个字母之间没什么关系)
2. 参数共享,如果采用全连接层预测 ,需要分别对每个位置单独训练分类器
3.不定长识别, 如果采用全连接,无法实现不定长识别
RNN要求参数输入为3维,以pytorch为例, 分别为T,b, feature_size
目前 输入为(b, feature_size, 4, 16)
首先,通过1X1卷积改变维度,再接conv层+pooling层,将H维度降为1,将W维度调整为(2*7-1)
conv = conv.squeeze(2)
conv = conv.permute(2, 0, 1)   # [w, b, c] (14, b, 512)
通过维度变换,将CNN输出为(T,b, feature_size),输入到RNN中。
RNN采用双层双向LSTM
class RNN(torch.nn.Module):
    def __init__(self, class_num, hidden_unit):
        super(RNN, self).__init__()
        self.Bidirectional_LSTM1 = torch.nn.LSTM(512, hidden_unit, bidirectional=True)
        self.embedding1 = torch.nn.Linear(hidden_unit * 2, 512)
        self.Bidirectional_LSTM2 = torch.nn.LSTM(512, hidden_unit, bidirectional=True)
        self.embedding2 = torch.nn.Linear(hidden_unit * 2, class_num)

    def forward(self, x):

        x = self.Bidirectional_LSTM1(x)   # LSTM output: output, (h_n, c_n)
        print('len_x:',len(x))
        print('双向LSTM后的维度:', x[0].shape)
        T, b, h = x[0].size()   # x[0]: (seq_len, batch, num_directions * hidden_size)
        x = self.embedding1(x[0].view(T * b, h))  # pytorch view() reshape as [T * b, nOut]
        print('dense后的维度', x.shape)
        x = x.view(T, b, -1)  # [14, b, 512]
        x = self.Bidirectional_LSTM2(x)

        # print('4:', x.shape)
        T, b, h = x[0].size()
        x = self.embedding2(x[0].view(T * b, h))

        x = x.view(T, b, -1)
        print('最终输出维度:', x.shape)
        return x  # [14,b,class_num]
3. 损失函数
3.1 RPN损失函数
首先训练RPN,得到建议框,每一张图仅有一个
采用绝对值损失(nn.MSELoss())
loss += 0.8 * nn.L1Loss().cuda()(y_pred[:][:2], y[:][:2])
loss += 0.2 * nn.L1Loss().cuda()(y_pred[:][2:], y[:][2:])
3.2 CRNN损失函数
训练CRNN网络
采用CTC损失函数
中文名称是“连接时序分类”,这个方法主要是解决神经网络label 和output 不对齐的问题(Alignment problem),
其优点是不用强制对齐标签且标签可变长,仅需输入序列和监督标签序列即可进行训练。
通过 引入blank字符,解决有些位置没有字符的问题;通过递推,快速计算梯度。
在pytorch中内置了CTC损失 即 torch.nn.CTCLoss
loss = ctc_loss(log_probs, targets, input_lengths, target_lengths)
log_probs :(T, b, nums_classes), 在输入之前需要经过softmax,转化为概率
targets: (b*n),  一个batch_size 中所有真实值组成的数组
input_lengths: (b), 一个batch_size中所有预测值长度组成的数组 (T, T, T,。。。。)
target_lengths: (b),   一个batch_size中所有真实值长度组成的数组 (b1, b2, b3,。。。。)
    ctc_loss = nn.CTCLoss()
    log_probs = torch.randn(50, 16, 20).log_softmax(2).detach().requires_grad_()
    print(log_probs.shape)
    # targets = torch.randint(1, 20, (16,30), dtype=torch.long)
    # print(targets.shape)
    input_lengths = torch.full((16,), 50, dtype=torch.long)
    print(input_lengths.shape)
    target_lengths = torch.randint(10, 30, (16,), dtype=torch.long)
    print(target_lengths.shape)
    print(sum(target_lengths.data))
    targets = torch.randint(1, 20, (sum(target_lengths.data),), dtype=torch.long)
    print(targets.shape)
    loss = ctc_loss(log_probs, targets, input_lengths, target_lengths)
    print(loss)
为了保证建议框更加精确,损失部分可加上位置损失来精调框的位置,以保证取到的区域更加准确。
4 . 训练
model
dataloader
pred
optimizer.zero_grad()
loss
loss.backward
optimizer.step()
5. 预测
model_path = "crnn.pth"
image_path = r"./demo/test_3.JPG"

# net init
nclass = len(params.alphabet) + 1
#32, 1, 1001, 256
model = crnn.CRNN(params.imgH, params.nc, nclass, params.nh)
if torch.cuda.is_available():
    model = model.cuda()

# load model
print('loading pretrained model from %s' % model_path)
if params.multi_gpu:
    model = torch.nn.DataParallel(model)
model.load_state_dict(torch.load(model_path))

converter = utils.strLabelConverter(params.alphabet)

transformer = dataset.resizeNormalize((100, 32))
image = Image.open(image_path).convert('L')
image = transformer(image)
if torch.cuda.is_available():
    image = image.cuda()
image = image.view(1, *image.size())
image = Variable(image)

model.eval()

# (T, b, num_classes)
preds = model(image)

_, preds = preds.max(2)

#(T * b ) -> (b, T) ->(b*T) ->(T)
preds = preds.transpose(1, 0).contiguous().view(-1)


preds_size = Variable(torch.LongTensor([preds.size(0)]))
raw_pred = converter.decode(preds.data, preds_size.data, raw=True)
sim_pred = converter.decode(preds.data, preds_size.data, raw=False)
print('%-20s => %-20s' % (raw_pred, sim_pred))
preds 维度为(T,),跳过“-”,将其他字符合并,结果为车牌
if length.numel() == 1:
    length = length[0]
    assert t.numel() == length, "text with length: {} does not match declared length: {}".format(t.numel(), length)
    if raw:
        return ''.join([self.alphabet[i - 1] for i in t])
    else:
        char_list = []
        for i in range(length):
            if t[i] != 0 and (not (i > 0 and t[i - 1] == t[i])):
                char_list.append(self.alphabet[t[i] - 1])
        return ''.join(char_list)


