Spring-Boot
Spring-Boot
引言
-
JavaSE:OOP
-
MySQL:持久化
-
HTML + CSS + JavaScript + jQuery:视图
-
Java Web:原始MVC三层架构开发
-
SSM:框架,简化开发流程,配置开始较为复杂
-
SpringBoot:Jar包,内嵌Tomcat,微服务架构
- War:Tomcat运行
-
SpringCloud:服务越来越多就有了它
什么是SpringBoot
- 以约定大于配置的核心思想,默认帮我们进行了很多设置
- 集成了大量常用的第三方库配置(例如 Redis、MongoDB、Jpa、RabbitMQ、Quartz 等等)
简单来说就是SpringBoot其实不是什么新的框架,它默认配置了很多框架的使用方式,就像Maven整合了所有的Jar
包,SpringBoot整合了所有的框架
SpringBoot主要优点
- 开箱即用,提供各种默认配置来简化项目配置
- 内嵌式容器简化Web项目
小知识点:classpath即为生成的target下的classes目录
HelloWorld
新建的包,一定要在主程序的同级目录下,否则识别不到
-
JDK 8
-
Spring Boot 2.2.5.RELEASE
-
官方文档:https://docs.spring.io/spring-boot/docs/2.2.5.RELEASE/reference/htmlsingle/#using-boot-starter
创建流程
- 通过spring.io创建
- 填写项目信息
- 选择初始化的组件(初学勾选 Web 即可)
- 填写项目路径
- 等待项目构建成功
项目结构
.
├── pom.xml
├── src
│   ├── main
│   │   ├── java
│   │   │   └── com
│   │   │       └── lu
│   │   │           ├── HelloWorldApplication.java
│   │   │           └── controller
│   │   │               └── HelloController.java
│   │   └── resources
│   │       ├── application.properties
│   │       ├── static
│   │       └── templates
│   └── test
│       └── java
│           └── com
│               └── lu
│                   └── HelloWorldApplicationTests.java
代码
依赖
<?xml version="1.0" encoding="UTF-8"?>
<project xmlns="http://maven.apache.org/POM/4.0.0" xmlns:xsi="http://www.w3.org/2001/XMLSchema-instance"
         xsi:schemaLocation="http://maven.apache.org/POM/4.0.0 https://maven.apache.org/xsd/maven-4.0.0.xsd">
    <modelVersion>4.0.0</modelVersion>
    <parent>
        <groupId>org.springframework.boot</groupId>
        <artifactId>spring-boot-starter-parent</artifactId>
        <version>2.2.5.RELEASE</version>
        <relativePath/> <!-- lookup parent from repository -->
    </parent>
    <groupId>com.lu</groupId>
    <artifactId>helloWorld</artifactId>
    <version>0.0.1-SNAPSHOT</version>
    <name>helloWorld</name>
    <description>helloWorld</description>
    <properties>
        <java.version>8</java.version>
    </properties>
    <dependencies>
        <!-- spring-boot-starter所有的SpringBoot依赖都是使用这个开头 -->
        <!-- Web依赖:Tomcat,DispatchServlet,XML... -->
        <dependency>
            <groupId>org.springframework.boot</groupId>
            <artifactId>spring-boot-starter-web</artifactId>
        </dependency>
        <!-- 单元测试 -->
        <dependency>
            <groupId>org.springframework.boot</groupId>
            <artifactId>spring-boot-starter-test</artifactId>
            <scope>test</scope>
        </dependency>
    </dependencies>

    <build>
        <plugins>
            <!-- 打包插件 -->
            <plugin>
                <groupId>org.springframework.boot</groupId>
                <artifactId>spring-boot-maven-plugin</artifactId>
            </plugin>
        </plugins>
    </build>
</project>
- 导入依赖不需要写版本号,会根据父依赖自动选择版本
HelloController.java
@RestController
public class HelloController {
    @RequestMapping("/hello")
    public String hello() {
        return "helloWorld";
    }
}
HelloWorldApplication.java
// 本身就是Spring的一个组件
// 程序主入口
@SpringBootApplication
public class HelloWorldApplication {
    public static void main(String[] args) {
        SpringApplication.run(HelloWorldApplication.class, args);
    }
}
- 访问localhost:8080/hello测试结果
彩蛋
- 在
resources文件夹中新建banner.txt - 填写的内容为ASCII艺术字
- 可以更改启动时的
Logo
banner.txt
  _          _
 | |   ___  | |_
 | |  / __| | __|
 | | | (__  | |_
 |_|  \___|  \__|
原理探究
spring-boot-starter
<dependency>
    <groupId>org.springframework.boot</groupId>
    <artifactId>spring-boot-starter</artifactId>
</dependency>
- 启动器:说白了就是SpringBoot的启动场景
- 比如spring-boot-starter-web,会帮我们自动导入Web环境所有的依赖
- SpringBoot会将所有功能场景,都变成一个个的启动器
- 我们要是用什么功能,就需要找到一个个启动器就可以了
自动装配
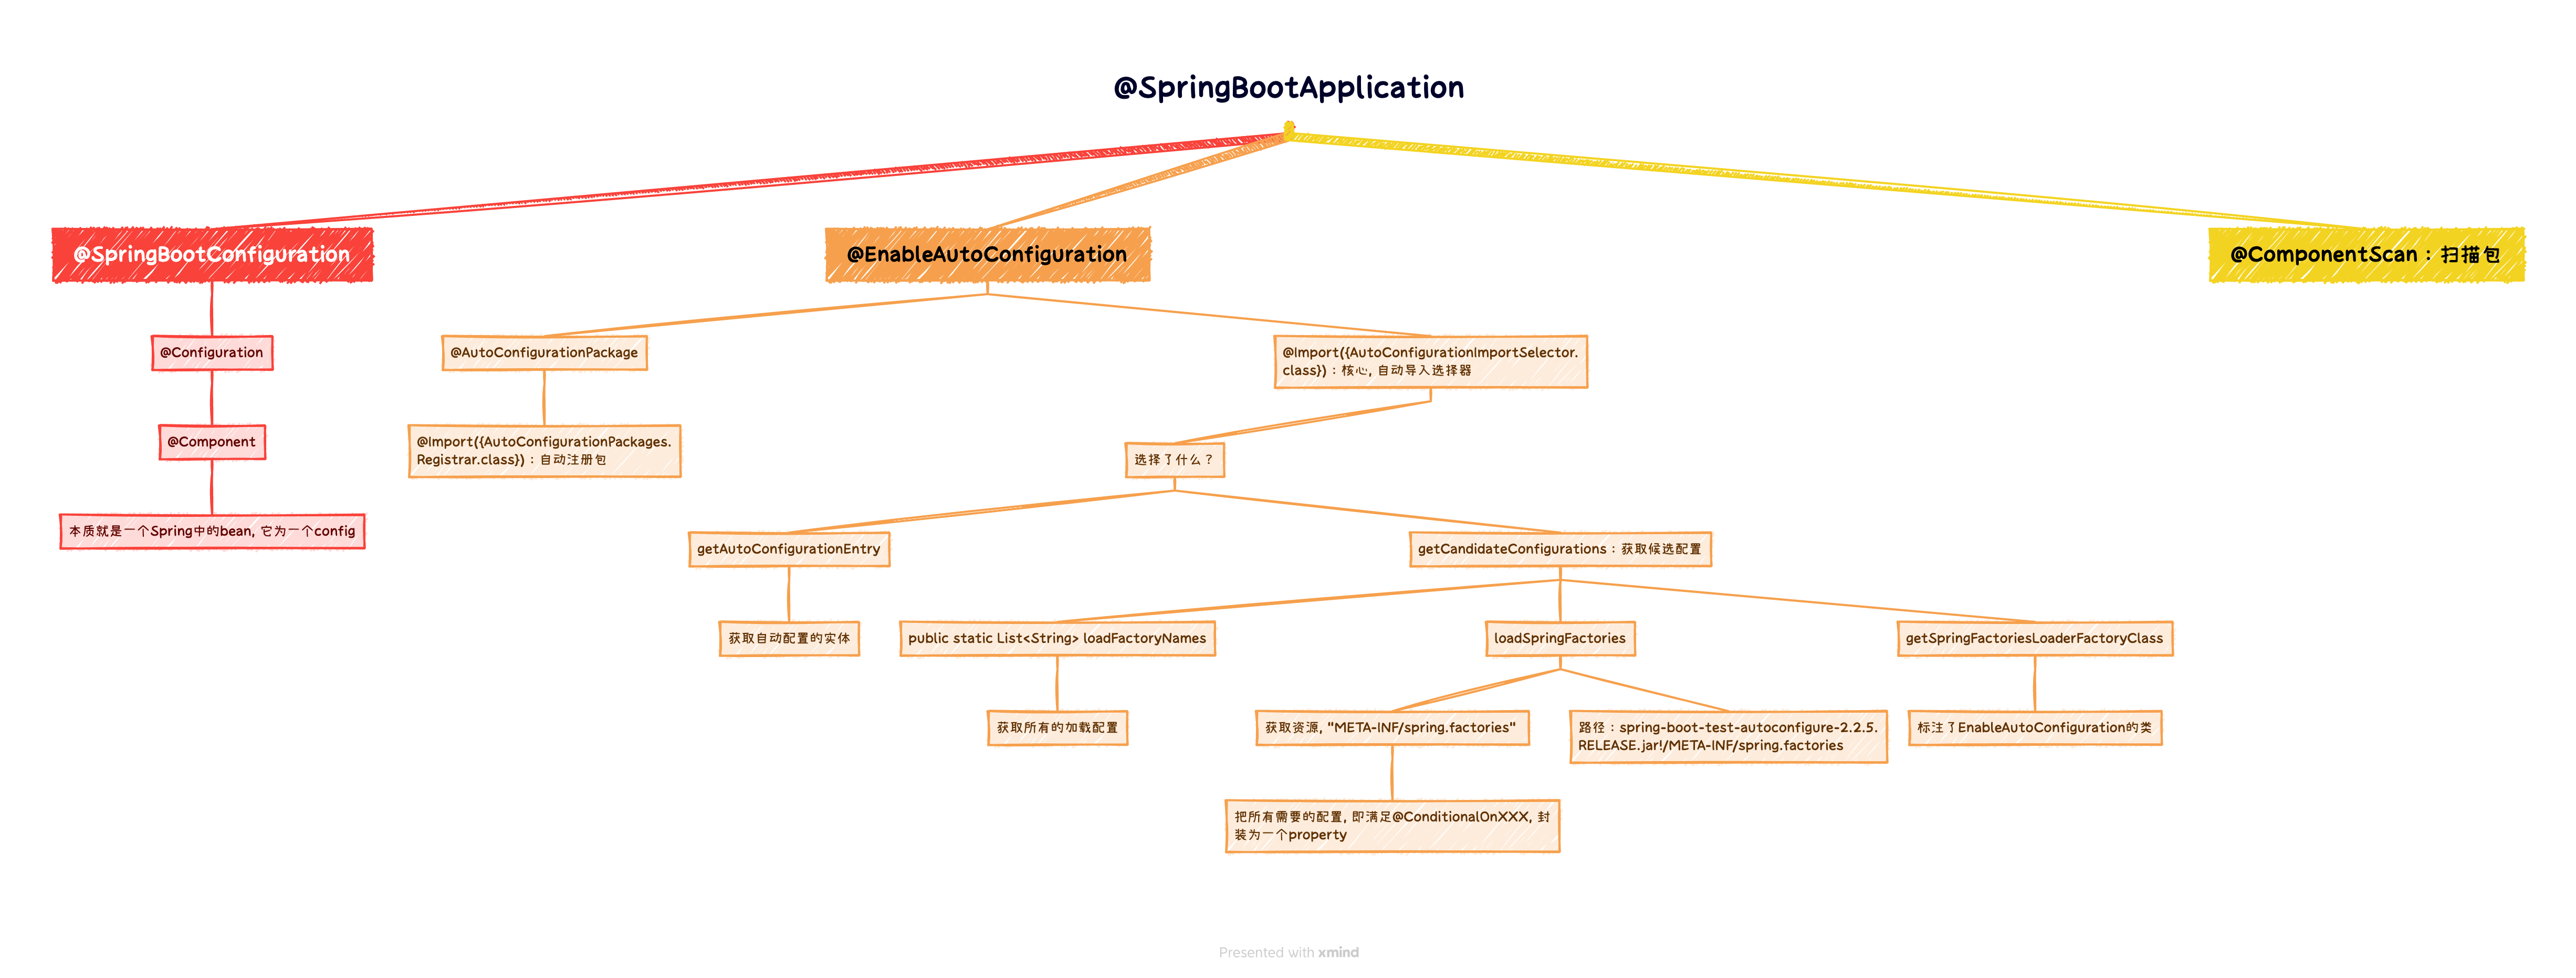
结论:
SpringBoot在启动的时候从类路径下的META-INF/spring.factories中获取EnableAutoConfiguration指定的值
SpringApplication
这个类主要做了以下四件事情:
public SpringApplication(ResourceLoader resourceLoader, Class<?>... primarySources) {
    // ...
    this.webApplicationType = WebApplicationType.deduceFromClasspath(); // 1 推断应用的类型是普通的项目还是Web项目
  this.setInitializers(this.getSpringFactoriesInstances(ApplicationContextInitializer.class)); // 2 查找并加载所有可用初始化器 , 设置到initializers属性中
    this.setListeners(this.getSpringFactoriesInstances(ApplicationListener.class)); // 3 找出所有的应用程序监听器,设置到listeners属性中
    this.mainApplicationClass = this.deduceMainApplicationClass(); // 4 推断并设置main方法的定义类,找到运行的主类
}
自动配置原理再探
按照自动装配我们走到spring.factories,该文件下有许多的AutoConfiguration类
我们以HttpEncodingAutoConfiguration为例解释自动配置原理
//表示这是一个配置类,和以前编写的配置文件一样,也可以给容器中添加组件;
@Configuration(
    proxyBeanMethods = false
)

// 启动指定类的ConfigurationProperties功能;
// 进入这个HttpProperties查看,将配置文件中对应的值和HttpProperties绑定起来;
// 并把HttpProperties加入到IOC容器中
@EnableConfigurationProperties({HttpProperties.class})

// Spring底层@Conditional注解
// 根据不同的条件判断,如果满足指定的条件,整个配置类里面的配置就会生效;
@ConditionalOnWebApplication(
    type = Type.SERVLET
)
@ConditionalOnClass({CharacterEncodingFilter.class})
@ConditionalOnProperty(
    prefix = "spring.http.encoding",
    value = {"enabled"},
    matchIfMissing = true
)
public class HttpEncodingAutoConfiguration {
		// ...
}
自动装配会到Properties类下去绑定配置
@ConfigurationProperties(
    prefix = "spring.http"
)
public class HttpProperties {
		// ...
}
可配置的项与配置的前缀都在类中给出
- 因此,以后再碰到完全不认识的类,我们可以通过这种方法去了解能够配置的参数
SpringBoot Web开发
开发过程需要解决的问题
- 静态资源导入
- 首页定位
- 模板引擎Thymeleaf:具体内容见博客Thymeleaf - James_Allen
- 装配扩展SpringMVC
- 增删查改
- 拦截器
- 国际化
静态资源导入
- 可参考下面这个方法
- 在类
WebMvcAutoConfiguration下
public void addResourceHandlers(ResourceHandlerRegistry registry) {
    if (!this.resourceProperties.isAddMappings()) {
        logger.debug("Default resource handling disabled");
    } else {
        Duration cachePeriod = this.resourceProperties.getCache().getPeriod();
        CacheControl cacheControl = this.resourceProperties.getCache().getCachecontrol().toHttpCacheControl();
        if (!registry.hasMappingForPattern("/webjars/**")) {
            this.customizeResourceHandlerRegistration(registry.addResourceHandler(new String[]{"/webjars/**"}).addResourceLocations(new String[]{"classpath:/META-INF/resources/webjars/"}).setCachePeriod(this.getSeconds(cachePeriod)).setCacheControl(cacheControl));
        }

        String staticPathPattern = this.mvcProperties.getStaticPathPattern();
        if (!registry.hasMappingForPattern(staticPathPattern)) {
            this.customizeResourceHandlerRegistration(registry.addResourceHandler(new String[]{staticPathPattern}).addResourceLocations(WebMvcAutoConfiguration.getResourceLocations(this.resourceProperties.getStaticLocations())).setCachePeriod(this.getSeconds(cachePeriod)).setCacheControl(cacheControl));
        }

    }
}
什么是webjars
-
它将web前端资源(js,css...)打成jar包文件
-
然后借助Maven工具,以jar包形式对web前端资源进行统一依赖管理
-
保证这些Web资源版本唯一性
样例
导入jQuery
<dependency>
    <groupId>org.webjars</groupId>
    <artifactId>jquery</artifactId>
    <version>3.6.4</version>
</dependency>
可根据上面的类发现,访问/webjars/**可映射到classpath:/META-INF/resources/webjars/
因此,我们可以通过访问localhost:8080/webjars/jquery/3.6.4/jquery.js来获取静态资源
staticPathPattern
常用静态资源导入方式
在类WebMvcProperties和ResourceProperties中
记录了默认静态资源路径,分别为:
classpath:/META-INF/resources/classpath:/resources/classpath:/static/classpath:/public/
优先级为:1 > 2 > 3 > 4
.
├── application.properties
├── public: 公共资源
├── resources: 上传资源
├── static: js, css, ...
└── templates
首页定制
在类WebMvcAutoConfiguration下
@Bean
public WelcomePageHandlerMapping welcomePageHandlerMapping(ApplicationContext applicationContext, FormattingConversionService mvcConversionService, ResourceUrlProvider mvcResourceUrlProvider) {
    WelcomePageHandlerMapping welcomePageHandlerMapping = new WelcomePageHandlerMapping(new TemplateAvailabilityProviders(applicationContext), applicationContext, this.getWelcomePage(), this.mvcProperties.getStaticPathPattern());
    welcomePageHandlerMapping.setInterceptors(this.getInterceptors(mvcConversionService, mvcResourceUrlProvider));
    return welcomePageHandlerMapping;
}

private Optional<Resource> getWelcomePage() {
    String[] locations = WebMvcAutoConfiguration.getResourceLocations(this.resourceProperties.getStaticLocations());
    return Arrays.stream(locations).map(this::getIndexHtml).filter(this::isReadable).findFirst();
}

private Resource getIndexHtml(String location) {
    return this.resourceLoader.getResource(location + "index.html");
}
- 在
staticPathPattern下的index.html即为首页
MVC自动配置原理
- 可为
WebMvcAutoConfiguration类下的一些功能进行定制化开发
ContentNegotiatingViewResolver 内容协商视图解析器
// 如果想DIY一些定制化功能, 只需要写这个组件, 然后将它交给SpringBoot
// 扩展MVC DispatcherServlet
@Configuration
public class MyMVCConfig implements WebMvcConfigurer {
    @Bean
    public ViewResolver myViewResolver() {
        return new MyViewResolver();
    }

    // public interface ViewResolver 实现了视图解析器接口的类, 就可以把它看作视图解析器
    // 自定义一个视图解析器
    public static class MyViewResolver implements ViewResolver {
        @Override
        public View resolveViewName(String s, Locale locale) throws Exception {
            return null;
        }
    }
}

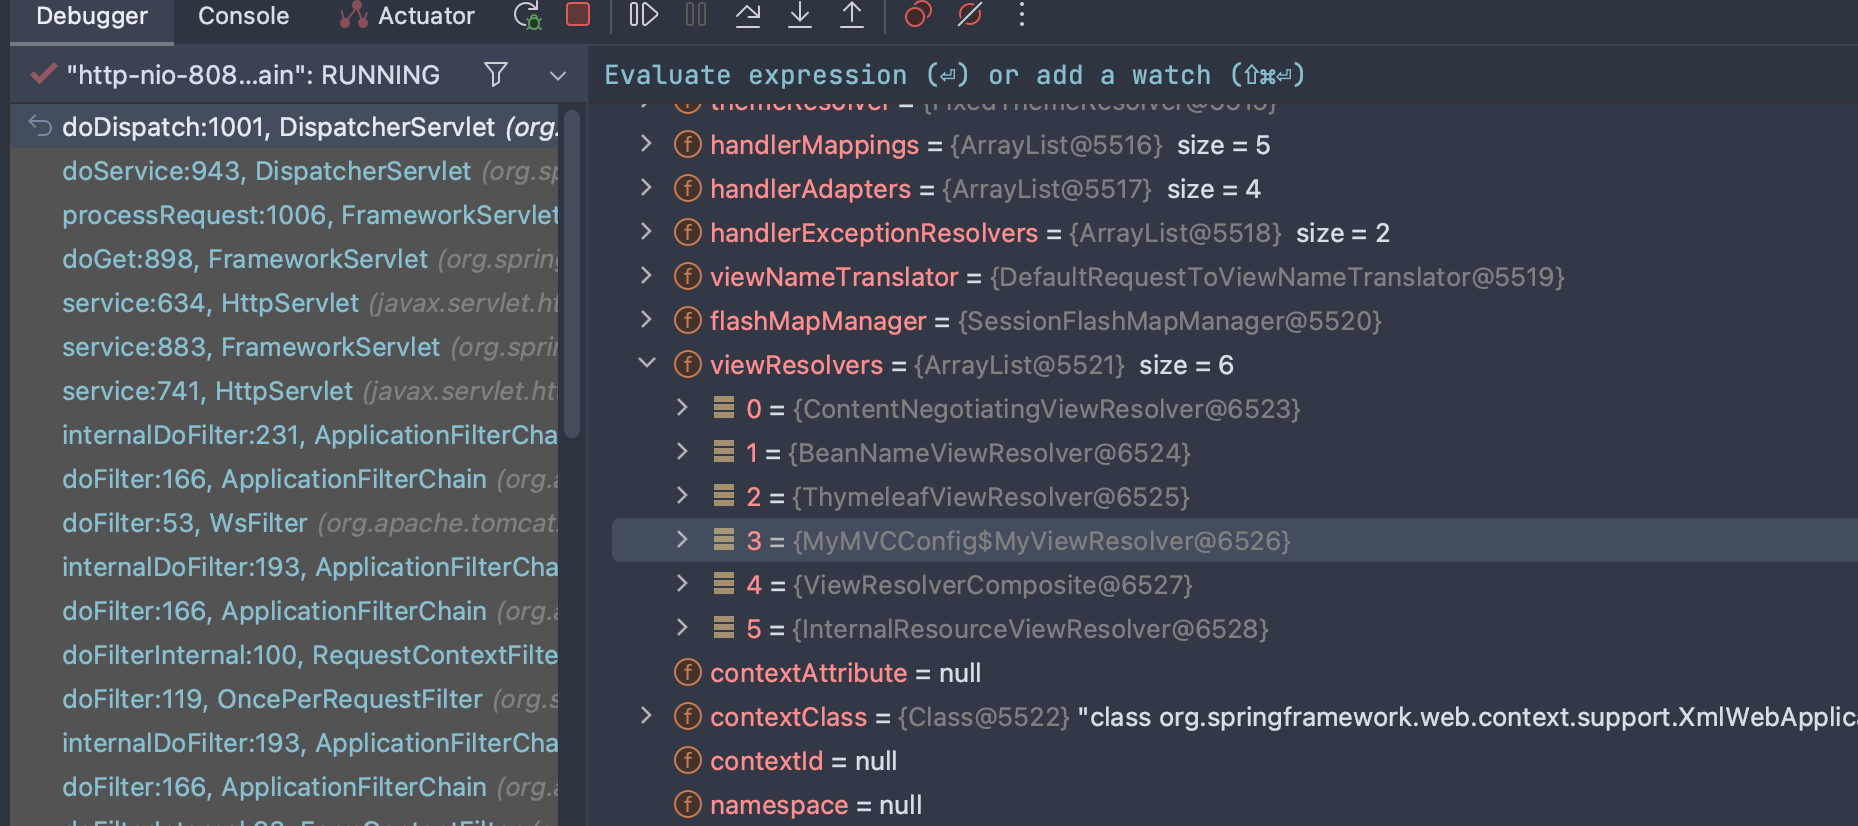
- 通过打断点,发现我们的视图解析器已被成功注入SpringBoot
FormattingConversionService 转换器和格式化器
@Bean
public FormattingConversionService mvcConversionService() {
    WebConversionService conversionService = new WebConversionService(this.mvcProperties.getDateFormat());
    this.addFormatters(conversionService);
    return conversionService;
}
public class WebMvcProperties {
    private String dateFormat;
  	// ...

  	public String getDateFormat() {
        return this.dateFormat;
    }

    public void setDateFormat(String dateFormat) {
        this.dateFormat = dateFormat;
    }
  	// ...
}
- 通过
WebMvcProperties我们可以发现,所需要的dateFormat可以在application.yaml中配置
扩展MVC
// 如果扩展SpringMVC, 官方建议这样做
@Configuration
public class MyMVCConfig implements WebMvcConfigurer {
    // 视图跳转
    @Override
    public void addViewControllers(ViewControllerRegistry registry) {
        registry.addViewController("/lct").setViewName("test");
    }
}
MyMVCConfig为什么不能加@EnableWebMvc?
- 这玩意就是导入了一个类: DelegatingWebMvcConfiguration(从容器中获取所有的WebMvcConfigurer)
- 而DelegatingWebMvcConfiguration继承于WebMvcConfigurationSupport
- 但WebMvcAutoConfiguration存在条件
@ConditionalOnMissingBean({WebMvcConfigurationSupport.class})
因此,加了@EnableWebMvc后的类相当于添加了WebMvcConfigurationSupport类,导致自动装配的Conditional无法
满足,所以要想扩展SpringMVC,不能添加这个注释
员工管理系统
- 静态资源
- 链接: https://pan.baidu.com/s/1dCQEBiEwwATuzhJaEIwxFA
- 提取码: abcd
准备工作
Department.java & Employee.java
@Data
@NoArgsConstructor
@AllArgsConstructor
public class Department {
    private Integer id;
    private String departmentName;
}

@Data
@NoArgsConstructor
public class Employee {
    private Integer id;
    private String lastName;
    private String email;
    private Integer gender; // 0: Female; 1: Male
    private Department department;
    private Date date;

    public Employee(Integer id, String lastName, String email, Integer gender, Department department) {
        this.id = id;
        this.lastName = lastName;
        this.email = email;
        this.gender = gender;
        this.department = department;
        this.date = new Date();
    }
}
DepartmentDao.java & Employee.java
@Repository
public class DepartmentDao {
    // 模拟数据库中的数据
    private static Map<Integer, Department> departments = null;

    static {
        departments = new HashMap<>();
        departments.put(101, new Department(101, "教学"));
        departments.put(102, new Department(102, "市场"));
        departments.put(103, new Department(103, "教研"));
        departments.put(104, new Department(104, "运营"));
        departments.put(105, new Department(105, "后勤"));
    }

    // 获得所有部门信息
    public Collection<Department> getDepartments() {
        return departments.values();
    }

    // 通过id得到部门
    public Department getDepartmentById(Integer id) {
        return departments.get(id);
    }
}

@Repository
public class EmployeeDao {
    private static Map<Integer, Employee> employees = null;
    @Autowired
    private DepartmentDao departmentDao;

    static {
        employees = new HashMap<>();
        employees.put(1001, new Employee(1001, "a", "a@qq.com", 1, new Department(101, "教学")));
        employees.put(1002, new Employee(1002, "b", "b@qq.com", 0, new Department(102, "市场")));
        employees.put(1003, new Employee(1003, "c", "c@qq.com", 0, new Department(103, "教研")));
        employees.put(1004, new Employee(1004, "d", "d@qq.com", 1, new Department(104, "运营")));
        employees.put(1005, new Employee(1005, "e", "e@qq.com", 1, new Department(105, "后勤")));
    }

    public Collection<Employee> list() {
        return employees.values();
    }

    public Employee getEmplyeeById(Integer id) {
        return employees.get(id);
    }

    private Integer initId = 1006;
    public void add(Employee employee) {
        if (employee.getId() == null) {
            employee.setId(initId ++);
        }
        employee.setDepartment(departmentDao.getDepartmentById(employee.getDepartment().getId()));
        employees.put(employee.getId(), employee);
    }

    public void delete(Integer id) {
        employees.remove(id);
    }
}
首页实现
- 所有静态资源需由
Thymeleaf接管
MyMVCConfig.java
@Configuration
public class MyMVCConfig implements WebMvcConfigurer {
    @Override
    public void addViewControllers(ViewControllerRegistry registry) {
        registry.addViewController("/").setViewName("index");
        registry.addViewController("/index.html").setViewName("index");
    }
}
index.html
- 链接样式:
th:href="@{/css/bootstrap.min.css}"- 链接中第一个"/"对应
staticPathPattern
- 链接中第一个"/"对应
- 取消thymeleaf缓存
spring.thymeleaf.cache = false
- 配置
server.servlet.context-path = "/lct"- 此时则访问
localhost:8080/lct才能访问到首页
- 此时则访问
<!DOCTYPE html>
<html lang="en" xmlns:th="http://www.thymeleaf.org">
	<head>
		<meta http-equiv="Content-Type" content="text/html; charset=UTF-8">
		<meta name="viewport" content="width=device-width, initial-scale=1, shrink-to-fit=no">
		<meta name="description" content="">
		<meta name="author" content="">
		<title>Signin Template for Bootstrap</title>
		<!-- Bootstrap core CSS -->
		<link th:href="@{/css/bootstrap.min.css}" rel="stylesheet">
		<!-- Custom styles for this template -->
		<link th:href="@{/css/signin.css}" rel="stylesheet">
	</head>

	<body class="text-center">
		<form class="form-signin" action="dashboard.html">
			<img class="mb-4" th:src="@{/img/bootstrap-solid.svg}" alt="" width="72" height="72">
			<h1 class="h3 mb-3 font-weight-normal">Please sign in</h1>
			<label class="sr-only">Username</label>
			<input type="text" class="form-control" placeholder="Username" required="" autofocus="">
			<label class="sr-only">Password</label>
			<input type="password" class="form-control" placeholder="Password" required="">
			<div class="checkbox mb-3">
				<label>
          <input type="checkbox" value="remember-me"> Remember me
        </label>
			</div>
			<button class="btn btn-lg btn-primary btn-block" type="submit">Sign in</button>
			<p class="mt-5 mb-3 text-muted">© 2017-2018</p>
			<a class="btn btn-sm">中文</a>
			<a class="btn btn-sm">English</a>
		</form>
	</body>
</html>
国际化
- 取消息使用
#{}
- i18n的properties配置

- spring.messages.basename
- 在MessageSourceProperties中存在basename自动装配
- 我们在yaml/properties更改它为
spring.messages.basename = i18n.login

- 自定义LocaleResolver
-
参考类
WebMvcAutoConfiguration下的LocaleResolver@Bean @ConditionalOnMissingBean @ConditionalOnProperty( prefix = "spring.mvc", name = {"locale"} ) public LocaleResolver localeResolver() { if (this.mvcProperties.getLocaleResolver() == org.springframework.boot.autoconfigure.web.servlet.WebMvcProperties.LocaleResolver.FIXED) { return new FixedLocaleResolver(this.mvcProperties.getLocale()); } else { AcceptHeaderLocaleResolver localeResolver = new AcceptHeaderLocaleResolver(); localeResolver.setDefaultLocale(this.mvcProperties.getLocale()); return localeResolver; } }
public class MyLocaleResolver implements LocaleResolver {
    // 解析请求
    @Override
    public Locale resolveLocale(HttpServletRequest request) {
        // 获取请求中的语言参数
        String language = request.getParameter("l");
        Locale locale = Locale.getDefault(); // 如果没有就用默认
        // 如果请求的链接携带了国际化参数
        if (!StringUtils.isEmpty(language)) {
            String[] split = language.split("_");
            // 国家, 地区
            locale = new Locale(split[0], split[1]);
        }
        return locale;
    }

    @Override
    public void setLocale(HttpServletRequest httpServletRequest, HttpServletResponse httpServletResponse, Locale locale) {

    }
}
- 将自定义配置注册到Spring容器中
@Configuration
public class MyMVCConfig implements WebMvcConfigurer {
    @Override
    public void addViewControllers(ViewControllerRegistry registry) {
        registry.addViewController("/").setViewName("index");
        registry.addViewController("/index.html").setViewName("index");
    }

    @Bean
    public LocaleResolver localeResolver() {
        return new MyLocaleResolver();
    }
}
登录及拦截器
- 注意点,请求最好走绝对路径,也就是"/"开头,不然可能会发生一些404
LoginController.java
@Controller
public class LoginController {
    @RequestMapping("/user/login")
    public String login(
            @RequestParam("username") String username,
            @RequestParam("password") String password,
            Model model,
            HttpSession session) {
        if (!StringUtils.isEmpty(username) && "1".equals(password)) {
            session.setAttribute("loginUser", username);
            return "redirect:/main.html";
        } else {
            model.addAttribute("msg", "用户名或者密码错误");
            return "index";
        }
    }
}
在登录页面添加信息显示
<!-- 如果msg为空, 则不显示消息 -->
<p style="color: red" th:text="${msg}" th:if="${not #strings.isEmpty(msg)}"/>
更改MVC配置
MyMVCConfig.java
@Configuration
public class MyMVCConfig implements WebMvcConfigurer {
    @Override
    public void addViewControllers(ViewControllerRegistry registry) {
        registry.addViewController("/").setViewName("index");
        registry.addViewController("/index.html").setViewName("index");
        registry.addViewController("/main.html").setViewName("dashboard");
    }

    @Override
    public void addInterceptors(InterceptorRegistry registry) {
        registry.addInterceptor(new LoginHandlerInterceptor())
                .addPathPatterns("/**")
                .excludePathPatterns("/index.html", "/", "/user/login", "/css/**", "/js/**", "/img/**");
    }

    @Bean
    public LocaleResolver localeResolver() {
        return new MyLocaleResolver();
    }
}
编写LoginHandlerInterceptor
public class LoginHandlerInterceptor implements HandlerInterceptor {
    @Override
    public boolean preHandle(HttpServletRequest request, HttpServletResponse response, Object handler) throws Exception {
        // 登录成功之后, 应该有用户的session
        Object loginUser = request.getSession().getAttribute("loginUser");
        if (null == loginUser) { // 未登录
            request.setAttribute("msg", "未登录");
            request.getRequestDispatcher("/index.html").forward(request, response);
            return false;
        }
        return true;
    }
}
CRUD
提取公共页面
创建目录templates/commons
添加文件commons.html
<!-- 头部导航栏 -->
<nav class="navbar navbar-dark sticky-top bg-dark flex-md-nowrap p-0" th:fragment="topbar">
    ....
</nav>

<!-- 侧边栏 -->
<nav class="col-md-2 d-none d-md-block bg-light sidebar" th:fragment="siderbar">
  	....
</nav>
选择项目高亮
<!-- dashboard.html -->
<!-- 传递参数给组件, 使用括号() -->
<div th:replace="~{commons/commons::siderbar(active='main.html')}"></div>

<!-- commons.html -->
<a th:class="${active == 'main.html' ? 'nav-link active' : 'nav-link'}" th:href="@{/main.html}">
展示
编写Controller
@Controller
public class EmployeeController {
    @Autowired
    EmployeeDao dao;

    @RequestMapping("/emps")
    public String list(Model model) {
        Collection<Employee> employees = dao.list();
        model.addAttribute("emps", employees);
        return "/emp/list";
    }
}
前端页面编写
<div class="table-responsive">
  <table class="table table-striped table-sm">
    <thead>
      <tr>
        <th>id</th>
        <th>lastName</th>
        <th>Email</th>
        <th>gender</th>
        <th>department</th>
        <th>birth</th>
        <th>Operator</th>
      </tr>
    </thead>
    <tbody>
      <tr th:each="emp : ${emps}">
        <td th:text="${emp.getId()}"></td>
        <td th:text="${emp.getLastName()}"></td>
        <td th:text="${emp.getEmail()}"></td>
        <td th:text="${emp.getGender()} == 0 ? 'Girl' : 'Boy'"></td>
        <td th:text="${emp.getDepartment().getDepartmentName()}"></td>
        <td th:text="${#dates.format(emp.getDate(), 'yyyy-MM-dd HH:mm:ss')}"></td>
        <td>
          <button class="btn btn-sm btn-primary">Edit</button>
          <button class="btn btn-sm btn-danger">Delete</button>
        </td>
      </tr>
    </tbody>
  </table>
</div>
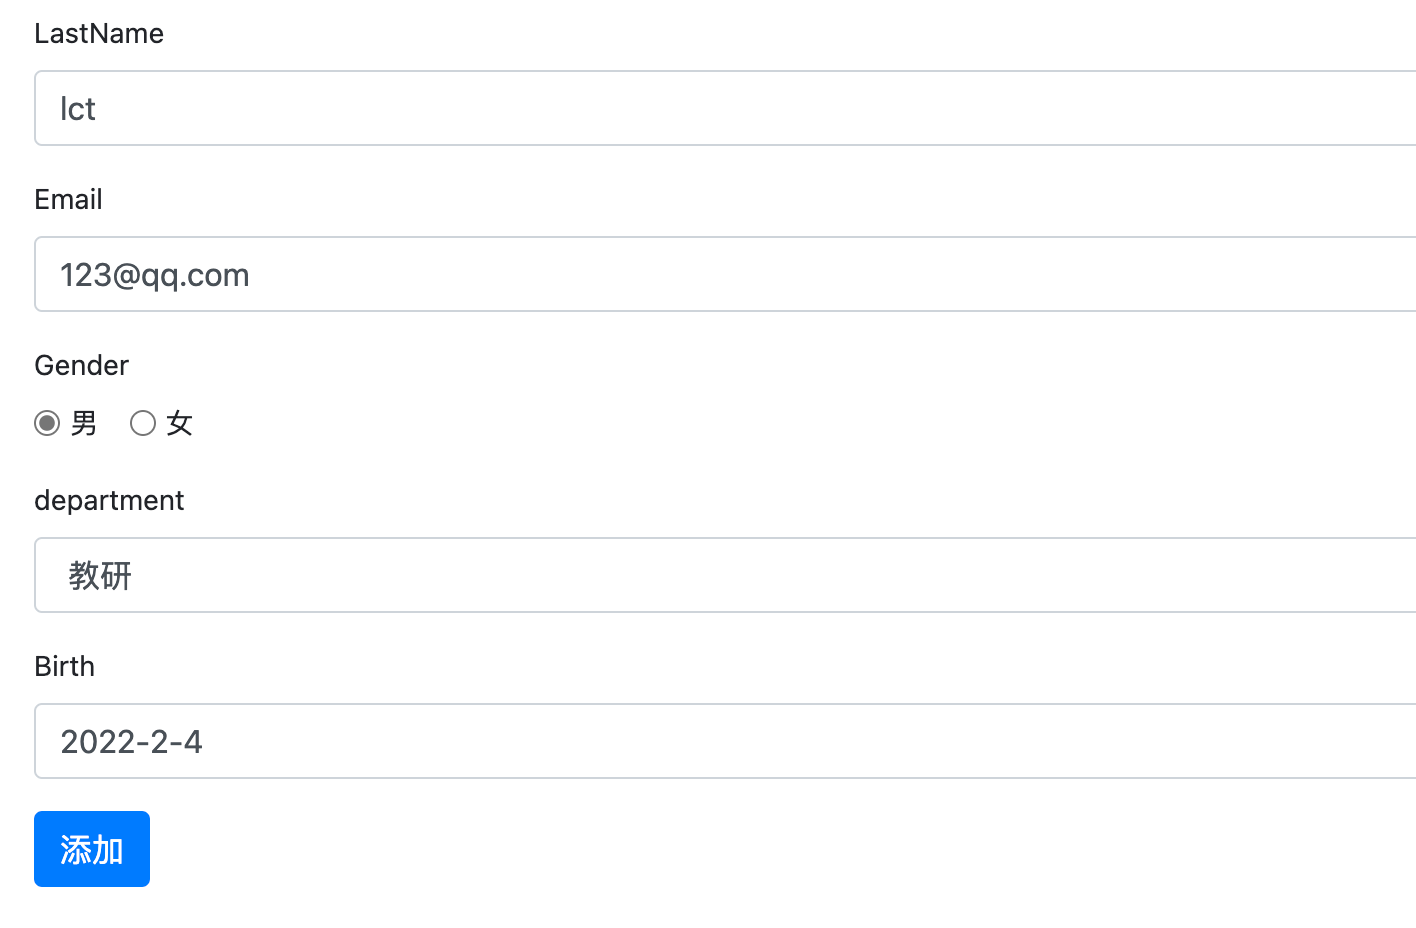
增加
跳转到添加页面
<h2><a class="btn btn-sm btn-success" th:href="@{/emp}">添加员工</a></h2>
编写form表单
<form th:action="@{/emp}" method="post">
    <div class="form-group">
        <label>LastName</label>
        <input type="text" name="lastName" class="form-control" placeholder="lastname:zsr">
    </div>
    <div class="form-group">
        <label>Email</label>
        <input type="email" name="email" class="form-control" placeholder="email:xxxxx@qq.com">
    </div>
    <div class="form-group">
        <label>Gender</label><br/>
        <div class="form-check form-check-inline">
            <input class="form-check-input" type="radio" name="gender" value="1">
            <label class="form-check-label">男</label>
        </div>
        <div class="form-check form-check-inline">
            <input class="form-check-input" type="radio" name="gender" value="0">
            <label class="form-check-label">女</label>
        </div>
    </div>
    <div class="form-group">
        <label>department</label>
        <!--注意这里的name是department.id,因为传入的参数为id-->
        <select class="form-control" name="department.id">
            <option th:each="dept : ${depts}" th:text="${dept.getDepartmentName()}" th:value="${dept.getId()}"></option>
        </select>
    </div>
    <div class="form-group">
        <label>Birth</label>
        <!--springboot默认的日期格式为yy/MM/dd-->
        <input type="text" name="date" class="form-control" placeholder="birth:yyyy/MM/dd">
    </div>
    <button type="submit" class="btn btn-primary">添加</button>
</form>
EmployeeController添加方法
@GetMapping("/emp")
public String toAddPage(Model model) {
    // 查出所有部门的信息
    Collection<Department> departments = departmentDao.getDepartments();
    model.addAttribute("depts", departments);
    return "/emp/add";
}
@PostMapping("/emp")
public String addEmp(Employee employee) {
    employeeDao.add(employee); // 调用底层业务方法保存员工信息
    // 添加的操作
    return "redirect:/emps";
}
添加页面日期格式可能不是SpringBoot默认,我们可以在配置文件更改默认日期格式
spring.mvc.date-format = yyyy-MM-dd
页面一览
修改
修改页面跳转
<a class="btn btn-sm btn-primary" th:href="@{/emp/}+${emp.getId()}">Edit</a>
@GetMapping("/emp/{id}")
public String toUpdate(@PathVariable("id") Integer id, Model model) {
    // 查出原来数据
    model.addAttribute("emp", employeeDao.getEmplyeeById(id));
    model.addAttribute("depts", departmentDao.getDepartments());
    return "/emp/update";
}
修改页面编写
<form th:action="@{/updateEmp}" method="post">
    <input type="hidden" name="id" th:value="${emp.getId()}">
    <div class="form-group">
        <label>LastName</label>
        <input th:value="${emp.getLastName()}" type="text" name="lastName" class="form-control">
    </div>
    <div class="form-group">
        <label>Email</label>
        <input th:value="${emp.getEmail()}" type="email" name="email" class="form-control">
    </div>
    <div class="form-group">
        <label>Gender</label><br/>
        <div class="form-check form-check-inline">
            <input th:checked="${emp.getGender() == 1}" class="form-check-input" type="radio" name="gender" value="1">
            <label class="form-check-label">男</label>
        </div>
        <div class="form-check form-check-inline">
            <input th:checked="${emp.getGender() == 0}" class="form-check-input" type="radio" name="gender" value="0">
            <label class="form-check-label">女</label>
        </div>
    </div>
    <div class="form-group">
        <label>department</label>
        <!--注意这里的name是department.id,因为传入的参数为id-->
        <select class="form-control" name="department.id">
            <option th:selected="${emp.getDepartment().getId()} == ${dept.getId()}" th:each="dept : ${depts}" th:text="${dept.getDepartmentName()}" th:value="${dept.getId()}"></option>
        </select>
    </div>
    <div class="form-group">
        <label>Birth</label>
        <!--springboot默认的日期格式为yy/MM/dd-->
        <input th:value="${#dates.format(emp.getDate(), 'yyyy-MM-dd HH:mm:ss')}" type="text" name="date" class="form-control">
    </div>
    <button type="submit" class="btn btn-primary">修改</button>
</form>
修改操作
@RequestMapping("/updateEmp")
public String updateEmp(Employee employee) {
    employeeDao.add(employee);
    return "redirect:/emps";
}
删除
<a th:href="@{/del/}+${emp.getId()}" class="btn btn-sm btn-danger">Delete</a>
@RequestMapping("/del/{id}")
public String deleteEmp(@PathVariable("id") Integer id) {
    employeeDao.delete(id);
    return "redirect:/emps";
}
404
- 在templates文件夹下创建
error文件夹 - 什么错误就写什么错误的HTML
- 404错误 --> /templates/error/404.html
注销
<a class="nav-link" th:href="@{/user/logout}">注销</a>
@RequestMapping("/user/logout")
public String logout(HttpSession session) {
    session.removeAttribute("loginUser");
    return "redirect:index.html";
}
Spring Data
整合JDBC
- 在创建页面需勾选
JDBC APIMYSQL Driver
- 默认数据源
- class com.zaxxer.hikari.HikariDataSource
- 可通过
spring.datasource.type更改数据源
pom.xml
<?xml version="1.0" encoding="UTF-8"?>
<project xmlns="http://maven.apache.org/POM/4.0.0" xmlns:xsi="http://www.w3.org/2001/XMLSchema-instance"
         xsi:schemaLocation="http://maven.apache.org/POM/4.0.0 https://maven.apache.org/xsd/maven-4.0.0.xsd">
    <modelVersion>4.0.0</modelVersion>
    <parent>
        <groupId>org.springframework.boot</groupId>
        <artifactId>spring-boot-starter-parent</artifactId>
        <version>2.2.5.RELEASE</version>
        <relativePath/> <!-- lookup parent from repository -->
    </parent>
    <groupId>com.lu</groupId>
    <artifactId>springboot-04-data</artifactId>
    <version>0.0.1-SNAPSHOT</version>
    <name>springboot-04-data</name>
    <description>springboot-04-data</description>
    <properties>
        <java.version>8</java.version>
    </properties>
    <dependencies>
        <dependency>
            <groupId>org.springframework.boot</groupId>
            <artifactId>spring-boot-starter-jdbc</artifactId>
        </dependency>
        <dependency>
            <groupId>org.springframework.boot</groupId>
            <artifactId>spring-boot-starter-thymeleaf</artifactId>
        </dependency>
        <dependency>
            <groupId>org.springframework.boot</groupId>
            <artifactId>spring-boot-starter-web</artifactId>
        </dependency>

        <dependency>
            <groupId>mysql</groupId>
            <artifactId>mysql-connector-java</artifactId>
            <scope>runtime</scope>
        </dependency>
        <dependency>
            <groupId>org.springframework.boot</groupId>
            <artifactId>spring-boot-starter-test</artifactId>
            <scope>test</scope>
        </dependency>
    </dependencies>

    <build>
        <plugins>
            <plugin>
                <groupId>org.springframework.boot</groupId>
                <artifactId>spring-boot-maven-plugin</artifactId>
            </plugin>
        </plugins>
    </build>
</project>
application.yaml
spring:
    datasource:
        username: root
        password: lu123
        driver-class-name: com.mysql.cj.jdbc.Driver
        url: jdbc:mysql://localhost:3306/mybatis?autoReconnect=true&useUnicode=true&characterEncoding=utf8&serverTimezone=GMT%2B8
JDBCController.java
@RestController
public class JDBCController {

    @Autowired
    JdbcTemplate jdbcTemplate;

    // 查询数据库的所有信息
    @GetMapping("/list")
    public List<Map<String, Object>> userList() {
        String sql = "select * from user";
        return jdbcTemplate.queryForList(sql);
    }

    @GetMapping("/add")
    public String addUser() {
        String sql = "insert into user values (4, '小明', '19322')";
        jdbcTemplate.update(sql);
        return "add-ok";
    }

    @GetMapping("/update/{id}")
    public String update(@PathVariable("id") int id) {
        String sql = "update user set pwd = ? where id = " + id;
        String pwd = "123456";
        jdbcTemplate.update(sql, pwd);
        return "update-ok";
    }

    @GetMapping("/del/{id}")
    public String delUser(@PathVariable("id") int id) {
        String sql = "delete from user where id = " + id;
        jdbcTemplate.update(sql);
        return "del-ok";
    }
}
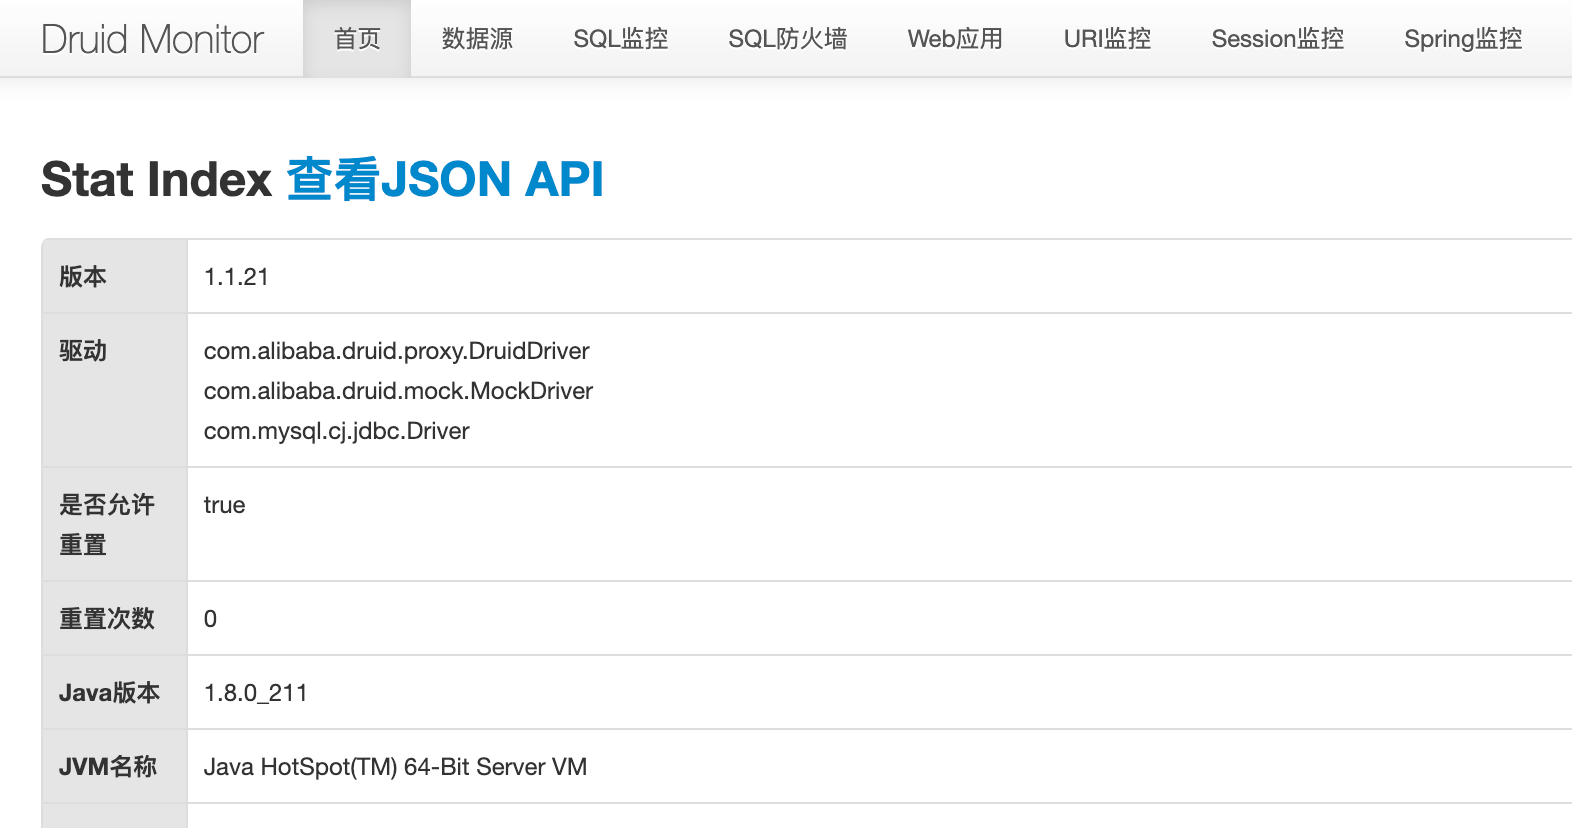
整合Druid
来自Alibaba
- 带有纯天然监控
添加依赖
<dependency>
    <groupId>com.alibaba</groupId>
    <artifactId>druid</artifactId>
    <version>1.1.21</version>
</dependency>
<dependency>
    <groupId>log4j</groupId>
    <artifactId>log4j</artifactId>
    <version>1.2.17</version>
</dependency>
编写application.yaml
spring:
    datasource:
        username: root
        password: lu123
        driver-class-name: com.mysql.cj.jdbc.Driver
        url: jdbc:mysql://localhost:3306/mybatis?autoReconnect=true&useUnicode=true&characterEncoding=utf8&serverTimezone=GMT%2B8
        type: com.alibaba.druid.pool.DruidDataSource

        #Spring Boot 默认是不注入这些属性值的,需要自己绑定
        #druid 数据源专有配置
        initialSize: 5
        minIdle: 5
        maxActive: 20
        maxWait: 60000
        timeBetweenEvictionRunsMillis: 60000
        minEvictableIdleTimeMillis: 300000
        validationQuery: SELECT 1 FROM DUAL
        testWhileIdle: true
        testOnBorrow: false
        testOnReturn: false
        poolPreparedStatements: true

        #配置监控统计拦截的filters,stat:监控统计、log4j:日志记录、wall:防御sql注入
        #如果允许时报错  java.lang.ClassNotFoundException: org.apache.log4j.Priority
        #则导入 log4j 依赖即可,Maven 地址:https://mvnrepository.com/artifact/log4j/log4j
        filters: stat,wall,log4j
        maxPoolPreparedStatementPerConnectionSize: 20
        useGlobalDataSourceStat: true
        connectionProperties: druid.stat.mergeSql=true;druid.stat.slowSqlMillis=500
延伸:在SpringBoot中注册Servlet与Filter
- 目的:配置Druid监控页面与原生的Filter
- 切记是
"/druid/*",写错了进不去
@Configuration
public class DruidConfig {
    /*
       将自定义的 Druid数据源添加到容器中,不再让 Spring Boot 自动创建
       绑定全局配置文件中的 druid 数据源属性到 com.alibaba.druid.pool.DruidDataSource从而让它们生效
       @ConfigurationProperties(prefix = "spring.datasource"):作用就是将 全局配置文件中
       前缀为 spring.datasource的属性值注入到 com.alibaba.druid.pool.DruidDataSource 的同名参数中
     */
    @Bean
    @ConfigurationProperties(prefix = "spring.datasource")
    public DataSource druidDataSource() {
        return new DruidDataSource();
    }

    // 这里相当于在 web.xml中注册 servlet
    // 配置 Druid 监控管理后台的Servlet;
    // 内置 Servlet 容器时没有web.xml文件,所以使用 Spring Boot 的注册 Servlet 方式
    // 长的很的是死代码
    @Bean
    public ServletRegistrationBean<?> statViewServlet() {
        ServletRegistrationBean<StatViewServlet> bean = new ServletRegistrationBean<>(new StatViewServlet(), "/druid/*");

        // 后台需要有人登录, 账号密码
        HashMap<String, String> initParams = new HashMap<>();

        // 增加配置
        initParams.put("loginUsername", "admin"); // 登录key, 两个都是固定的
        initParams.put("loginPassword", "1");

        // 允许谁可以访问
        initParams.put("allow", "");

        bean.setInitParameters(initParams); // 设置初始化参数
        return bean;
    }

    // filter
    @Bean
    public FilterRegistrationBean<?> webStatFilter() {
        FilterRegistrationBean<Filter> bean = new FilterRegistrationBean<>();
        bean.setFilter(new WebStatFilter());

        // 过滤哪些请求
        Map<String, String> initParameters = new HashMap<>();
        // 这些东西不进行统计
        initParameters.put("exclusions", "*.js, *.css, /druid/*");
        bean.setInitParameters(initParameters);

        return bean;
    }
}
整合Mybatis
添加依赖
<dependency>
    <groupId>org.mybatis.spring.boot</groupId>
    <artifactId>mybatis-spring-boot-starter</artifactId>
    <version>2.1.1</version>
</dependency>
编写实体类User.java
@Data
@NoArgsConstructor
@AllArgsConstructor
public class User implements Serializable {
    private int id;
    private String name;
    private String pwd;
}
编写接口UserMapper.java
@Mapper // 表示为Mybatis的mapper类
@Repository // 注入Spring, 表示为Dao层
public interface UserMapper {
    List<User> list();

    User queryById(int id);

    int add(User user);

    int update(User user);

    int delete(int id);
}
添加application.yaml配置
spring:
    datasource:
        username: root
        password: lu123
        driver-class-name: com.mysql.cj.jdbc.Driver
        url: jdbc:mysql://localhost:3306/mybatis?autoReconnect=true&useUnicode=true&characterEncoding=utf8&serverTimezone=GMT%2B8

# Merge Mybatis
mybatis:
    type-aliases-package: com.lu.pojo
    mapper-locations: classpath:mybatis/mapper/*.xml
编写UserMapper.xml,位置位于resources/mybatis/mapper/UserMapper.xml
<?xml version="1.0" encoding="UTF-8" ?>
<!DOCTYPE mapper
        PUBLIC "-//mybatis.org//DTD Mapper 3.0//EN"
        "http://mybatis.org/dtd/mybatis-3-mapper.dtd">

<mapper namespace="com.lu.dao.UserMapper">
    <cache/>

    <select id="list" resultType="User">
        select * from mybatis.user
    </select>

    <select id="queryById" resultType="User">
        select * from mybatis.user where id = #{id}
    </select>

    <delete id="delete">
        delete from mybatis.user where id = #{id}
    </delete>
</mapper>
编写Controller测试
@RestController
public class UserController {
    @Autowired
    private UserMapper mapper;

    @RequestMapping("/list")
    public List<User> list() {
        return mapper.list();
    }

    @RequestMapping("/id/{id}")
    public User queryById(@PathVariable("id") int id) {
        return mapper.queryById(id);
    }
}
- 可成功查询,整合完成
任务
异步任务
- 处理的情况:有些后台任务处理需要时间,但前端不能卡在那,因此需要让前端先跳,后端异步处理任务
开启方式
- 在方法上添加注解
@Async - 在SpringApplication主方法添加
@EnableAsync注解
样例
AsyncService.java
@Service
public class AsyncService {
    @Async
    public void hello() {
        try {
            Thread.sleep(2000);
        } catch (InterruptedException e) {
            throw new RuntimeException(e);
        }
        System.out.println("数据正在处理");
    }
}
AsyncController.java
@RestController
public class AsyncController {
    @Autowired
    AsyncService service;

    @RequestMapping("/hello")
    public String hello() {
        service.hello();
        return "OK";
    }
}
@EnableAsync // 开启异步
@SpringBootApplication
public class Springboot09MissionApplication {

    public static void main(String[] args) {
        SpringApplication.run(Springboot09MissionApplication.class, args);
    }

}
邮件任务
添加依赖
<dependency>
    <groupId>org.springframework.boot</groupId>
    <artifactId>spring-boot-starter-mail</artifactId>
</dependency>
配置application.properties
spring.mail.username = xxx@qq.com
spring.mail.password = 授权码
spring.mail.host = smtp.qq.com
# QQ Exclusive
spring.mail.properties.mail.smtl.ssl.enable = true
测试
@SpringBootTest
class Springboot09MissionApplicationTests {
    @Autowired
    JavaMailSenderImpl mailSender;

    @Test
    void contextLoads() {
      	// 简单邮件
        SimpleMailMessage message = new SimpleMailMessage();
        message.setSubject("Meeting");
        message.setText("Tonight 7:00 p.m");
        message.setTo("24736743@qq.com");
        message.setFrom("24736743@qq.com");
        mailSender.send(message);
    }
}
- 成功发送
复杂邮件样例
@Test
public void contextLoads2() throws MessagingException {
    // 邮件设置2:一个复杂的邮件
    MimeMessage mimeMessage = mailSender.createMimeMessage();
  	// 是否支持多文本上传(True, False)
    MimeMessageHelper helper = new MimeMessageHelper(mimeMessage, true);

    helper.setSubject("通知-明天来狂神这听课");
  	// 是否可解析为HTML(True, False)
    helper.setText("<b style='color:red'>今天 7:30来开会</b>",true);

    // 发送附件
    helper.addAttachment("1.jpg",new File(""));
    helper.addAttachment("2.jpg",new File(""));

    helper.setTo("24736743@qq.com");
    helper.setFrom("24736743@qq.com");

    mailSender.send(mimeMessage);
}
定时任务
编写ScheduledService.java
- cron表达式生成:http://www.bejson.com/othertools/cron/
@Service
public class ScheduledService {
    // cron表达式
    @Scheduled(cron = "0/2 * * * * ?")
    public void hello() {
        System.out.println("hello");
    }
}
主程序开启定时功能
@EnableAsync // 开启异步
@EnableScheduling // 开启定时功能
@SpringBootApplication
public class Springboot09MissionApplication {

    public static void main(String[] args) {
        SpringApplication.run(Springboot09MissionApplication.class, args);
    }
}
- 运行主程序即可定时执行

 浙公网安备 33010602011771号