JavaWeb
Java Web
基本概念
在Java中,动态web资源开发的技术统称为Java Web
- 动态web:提供给所有人看的数据始终会发生变化,每个人在不同的时间,不同的地点看到的信息各不相同!
JDK目录
- bin:存放可执行程序
- include:JDK由C和C++编写,启动时需引入一些头文件
- jre:Java运行时环境的根目录
- lib:Java类库和库文件
- src.zip:src中放置的是JDK核心类的源代码,通过该文件可以查看Java基础类的源代码
Web 应用程序组成
- html, css, js
- jsp, servlet
- Java
- jar
- 配置文件(Properties)
静态Web
-
客户端 --> 服务器(Request)
- 服务器内:
- Web Server --> index.html
- index.html --> Web Server
-
服务器 --> 客户端(Response)
-
缺点
- Web页面无法动态更新
- 伪动态
- JavaScript
- 无法和数据库交互(数据无法持久化)
- Web页面无法动态更新
动态Web
Web页面展示的效果因人而异
Web 服务器
JSP/Servlet
- B/S架构
- 基于Java
服务器是一种被动操作,用来处理用户的一些请求和给用户一些响应信息
Tomcat
- webapps:存放网站的
- 一个文件夹代表一个网站
- ROOT:为访问IP加端口的默认网站
- 其他文件夹需在以上基础上
/name - 文件夹内的
index.html为该文件夹形成的网站的默认页面
- conf/server.xml:服务器核心配置文件
- 可以配置端口
- 可以配置主机名称
- webapps
	- ROOT
	- test:网站目录名
		- WEB-INF
			- classes:Java程序
			- lib:web应用依赖的Jar包
			- web.xml:网站的配置文件
		- index.jsp:默认首页
		- static
			- css
				- style.css
			- js
			- img
		- ...
可能遇到的问题
- Java环境没有配
- 乱码,需要配置文件中修改配置
一些默认端口号
- Tomcat:8080
- MySQL:3306
- HTTP:80
- HTTPS:443
网络是如何访问的
- 输入域名,回车
- 检测本机
hosts配置,查看是否有该域名的映射- 有,直接返回对应ip
- 没有,去DNS服务器找,找到就返回,找不到就报错
Tomcat本地路径:/opt/homebrew/Cellar/
HTTP
HTTP(超文本传输协议)简单的请求响应协议,运行在TCP上
-
默认端口:80
-
文本:HTML,字符串 ...
-
超文本:图片,音乐,视频,定位 ...
HTTPS:安全的
- 默认端口:443
HTTP请求
请求 URL: https://www.baidu.com/ 	 # 请求域名
请求方法: GET  					   # GET/POST
状态代码: 200 OK 				   # 状态码
远程地址: 180.101.50.242:443 	   # 远程IP
Accept:  # 告诉浏览器它返回的数据支持的类型
Accept-Encoding: gzip, deflate, br
Accept-Language: zh-CN,zh;q=0.9,en;q=0.8,en-GB;q=0.7,en-US;q=0.6
Connection: keep-alive # 告诉浏览器,请求完成是断开还是保持连接
- Get:请求能携带的参数少,大小有限制,且在浏览器URL会明文显示,不安全,但快
- Post:请求能携带的参数没限制,且在浏览器URL不会明文显示,安全,但相对慢(当今网速已基本不存在该情况)
HTTP响应
Connection: keep-alive					# 连接
Content-Encoding: gzip					# 编码
Content-Type: text/html; charset=utf-8	# 类型
Refresh:告诉客户端,多久刷新一次
Location:让网页重新定位
状态码
200:请求响应成功
3**:请求重定向
4**:找不到资源 | 404
5**:服务器代码错误 | 502:网关错误
Maven
为什么用?
- Java Web开发中,需要使用大量的Jar包
- 需要一个东西可以自动导入并配置
- 因此,Maven(项目架构管理工具)诞生
核心思想:约定大于配置
- 有约束就不要违反
本地仓库:/Users/lct/.m2
远程仓库,可以搜pom.xml文件用到的dependency
- GAV:groupID、artifactID、version
资源导出失败问题
- 比如说java文件夹中默认只有java源文件,xml等文件可能找不到
解决方式:在build中配置resources,防止资源导出失败
<build>
      <resources>
        <resource>
            <directory>src/main/resources</directory>
            <excludes>
                <exclude>**/*.properties</exclude>
                <exclude>**/*.xml</exclude>
             </excludes>
            <filtering>false</filtering>
        </resource>
        <resource>
            <directory>src/main/java</directory>
            <includes>
                <include>**/*.properties</include>
                <include>**/*.xml</include>
            </includes>
            <filtering>false</filtering>
        </resource>
    </resources>
</build>
Maven父子工程
- 父项目中的Jar包子项目可以直接使用,反之不行
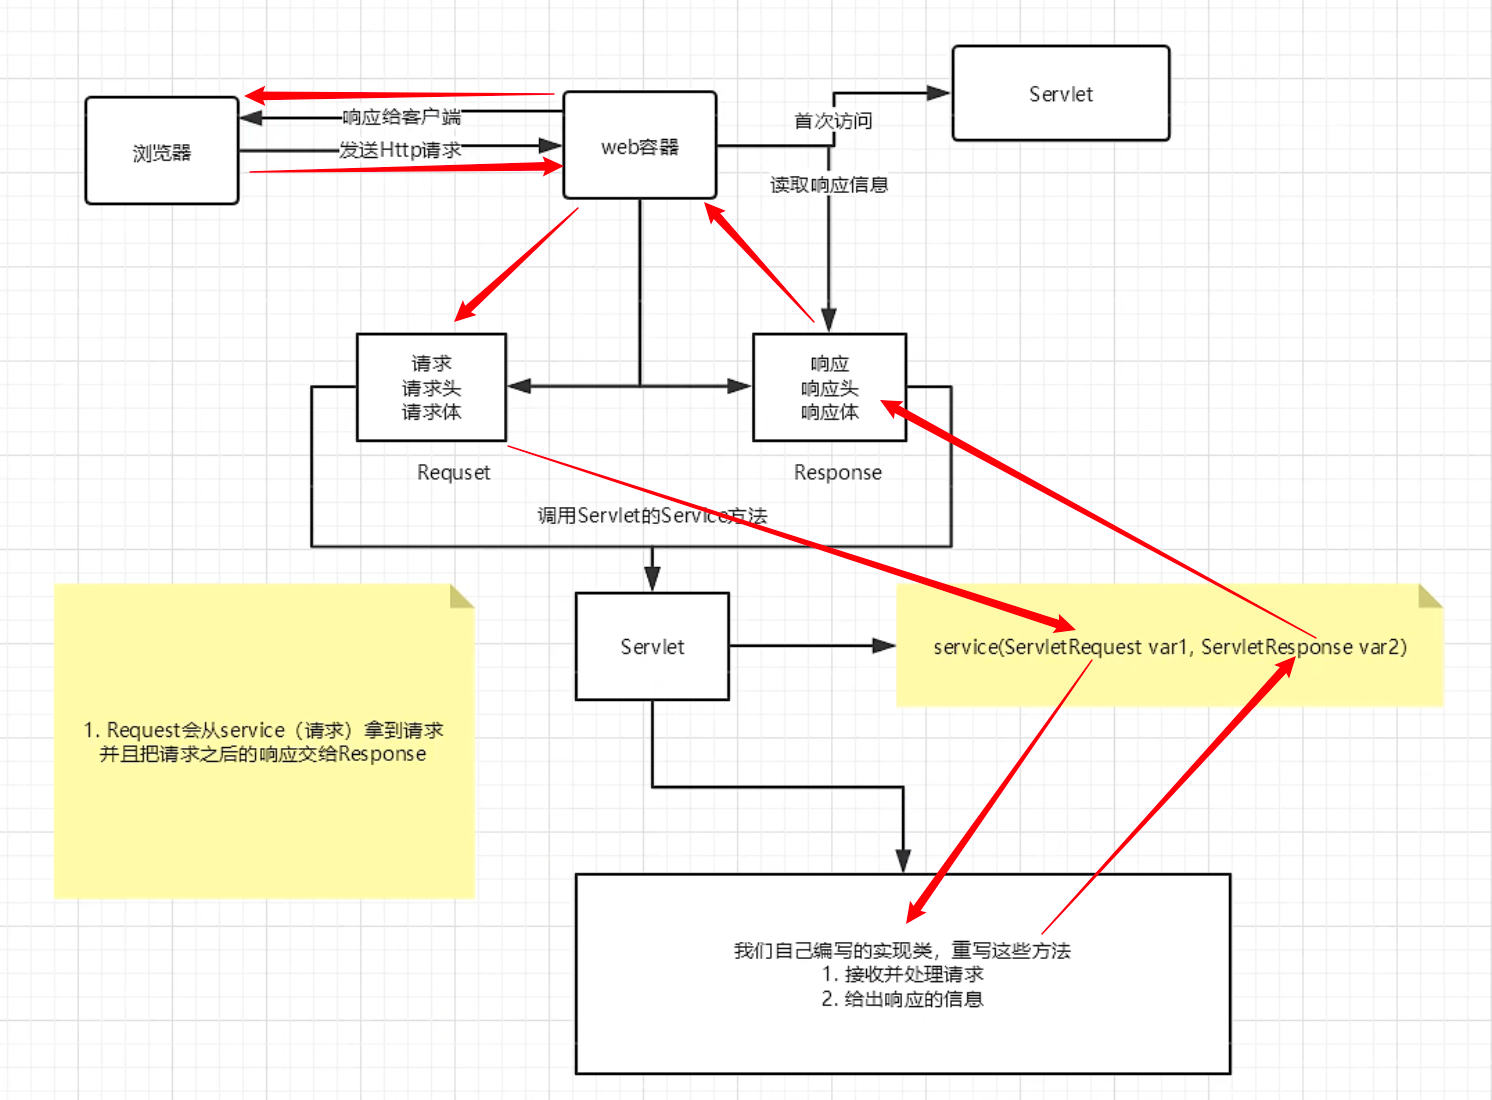
Servlet
实现了Servlet接口到Java程序
- 用于开发动态web的技术
- 开发一个Servlet程序
- 编写一个类,实现Servlet接口
- 把开发好的Java类部署到web服务器中
所涉及的dependency
tomcat@10
<dependency>
    <groupId>jakarta.servlet</groupId>
    <artifactId>jakarta.servlet-api</artifactId>
    <version>6.0.0</version>
</dependency>
tomcat@9
<dependency>
    <groupId>javax.servlet</groupId>
    <artifactId>javax.servlet-api</artifactId>
    <version>4.0.1</version>
</dependency>
web.xml头文件
<?xml version="1.0" encoding="UTF-8"?>
<web-app xmlns="http://xmlns.jcp.org/xml/ns/javaee"
         xmlns:xsi="http://www.w3.org/2001/XMLSchema-instance"
         xsi:schemaLocation="http://xmlns.jcp.org/xml/ns/javaee
     http://xmlns.jcp.org/xml/ns/javaee/web-app_4_0.xsd"
         version="4.0">

</web-app>
HelloServlet
遇到的一些坑
-
Tomcat目录在:/opt/homebrew/Cellar/
-
最新的Tomcat与Servlet要用JDK 17来运行
-
Maven中要配置JDK版本,不然一直会跳到默认的1.5
<properties>
    <maven.compiler.source>17</maven.compiler.source>
    <maven.compiler.target>17</maven.compiler.target>
</properties>
在web.xml中注册Servlet
<servlet>
    <servlet-name>hello</servlet-name>
    <servlet-class>com.lu.servlet.HelloServlet</servlet-class>
</servlet>
<servlet-mapping>
    <servlet-name>hello</servlet-name>
    <url-pattern>/hello</url-pattern>
</servlet-mapping>
原理
Servlet是由Web服务器调用,Web服务器在收到浏览器请求,有以下处理
Mapping
-
一个Servlet可以有多个映射
-
可以用通配符
-
可自定义路径
<!-- http://localhost:8080/s1/afsafas.lct --> <servlet-mapping> <servlet-name>hello</servlet-name> <url-pattern>*.lct</url-pattern> </servlet-mapping> -
固定的映射路径优先级高于通配符
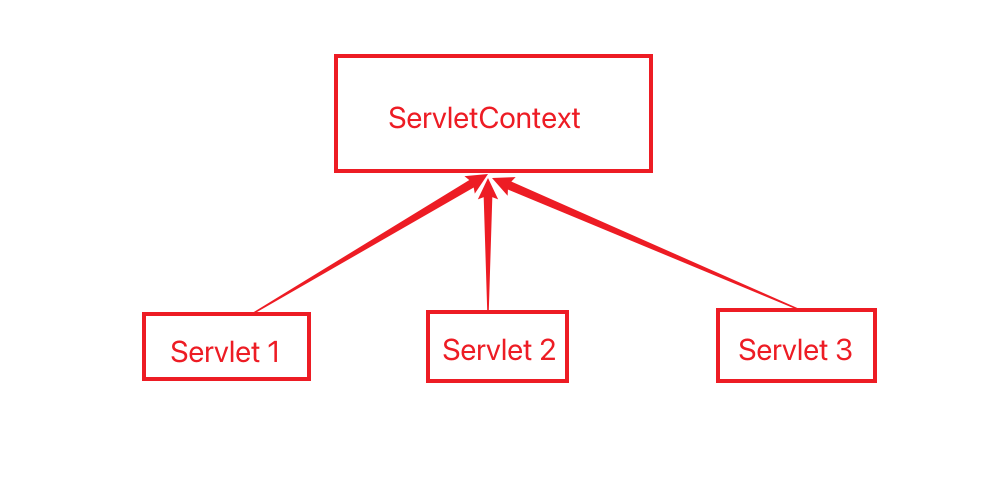
ServletContext
每个web程序都有一个ServletContext用于管理Servlet,凌驾于所有Servlet之上
- 共享数据
-
获取初始化参数
<context-param>
    <param-name>url</param-name>
    <param-value>jdbc:mysql://localhost:3306/mybatis</param-value>
</context-param>
String url = servletContext.getInitParameter("url"); -
请求转发
- 转发:路径不会改变
- A走到B,A的请求需要C的资源,B向C要返回给A
- 重定向:路径会改变
- A走到B,A的请求需要C的资源,B告诉A它需要的C那有,A走到C
this.getServletContext().getRequestDispatcher("/test").forward(req, resp); // 字符串位置写路径 - 转发:路径不会改变
-
读取资源文件
db.properties
username=root
password=lu12
@Override
protected void doGet(HttpServletRequest req, HttpServletResponse resp) throws ServletException, IOException {
    InputStream in = this.getServletContext().getResourceAsStream("/WEB-INF/classes/db.properties"); // classpath
    Properties prop = new Properties();
    prop.load(in);
    String username = prop.getProperty("username");
    String password = prop.getProperty("password");
    resp.getWriter().print(username + ", " + password);
}
HttpServletResponse
对浏览器的一些操作
一些方法
void addCookie(Cookie var1);
boolean containsHeader(String var1);
String encodeURL(String var1);
String encodeRedirectURL(String var1);
void sendError(int var1, String var2) throws IOException;
void sendError(int var1) throws IOException;
void sendRedirect(String var1) throws IOException;
void setDateHeader(String var1, long var2);
void addDateHeader(String var1, long var2);
void setHeader(String var1, String var2);
void addHeader(String var1, String var2);
void setIntHeader(String var1, int var2);
void addIntHeader(String var1, int var2);
void setStatus(int var1);
int getStatus();
一些状态码
int SC_CONTINUE = 100;
int SC_SWITCHING_PROTOCOLS = 101;
int SC_OK = 200;
int SC_CREATED = 201;
int SC_ACCEPTED = 202;
int SC_NON_AUTHORITATIVE_INFORMATION = 203;
int SC_NO_CONTENT = 204;
int SC_RESET_CONTENT = 205;
int SC_PARTIAL_CONTENT = 206;
int SC_MULTIPLE_CHOICES = 300;
int SC_MOVED_PERMANENTLY = 301;
int SC_MOVED_TEMPORARILY = 302;
int SC_FOUND = 302;
int SC_SEE_OTHER = 303;
int SC_NOT_MODIFIED = 304;
int SC_USE_PROXY = 305;
int SC_TEMPORARY_REDIRECT = 307;
int SC_BAD_REQUEST = 400;
int SC_UNAUTHORIZED = 401;
int SC_PAYMENT_REQUIRED = 402;
int SC_FORBIDDEN = 403;
int SC_NOT_FOUND = 404;
int SC_METHOD_NOT_ALLOWED = 405;
int SC_NOT_ACCEPTABLE = 406;
int SC_PROXY_AUTHENTICATION_REQUIRED = 407;
int SC_REQUEST_TIMEOUT = 408;
int SC_CONFLICT = 409;
int SC_GONE = 410;
int SC_LENGTH_REQUIRED = 411;
int SC_PRECONDITION_FAILED = 412;
int SC_REQUEST_ENTITY_TOO_LARGE = 413;
int SC_REQUEST_URI_TOO_LONG = 414;
int SC_UNSUPPORTED_MEDIA_TYPE = 415;
int SC_REQUESTED_RANGE_NOT_SATISFIABLE = 416;
int SC_EXPECTATION_FAILED = 417;
int SC_INTERNAL_SERVER_ERROR = 500;
int SC_NOT_IMPLEMENTED = 501;
int SC_BAD_GATEWAY = 502;
int SC_SERVICE_UNAVAILABLE = 503;
int SC_GATEWAY_TIMEOUT = 504;
int SC_HTTP_VERSION_NOT_SUPPORTED = 505;
-
向浏览器输出信息
resp.setContentType("text/html"); resp.setCharacterEncoding("utf-8"); resp.getWriter().print("名字: " + username); -
下载文件
@Override
protected void doGet(HttpServletRequest req, HttpServletResponse resp) throws ServletException, IOException {
    // 1. 获取下载文件路径
    String path = "/Users/lct/Documents/IdeaProjects/javaweb-02-servlet/response/src/main/resources/1.png";
    // 2. 获取文件名
    String fileName = path.substring(path.lastIndexOf("/") + 1);
    // 3. 让浏览器支持我们下载的东西
    resp.setHeader("Content-Disposition", "attachment; filename=" + URLEncoder.encode(fileName, StandardCharsets.UTF_8));
    // 4. 获取下载文件的输入流
    FileInputStream in = new FileInputStream(path);
    // 5. 创建缓冲区
    int len;
    byte[] buffer = new byte[1024];
    // 6. 获取输出流
    ServletOutputStream out = resp.getOutputStream();
    // 7. 将输出流写到缓冲区并输出到客户端
    while ((len = in.read(buffer)) > 0) {
        out.write(buffer, 0, len);
    }
    out.close();
    in.close();
}
- 验证码
@Override
protected void doGet(HttpServletRequest req, HttpServletResponse resp) throws ServletException, IOException {
    // 如何让浏览器3秒自动刷新一次
    resp.setHeader("Refresh", "3");
    // 在内存中创建一个图片
    BufferedImage image = new BufferedImage(80, 20, BufferedImage.TYPE_INT_RGB);
    // 得到图片
    Graphics2D graphics = (Graphics2D) image.getGraphics();
    // 设置图片背景颜色
    graphics.setColor(Color.white);
    graphics.fillRect(0, 0, 80, 20);
    // 给图片写数据
    graphics.setColor(Color.BLUE);
    graphics.setFont(new Font(null, Font.BOLD, 20));
    graphics.drawString(getNum(), 0, 20);
    // 告诉浏览器这个请求用图片的方式打开
    resp.setContentType("image/jpeg");
    // 网站存在缓存,不让它缓存
    resp.setDateHeader("expires", -1);
    resp.setHeader("Cache-Control", "no-cache");
    resp.setHeader("Pragma", "no-cache");
    // 把图片写给浏览器
    ImageIO.write(image, "jpg", resp.getOutputStream());
}

// 生成随机数
public String getNum() {
    String num = String.valueOf(new Random().nextInt(99999999));
    return "0".repeat(Math.max(0, 8 - num.length())) + num;
}
- 重定向
// 重定向本质
// resp.setHeader("Location", "/re/img");
// resp.setStatus(HttpServletResponse.SC_MOVED_TEMPORARILY); // 302
resp.sendRedirect("/re/img"); // 重定向
重定向与转发
相同点
- 页面都会实现跳转
不同点
- 请求转发url不会发生变化(307),重定向url会发生变化(302)
小案例
<html>
<body>
<form action="${pageContext.request.contextPath}/request" method="get">
    Username: <input type="text" name="username"> <br>
    Password: <input type="password" name="password"> <br>
    <input type="submit">
</form>
</body>
</html>
@Override
protected void doGet(HttpServletRequest req, HttpServletResponse resp) throws ServletException, IOException {
    // 处理请求
    String username = req.getParameter("username");
    String password = req.getParameter("password");
    System.out.println(username + ": " + password);
    // 重定向注意路径问题
    resp.sendRedirect("/re/success.jsp");
}
注意点:路径需要加上当前项目的默认路径
HttpServletRequest
代表客户端向浏览器发来的请求,通过它可以获得客户端端信息及要操作的服务
- 获取前端传来的参数
- 请求转发
结合案例
<%@ page contentType="text/html;charset=UTF-8" language="java" %>
<html>
<head>
    <title>登录</title>
</head>
<body>
    <div>
        <form action="${pageContext.request.contextPath}/login" method="post">
            用户名:<input type="text" name="username"> <br>
            密码:<input type="password" name="password"> <br>
            爱好:
            <input type="checkbox" name="hobbies" value="女孩"> 女孩
            <input type="checkbox" name="hobbies" value="代码"> 代码
            <input type="checkbox" name="hobbies" value="唱歌"> 唱歌
            <input type="checkbox" name="hobbies" value="电影"> 电影
            <br>
            <input type="submit">
        </form>
    </div>
</body>
</html>
@Override
protected void doPost(HttpServletRequest req, HttpServletResponse resp) throws ServletException, IOException {
    // 解决乱码问题
    req.setCharacterEncoding("utf-8");
  	resp.setContentType("text/html");
    resp.setCharacterEncoding("utf-8");
    String username = req.getParameter("username");
    String password = req.getParameter("password");
    String[] hobbies = req.getParameterValues("hobbies");
    System.out.println(username + ", " + password);
    System.out.println(Arrays.toString(hobbies));
    // 通过请求转发
    // 这里的"/"代表当前的web应用
    req.getRequestDispatcher("/success.jsp").forward(req, resp);
}
<%@ page contentType="text/html;charset=UTF-8" language="java" %>
<html>
<head>
    <title>Title</title>
</head>
<body>
    <h1>登录成功</h1>
</body>
</html>
Cookie & Session
会话:打开浏览器,点了很多超链接,访问多个web资源,关闭浏览器,该过程即为会话
有状态会话:一个同学来过教室并签到,下次再来我们就知道他曾经来过
Cookie:服务端给客户端一个信件,客户端下次访问服务器带上信件就行
Session:服务器登记你来过,下次你来的时候我从登记表来匹配你
Cookie
Demo
@Override
protected void doGet(HttpServletRequest req, HttpServletResponse resp) throws ServletException, IOException {
    req.setCharacterEncoding("utf-8");
    resp.setContentType("text/html");
    resp.setCharacterEncoding("utf-8");
    PrintWriter out = resp.getWriter();
    // 服务器从客户端获取
    Cookie[] cookies = req.getCookies(); // 说明cookie可能存在多个
    // 判断cookie是否存在
    if (cookies != null) {
        // 存在cookie
        for (Cookie cookie : cookies) {
            // 获取cookie名字
            if (cookie.getName().equals("last")) {
                // 获取cookie值
                Date date = new Date(Long.parseLong(cookie.getValue()));
                out.write("Last Visit: "+ date);
            }
        }
    }
    // 服务器给客户端响应一个cookie
    Cookie cookie = new Cookie("last", String.valueOf(System.currentTimeMillis()));
    // 设置cookie过期时间
    cookie.setMaxAge(60 * 60 * 24);
    resp.addCookie(cookie);
}
细节
- 一个cookie只能保存一个信息
- 一个web站点可以给浏览器发送多个cookie,最多放20个
- 大小有限制:4kb
- 300个cookie为浏览器上限
- 设置MaxAge为0即可删除cookie
编码解码
URLEncoder.encode("lct", StandardCharsets.UTF_8);
URLDecoder.decode("lct", StandardCharsets.UTF_8);
Session ⭐
- 服务器会给每一个用户创建一个Session对象
- 一个Session独占一个浏览器,只有浏览器没关,它就存在
- 用户登录后,所有账号相关网站它都可以访问
// Session创建的时候做了什么事情
Cookie cookie = new Cookie("JSESSIONID", id);
resp.addCookie(cookie);
添加Attr
@Override
protected void doGet(HttpServletRequest req, HttpServletResponse resp) throws ServletException, IOException {
    req.setCharacterEncoding("utf-8");
    resp.setContentType("text/html;charset=utf-8");
    resp.setCharacterEncoding("utf-8");
    // 得到Session
    HttpSession session = req.getSession();
    // 给Session中存东西
    session.setAttribute("name", new Person("哈哈", 18));
    String id = session.getId();
    // 判断是否为新创建的
    if (session.isNew()) {
        // 不会走这边,因为当浏览器打开时,Session就已经被创建
        resp.getWriter().write("session创建成功,id为" + id);
    } else {
        resp.getWriter().write("session已经存在,id为" + id);
    }
}
获取Attr
@Override
protected void doGet(HttpServletRequest req, HttpServletResponse resp) throws ServletException, IOException {
    req.setCharacterEncoding("utf-8");
    resp.setContentType("text/html;charset=utf-8");
    resp.setCharacterEncoding("utf-8");
    HttpSession session = req.getSession();
    Person person = (Person) session.getAttribute("name");
    String msg = person.toString();
    resp.getWriter().write(msg);
}
使Session失效
@Override
protected void doGet(HttpServletRequest req, HttpServletResponse resp) throws ServletException, IOException {
    HttpSession session = req.getSession();
    session.removeAttribute("name");
    session.invalidate();
}
两者区别
- Cookie是把用户当数据写给用户当浏览器,浏览器保存
- Session把用户的数据写到用户独占Session中,服务器端保存
- Session对象由服务器创建,Cookie需要手动添加
JSP
- 写JSP就是在写HTML
- 区别:
- HTML只给用户提供静态数据
- JSP页面中可以嵌入Java代码,为用户提供动态数据
- JSP最终也会转换为一个Java类(Servlet)
涉及依赖:
<dependency>
      <groupId>javax.servlet</groupId>
      <artifactId>javax.servlet-api</artifactId>
      <version>4.0.1</version>
</dependency>
<dependency>
      <groupId>javax.servlet</groupId>
      <artifactId>jstl</artifactId>
      <version>1.2</version>
</dependency>
<dependency>
    <groupId>org.apache.taglibs</groupId>
    <artifactId>taglibs-standard-impl</artifactId>
    <version>1.2.5</version>
</dependency>
JSP声明
这样写可以使代码位于全局(也就是说可以定义函数),否则代码仅在service方法内
<%!
    static {
        System.out.println("Loading Servlet");
    }
    private int globalVar = 0x3f3f3f3f;
    public void lct() {
        System.out.println("进入方法lct()");
    }
%>
自定义错误页面
web.xml
<error-page>
    <error-code>404</error-code>
    <location>/error/404.jsp</location>
</error-page>
<error-page>
    <error-code>500</error-code>
    <location>/error/500.jsp</location>
</error-page>
JSP页面
- 前者将两个页面合二为一
- 后者是通过拼接实现
<body>
    <%@ include file="common/header.jsp"%>
    <h1>网页主体</h1>
    <%@ include file="common/footer.jsp"%>

    <hr>

    <jsp:include page="common/header.jsp"/>
    <h1>网页主体</h1>
    <jsp:include page="common/footer.jsp"/>
</body>
JSP内置对象
- PageContext:存东西
- Request:存东西
- Response
- Session:存东西
- Application(ServletContext):存东西
- config(ServletConfig)
- out:输出到页面
- page:几乎不用
- exception
内置对象测试
<%@ page contentType="text/html;charset=UTF-8" language="java" %>
<html>
<head>
    <title>Title</title>
</head>
<body>
    <%
        pageContext.setAttribute("name01", "lct01");
        request.setAttribute("name02", "lct02");
        session.setAttribute("name03", "lct03");
        application.setAttribute("name04", "lct04");
    %>

    <%
        String name01 = (String) pageContext.findAttribute("name01");
        String name02 = (String) pageContext.findAttribute("name02");
        String name03 = (String) pageContext.findAttribute("name03");
        String name04 = (String) pageContext.findAttribute("name04");
        String name05 = (String) pageContext.findAttribute("name05");
    %>
    <h3>${name01}</h3>
    <h3>${name02}</h3>
    <h3>${name03}</h3>
    <h3>${name04}</h3>
    <h3>${name05}</h3>
</body>
</html>
- pageContext:保存到数据只在一个页面中有效
- request:保存的数据只在一次请求中有效,请求转发会携带这个数据
- session:保存的数据只在一次会话中有效,从打开浏览器到关闭浏览器
- application:保存的数据在服务器中有效,从打开服务器到关闭服务器
EL
- EL
- \(\$\{\}\)
- 获取数据
- 执行运算
- 获取Web开发的常用对象
JSTL
弥补HTML标签的不足
- 导入
<%@ taglib prefix="c" uri="http://java.sun.com/jsp/jstl/core" %>
遇到的问题
homebrew安装的Tomcat的目录:/opt/homebrew/Cellar/
Tomcat10很坑,不要靠近
- 解决“至少有一个JAR被扫描用于TLD但尚未包含TLD”的问题
- 找到Tomcat的
conf文件夹 - 打开
catalina.properties - 找到
tomcat.util.scan.StandardJarScanFilter.jarsToSkip=/- 修改为
tomcat.util.scan.StandardJarScanFilter.jarsToSkip=*.jar
- 修改为
- 找到Tomcat的
c:if
<body>
    <form action="coreif.jsp" method="get">
        <label>
            <input type="text" name="username" value="${param.username}">
        </label>
        <input type="submit" value="Login">
    </form>

    <c:if test="${param.username.equals('admin')}" var="isAdmin">
        <c:out value="Welcome Admin"/>
    </c:if>
    <c:out value="${isAdmin}"/>
</body>
JavaBean
实体类
- 必须要有一个无参构造
- 属性必须私有化
- 必须有get/set方法
- 一般用于和数据库字段做映射(ORM)
- ORM:对象关系映射
- 表 --> 类
- 字段 --> 属性
- 行记录 --> 对象
MVC
Model, View and Controller
- Controller
- Servlet
- 接收用户请求(req,请求参数,Session)
- 获取Model传的数据
- 视图跳转(重定向或者转发)
- View
- JSP
- 展示数据
- 提供可操作的请求(a, form, img ...)
- 登录
- 注册
- ...
- Model
- 控制业务操作(Service)
- 管理数据(CRUD --> Dao)
Filter
-
功能
- 处理乱码
- 登录验证
-
知识点
- Web服务器启动,Filter就初始化
- 过滤器的所有代码,在过滤特定请求的时候都会执行
- 过滤完成后,也要让过滤器持续同行
- Web服务器关闭时,Filter才会销毁
配置Filter
<filter>
    <filter-name>cef</filter-name>
    <filter-class>com.lu.filter.CharacterEncodingFilter</filter-class>
</filter>
<filter-mapping>
    <filter-name>cef</filter-name>
    <url-pattern>/servlet/*</url-pattern>
</filter-mapping>
监听器
- Listener
- 主要作用于GUI
- Adapter
- 有些Listener要实现很多方法,可以用它选择性地实现它们中的部分方法
JDBC
配置
<dependency>
    <groupId>com.mysql</groupId>
    <artifactId>mysql-connector-j</artifactId>
    <version>8.0.32</version>
</dependency>
String url = "jdbc:mysql://localhost:3306/[数据库名]?autoReconnect=true&useUnicode=true&characterEncoding=utf8&serverTimezone=GMT%2B8";
String username = "root";
String password = "lu123";
String driver = "com.mysql.cj.jdbc.Driver";
样例一
使用Statement
import java.sql.*;

public class TestJDBC {
    public static void main(String[] args) throws ClassNotFoundException, SQLException {
        Class.forName(driver);
        Connection connection = DriverManager.getConnection(url, username, password);
        Statement statement = connection.createStatement();
        String sql = "select * from people";
        ResultSet resultSet = statement.executeQuery(sql);
        while (resultSet.next()) {
            System.out.println("id = " + resultSet.getObject("id"));
            System.out.println("name = " + resultSet.getObject("name"));
            System.out.println("age = " + resultSet.getObject("age"));
            System.out.println("addr = " + resultSet.getObject("addr"));
        }
        resultSet.close();
        statement.close();
        connection.close();
    }
}
样例二
使用PreparedStatement
public class TestPreparedJDBC {
    public static void main(String[] args) throws ClassNotFoundException, SQLException {
        String url = "jdbc:mysql://localhost:3306/jdbc?autoReconnect=true&useUnicode=true&characterEncoding=utf8&serverTimezone=GMT%2B8";
        String username = "root";
        String password = "lu123";
        Class.forName("com.mysql.cj.jdbc.Driver");
        Connection connection = DriverManager.getConnection(url, username, password);
        String sql = "select * from people limit ?";
        PreparedStatement preparedStatement = connection.prepareStatement(sql);
        preparedStatement.setInt(1, 3);
        ResultSet resultSet = preparedStatement.executeQuery();
        while (resultSet.next()) {
            System.out.println("id = " + resultSet.getObject("id"));
            System.out.println("name = " + resultSet.getObject("name"));
        }
        resultSet.close();
        preparedStatement.close();
        connection.close();
    }
}
注意点
Connection、PreparedStatement、ResultSet在哪里实例化就在哪里关闭- Service层(使用Dao的地方)最好有
try & catch & finally
事务
ACID
- 原子性(Atomicity)
- 操作要么全部成功,要么全部失败
- 一致性(Consistency)
- 事务按照预期生效,数据的状态是预期的状态
- 隔离性(Isolation)
- 数据库为每一个用户开启的事务,不能被其他事务的操作数据所干扰,多个并发事务之间要相互隔离
- 持久性(Durability)
- 持久性是指一个事务一旦被提交,它对数据库中数据的改变就是永久性的

 浙公网安备 33010602011771号