arduino使用18D20测温元件测量环境温度
一、实验目的
使用18D20测温元件测量环境温度
二、实验工具及方法
arduino uno , 18D20
找出 DS18B20的电源线, 地线和数据线,电源线,地线分别连到 Arduino 实验板的+5V,GND 端口,数据总线连至数字端口10。

三、实验代码
在arduino ide中键入代码:
    #include <OneWire.h>

    // OneWire DS18S20, DS18B20, DS1822 Temperature Example
    //
    // http://www.pjrc.com/teensy/td_libs_OneWire.html
    //
    // The DallasTemperature library can do all this work for you!
    // https://github.com/milesburton/Arduino-Temperature-Control-Library

    OneWire  ds(10);  // on pin 10 (a 4.7K resistor is necessary)

    void setup(void) {
      Serial.begin(9600);
    }

    void loop(void) {
      byte i;
      byte present = 0;
      byte type_s;
      byte data[12];
      byte addr[8];
      float celsius, fahrenheit;

      if ( !ds.search(addr)) {
        Serial.println("No more addresses.");
        Serial.println();
        ds.reset_search();
        delay(250);
        return;
      }

      Serial.print("ROM =");
      for( i = 0; i < 8; i++) {
        Serial.write(' ');
        Serial.print(addr[i], HEX);
      }

      if (OneWire::crc8(addr, 7) != addr[7]) {
          Serial.println("CRC is not valid!");
          return;
      }
      Serial.println();

      // the first ROM byte indicates which chip
      switch (addr[0]) {
        case 0x10:
          Serial.println("  Chip = DS18S20");  // or old DS1820
          type_s = 1;
          break;
        case 0x28:
          Serial.println("  Chip = DS18B20");
          type_s = 0;
          break;
        case 0x22:
          Serial.println("  Chip = DS1822");
          type_s = 0;
          break;
        default:
          Serial.println("Device is not a DS18x20 family device.");
          return;
      }

      ds.reset();
      ds.select(addr);
      ds.write(0x44, 1);        // start conversion, with parasite power on at the end

      delay(1000);     // maybe 750ms is enough, maybe not
      // we might do a ds.depower() here, but the reset will take care of it.

      present = ds.reset();
      ds.select(addr);
      ds.write(0xBE);         // Read Scratchpad

      Serial.print("  Data = ");
      Serial.print(present, HEX);
      Serial.print(" ");
      for ( i = 0; i < 9; i++) {           // we need 9 bytes
        data[i] = ds.read();
        Serial.print(data[i], HEX);
        Serial.print(" ");
      }
      Serial.print(" CRC=");
      Serial.print(OneWire::crc8(data, 8), HEX);
      Serial.println();

      // Convert the data to actual temperature
      // because the result is a 16 bit signed integer, it should
      // be stored to an "int16_t" type, which is always 16 bits
      // even when compiled on a 32 bit processor.
      int16_t raw = (data[1] << 8) | data[0];
      if (type_s) {
        raw = raw << 3; // 9 bit resolution default
        if (data[7] == 0x10) {
          // "count remain" gives full 12 bit resolution
          raw = (raw & 0xFFF0) + 12 - data[6];
        }
      } else {
        byte cfg = (data[4] & 0x60);
        // at lower res, the low bits are undefined, so let's zero them
        if (cfg == 0x00) raw = raw & ~7;  // 9 bit resolution, 93.75 ms
        else if (cfg == 0x20) raw = raw & ~3; // 10 bit res, 187.5 ms
        else if (cfg == 0x40) raw = raw & ~1; // 11 bit res, 375 ms
         default is 12 bit resolution, 750 ms conversion time
      }
      celsius = (float)raw / 16.0;
      fahrenheit = celsius * 1.8 + 32.0;
      Serial.print("  Temperature = ");
      Serial.print(celsius);
      Serial.print(" Celsius, ");
      Serial.print(fahrenheit);
      Serial.println(" Fahrenheit");
    }
需要导入包,建议使用1.8以上版本软件

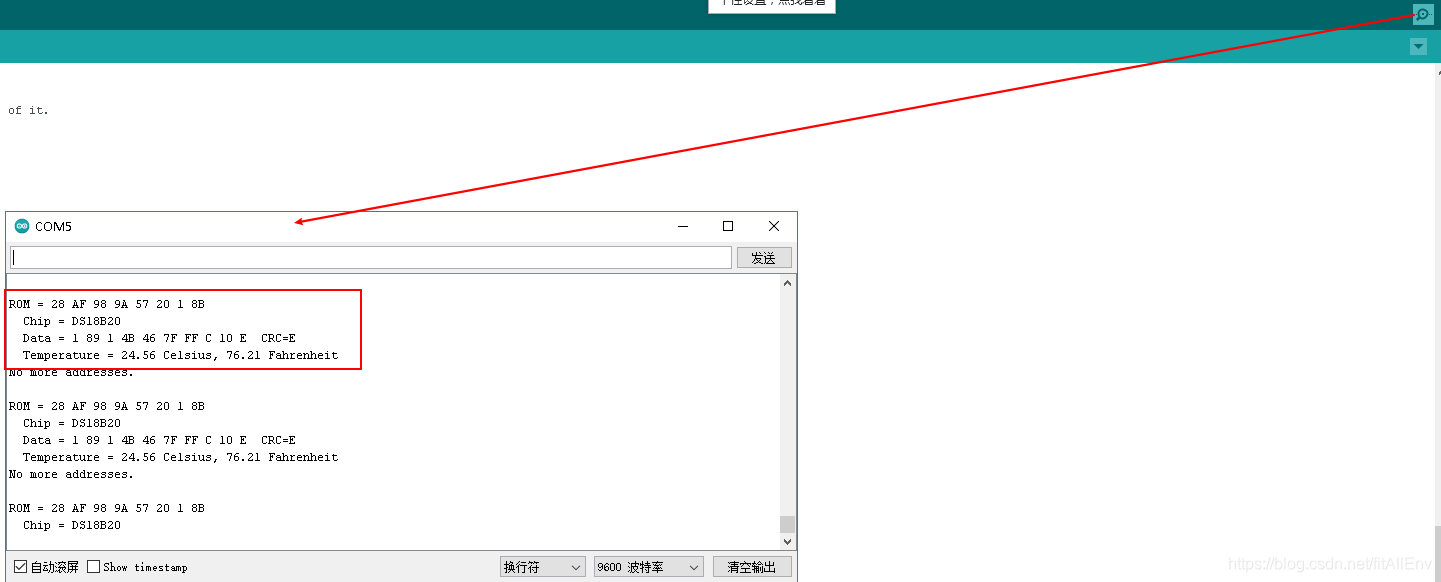
向arduino少入程序,打开串口输出

四、实验总结
由于以往的温度传感器输出的是模拟量,我们还要增加额外的 A/D和 D/A 芯片进行转换,那么对于 Arduino 外部接口资源并不丰富是一大挑战同时利用率不高,DS18B20解决了这个问题,一线总线独特而且经济的特点,完全适用 Arduino 平台,使用户可轻松地组建传感器网络。


