Spring Bean DI装配问题、高级装配、根据环境注入、同父类的多个子类注入问题、作用域、如何运行时注入配置
Spring的初衷
简化系统的复杂性;
使用依赖注入降低系统耦合度,减少开发者对对象的维护;
提供切面编程,将模块组件化,而非代码直接调用;
提供特定模块的模板,避免开发者写重复代码;
利于测试;
Spring Bean的装配
三种装配方式:XML、JavaConfig、自动装配
XML通过XML文件方式注入
JavaConfig通过@Configuration和@Bean注入
自动装配通过@Component和@Autowired注入
自动装配
@Component
@ComponentScan,也可以通过XML配置启动扫描
@Autowired、@Inject
可以通过构造器注入 setter注入
Spring高级装配
1.根据环境生成不同bean
场景:在不同的环境中,需要注入不同的Bean,比如开发环境和生产环境中某些配置的类是不同的,这个时候呢,就可以通过 @profile 注解来表示这个Bean是在哪个环境中会被注入。
@Component
@Profile("dev")
public class MyConfig {
}
当配置成了 @Profile("dev") 的时候,当Spring Bean容器启动并注入时,会先去配置中寻找 spring.profiles.active 的值,如果它的值是 dev 那么MyConfig的Bean会被注入到容器中;如果它不是的话,那么这个Bean不会被注入;如果 spring.profiles.active 的值是空的话,会去判断 spring.profiles.default 的值,如果匹配上了那么就注入,否则不会注入;如果连 spring.profiles.default 的值都是空的话,那么所有@Profile的类都不会被注入。
2.根据条件生成bean:
场景:当对Bean的注入需要限定一定的条件时,可以用到 @Conditional
首先,使用这个注解需要指明具体的类class👇。
@Component
@Conditional({MyCondition.class})
public class MyConfig {
}
其次,这个MyCondition需要是Condition接口的实现类👇,这里的matches返回值true表示这个Bean可以注入,否则不能注入。
public class MyCondition implements Condition {
    @Override
    public boolean matches(ConditionContext context, AnnotatedTypeMetadata metadata) {
        return false;
    }
}
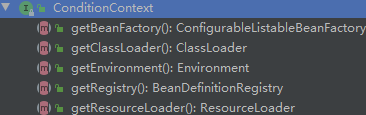
这里面的参数 ConditionContext context 与 AnnotatedTypeMetadata metadata
context代表Spring上下文信息,可以获得Bean信息,配置信息等,metadata代表的注解信息。
最后,上面的 @Profile 就是一个 就是一个实现了 @Conditional 的注解,源码👇。
@Retention(RetentionPolicy.RUNTIME)
@Target({ElementType.TYPE, ElementType.METHOD})
@Documented
@Conditional(ProfileCondition.class)
public @interface Profile {

    /**
     * The set of profiles for which the annotated component should be registered.
     */
    String[] value();

}
class ProfileCondition implements Condition {

    @Override
    public boolean matches(ConditionContext context, AnnotatedTypeMetadata metadata) {
        if (context.getEnvironment() != null) {
            MultiValueMap<String, Object> attrs = metadata.getAllAnnotationAttributes(Profile.class.getName());
            if (attrs != null) {
                for (Object value : attrs.get("value")) {
                    if (context.getEnvironment().acceptsProfiles(((String[]) value))) {
                        return true;
                    }
                }
                return false;
            }
        }
        return true;
    }

}
3.处理Bean注入歧义
场景:有多个类实现的同一个接口A的时候,当其它类对接口A进行自动注入时,这个时候Spring就没法判断到底用哪一个类的Bean。
注入时,设置主要的类@Primary
需要给Bean加上 @Primary ,表示有多个同父类的Bean被注入时,加了@Primary的Bean是首先被自动注入的。
例如:Animal接口的实现类Dog、Cat、Turtle。Turtle类注入是加了@Primary的,那么Turtle是被首先注入的
//接口
public interface Animal {}

@Component
public class Dog implements Animal { }

@Component
public class Cat implements Animal { }

@Component
@Primary
public class Turtle implements Animal { }

//最终注入在AnimalService中的是Turtle
@Service
public class AnimalService {
    @Autowired
    private Animal animal;

    @PostConstruct
    public void init() {
        System.out.println(animal.toString());
    }
}
最终打印结果:com.lcm.springmvc.user.model.Turtle@6869a3b3
同样,可以在@Bean的注解加上@Primary注解
给指定类设置名称@Qualifier
@Primary只能让最主要的类可以被明确注入,如果同父类的多个类都需要被注入呢,比如上面的AnimalService中,同时需要注入Cat和Dog呢,可以通过@Qualifier实现。
下面是例子:还是上面的Animal接口,Dog、Cat、Turtle实现类
public interface Animal {}

@Component
@Qualifier("dog")
public class Dog implements Animal { }

@Component
@Qualifier("cat")
public class Cat implements Animal { }

@Component
@Qualifier("turtle")
public class Turtle implements Animal { }

@Service
public class AnimalService {
    @Autowired
    @Qualifier("turtle")
    private Animal animalTurtule;
    @Autowired
    @Qualifier("dog")
    private Animal animalDog;
    @Autowired
    @Qualifier("cat")
    private Animal animalCat;

    @PostConstruct
    public void init() {
        System.out.println(animalTurtule.toString());
        System.out.println(animalDog.toString());
        System.out.println(animalCat.toString());
    }
}
最终打印结果:
com.lcm.springmvc.user.model.Turtle@6f4ade6e
com.lcm.springmvc.user.model.Dog@39e43310
com.lcm.springmvc.user.model.Cat@eb507b9
但是,假如Turtle类出现一个子类叫GreenTurtle,它需要被AnimalService所注入,这个时候该怎么办呢。很容易想到的就是@Qualifier("greenTurtle"),当然,这是一种解决办法,但如果我们想把turtle和green这两个属性抽取出来呢,是不是就加两个注解@Qualifier("turtle")和@Qualifier("green")呢。早些的Java版本不支持重复注解,后来有了@Repeatable表示注解可重复。可以采取这种更好的方式,,重写一个自己的@Qualifier注解。
//这个注解表示乌龟属
@Target({ElementType.FIELD, ElementType.METHOD, ElementType.PARAMETER, ElementType.TYPE, ElementType.ANNOTATION_TYPE})
@Retention(RetentionPolicy.RUNTIME)
@Qualifier
public @interface Chinemys { }

//这个注解表示绿色
@Target({ElementType.FIELD, ElementType.METHOD, ElementType.PARAMETER, ElementType.TYPE, ElementType.ANNOTATION_TYPE})
@Retention(RetentionPolicy.RUNTIME)
@Qualifier
public @interface Green { }

//这个注解表示常规的
@Target({ElementType.FIELD, ElementType.METHOD, ElementType.PARAMETER, ElementType.TYPE, ElementType.ANNOTATION_TYPE})
@Retention(RetentionPolicy.RUNTIME)
@Qualifier
public @interface Normal { }

//普通乌龟
@Component
@Chinemys
@Normal
public class Turtle implements Animal { }

//绿毛龟
@Component
@Chinemys
@Green
public class GreenTurtle extends Turtle { }

//最终注入
@Service
public class AnimalService {
    @Autowired
    @Chinemys
    @Normal
    private Animal animalTurtle;
    @Autowired
    @Chinemys
    @Green
    private Animal animalGreenTurtle;

    @PostConstruct
    public void init() {
        System.out.println(animalTurtle.toString());
        System.out.println(animalGreenTurtle.toString());
    }
}
输出结果:
com.lcm.springmvc.user.model.Turtle@53a5e217
com.lcm.springmvc.user.model.GreenTurtle@624a24f6
这样的好处就是,避免了注解重复,避免了对字符串的管理(万一手写出错呢),更好的保证了多样性的子类Bean的注入。
4.作用域@Scope
Spring Bean在注入时,默认是单例的。单例是有好处的,比如减少了后续new对象的开销和回收对象的开销(空间换时间)。但是呢,如果有些特定的场景需要在不同的情况下才创建对象呢,这个时候就可以在Bean注入时配置@Scope作用域。
四个作用域:singleton,prototype(多例,需要时生成对象),session(一个session生成一个对象),request(一次请求一个对象)。
@Component
@Scope(ConfigurableBeanFactory.SCOPE_SINGLETON)
public class ScopeBean { }
当然,也可以手写字符串"singleton",不过避免出错还是用常量类吧。
public interface ConfigurableBeanFactory extends HierarchicalBeanFactory, SingletonBeanRegistry {
    String SCOPE_SINGLETON = "singleton";
    String SCOPE_PROTOTYPE = "prototype";
}
public interface WebApplicationContext extends ApplicationContext {

    String SCOPE_REQUEST = "request";
    String SCOPE_SESSION = "session";
    String SCOPE_GLOBAL_SESSION = "globalSession";
    String SCOPE_APPLICATION = "application";
}
另外值得关注的一个问题就是,关于request级别的作用域,当request作用域的bean被其它单例的类注入时,会发生什么?因为request作用域的bean在一次请求到来时才会生成bean并注入,而单例的bean在容器启动时就被注入了,这个时候单例的bean会将变量中的bean也注入,那么这个被注入的request作用域bean此时是什么呢?代码例子👇
@Component
@Scope(WebApplicationContext.SCOPE_REQUEST)
public class ScopeBean { }

@Service
public class ScopeService {

    @Autowired
    private ScopeBean scopeBean;

    @PostConstruct
    public void init() {
        System.out.println(scopeBean.toString());
    }

    public String getScopeInfo() {
        return scopeBean.toString();
    }
}
如果代码像上面这个例子这样(单例bean注入request作用域的bean),然后启动项目会发生什么呢,答案在👇
org.springframework.beans.factory.UnsatisfiedDependencyException: Error creating bean with name 'scopeService': Unsatisfied dependency expressed through field 'scopeBean'; nested exception is org.springframework.beans.factory.BeanCreationException: Error creating bean with name 'scopeBean': Scope 'request' is not active for the current thread; consider defining a scoped proxy for this bean if you intend to refer to it from a singleton; nested exception is java.lang.IllegalStateException: No thread-bound request found: Are you referring to request attributes outside of an actual web request, or processing a request outside of the originally receiving thread? If you are actually operating within a web request and still receive this message, your code is probably running outside of DispatcherServlet/DispatcherPortlet: In this case, use RequestContextListener or RequestContextFilter to expose the current request.
这就表示了这种方式是不被允许了,那么Spring提供了什么方案呢?下面是更新之后的例子👇
@Component
@Scope(WebApplicationContext.SCOPE_REQUEST, proxyMode = ScopedProxyMode.TARGET_CLASS)
public class ScopeBean { }
这就表示当一个request作用域的bean被注入到singleton作用域的bean时,spring一开始会把ScopeBean的代理的对象给注入到ScopeService中
5.运行时注入(注入配置文件参数等)
通过注入Environment的方式
通过@Value("${}")占位符的方式
通过SpringEL表达式


 浙公网安备 33010602011771号