SpringMVC 原理 - 设计原理、启动过程、请求处理详细解读
SpringMVC 原理 - 设计原理、启动过程、请求处理详细解读
目录
一、 设计原理
Servlet 规范
SpringMVC 是基于 Servlet 的。
Servlet 是运行在 web 服务器上的程序,它接收并响应来自 web 客户端的请求(通常是 HTTP 请求)。
Servlet 规范有三个主要的技术点: Servlet, Filter, Listener
1. Servlet
Servlet 是实现 Servlet 接口的程序。对于 HTTP, 通常继承 javax.servlet.http.HttpServlet, 可以为不同的 URL 配置不同的 Servlet。Servlet 是"单例"的,所有请求共用一个 Servlet, 因此对于共享变量(比如实例变量),需要自己保证其线程安全性。DispatcherServlet 便是一个 Servlet。
Servlet 生命周期
-
Servlet 实例化后,Servlet 容器会调用
init方法初始化。init 只会被调用一次,且必须成功执行才能提供服务。 -
客户端每次发出请求,Servlet 容器调用
service方法处理请求。 -
Servlet 被销毁前,Servlet 容器调用
destroy方法。通常用来清理资源,比如内存,文件,线程等。
2. Filter
Filter 是过滤器,用于在客户端的请求访问后端资源之前,拦截这些请求;或者在服务器的响应发送回客户端之前,处理这些响应。只有通过 Filter 的请求才能被 Servlet 处理。
Filter 可以通过配置(xml 或 java-based)拦截特定的请求,在 Servlet 执行前后(由 chain.doFilter 划分)处理特定的逻辑,如权限过滤,字符编码,日志打印,Session 处理,图片转换等
Filter 生命周期
-
Filter 实例化后,Servlet 容器会调用
init方法初始化。init 方法只会被调用一次,且成功执行(不抛出错误且没有超时)才能提供过滤功能 -
客户端每次发出请求,Servlet 容器调用
doFilter方法拦截请求。public void doFilter(ServletRequest request, ServletResponse response, FilterChain chain) throws java.io.IOException, ServletException { // 客户端的请求访问后端资源之前的处理逻辑 System.out.println("我在 Servlet 前执行"); // 把请求传回过滤链,即传给下一个 Filter, 或者交给 Servlet 处理 chain.doFilter(request,response); // 服务器的响应发送回客户端之前的处理逻辑 System.out.println("我在 Servlet 后执行"); } -
Filter 生命周期结束时调用
destroy方法,通常用来清理它所持有的资源,比如内存,文件,线程等。
3. Listener
Listener 是监听某个对象的状态变化的组件,是一种观察者模式。
被监听的对象可以是域对象 ServletContext, Session, Request
监听的内容可以是域对象的创建与销毁,域对象属性的变化
| ServletContext | HttpSession | ServletRequest | |
|---|---|---|---|
| 对象的创建与销毁 | ServletContextListener | HttpSessionListener | ServletRequestListener |
| 对象的属性的变化 | ServletContextAttributeListener | HttpSessionAttributeListener | ServletRequestAttributeListener |
ContextLoaderListener 是一个 ServletContextListener, 它会监听 ServletContext 创建与销毁事件
public interface ServletContextListener extends EventListener {

    // 通知 ServletContext 已经实例化完成了,这个方法会在所有的 servlet 和 filter 实例化之前调用
    public void contextInitialized(ServletContextEvent sce);

    // 通知 ServletContext 将要被销毁了,这个方法会在所有的 servlet 和 filter 调用 destroy 之后调用
    public void contextDestroyed(ServletContextEvent sce);

}
Servlet 的配置与 SpringMVC 的实现
通过 web.xml
这个是以前常用的配置方式。Servlet 容器会在启动时加载根路径下 /WEB-INF/web.xml 配置文件。根据其中的配置加载 Servlet, Listener, Filter 等,然后根据 Servlet 规范调用相应的方法。下面是 SpringMVC 的常见配置:
    <listener>
        <!--监听器,用来管理 root WebApplicationContext 的生命周期:加载、初始化、销毁-->
        <listener-class>org.springframework.web.context.ContextLoaderListener</listener-class>
    </listener>

    <context-param>
        <!--root web application context, 通过 ContextLoaderListener 加载-->
        <param-name>contextConfigLocation</param-name>
        <param-value>classpath:applicationContext.xml</param-value>
    </context-param>

    <context-param>
        <!--可以不配置,默认为 XmlWebApplicationContext-->
        <param-name>contextClass</param-name>
        <!--WebApplicationContext 实现类-->
        <param-value>org.springframework.web.context.support.XmlWebApplicationContext</param-value>
    <context-param>

    <servlet>
        <servlet-name>dispatcher</servlet>
        <servlet-class>org.springframework.web.servlet.DispatcherServlet</servlet-class>
        <init-param>
            <!--DispatchServlet 持有的 WebApplicationContext-->
            <param-name>contextConfigLocation</param-name>
            <param-value>/WEB-INF/applicationContext.xml</param-value>
            <load-on-startup>1</load-on-startup>
        </init-param>
    </servlet>
    <servlet-mapping>
        <servlet-name>dispatch</servlet-name>
        <servlet-pattern>/*</servlet-pattern>
    </servlet-mapping>
通过 ServletContainerInitializer
这个是 Servlet 3.0 的规范,新的 code-based 的配置方式。简单来说就是容器会去加载文件JAR包下 META-INF/services/javax.servlet.ServletContainerInitalizer 文件中声明的 ServletContainerInitalizer(SCI) 实现类,并调用他的 onStartup 方法,可以通过 @HandlesTypes 注解将特定的 class 添加到 SCI。
在 spring-web 模块下有个文件 META-INF/services/javax.servlet.ServletContainerInitializer, 其内容为
org.springframework.web.SpringServletContainerInitializer
SpringServletContainerInitializer
@HandlesTypes(WebApplicationInitializer.class)
public class SpringServletContainerInitializer implements ServletContainerInitializer {

	@Override
	public void onStartup(@Nullable Set<Class<?>> webAppInitializerClasses, ServletContext servletContext)
			throws ServletException {

		List<WebApplicationInitializer> initializers = new LinkedList<>();

		if (webAppInitializerClasses != null) {
			for (Class<?> waiClass : webAppInitializerClasses) {
				// Be defensive: Some servlet containers provide us with invalid classes,
				// no matter what @HandlesTypes says...
				if (!waiClass.isInterface() && !Modifier.isAbstract(waiClass.getModifiers()) &&
						WebApplicationInitializer.class.isAssignableFrom(waiClass)) {
					try {
						initializers.add((WebApplicationInitializer)
								ReflectionUtils.accessibleConstructor(waiClass).newInstance());
					}
					catch (Throwable ex) {
						throw new ServletException("Failed to instantiate WebApplicationInitializer class", ex);
					}
				}
			}
		}

		if (initializers.isEmpty()) {
			servletContext.log("No Spring WebApplicationInitializer types detected on classpath");
			return;
		}

		servletContext.log(initializers.size() + " Spring WebApplicationInitializers detected on classpath");
		AnnotationAwareOrderComparator.sort(initializers);
		for (WebApplicationInitializer initializer : initializers) {
			initializer.onStartup(servletContext);
		}
	}

}
它会探测并加载 ClassPath 下 WebApplicationContextInitializer 的实现类,调用它的 onStartUp 方法。
简单来说,只要 ClassPath 下存在 WebApplicationContextInitializer 的实现类,SpringMVC 会自动发现它,并且调用他的 onStartUp 方法
下面是一个 SpringMVC 的 java-based 配置方式:
public class MyWebAppInitializer implements WebApplicationInitializer {

    @Override
    public void onStartup(ServletContext container) {
        // 创建根容器
        AnnotationConfigWebApplicationContext rootContext = new AnnotationConfigWebApplicationContext();
        rootContext.register(AppConfig.class);

        // 创建 ContextLoaderListener
        // 用来管理 root WebApplicationContext 的生命周期:加载、初始化、销毁
        container.addListener(new ContextLoaderListener(rootContext));

        // 创建 dispatcher 持有的上下文容器
        AnnotationConfigWebApplicationContext dispatcherContext = new AnnotationConfigWebApplicationContext();
        dispatcherContext.register(DispatcherConfig.class);

        // 注册、配置 dispatcher servlet
        ServletRegistration.Dynamic dispatcher = container.addServlet("dispatcher", new DispatcherServlet(dispatcherContext));
        dispatcher.setLoadOnStartup(1);
        dispatcher.addMapping("/");
    }
}
可见,它和上面 web.xml 配置方式基本一致,也配置了 ContextLoaderListener 和 DispatcherServlet 以及其持有的 application context,不过通过代码实现,逻辑更加清晰。
如果每次都需要创建 ContextLoaderListener 和 DispatcherServlet,显然很麻烦,不符合 KISS 原则(keep it simple and stupid)。
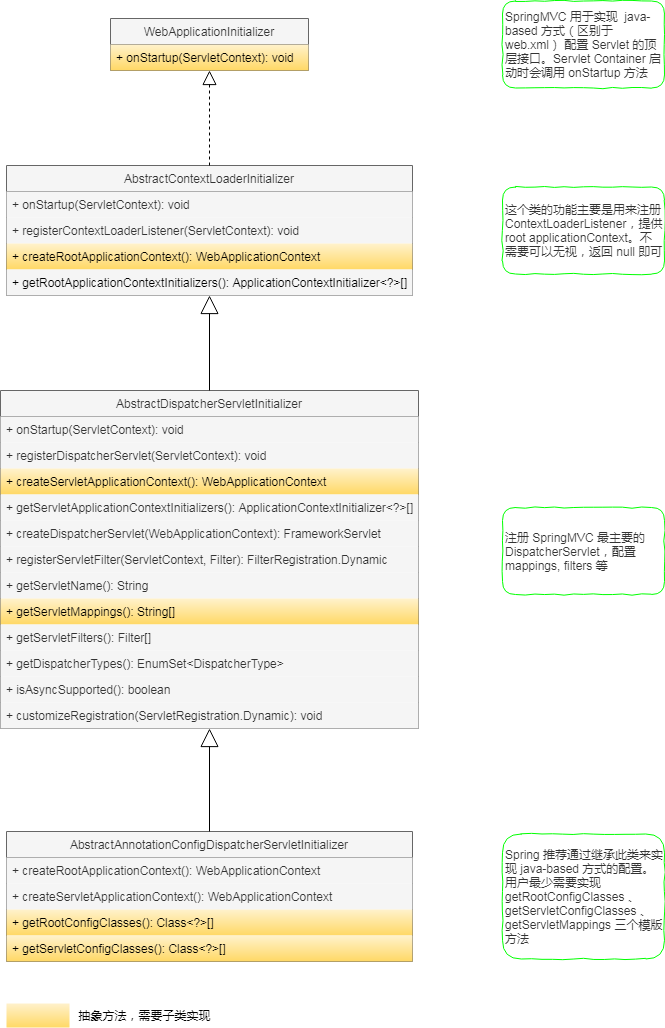
SpringMVC 为 WebApplicationInitializer 提供了基本的抽象实现类

代码实现这里不再赘述,总之就是利用模版方法,调用钩子方法。子类只需提供少量的配置即可完成整个逻辑的创建。
所以,更简单的方法是继承 AbstractAnnotationConfigDispatcherServletInitializer
public class MyWebAppInitializer extends AbstractAnnotationConfigDispatcherServletInitializer {

    @Override
    protected Class<?>[] getRootConfigClasses() {
        return null;
    }

    @Override
    protected Class<?>[] getServletConfigClasses() {
        return new Class<?>[] { MyWebConfig.class };
    }

    @Override
    protected String[] getServletMappings() {
        return new String[] { "/" };
    }
}
WebApplicationContext
SpringMVC 用 Spring 化的方式来管理 web 请求中的各种对象。
什么是 Spring 化? IOC 和 AOP, 这不是本文的重点,具体自行查阅。
SpringMVC 会通过 WebApplicationContext 来管理服务器请求中涉及到的各种对象和他们之间的依赖关系。我们不需要花费大量的精力去理清各种对象之间的复杂关系,而是以离散的形式专注于单独的功能点。
WebApplicationContext 继承自 ApplicationContext, 它定义了一些新的作用域,提供了 getServletContext 接口。
public interface WebApplicationContext extends ApplicationContext {

    // 根容器名,作为 key 存储在 ServletContext 中; ServletContext 持有的 WebApplicationContext
    String ROOT_WEB_APPLICATION_CONTEXT_ATTRIBUTE = WebApplicationContext.class.getName() + ".ROOT";

    /**
     * 这三个是 WebApplicationContext 特有的作用域
     * 通过 WebApplicationContextUtils.registerWebApplicationScopes 注册相应的处理器
     */
    String SCOPE_REQUEST = "request";
    String SCOPE_SESSION = "session";
    String SCOPE_APPLICATION = "application";

    /**
     * ServletContext 在 WebApplicationContext 中的名字
     * 通过 WebApplicationContextUtils.registerEnvironmentBeans 注册到 WebApplicationContext 中
     */
    String SERVLET_CONTEXT_BEAN_NAME = "servletContext";

    /**
      * ServletContext 和 ServletConfig 配置参数在 WebApplicationContext 中的名字
      * ServletConfig 的参数具有更高的优先级,会覆盖掉 ServletContext 中的参数
      * 值为 Map<String, String> 结构
      */
    String CONTEXT_PARAMETERS_BEAN_NAME = "contextParameters";

    /**
      * ServletContext 属性信息在 WebApplicationContext 中的名字
      * 值为 Map<String, String> 结构
      * 属性是用来描述 ServletContext 本身的一些信息的
      */
    String CONTEXT_ATTRIBUTES_BEAN_NAME = "contextAttributes";


    /**
     * 获取 ServletContext 接口
     */
    @Nullable
    ServletContext getServletContext();

}
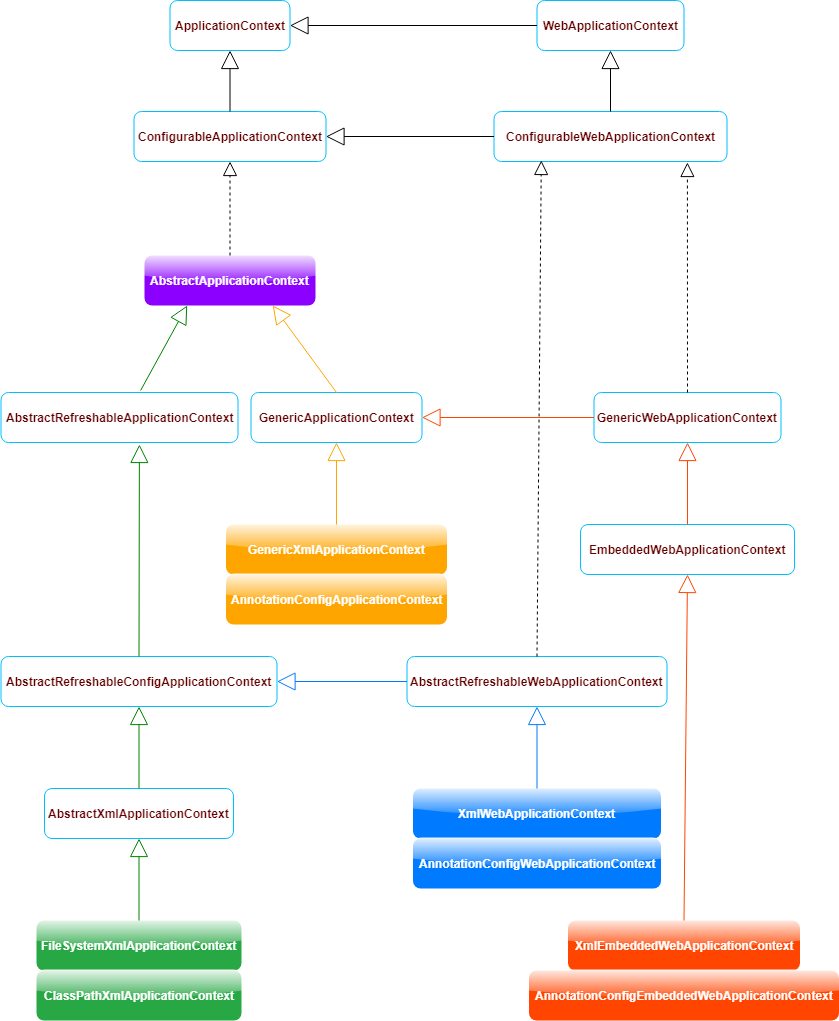
WebApplicationContext 类图

ApplicationContext 有一个抽象实现类 AbstractApplicationContext, 模板方法的设计模式。它有一个 refresh 方法,它定义了加载或初始化 bean 配置的基本流程。后面的实现类提供了不同的读取配置的方式,可以是 xml, annotation, web 等,并且可以通过模板方法定制自己的需求。
AbstractApplicationContext 有两个实现体系, 他们的区别是每次 refresh 时是否会创建一个新的 DefaultListableBeanFactory。DefaultListableBeanFactory 是实际存放 bean 的容器, 提供 bean 注册功能。
-
AbstractRefreshableApplicationContext 这个 refreshable 并不是指 refresh 这个方法,而是指 refreshBeanFactory 这个方法。他会在每次 refresh 时创建一个新的 BeanFactory(DefaultListableBeanFactory)用于存放 bean,然后调用 loadBeanDefinitions 将 bean 加载到新创建的 BeanFactory。
-
GenericApplicationContext 内部持有一个 DefaultListableBeanFactory, 所以可以提前将 Bean 加载到 DefaultListableBeanFactory, 它也有 refreshBeanFactory 方法,但是这个方法啥也不做。
根据读取配置的方式,可以分成 3 类,基于 xml 的配置, 基于 annotation 的配置和基于 java-based 的配置
-
基于 xml 的配置使用 xml 作为配置方式, 此类的名字都含有 Xml, 比如从文件系统路径读取配置的 FilePathXmlApplicationContext, 从 ClassPath 读取配置的 ClassPathXmlApplicationContext, 基于 Web 的 XmlWebApplicationContext 等
-
基于注解的配置通过扫描指定包下面具有某个注解的类,将其注册到 bean 容器,相关注解有 @Component, @Service, @Controller, @Repository,@Named 等
-
java-based 的配置方式目前是大势所趋,结合注解的方式使用简单方便易懂,主要是 @Configuration 和 @Bean
上面几个类是基础类,下面是 SpringMVC 相关的 WebApplicationContext
XmlWebApplicationContext 和 AnnotationConfigWebApplicationContext 继承自 AbstractRefreshableApplicationContext,表示它们会在 refresh 时新创建一个 DefaultListableBeanFactory, 然后 loadBeanDefinitions。 它们分别从 xml 和 注解类(通常是 @Configuration 注解的配置类)中读取配置信息。
XmlEmbeddedWebApplicationContext 和 AnnotationConfigEmbeddedWebApplicationContext 继承自 GenericApplicationContext,表示他们内部持有一个 DefaultListableBeanFactory, 从名字可以看出它们是用于 "Embedded" 方面的,即 SpringBoot 嵌入容器所使用的 WebApplicationContext
SpringMVC 应用中几乎所有的类都交由 WebApplicationContext 管理,包括业务方面的 @Controller, @Service, @Repository 注解的类, ServletContext, 文件处理 multipartResolver, 视图解析器 ViewResolver, 处理器映射器 HandleMapping 等。
refresh 流程
AbstractApplicationContext#refresh
@Override
public void refresh() throws BeansException, IllegalStateException {
    synchronized (this.startupShutdownMonitor) {
        prepareRefresh();

        // XmlWebApplicationContext 和 AnnotationConfigWebApplicationContext 会在这里执行 refreshBeanFactory
        // 创建一个新的 DefaultListableBeanFactory 然后从 xml 或 java-config 配置中 loadBeanDefinitions
        ConfigurableListableBeanFactory beanFactory = obtainFreshBeanFactory();

        prepareBeanFactory(beanFactory);

        try {
            // 在这里会配置一些 web 相关的东西,注册 web 相关的 scope
            postProcessBeanFactory(beanFactory);

            // 下面步骤和初始化其他 ApplicationContext 基本一致,忽略
            invokeBeanFactoryPostProcessors(beanFactory);
            registerBeanPostProcessors(beanFactory);
            initMessageSource();
            initApplicationEventMulticaster();
            onRefresh();
            registerListeners();
            finishBeanFactoryInitialization(beanFactory);
            finishRefresh();
        }

        catch (BeansException ex) {
            if (logger.isWarnEnabled()) {
                logger.warn("Exception encountered during context initialization - " +
                        "cancelling refresh attempt: " + ex);
            }

            destroyBeans();
            cancelRefresh(ex);
            throw ex;
        }

        finally {
            resetCommonCaches();
        }
    }
}
AbstractRefreshableWebApplicationContext 重写了 postProcessBeanFactory 方法
AbstractRefreshableWebApplicationContext#postProcessBeanFactory
@Override
protected void postProcessBeanFactory(ConfigurableListableBeanFactory beanFactory) {
    // servlet-context aware 后处理器
    beanFactory.addBeanPostProcessor(new ServletContextAwareProcessor(this.servletContext, this.servletConfig));
    beanFactory.ignoreDependencyInterface(ServletContextAware.class);
    beanFactory.ignoreDependencyInterface(ServletConfigAware.class);

    // 注册 scope: request, session, application;
    // bean 依赖: ServletRequest, ServletResponse, HttpSession, WebRequest, beanFactory
    WebApplicationContextUtils.registerWebApplicationScopes(beanFactory, this.servletContext);

    // 注册 servletContext, servletConfig, contextParameters, contextAttributes
    WebApplicationContextUtils.registerEnvironmentBeans(beanFactory, this.servletContext, this.servletConfig);
}
这些方法都比较简单,不再展开
SpringMVC 通过两种方式创建 WebApplicationContext
一种是通过 ContextLoaderListener, 它创建的 WebApplicationContext 称为 root application context,或者说根容器。一个 ServletContext 中只能有一个根容器,而一个 web application 中只能有一个 ServletContext,因此一个 web 应用程序中只能有一个根容器,根容器的作用和 ServletContext 类似,提供了一个全局的访问点,可以用于注册多个 servlet 共享的业务 bean。 根容器不是必要的。
另一种是通过 DispatcherServlet, 它创建的 WebApplicationContext,称为上下文容器,上下文容器只在 DispatcherServlet 范围内有效。DispatcherServlet 本质上是一个 Servlet,因此可以有多个 DispatcherServlet,也就可以有多个上下文容器。
如果上下文容器的 parent 为 null, 并且当前 ServletContext 中存在根容器,则把根容器设为他的父容器。
二、 启动过程
ContextLoaderListener
一般我们会配置(web.xml 或 java-based)一个 ContextLoaderListener, 它实现了 ServletContextListener 接口, 主要用来加载根容器。
根据 Servelet 规范,这个 Listener 会在 ServletContext 创建时执行 ServletContextListener#contextInitialized 方法。
相关代码如下:
@Override
public void contextInitialized(ServletContextEvent event) {
    initWebApplicationContext(event.getServletContext());
}
ContextLoader#initWebApplicationContext
/**
 * Initialize Spring's web application context for the given servlet context,
 * using the application context provided at construction time, or creating a new one
 * according to the "{@link #CONTEXT_CLASS_PARAM contextClass}" and
 * "{@link #CONFIG_LOCATION_PARAM contextConfigLocation}" context-params.
 * @param servletContext current servlet context
 * @return the new WebApplicationContext
 * @see #ContextLoader(WebApplicationContext)
 * @see #CONTEXT_CLASS_PARAM
 * @see #CONFIG_LOCATION_PARAM
 */
public WebApplicationContext initWebApplicationContext(ServletContext servletContext) {
    // 当前 ServletContext 中是否已经存在 root web applicationContext
    // 一个 ServletContext 中只能有一个根容器
    if (servletContext.getAttribute(WebApplicationContext.ROOT_WEB_APPLICATION_CONTEXT_ATTRIBUTE) != null) {
        throw new IllegalStateException(
                "Cannot initialize context because there is already a root application context present - " +
                "check whether you have multiple ContextLoader* definitions in your web.xml!");
    }

    servletContext.log("Initializing Spring root WebApplicationContext");
    Log logger = LogFactory.getLog(ContextLoader.class);
    if (logger.isInfoEnabled()) {
        logger.info("Root WebApplicationContext: initialization started");
    }
    long startTime = System.currentTimeMillis();

    try {
        // context 可以通过构造方法传入(这个在 java config 方式会用到)
        if (this.context == null) {
            // 若 web application 为空,创建一个, 这个一般是 web.xml 方式配置的
            this.context = createWebApplicationContext(servletContext);
        }
        if (this.context instanceof ConfigurableWebApplicationContext) {
            ConfigurableWebApplicationContext cwac = (ConfigurableWebApplicationContext) this.context;
            if (!cwac.isActive()) {
                // The context has not yet been refreshed -> provide services such as
                // setting the parent context, setting the application context id, etc
                if (cwac.getParent() == null) {
                    // The context instance was injected without an explicit parent ->
                    // determine parent for root web application context, if any.
                    ApplicationContext parent = loadParentContext(servletContext);
                    cwac.setParent(parent);
                }
                // 设置 ID, ServletContext, contextConfigLocation
                // 执行 refresh 操作
                configureAndRefreshWebApplicationContext(cwac, servletContext);
            }
        }

        // 将 web application context 放进 servlet context 中
        // 因此可以调用 servletContext.getAttribute(WebApplicationContext.ROOT_WEB_APPLICATION_CONTEXT_ATTRIBUTE) 拿到这个 WebApplicationContext
        // 更简单的方法是通过 SpringMVC 提供的工具类 WebApplicationContextUtils.getWebApplicationContext(servletContext)
        servletContext.setAttribute(WebApplicationContext.ROOT_WEB_APPLICATION_CONTEXT_ATTRIBUTE, this.context);

        ClassLoader ccl = Thread.currentThread().getContextClassLoader();
        if (ccl == ContextLoader.class.getClassLoader()) {
            currentContext = this.context;
        }
        else if (ccl != null) {
            currentContextPerThread.put(ccl, this.context);
        }

        if (logger.isInfoEnabled()) {
            long elapsedTime = System.currentTimeMillis() - startTime;
            logger.info("Root WebApplicationContext initialized in " + elapsedTime + " ms");
        }

        return this.context;
    }
    catch (RuntimeException | Error ex) {
        logger.error("Context initialization failed", ex);
        servletContext.setAttribute(WebApplicationContext.ROOT_WEB_APPLICATION_CONTEXT_ATTRIBUTE, ex);
        throw ex;
    }
}
如果 context 为 null, 则创建一个
ContextLoader#createWebApplicationContext
// web.xml 配置方式需要调用此方法创建 WebApplicationContext
// java-config 一般通过构造方法传入,不需要再创建,上面有示例
protected WebApplicationContext createWebApplicationContext(ServletContext sc) {
    // 决定使用哪个 WebApplicationContext 的实现类
    Class<?> contextClass = determineContextClass(sc);
    if (!ConfigurableWebApplicationContext.class.isAssignableFrom(contextClass)) {
        throw new ApplicationContextException("Custom context class [" + contextClass.getName() +
                "] is not of type [" + ConfigurableWebApplicationContext.class.getName() + "]");
    }
    // 调用工具类实例化一个 WebApplicationContext
    return (ConfigurableWebApplicationContext) BeanUtils.instantiateClass(contextClass);
}
ContextLoader#determineContextClass 根据 ContextLoader.CONTEXT_CLASS_PARAM 确定使用哪个 WebApplicationContext 的实现类。
protected Class<?> determineContextClass(ServletContext servletContext) {
    // CONTEXT_CLASS_PARAM = "contextClass", 即在 web.xml 中配置的初始化参数 contextClass
    String contextClassName = servletContext.getInitParameter(CONTEXT_CLASS_PARAM);
    if (contextClassName != null) {
        try {
            return ClassUtils.forName(contextClassName, ClassUtils.getDefaultClassLoader());
        }
        catch (ClassNotFoundException ex) {
            throw new ApplicationContextException(
                    "Failed to load custom context class [" + contextClassName + "]", ex);
        }
    }
    else {
        // 如果未配置 contextClass, 从 defaultStrategies 属性文件中获取,下面会说到
        contextClassName = defaultStrategies.getProperty(WebApplicationContext.class.getName());
        try {
            return ClassUtils.forName(contextClassName, ContextLoader.class.getClassLoader());
        }
        catch (ClassNotFoundException ex) {
            throw new ApplicationContextException(
                    "Failed to load default context class [" + contextClassName + "]", ex);
        }
    }
}
若 contextClass 未指定,则从 defaultStrategies 这个 Properties 中获取,他默认加载 ClassPath 路径下, ContextLoader.properties 文件中配置的类,默认为 XmlWebApplicationContext。
// 属性文件中的类为 XmlWebApplicationContext。
private static final String DEFAULT_STRATEGIES_PATH = "ContextLoader.properties";


private static final Properties defaultStrategies;

// 静态加载 XmlWebApplicationContext 到 defaultStrategies 中
static {
    // Load default strategy implementations from properties file.
    // This is currently strictly internal and not meant to be customized
    // by application developers.
    try {
        ClassPathResource resource = new ClassPathResource(DEFAULT_STRATEGIES_PATH, ContextLoader.class);
        defaultStrategies = PropertiesLoaderUtils.loadProperties(resource);
    }
    catch (IOException ex) {
        throw new IllegalStateException("Could not load 'ContextLoader.properties': " + ex.getMessage());
    }
}
确定 class 后,反射实例化一个 WebApplicationContext 的实现类,一个"裸"的根容器创建出来了。
想一想,平时为啥创建 ApplicationContext?
作为 Bean 容器,当然是用来管理 Bean 了。
既然用来管理 Bean,是不是应该先把 Bean 放进去? 通过 xml? 注解? 或者干脆直接调用 register 方法注册? 然后是不是应该 refresh 一下?配置一些 post-processer,设置一些参数,提前创建 Singleton?
ContextLoader#configureAndRefreshWebApplicationContext
protected void configureAndRefreshWebApplicationContext(ConfigurableWebApplicationContext wac, ServletContext sc) {
    if (ObjectUtils.identityToString(wac).equals(wac.getId())) {
        // The application context id is still set to its original default value
        // -> assign a more useful id based on available information
        String idParam = sc.getInitParameter(CONTEXT_ID_PARAM);
        if (idParam != null) {
            wac.setId(idParam);
        }
        else {
            // Generate default id...
            wac.setId(ConfigurableWebApplicationContext.APPLICATION_CONTEXT_ID_PREFIX +
                    ObjectUtils.getDisplayString(sc.getContextPath()));
        }
    }

    // WebApplication 会持有当前 ServletContext
    wac.setServletContext(sc);
    // CONFIG_LOCATION_PARAM = "contextConfigLocation", web.xml 里面配置参数
    // root web application context 的 Bean 配置文件
    String configLocationParam = sc.getInitParameter(CONFIG_LOCATION_PARAM);
    if (configLocationParam != null) {
        wac.setConfigLocation(configLocationParam);
    }

    // The wac environment's #initPropertySources will be called in any case when the context
    // is refreshed; do it eagerly here to ensure servlet property sources are in place for
    // use in any post-processing or initialization that occurs below prior to #refresh
    ConfigurableEnvironment env = wac.getEnvironment();
    if (env instanceof ConfigurableWebEnvironment) {
        // 初始化属性资源,占位符等
        // 在这里调用确保 servlet 属性资源在 post-processing 和 initialization 阶段是可用的
        ((ConfigurableWebEnvironment) env).initPropertySources(sc, null);
    }

    // ApplicationContextInitializer 回调接口,在 refresh 之前定制一些信息
    customizeContext(sc, wac);

    // 所有的 ApplicationContext 调用 refresh 之后才可用,此方法位于
    // AbstractApplication,它统一了 ApplicationContext 初始化的基本
    // 流程,子类(包括 WebApplicationContext 的实现类)通过钩子方法
    //(模版方法)定制一些自己的需求
    // web refresh 流程上面以已经说过
    wac.refresh();
}
小结: ContextLoaderListener 的初始化流程可以用下面的代码表示
def initWebApplicationContext():
    if context == null:
        context = createWebApplicationContext()

    configureAndRefreshWebApplicationContext(context)
DispatcherServlet 初始化流程
SpringMVC 将前端的所有请求都交给 DispatcherServlet 处理,他本质上是一个 Servlet,可以通过 web.xml 或者 java config 方式配置。
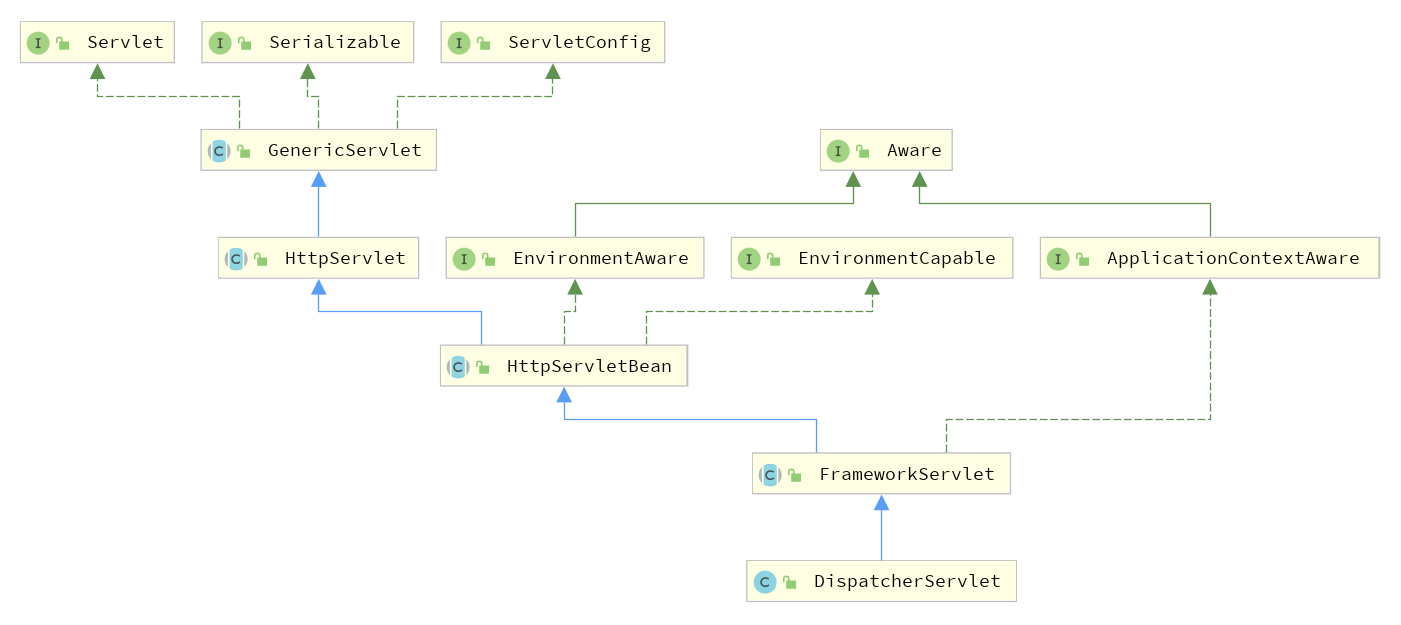
DispatcherServlet 类图

SpringMVC 将 DispatcherServlet 也当做一个 bean 来处理,所以对于一些 bean 的操作同样可以作用于 DispatcherServlet, 比如相关 *Aware 接口。
Servlet 容器会在启动时调用 init 方法。完成一些初始化操作,其调用流程如下:
HttpServletBean#init -> FrameworkServlet#initServletBean -> FrameworkServlet#initWebApplicationContext
前面两个方法比较简单,主要是 initWebApplicationContext
FrameworkServlet#initWebApplicationContext
/**
 * Initialize and publish the WebApplicationContext for this servlet.
 * <p>Delegates to {@link #createWebApplicationContext} for actual creation
 * of the context. Can be overridden in subclasses.
 * @return the WebApplicationContext instance
 * @see #FrameworkServlet(WebApplicationContext)
 * @see #setContextClass
 * @see #setContextConfigLocation
 */
protected WebApplicationContext initWebApplicationContext() {
    // 获取根容器,ServletContext 持有的 WebApplicationContext
    WebApplicationContext rootContext =
            WebApplicationContextUtils.getWebApplicationContext(getServletContext());
    // 上下文容器,当前 DispatcherServlet 持有的 WebApplicationContext
    WebApplicationContext wac = null;

    // web application 可以通过构造方法传入, java-config 方式会用到
    if (this.webApplicationContext != null) {
        wac = this.webApplicationContext;
        if (wac instanceof ConfigurableWebApplicationContext) {
            ConfigurableWebApplicationContext cwac = (ConfigurableWebApplicationContext) wac;
            if (!cwac.isActive()) {
                // The context has not yet been refreshed -> provide services such as
                // setting the parent context, setting the application context id, etc
                if (cwac.getParent() == null) {
                    // The context instance was injected without an explicit parent -> set
                    // the root application context (if any; may be null) as the parent
                    cwac.setParent(rootContext);
                }

                // 配置刷新 web application context, 下面会说到
                configureAndRefreshWebApplicationContext(cwac);
            }
        }
    }
    if (wac == null) {
        // No context instance was injected at construction time -> see if one
        // has been registered in the servlet context. If one exists, it is assumed
        // that the parent context (if any) has already been set and that the
        // user has performed any initialization such as setting the context id
        wac = findWebApplicationContext();
    }
    if (wac == null) {
        // 如果通过 web.xml 方式配置,此时 wac 为空,创建一个,默认 XmlWebApplicationContext
        // 配置文件位置 contextConfigLocation 在这里加载
        // 这个方法比较简单,不再赘述
        wac = createWebApplicationContext(rootContext);
    }

    if (!this.refreshEventReceived) {
        // 初始化 SpringMVC 处理过程中面向不同功能的策略对象
        // 比如 MultipartResolver, HandlerMappings, ViewResolvers 等
        synchronized (this.onRefreshMonitor) {
            onRefresh(wac);
        }
    }

    if (this.publishContext) {
        // 将 DispatcherServlet 持有的 web application context 放进 ServletContext
        // 命名规则为 SERVLET_CONTEXT_PREFIX + dispatcherServlet 名字
        // SERVLET_CONTEXT_PREFIX = FrameWorkServlet.class.getName() + ".CONTEXT."
        String attrName = getServletContextAttributeName();
        getServletContext().setAttribute(attrName, wac);
    }

    return wac;
}
DispatcherServlet 持有的 WebApplicationContext 可以通构造方法传入,或者 createWebApplicationContext 方法创建
创建容器步骤和 ContextLoader#createWebApplicationContext 有所不同
FrameworkServlet#createWebApplicationContext
// web.xml 配置方式需要调用此方法创建 WebApplicationContext
// java-config 一般通过构造方法传入,不需要再创建,上面有示例
protected WebApplicationContext createWebApplicationContext(@Nullable ApplicationContext parent) {
    // 返回 WebApplicationContext 的实现类,默认为 XmlWebApplicationContext
    Class<?> contextClass = getContextClass();
    if (!ConfigurableWebApplicationContext.class.isAssignableFrom(contextClass)) {
        throw new ApplicationContextException(
                "Fatal initialization error in servlet with name '" + getServletName() +
                "': custom WebApplicationContext class [" + contextClass.getName() +
                "] is not of type ConfigurableWebApplicationContext");
    }
    ConfigurableWebApplicationContext wac =
            (ConfigurableWebApplicationContext) BeanUtils.instantiateClass(contextClass);

    wac.setEnvironment(getEnvironment());
    // parent 为 rootContext
    wac.setParent(parent);

    // 获 bean 取配置文件位置
    String configLocation = getContextConfigLocation();
    if (configLocation != null) {
        wac.setConfigLocation(configLocation);
    }

    // 配置,刷新容器,下面会说到
    configureAndRefreshWebApplicationContext(wac);

    return wac;
}
FrameworkServlet#configureAndRefreshWebApplicationContext
protected void configureAndRefreshWebApplicationContext(ConfigurableWebApplicationContext wac) {
    if (ObjectUtils.identityToString(wac).equals(wac.getId())) {
        // The application context id is still set to its original default value
        // -> assign a more useful id based on available information
        if (this.contextId != null) {
            wac.setId(this.contextId);
        }
        else {
            // Generate default id...
            wac.setId(ConfigurableWebApplicationContext.APPLICATION_CONTEXT_ID_PREFIX +
                    ObjectUtils.getDisplayString(getServletContext().getContextPath()) + '/' + getServletName());
        }
    }

    // 配置 Servlet 相关信息
    wac.setServletContext(getServletContext());
    wac.setServletConfig(getServletConfig());
    wac.setNamespace(getNamespace());
    wac.addApplicationListener(new SourceFilteringListener(wac, new ContextRefreshListener()));

    // The wac environment's #initPropertySources will be called in any case when the context
    // is refreshed; do it eagerly here to ensure servlet property sources are in place for
    // use in any post-processing or initialization that occurs below prior to #refresh
    ConfigurableEnvironment env = wac.getEnvironment();
    if (env instanceof ConfigurableWebEnvironment) {
        // 初始化属性资源,占位符等
        // 在这里调用确保 servlet 属性资源在 post-processing 和 initialization 阶段是可用的
        ((ConfigurableWebEnvironment) env).initPropertySources(getServletContext(), getServletConfig());
    }

    // 空方法,可以在 refresh 之前配置一些信息
    postProcessWebApplicationContext(wac);
    // ApplicationContextInitializer 回调接口
    applyInitializers(wac);
    // 所有的 ApplicationContext 调用 refresh 之后才可用,此方法位于
    // AbstractApplication,它统一了 ApplicationContext 初始化的基本
    // 流程,子类(包括 WebApplicationContext 的实现类)通过钩子方法
    //(模版方法)定制一些自己的需求
    // web refresh 流程上面以已经说过
    wac.refresh();
}
DispatcherServlet#onRefresh
/**
 * This implementation calls {@link #initStrategies}.
 */
@Override
protected void onRefresh(ApplicationContext context) {
    // 初始化面向不同功能的策略对象
    initStrategies(context);
}
DispatcherServlet#initStrategies
protected void initStrategies(ApplicationContext context) {
    initMultipartResolver(context);
    initLocaleResolver(context);
    initThemeResolver(context);
    initHandlerMappings(context);
    initHandlerAdapters(context);
    initHandlerExceptionResolvers(context);
    initRequestToViewNameTranslator(context);
    initViewResolvers(context);
    initFlashMapManager(context);
}
这些策略方法的执行流程都是相似的,即从当前 context 中查找相应类型、相应名字的 bean,将他设为当前 DispatcherServlet 的成员变量。对于必须存在的 bean, 通过 DispatcherServlet.properties 文件提供。下面以 initHandlerMappings 为例说明
DispatcherServlet#initHandlerMappings
private void initHandlerMappings(ApplicationContext context) {
    this.handlerMappings = null;

    // 默认为 true, 表示查找所有的 HandlerMappings 实现类
    if (this.detectAllHandlerMappings) {
        // 从 ApplicationContext(包括父容器)中查找所有的 HandlerMappings
        Map<String, HandlerMapping> matchingBeans =
                BeanFactoryUtils.beansOfTypeIncludingAncestors(context, HandlerMapping.class, true, false);
        if (!matchingBeans.isEmpty()) {
            this.handlerMappings = new ArrayList<>(matchingBeans.values());
            // We keep HandlerMappings in sorted order.
            AnnotationAwareOrderComparator.sort(this.handlerMappings);
        }
    }
    else {
        try {
            // 只加载名字为 handlerMapping 的 HandlerMapping
            HandlerMapping hm = context.getBean(HANDLER_MAPPING_BEAN_NAME, HandlerMapping.class);
            this.handlerMappings = Collections.singletonList(hm);
        }
        catch (NoSuchBeanDefinitionException ex) {
            // Ignore, we'll add a default HandlerMapping later.
        }
    }

    // 确保至少有一个 HandlerMapping
    if (this.handlerMappings == null) {
        // 加载默认的 HandlerMapping, 下面会说到
        this.handlerMappings = getDefaultStrategies(context, HandlerMapping.class);
        if (logger.isTraceEnabled()) {
            logger.trace("No HandlerMappings declared for servlet '" + getServletName() +
                    "': using default strategies from DispatcherServlet.properties");
        }
    }
}
DispatcherServlet#getDefaultStrategies
protected <T> List<T> getDefaultStrategies(ApplicationContext context, Class<T> strategyInterface) {
    String key = strategyInterface.getName();
    // 从 defaultStrategies 这个 Properties 中获取
    String value = defaultStrategies.getProperty(key);

    // 后面反射创建 value 类,省略
    ...
}
下面位于 DispatcherServlet
// 静态加载 DispatcherServlet.properties 文件中的类到 defaultStrategies
static {

    try {
        // DEFAULT_STRATEGIES_PATH = "DispatcherServlet.properties";
        ClassPathResource resource = new ClassPathResource(DEFAULT_STRATEGIES_PATH, DispatcherServlet.class);
        defaultStrategies = PropertiesLoaderUtils.loadProperties(resource);
    }
    catch (IOException ex) {
        throw new IllegalStateException("Could not load '" + DEFAULT_STRATEGIES_PATH + "': " + ex.getMessage());
    }
}
因此可以根据需求,在 DispatcherServlet#onRefresh 之前将需要的策略类注册进 context, 它们会在 onRefresh 之后生效。
小结: DispatcherServlet 的初始化流程可以表示为
def initWebApplicationContext():
    rootContext = WebApplicationContextUtils.getWebApplicationContext(getServletContext())

    if context == null:
        context = createWebApplicationContext(rootContext)

    context.setParent(rootContext)
    configureAndRefreshWebApplicationContext(context)

    onRefresh(context)
三、 请求处理
DispatcherServlet 处理流程
DispatcherServlet 中主要组件的简析
Handler
处理器。请求对应的处理方法,@Controller 注解的类的方法
HandlerInterceptor
拦截器。在 handler 执行前后及视图渲染后执行拦截,可以注册不同的 interceptor 定制工作流程
public interface HandlerInterceptor {

    // 在 handler 执行前拦截,返回 true 才能继续调用下一个 interceptor 或者 handler
    default boolean preHandle(HttpServletRequest request, HttpServletResponse response, Object handler) throws Exception {
        return true;
    }

    // 在 handler 执行后,视图渲染前进行拦截处理
    default void postHandle(HttpServletRequest request, HttpServletResponse response, Object handler,
        @Nullable ModelAndView modelAndView) throws Exception {
    }

    // 视图渲染后,请求完成后进行处理,可以用来清理资源
    // 除非 preHandle 放回 false,否则一定会执行,即使发生错误
    default void afterCompletion(HttpServletRequest request, HttpServletResponse response, Object handler,
        @Nullable Exception ex) throws Exception {
    }

}
HandlerExecutionChain
处理器执行链。里面包含 handler 和 interceptors
HandlerMapping
处理器映射器。request -> handler 的映射。主要有 BeanNameUrlHandlerMapping 和 RequestMappingHandlerMapping 两个实现类
BeanNameUrlHandlerMapping 将 bean 名字作为 url 映射到相应的 handler, 也就是说 bean 名字必须是这种形式的: "/foo", "/bar",这个应该是比较老的东西了
RequestMappingHandlerMapping 使用 @RequestMapping 注解将 url 和 handler 相关联。
HandlerAdapter
处理器适配器。适配器模式,通过他来调用具体的 handler
ViewResolver
视图解析器。其中的 resolveViewName 方法可以根据视图名字,解析出对应的 View 对象。可以配置不同的 viewResolver 来解析不同的 view, 常见的如 Jsp, Xml, Freemarker, Velocity 等
View
视图。不同的 viewResolver 对应不同 View 对象,调用 view.render 方法渲染视图
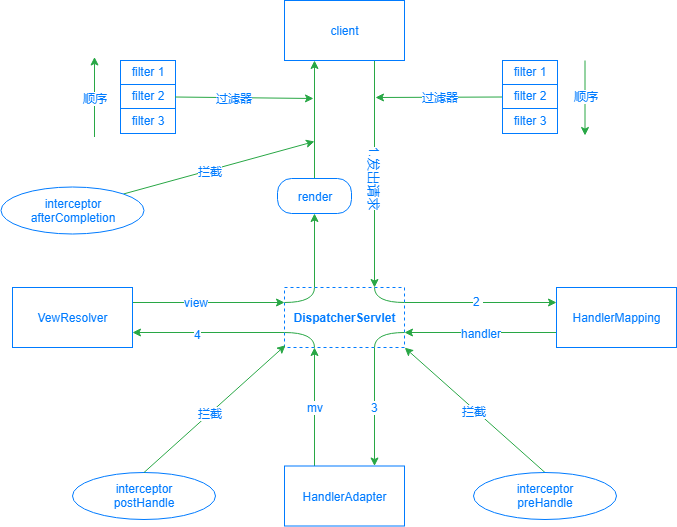
SpringMVC 处理请求流程图

- 客户端发出请求,会先经过 filter 过滤,通过的请求才能到达 DispatcherServlet。
- DispatcherServlet 通过 handlerMapping 找到请求对应的 handler,返回一个 HandlerExecutionChain 里面包含 interceptors 和 handler
- DispatcherServlet 通过 handlerAdapter 调用实际的 handler 处理业务逻辑, 返回 ModelAndView。里面会包含逻辑视图名和 model 数据。注意,在此之前和之后,会分别调用 interceptors 拦截处理
- 调用 viewResolver 将逻辑视图名解析成 view 返回
- 调用 view.render 渲染视图,写进 response。然后 interceptors 和 filter 依次拦截处理,最后返回给客户端
下面结合源码看一看
DispatcherServlet 请求处理源码解析
DispatcherServlet 是一个 servlet,他的调用流程大致如下
HttpServlet#service -> FrameworkServlet#processRequest -> DispatcherServlet#doService -> DispatcherServlet#doDispatch
DispatcherServlet#doDispatch
protected void doDispatch(HttpServletRequest request, HttpServletResponse response) throws Exception {
    HttpServletRequest processedRequest = request;
    HandlerExecutionChain mappedHandler = null;
    boolean multipartRequestParsed = false;

    WebAsyncManager asyncManager = WebAsyncUtils.getAsyncManager(request);

    try {
        ModelAndView mv = null;
        Exception dispatchException = null;

        try {
            // 检查是否为文件上传请求
            processedRequest = checkMultipart(request);
            multipartRequestParsed = (processedRequest != request);

            // 通过 handlerMapping 查到请求对应的 handler
            // 返回 HandlerExecutionChain 里面包含 handler 和 interceptors
            mappedHandler = getHandler(processedRequest);
            if (mappedHandler == null) {
                noHandlerFound(processedRequest, response);
                return;
            }

            // 根据 handler 匹配对应的 handlerAdapter
            HandlerAdapter ha = getHandlerAdapter(mappedHandler.getHandler());

            // Process last-modified header, if supported by the handler.
            String method = request.getMethod();
            boolean isGet = "GET".equals(method);
            if (isGet || "HEAD".equals(method)) {
                long lastModified = ha.getLastModified(request, mappedHandler.getHandler());
                if (new ServletWebRequest(request, response).checkNotModified(lastModified) && isGet) {
                    return;
                }
            }

            // 拦截器前置处理,调用 HandlerInterceptor#preHandle
            if (!mappedHandler.applyPreHandle(processedRequest, response)) {
                return;
            }

            // 调用 handler, 就是 @Controller 注解的类对应的方法
            // 如果是一个 rest 请求,mv 为 null,后面不会再调用 render 方法
            mv = ha.handle(processedRequest, response, mappedHandler.getHandler());

            if (asyncManager.isConcurrentHandlingStarted()) {
                return;
            }

            // 设置 viewName, 后面会根据 viewName 找到对应的 view
            applyDefaultViewName(processedRequest, mv);

            // 拦截器后置处理,调用 HandlerInterceptor#postHandle
            mappedHandler.applyPostHandle(processedRequest, response, mv);
        }
        catch (Exception ex) {
            dispatchException = ex;
        }
        catch (Throwable err) {
            // As of 4.3, we're processing Errors thrown from handler methods as well,
            // making them available for @ExceptionHandler methods and other scenarios.
            dispatchException = new NestedServletException("Handler dispatch failed", err);
        }

        // 结果处理,错误,视图等
        processDispatchResult(processedRequest, response, mappedHandler, mv, dispatchException);
    }
    catch (Exception ex) {
        // 拦截器结束处理, 调用 HandlerInterceptor#afterCompletion
        // 即使发生错误也会执行
        triggerAfterCompletion(processedRequest, response, mappedHandler, ex);
    }
    catch (Throwable err) {
        triggerAfterCompletion(processedRequest, response, mappedHandler,
                new NestedServletException("Handler processing failed", err));
    }
    finally {
        if (asyncManager.isConcurrentHandlingStarted()) {
            // Instead of postHandle and afterCompletion
            if (mappedHandler != null) {
                mappedHandler.applyAfterConcurrentHandlingStarted(processedRequest, response);
            }
        }
        else {
            // Clean up any resources used by a multipart request.
            if (multipartRequestParsed) {
                cleanupMultipart(processedRequest);
            }
        }
    }
}
processDispatchResult 会进行异常处理(如果存在的话),然后调用 render 方法渲染视图
DispatcherServlet#render
protected void render(ModelAndView mv, HttpServletRequest request, HttpServletResponse response) throws Exception {
    // Determine locale for request and apply it to the response.
    Locale locale =
            (this.localeResolver != null ? this.localeResolver.resolveLocale(request) : request.getLocale());
    response.setLocale(locale);

    View view;
    // 这个是 @Controller 方法返回的名字
    String viewName = mv.getViewName();
    if (viewName != null) {
        // 调用 viewResolver 解析视图,返回一个视图对象
        // 会遍历 viewResolvers 找到第一个匹配的处理, 返回 View 对象
        view = resolveViewName(viewName, mv.getModelInternal(), locale, request);
        if (view == null) {
            throw new ServletException("Could not resolve view with name '" + mv.getViewName() +
                    "' in servlet with name '" + getServletName() + "'");
        }
    }
    else {
        // 已经有视图对象
        view = mv.getView();
        if (view == null) {
            throw new ServletException("ModelAndView [" + mv + "] neither contains a view name nor a " +
                    "View object in servlet with name '" + getServletName() + "'");
        }
    }

    // Delegate to the View object for rendering.
    if (logger.isTraceEnabled()) {
        logger.trace("Rendering view [" + view + "] ");
    }
    try {
        if (mv.getStatus() != null) {
            response.setStatus(mv.getStatus().value());
        }

        // 渲染,不同的 viewResolver 会有不同的逻辑实现
        view.render(mv.getModelInternal(), request, response);
    }
    catch (Exception ex) {
        if (logger.isDebugEnabled()) {
            logger.debug("Error rendering view [" + view + "]", ex);
        }
        throw ex;
    }
}
总结
-
SpringMVC 是基于 Servlet 的, 因此 SpringMVC 的启动流程基于 Servlet 的启动流程
-
ServletContext 持有的 WebApplicationContext 称为根容器; 根容器在一个 web 应用中都可以访问到,因此可以用于注册共享的 bean;如果不需要可以不创建,根容器不是必要的
-
根容器是指在 ServletContext 中以 WebApplicationContext.ROOT_WEB_APPLICATION_CONTEXT_ATTRIBUTE 为 key 的 WebApplicationContext。根容器并不一定要由 ContextLoaderListener 创建。
-
DispatcherServlet 持有的 WebApplicationContext 称为它的上下文容器;每个 DispatcherServlet 都会持有一个上下文容器(自己创建或者构造传入)。
-
SpringMVC 的处理流程并不一定按上面的顺序执行,比如如果是 json 请求,HandlerAdapter 调用 handler 处理后返回的 mv 可能是 null, 后面就不会进行视图渲染
-
请求如果没有到达 DispatcherServlet 可能是被过滤器过滤了(权限?异常?);一定不是被拦截器拦截的,因为拦截器在 DispatcherServlet 内部执行。
-
除非请求被 interceptor#preHandle 拦截,否则 interceptor#afterCompletion 一定会执行,即使发生错误。
-
获取 WebApplicationContext, 除了相关 Aware 接口,还可以通过 WebApplicationContextUtils.getWebApplicationContext 获取根容器,相关原理在这里, 或者通过 RequestContextUtils.findWebApplicationContext 获取当前 DispatcherServlet 对应的上下文容器,相关代码在 DispatcherServlet#doService
-
SpringBoot 应用部署到外部容器的时候为啥要继承 SpringBootServletInitializer, 因为它是一个 WebApplicationContextInitializer, 具体见这里
备注
以上相关代码基于 SpringBoot 2.1.6.RELEASE, SpringMVC 5.1.6.RELEASE, Servlet 3.0
结语
写了不少,算是对 SpringMVC 的一次复习了。能力有限,如有不正确的地方,欢迎拍砖!
参考:


 浙公网安备 33010602011771号