
vue的基础使用
vue的介绍
渐进式的JavaScript框架
vue           react            angualr

作者:尤雨溪    facebook         谷歌公司

vue的官网文档  https://cn.vuejs.org/
前端框架和库的区别
功能上的不同
jquery库:包含DOM(操作DOM)+请求,就是一块功能。

art-template库:模板引擎渲染,高性能的渲染DOM    (我们后端的一种模板  跟python的模板类似)

框架:大而全的概念,简易的DOM体验+请求处理+模板引擎

在KFC的世界里,库就是一个小套餐,框架就是全家桶。
代码上的不同
一般使用库的代码,是调用某个函数或者直接使用抛出来的对象,我们自己处理库中的代码。
一般使用框架,其框架本身提供的好的成套的工具帮我们运行我们编写好的代码。
框架的使用
- 初始化自身的一些行为
- 执行你所编写的代码
- 释放一些资源
nodejs
-
去官网https://nodejs.org/en/download/ 下载 安装(傻瓜式安装)
-
打开终端 cmd : 执行
node -v如果出现版本号,证明安装node成功 ,跟安装python雷同 -
下载完node之后,会自带包管理器 npm,好比 是python中 pip3包管理器。pip3 install xxx
-
使用npm
-
1.要初始化npm的项目 :
npm init --yes自动生成一个package.json文件```javascript { "name": "vue_lesson", "version": "1.0.0", "description": "这是我的vue的第一个项目", "main": "index.js", "scripts": { "test": "echo "Error: no test specified" && exit 1" }, "author": "mjj", "license": "ISC", "dependencies": { "vue": "^2.5.16" } } ```2.下载依赖包
npm install vue --savenpm install jquery --save3.卸载包
npm uninstall vue --save4.下载所有的依赖包
npm install
-
vue的起步


1、安装node.js

官网下载,安装后,检查:node -v , npm -v 查看是否吸纳是版本信息;

使用 npm install npm -g 更新至最新;

2、安装 淘宝镜像(cnpm)

npm install -g cnpm --registry=https://registry.npm.taobao.org

3、全局安装 vue-cli

npm install --global vue-cli

或 sudo npm install vue-cli -g

安装完vue-cli之后要先安装webpack才能进行打包

4、安装webpack

npm install webpack -g

5、创建vue项目工程

vue init webpack vue-demo

cd vue-demo

npm install //安装项目依赖

npm run dev //运行项目,ctrl+c/control+c退出运行

6、查看项目结构

main.js 是我们的入口文件,主要作用是初始化vue实例并使用需要的插件
App.vue是我们的主组件,所有页面都是在App.vue下进行切换的。其实你也可以理解为所有的路由也是App.vue的自组件。所以我将router标示为App.vue的子组件。
index.html文件入口
src放置组件和入口文件
node_modules为依赖的模块
config中配置了路径端口值等
build中配置了
webpack的基本配置、开发环境配置、生产环境配置等
- 引包:
- 创建实例化对象
new Vue({
  el:'#app',//目的地
  data:{
      msg:"hello Vue"
  }
});
/*
{{}}: 模板语法插值
    {{变量}}
    {{1+1}}
    {{'hello'}}
    {{函数的调用}}
    {{1==1?'真的':'假的'}}
*/
指令系统
//常用
v-text
v-html
v-if
v-show
v-for
v-bind
v-on

表单控件的value (看后面)
<div id="content">
    {{ msg }}
    <div v-text="msg"></div>
    <div v-html="msg"></div>
</div>
<!--引包-->
<script src='./vue.js'></script>
<script>
    new Vue({
        el:'#content',
        data () {
            //data中是一个函数 函数中return一个对象,可以是空对象 但不能不return
            return {
                msg:"<h2>alex</h2>"
            }
        }
    })
</script>
<!DOCTYPE html>
<html lang="zh-CN">
<head>
    <meta charset="UTF-8">
    <title>Title</title>
    <meta name="viewport" content="width=device-width, initial-scale=1">
    <style>
        .box {
            width: 200px;
            height: 200px;
            background-color: red;
        }

        .box2 {
            width: 200px;
            height: 200px;
            background-color: green;
        }
    </style>
</head>
<body>

<div id="content">
    {{ add(2,3) }}
    <button v-on:click='handlerClick'>隐藏</button>
    <div class="box" v-show='isShow'></div>
    <div class="box2" v-if="isShow"></div>

    <div v-if="Math.random() > 0.5">
        有了
    </div>
    <div v-else>
        没了
    </div>
</div>
<script src='./vue.js'></script>
<script>
    //数据驱动视图
    new Vue({
        el: '#content',
        data() {
            return {
                isShow: true
            }
        },
        methods: {
            add(x, y) {
                return x + y
            },
            handlerClick() {
                //数据驱动
                this.isShow = !this.isShow;

            }
        }
    })
</script>

</body>
</html>
<!DOCTYPE html>
<html lang="zh-CN">
<head>
    <meta charset="UTF-8">
    <title>Title</title>
    <meta name="viewport" content="width=device-width, initial-scale=1">
    <style>
        .box {
            width: 200px;
            height: 200px;
            background-color: red;
        }
        .active{
            background-color: green;
        }

    </style>
</head>
<body>

<div id="app">
    <!--<button v-on:click = 'handlerChange'>切换颜色</button>-->
   <!--v-bind 标签中所有的属性 img标签src alt,a标签的href title id class-->
    <!--<img v-bind:src="imgSrc" v-bind:alt="msg">-->
    <!--<div class="box" v-bind:class = '{active:isActive}'></div>-->

     <button @mouseenter = 'handlerChange' @mouseleave = 'handlerLeave'>切换颜色</button>
    <img :src="imgSrc" :alt="msg">
    <div class="box" :class = '{active:isActive}'></div>
</div>
<script src='./vue.js'></script>
<script>
    //数据驱动视图  设计模式 MVVM  Model  View  ViewModel

    //声明式的JavaScript框架

//    v-bind和v-on的简便写法   :  @
    new Vue({
        el: '#app',
        data() {
            return {
                imgSrc:'./1.jpg',
                msg:'美女',
                isActive:true
            }
        },
        methods:{
            handlerChange(){
//                this.isActive = !this.isActive;
                this.isActive = false;
            },
            handlerLeave(){
                this.isActive = true;
            }
        }

    })
</script>

</body>
</html>
<div id="app">
    <ul v-if="data.status === 'ok'">
        <!--v-for的优先级是最高的     diff算法-->
        <li v-for = '(item,index) in data.users' :key="item.id" >
            <h3>{{ item.id }} -- {{ item.name }} -- {{ item.age }}</h3>
        </li>
    </ul>
    <div v-for = '(value,key) in person'>
        {{ key }}-----{{ value }}
    </div>
</div>
<script src='./vue.js'></script>
<script>

    new Vue({
        el: '#app',
        data() {

            return {
                data: {
                    status: 'ok',
                    users: [
                        {id: 1, name: 'alex', age: 18},
                        {id: 2, name: 'wusir', age: 30},
                        {id: 3, name: 'yuan', age: 48}
                    ]
                },
                person:{
                    name:'alex'
                }
            }
        },
        methods: {}

    })
</script>
1.Vue的模板语法

          可以插入任何你想插入的内容,除了if-else if-else用三元运算符代替
         <h2>{{ 1>2? '真的': '假的' }}</h2>

2.Vue的指令系统之v-text和v-html

          v-text相当于innerText
          v-html相当于innerHTML

3.Vue的指令系统之v-if和v-show

         v-show 相当于 style.display
         v-if 是“真正”的条件渲染,因为它会确保在切换过程中条件块内的事件监听器和子组件适当地被销毁和重建。
         一般来说,v-if 有更高的切换开销,而 v-show 有更高的初始渲染开销。因此,如果需要非常频繁地切换,则使用 v-show 较好;如果在运行时条件很少改变,则使用 v-if 较好。

4.Vue的指令系统之v-bind 和v-on

         v-bind可以绑定标签中任何属性
         v-on 可以监听 js中所有事件

         简写:
               v-bind:src  等价于   :src
               v-on:click 等价于    @click

5.Vue的指令系统之v-for

          v-for可以遍历列表,也可以遍历对象
          在使用vue的v-for指令时,一定要绑定key,避免vue帮咱们计算DOM
双向数据绑定(见官网)
<!DOCTYPE html>
<html lang="zh-CN">
<head>
    <meta charset="UTF-8">
    <title>Title</title>
    <meta name="viewport" content="width=device-width, initial-scale=1">
</head>
<body>
    <div id="app">
        <p>{{ msg }}</p>
        <button @click = 'clickHandler'>修改</button>
    </div>
    <script src="vue.js"></script>
    <script>
        new Vue({
            el:'#app',
            data(){
                return {
                    msg:"alex",
                    age:18
                }

            },
            methods:{
                clickHandler(){
                    this.msg = "wusir"
                }
            },
            watch:{
                //watch单个属性,如果想监听多个属性 声明多个属性的监听
                'msg':function (value) {

                    if (value === 'wusir'){
                       this.msg = '大武sir'
                    }
                },
                'age' :function (value) {

                }
            }
        })
    </script>
</body>
</html>
<!DOCTYPE html>
<html lang="zh-CN">
<head>
    <meta charset="UTF-8">
    <title>Title</title>
    <meta name="viewport" content="width=device-width, initial-scale=1">
</head>
<body>
<div id="app">
    <p>{{ myMsg }}</p>
    <button @click='clickHandler'>修改</button>
</div>
<script src="vue.js"></script>
<script>
    let vm = new Vue({
        el: '#app',
        data() {
            return {
                msg: "alex",
                age: 18
            }
        },
        methods: {
            clickHandler() {
                this.msg = "wusir";
                this.age = 20;
            }
        },
        computed: {
            myMsg: function () {
                //业务逻辑

//                    计算属性默认只有getter方法
                return `我的名字叫${this.msg},年龄是${this.age}`;
            }
        }
    })
</script>
</body>
</html>
(1)局部组件 let Son = { data(){ return { } }, methods:{ }, computed:{ }, created(){ } } .... { template:`<Son />`, components:{ Son } } ``` 声子 挂子 用子 (2)全局组件 Vue.component('组件的名字',{ data(){ return { msg:'hahah' } }, methods:{ }, computed:{ }, created(){ } })
父子组件传值 父= 》子 (1)在子组件中 声明props 只要声明了该属性,那么就可以在组件中任意使用 (2)在父组件中 通过绑定自定义属性 挂载数据属性 <Son :msg = 'msg'> <Son msg = 'alex'> 子=》父 (1)在子组件中 通过this.$emit('方法名',值) (2)在父组件中 绑定自定义的事件 平行组件 bus 公交车对象:绑定 $on和$emit let bus = new Vue(); A=>B 传值 $emit('函数名',值)==> $on(’函数名‘,()=>{})
Home.vue

<template>
    <div>
        我是首页
        <Son title = 'alex' @handler = 'handlerClick'/>
        <Son :msg = 'msg'/>
    </div>
</template>

<script>
//1.声子  挂子  用子  局部组件的使用
import Son from './Son'
    export default {
        name:'Home',
        data(){
            return {
                msg:"我是父组件的信息"
            }
        },

        methods:{
            handlerClick(val){
                 alert(val);   //1
            }
        },
        components:{
            Son
        }
    }
</script>

<style scoped>

</style>


Son.vue

<template>
    <div>
        <h2>我是子组件{{ title }}-- {{msg}}</h2>
    </div>
</template>

<script>
    export default {
        name:'Son',
        data(){
            return {
            }
        },
        props:['title','msg'],    // 父组件向子组件传值
        created(){
            this.$emit('handler',1);    // 子组件向父组件传值
        }
    }
</script>

<style scoped>

</style>
main.js

import Vue from 'vue'
import App from './App'
import router from './router'
//创建bus实例,挂载在原型
let bus = new Vue()
Vue.prototype.$bus = bus;

Vue.config.productionTip = false
/* eslint-disable no-new */
new Vue({
  el: '#app',
  router,
  components: { App },
  template: '<App/>'
})


Home.vue

<template>
    <div>
        我是首页
         <button @click = 'busHandler'>通过bus对象传值</button>
    </div>
</template>

<script>
import Son from './Son'
    export default {
        name:'Home',
        data(){
            return {
            }
        },

        methods:{
            busHandler(){
                this.$bus.$emit('click','wusir');   //Home向Son传值
            }
        },
        components:{
            Son
        }
    }
</script>

<style scoped>

</style>


Son.vue

<template>
    <div>
        <h2>我是子组件---{{ name}}</h2>
    </div>
</template>

<script>
    export default {
        name:'Son',
        data(){
            return {
                name:''
            }
        },
        created(){
            this.$bus.$on('click',(name)=>{
                this.name = name;
            })
        }
    }
</script>

<style scoped>

</style>
1.局部过滤器         在当前组件内部使用过滤器 ,给某些数据 `添油加醋`

//声明
filters:{
    '过滤器的名字':function(val,a,b){
        //a 就是alax ,val就是当前的数据
    }
}
//使用  管道符
数据 | 过滤器的名字('alex','wusir')

<!DOCTYPE html>
<html lang="zh-CN">
<head>
    <meta charset="UTF-8">
    <title>Title</title>
    <meta name="viewport" content="width=device-width, initial-scale=1">
</head>
<body>
    <div id="app">
        <App />
    </div>
    <script src="vue.js"></script>
    <script src="moment.js"></script>
    <script>
        let App = {
            data(){
                return {
                    msg:"hello world",
                    time:new Date()
                }
            },
            template:`

               <div>我是一个APP  {{ msg | myReverse }}
                <h2>{{ time | myTime('YYYY-MM-DD')}}</h2>

               </div>
            `,
            filters:{
                myReverse:function (val) {
                    return val.split('').reverse().join('')
                },
                //年-月- 日  年- 月
                myTime:function(val,formatStr){
                    return moment(val).format(formatStr);
                }
            }
        }
        new Vue({
            el:'#app',
            data(){
                return {

                }
            },
            components:{
                App
            }

        })

    </script>
</body>
</html>


2.全局过滤器     只要过滤器一创建,在任何组件中都能使用  ***

Vue.filter('过滤器的名字',function(val,a,b){})
在各个组件中都能使用
数据 | 过滤器的名字('alex','wusir')
<!DOCTYPE html>
<html lang="zh-CN">
<head>
    <meta charset="UTF-8">
    <title>Title</title>
    <meta name="viewport" content="width=device-width, initial-scale=1">
</head>
<body>
<div id="app">
    <App/>
</div>
<script src="vue.js"></script>

<script>
    let Test = {
        data() {
            return {
                msg: 'alex',
                count:0,
                timer:null
            }
        },
        template: `
               <div id="test">
                    <div id="box">{{ msg }}</div>
                    <p>{{ count }}</p>
                    <button @click = 'change'>修改</button>
               </div>
            `,
        methods: {
            change() {
                this.msg = 'wusir';
                document.querySelector('#box').style.color = 'red';
            }
        },
        beforeCreate() {

            // 组件创建之前
            console.log('组件创建之前', this.msg);

        },
        created() {
//                ********最重要
            // 组件创建之后
//            this.timer = setInterval(()=>{
//                this.count++
//            },1000);

            // 使用该组件,就会触发以上的钩子函数,
            // created中可以操作数据,发送ajax,并且可以实现数据驱动视图
            // 应用:发送ajax请求

            console.log('组件创建之后', this.msg);

            // this.msg = '嘿嘿黑';

        },
        beforeMount() {

            // 装载数据到DOM之前会调用

            console.log(document.getElementById('app'));


        },
        mounted() {
//            *******很重要*****

            // 这个地方可以操作DOM

            // 装载数据到DOM之后会调用 可以获取到真实存在的DOM元素,vue操作以后的DOM

            console.log(document.getElementById('app'));
            //jsDOM操作

        },
        beforeUpdate() {

            // 在更新之前,调用此钩子,应用:获取原始的DOM

            console.log(document.getElementById('app').innerHTML);

        },
        updated() {

            // 在更新之后,调用此钩子,应用:获取最新的DOM

            console.log(document.getElementById('app').innerHTML);

        },
        beforeDestroy() {

            console.log('beforeDestroy');

        },
        destroyed() {
            //注意: 定时器的销毁 要在此方法中处理
            console.log('destroyed',this.timer);
            clearInterval(this.timer);

        },
        activated(){

            console.log('组件被激活了');

        },

        deactivated(){

            console.log('组件被停用了');

        }
    }
    let App = {
        data() {
            return {
                isShow:true
            }
        },
        template: `

               <div>

                   <keep-alive>
                     <Test  v-if="isShow"/>
                  </keep-alive>
                    <button @click = 'clickHandler'>改变test组件的生死</button>
               </div>
            `,
        methods:{
          clickHandler(){
              this.isShow = !this.isShow;
          }
        },
        components: {
            Test
        }

    }
    new Vue({
        el: '#app',
        data() {
            return {}
        },
        components: {
            App
        }

    })

</script>
</body>
</html>
Vue+Vue-router 主要来做 SPA(Single Page Application) 单页面应用

Vue-router是Vue的核心插件


为什么要使用单页面应用?

      传统的路由跳转,如果后端资源过多,会导致页面出现`白屏现象`,让前端来做路由,在某个生命周期的钩子函数中发送ajax,数据驱动。为了用户体验


##### 使用Vue-router

1.下载

 //如果以后是模块化编程,Vue.proptotype.$VueRouter = VueRouter
    //    Vue.use(VueRouter)
    const Home = {
        data() {
            return {}
        },
        template: `<div>我是首页</div>`
    }
    const Course = {
        data() {
            return {}
        },
        template: `<div>我是免费课程</div>`
    }
    //2.创建路由
    const router = new VueRouter({
        //3.定义路由规则
        //mode:'history',
        routes: [
            {
              path:'/',
              redirect:'/home'
            },
            {
                path: '/home',
                component: Home
            },
            {
                path: '/course',
                component: Course
            }
        ]
    })
    let App = {
        data() {
            return {}
        },
//        router-link和router-view 是vue-router 提供的两个全局组件
        //router-view  是路由组件的出口
        //router-link默认会被渲染成a标签,to属性默认被渲染成href
        template: `
            <div>

                <div class="header">

                    <router-link to = '/home'>首页</router-link>
                    <router-link to = '/course'>免费课程</router-link>
                </div>
                <router-view></router-view>
            </div>

        `

    }
    new Vue({
        el: '#app',
        //4.挂载 路由对象
        router,
        data() {
            return {}
        },
        template: `<App />`,
        components: {
            App
        }
    })
```
<!DOCTYPE html>
<html lang="zh-CN">
<head>
    <meta charset="UTF-8">
    <title>Title</title>
    <meta name="viewport" content="width=device-width, initial-scale=1">
</head>
<body>
<div id="app">

</div>
<script src="vue.js"></script>
<script src="vue-router.js"></script>
<script>
    //如果以后是模块化编程,Vue.proptotype.$VueRouter = VueRouter
    //    Vue.use(VueRouter)
    const Home = {
        data() {
            return {}
        },
        template: `<div>我是首页</div>`
    }
    const Course = {
        data() {
            return {}
        },
        template: `<div>我是免费课程</div>`
    }
    //创建路由
    const router = new VueRouter({
        //定义路由规则
        //mode:'history',
        routes: [
            {
              path:'/',
              redirect:'/home'
            },
            {
                path: '/home',
                component: Home
            },
            {
                path: '/course',
                component: Course
            }
        ]
    })
    let App = {
        data() {
            return {}
        },
//        router-link和router-view 是vue-router 提供的两个全局组件
        //router-view  是路由组件的出口
        template: `
            <div>

                <div class="header">
                    <router-link to = '/home'>首页</router-link>
                    <router-link to = '/course'>免费课程</router-link>
                </div>
                <router-view></router-view>
            </div>

        `

    }
    new Vue({
        el: '#app',
        //挂载 路由对象
        router,
        data() {
            return {}
        },
        template: `<App />`,
        components: {
            App
        }
    })

</script>

</body>
</html>
<!DOCTYPE html>
<html lang="zh-CN">
<head>
    <meta charset="UTF-8">
    <title>Title</title>
    <meta name="viewport" content="width=device-width, initial-scale=1">
</head>
<body>
<div id="app">

</div>
<script src="vue.js"></script>
<script src="vue-router.js"></script>
<script>
    const Home = {
        data() {
            return {}
        },
        template: `<div>我是首页</div>`
    }
    const Course = {
        data() {
            return {
                categoryList:[]
            }
        },
        template: `<div>
        <span v-for = '(item,index) in categoryList'>{{item.name}}</span>


    </div>`,
        methods:{
          getCategroyList(){

          }
        },
        created(){
            //ajax 发送请求 数据获取
            this.getCategroyList();
        }
    }
    //创建路由
    const router = new VueRouter({
        //定义路由规则
        routes: [
            {
              path:'/',
              redirect:'/home'
            },
            {
                path: '/home',
                name:'Home',
                component: Home
            },
            {
                path: '/course',
                name:'Course',
                component: Course
            }
        ]
    })
    let App = {
        data() {
            return {}
        },
        template: `
            <div>

                <div class="header">
                    <router-link :to = '{name:"Home"}'>首页</router-link>
                    <router-link :to = '{name:"Course"}'>免费课程</router-link>
                </div>
                <router-view></router-view>
            </div>

        `

    }
    new Vue({
        el: '#app',
        //挂载 路由对象
        router,
        data() {
            return {}
        },
        template: `<App />`,
        components: {
            App
        }
    })

</script>

</body>
</html>
<!DOCTYPE html>
<html lang="zh-CN">
<head>
    <meta charset="UTF-8">
    <title>Title</title>
    <meta name="viewport" content="width=device-width, initial-scale=1">
</head>
<body>
<div id="app">

</div>
<script src="vue.js"></script>
<script src="vue-router.js"></script>
<script>
    //如果以后是模块化编程,Vue.proptotype.$VueRouter = VueRouter
    //    Vue.use(VueRouter)

    //路由范式:

    //http://127.0.0.1:8080/index/user
    //http://127.0.0.1:8080/user/1 params
    //http://127.0.0.1:8080/user/2
    //http://127.0.0.1:8080/user?user_id =1   query


    const User = {
        data() {
            return {
                user_id:null
            }
        },
        template: `<div>我是用户{{ user_id}}</div>`,
        created() {
            console.log(this.$route); //路由信息对象
//            提醒一下,当使用路由参数时,例如从 /user/foo 导航到 /user/bar,原来的组件实例会被复用。因为两个路由都渲染同个组件,比起销毁再创建,复用则显得更加高效。不过,这也意味着组件的生命周期钩子不会再被调用。
        },
        watch: {
            '$route'(to, from) {
                // 对路由变化作出响应...
                console.log(to.params.id);
                console.log(from);
                this.user_id = to.params.id;
                //发送ajax

            }
        }
    }

    //创建路由
    const router = new VueRouter({
        //定义路由规则
        routes: [

            {
                path: '/user/:id',
                name: 'User',
                component: User
            }

        ]
    })
    let App = {
        data() {
            return {}
        },
        template: `
            <div>

                <div class="header">
                    <router-link :to = '{name:"User",params:{id:1}}'>用户1</router-link>
                    <router-link :to = '{name:"User",params:{id:2}}'>用户2</router-link>

                </div>
                <router-view></router-view>
            </div>

        `

    }
    new Vue({
        el: '#app',
        //挂载 路由对象
        router,
        data() {
            return {}
        },
        template: `<App />`,
        components: {
            App
        }
    })

</script>

</body>
</html>
<!DOCTYPE html>
<html lang="zh-CN">
<head>
    <meta charset="UTF-8">
    <title>Title</title>
    <meta name="viewport" content="width=device-width, initial-scale=1">
</head>
<body>
<div id="app">

</div>
<script src="vue.js"></script>
<script src="vue-router.js"></script>
<script>
    const Home = {
        data() {
            return {}
        },
        template: `<div>我是首页</div>`
    }

    const User = {
        data() {
            return {
                user_id: null
            }
        },
        template: `<div>我是用户{{ user_id}}
                    <button @click = 'clickHandler'>跳转首页</button>

                 </div>`,
        created() {
            console.log(this.$route);
        },
        methods:{
            //编程式导航
            clickHandler(){
                this.$router.push({
                    name:"Home"
                })
            }
        },
        watch: {
            '$route'(to, from) {
                // 对路由变化作出响应...
                console.log(to.params.id);
                console.log(from);
                this.user_id = to.params.id;
                //发送ajax

            }
        }
    }

    //创建路由
    const router = new VueRouter({
        //定义路由规则
        routes: [

            {
                path: '/user/:id',
                name: 'User',
                component: User
            },
            {
                path: '/home',
                name: 'Home',
                component: Home
            }

        ]
    })
    let App = {
        data() {
            return {}
        },
        template: `
            <div>

                <div class="header">
                    <router-link :to = '{name:"User",params:{id:1}}'>用户1</router-link>
                    <router-link :to = '{name:"User",params:{id:2}}'>用户2</router-link>

                </div>
                <router-view></router-view>
            </div>

        `

    }
    new Vue({
        el: '#app',
        //挂载 路由对象
        router,
        data() {
            return {}
        },
        template: `<App />`,
        components: {
            App
        }
    })

</script>

</body>
</html>
main.js(设置全局守卫)

import Vue from 'vue'
import App from './App'
import router from './router'

//1.导入element-ui模块 并且导入全局的css样式
import ElementUI from 'element-ui';
import 'element-ui/lib/theme-chalk/index.css';
Vue.use(ElementUI);

//将lfHeader 注册成全局组件
import LfHeader from '@/components/Common/LfHeader'
Vue.component(LfHeader.name,LfHeader);

// 引入vue-cookies
import VueCookies from 'vue-cookies'
Vue.use(VueCookies);

// 引入全局的geetest.js
import '../static/global/gt'

//引入项目中的全局的css样式
import '../static/global/index.css'

import * as api from './restful/api'
Vue.prototype.$http = api;

//导入store实例
import store from './store'


//全局导航守卫
router.beforeEach((to, from, next) => {
if(to.meta.requiresAuth){ //表示用户访问该组件需要登录
  if(!localStorage.getItem('token')){
    next({
        name: 'Login'
      })
  }else{
        let user = {
        token:localStorage.getItem('token'),
        username:localStorage.getItem('username'),
        head_img:localStorage.getItem('head_img'),
      };

      store.dispatch('getUserInfo',user);
     next()
  }
}else{
  //直接放行
  next()
}
//if (localStorage.getItem('token')) {
//    // 用户登录过
//    let user = {
//        token:localStorage.getItem('token'),
//        username:localStorage.getItem('username'),
//        head_img:localStorage.getItem('head_img'),
//    };
//
//    store.dispatch('getUserInfo',user);
//}
//
//  // ...
//  next();
})

Vue.config.productionTip = false;
/* eslint-disable no-new */
new Vue({
  el: '#app',
  router,
  store,
  components: { App },
  template: '<App/>'
});


router/index.js

import Vue from 'vue'
import Router from 'vue-router'

Vue.use(Router);
import Login from '@/components/Login/Login'
import Cart from '@/components/Cart/Cart'
import Account from '@/components/Cart/Account'
import MyOrder from '@/components/Order/MyOrder'
import PaySuccess from '@/components/Order/PaySuccess'

export default new Router({
  linkActiveClass:'is-active',
  mode:'history',

  //1.创建匹配路由组件  2、配置路由信息  3.在router-link中使用
  routes: [
    {
      path:'/login',
      name:'Login',
      component:Login
    },
    {
      path:"/purchase/shopping_cart",
      name:'shop_cart',
      component:Cart,
      // 路由元信息,如果requiresAuth(该名字可自定义)为true,表示用户需要登录
      meta: {
        requiresAuth: true
      }
    },
    {
     path:'/buy',
      name:'account',
      component:Account,
      meta: {
        requiresAuth: true
      }
    },
    {
      path:'/my/order',
      name:'my_order',
      component:MyOrder,
      meta: {
        requiresAuth: true
      }
    },
    {
      path:'/order/pay_success',
      name:'pay_success',
      component:PaySuccess,
      meta: {
        requiresAuth: true
      }
    }
  ]
})
给标签或者组件 添加ref
<div ref = 'alex'>哈哈哈</div>
<p ref = 'a'></p>
<Home ref = 'b'></Home>

this.$refs.alex  获取原始的DOM对象
this.$refs.b 获取的是组件实例化对象

$refs获取组件内的元素
$parent:获取当前组件的父组件
$children:获取当前组件的子组件
$root:获取New Vue的实例化对象
$el:获取组件对象的DOM元素
1- cmd

  module.exports = xxx

  require()

2- es6module

//module.js

  var person = {
      name:'张三',
      fav:function () {
          alert(1);
      }
  }
  var name;
  name = 23;
  export {name}
  export  var num2 = 34;
  export function add() {
      alert(2)
  }
  export default person


//main.js
  import * as a from './module.js'
  //as 起别名
https://www.webpackjs.com/concepts/

  1、nodejs 安装

  2、npm init --yes 默认生成一个package.json文件 (管理整个项目中的包)
详细使用见官网:https://element.eleme.io/#/zh-CN/component/installation

安装:npm i element-ui -S

快速上手 :
        引入 Element
                import ElementUI from 'element-ui';
                import 'element-ui/lib/theme-chalk/index.css';

                Vue.use(ElementUI);

组件:看需要什么组件就用什么组件(效果图下倒三角 显示代码)
详情见官网:https://www.kancloud.cn/yunye/axios/234845

安装;npm i axios -S

将axios挂载到vue的原型上,那么在各个组件中都能使用,因为面向对象(继承)

Example:

执行 GET 请求
// 为给定 ID 的 user 创建请求
axios.get('/user?ID=12345')
  .then(function (response) {
    console.log(response);
  })
  .catch(function (error) {
    console.log(error);
  });

// 可选地,上面的请求可以这样做
axios.get('/user', {
    params: {
      ID: 12345
    }
  })
  .then(function (response) {
    console.log(response);
  })
  .catch(function (error) {
    console.log(error);
  });

执行 POST 请求
axios.post('/user', {
    firstName: 'Fred',
    lastName: 'Flintstone'
  })
  .then(function (response) {
    console.log(response);
  })
  .catch(function (error) {
    console.log(error);
  });

执行多个并发请求
function getUserAccount() {
  return axios.get('/user/12345');
}

function getUserPermissions() {
  return axios.get('/user/12345/permissions');
}

axios.all([getUserAccount(), getUserPermissions()])
  .then(axios.spread(function (acct, perms) {
    // 两个请求现在都执行完成
  }));
main.js

import Vue from 'vue'
import App from './App'
import router from './router'
import ElementUI from 'element-ui';
import 'element-ui/lib/theme-chalk/index.css';
// 引入axios
import Axios from 'axios'
// 将axios挂载到Vue原型上
Vue.prototype.$http = Axios;

import '../static/global/index.css'

//设置公共的url
Axios.defaults.baseURL = 'https://www.luffycity.com/api/v1/';

Vue.config.productionTip = false;
Vue.use(ElementUI);

/* eslint-disable no-new */
new Vue({
  el: '#app',
  router,
  components: { App },
  template: '<App/>'
});


App.vue

<template>
  <div id="app">
    <div class="header">
      <ul>
        <li v-for="(item) in navList" :key='item.id'>
          <router-link :to="{name:item.name}">{{ item.title }}</router-link>
        </li>
      </ul>
    </div>
    <router-view/>
  </div>
</template>

<script>
export default {
  name: 'App',
  data(){
    return {
      navList:[
        {id:1,title:'首页',name:"Home"},
        {id:2,title:'免费课程',name:"Course"}
      ]
    }
  }
}
</script>

<style>

</style>


index.js

import Vue from 'vue'
import Router from 'vue-router'
import Home from '@/components/Home/Home'
import Course from '@/components/Course/Course'

Vue.use(Router);

export default new Router({
  // mode:'history',
  routes: [
    {
      path: '/',
      redirect:'/home'
    },
    {
      path: '/home',
      name: 'Home',
      component: Home
    },
    {
      path: '/course',
      name: 'Course',
      component: Course
    }
  ]
})


Home.vue

<template>
    <div>
       我是首页
    </div>
</template>

<script>
    export default {
        name:'Home'
    }
</script>

<style scoped>

</style>


Course.vue

<template>
    <div>
       <div class="categoryList">
           <span @click = 'categoryHandler(index,item.id)' v-for = '(item,index) in categoryList' :key="item.id" :class="{active:index==currentIndex}">{{ item.name }}</span>
       </div>
       <div class="course">
           <ul>
               <li v-for = '(course) in courseList' :key="course.id">
                   <h3>{{course.name}}</h3>
               </li>
           </ul>
       </div>
    </div>
</template>

<script>
    export default {
        name:'Course',
        data(){
            return {
                categoryList:[], //分类列表
                currentIndex:0,
                courseList:[],  //课程列表
                categoryId:0, //默认全部课程id
            }
        },
        methods:{
            //获取 分类列表的数据
            getCategoryList(){
                this.$https.get('course_sub/category/list/')
                .then((res)=>{
                    console.log(res);
                    var data = res.data;

                    if(data.error_no === 0){

                        this.categoryList = data.data;
                        let obj = {
                            id:0,
                            name:'全部',
                            category:0
                        }
                        this.categoryList.unshift(obj);
                        // 数组  删除任意一个指定的元素
                        //指定数组中的索引 删除指定的元素  数组.splice(起始位置,删除的个数)
                    }
                })
                .catch((err)=>{
                    console.log('获取列表失败',err)
                })
            },
            categoryHandler(index,categoryId){
                this.currentIndex = index;
                this.categoryId = categoryId;
                this.getCourseList()
            },
            getCourseList(){
                var _this = this;
                this.$https.get(`courses/?sub_category=${this.categoryId}`)
                .then(function(res){
                    var data = res.data;
                    _this.courseList = data.data;
                    console.log(_this.courseList)

                })
                .catch(err=>{
                    console.log(err);
                })
            }

        },
        created(){
            this.getCategoryList();
            this.getCourseList()
        }
    }
</script>

<style scoped>
span{
    padding: 0 20px;
}
span.active{
    color: blue;
}
</style>
详情见官网:https://www.npmjs.com/package/vue-cookies

下载: npm i vue-cookies -S


引入项目:

// require
var Vue = require('vue')
Vue.use(require('vue-cookies'))

// es2015 module(主要用下面这种引入方法)
import VueCookies from 'vue-cookies'
Vue.use(VueCookies)


使用:

// set default config
$cookies.config() 设置默认值
$cookies.config(expireTimes, path)
    expireTimes 默认1d
    path 默认'/'。 注意:// 哈希模式下:域名/projectName/#/aaaa 默认为 '/projectName'。 域名/projectName#/aaaa 默认为 '/'。确认 #号前面是否有'/'。

// set global cookie
$cookies.set()
$cookies.set(key, value[, expireTimes[, path[, domain[, secure]]]])
    key: cookie名,注意 $cookies key names Cannot be set to ['expires', 'max-age', 'path', 'domain', 'secure']
    value: cookie值,vue-cookie会自动帮你把对象转为json if (value && value.constructor === Object ){value = JSON.stringify(value)}
    expireTimes: cookie有效时间,默认时间为1d,可以为到期时间点,也可以为有效时间段,在vue-cookies中传入Infinity||-1被认该cookie永久有效,传入'0'则关闭浏览器的时候销毁cookie
    path: cookie所在目录,默认 '/' 根目录,设置path:'/projectName'指定项目名下'/projectName'使用
    domain: cookie所在的域,默认为请求地址
    secure: Secure属性是说如果一个cookie被设置了Secure=true,那么这个cookie只能用https协议发送给服务器,用http协议不发送。

$cookies.get('key')
$cookies.get(key)       // return value

$cookies.remove('key')
$cookies.remove(key [, path [, domain]])   // return  false or true , warning: next version return this; use isKey(key) return true/false,please

是否有key cookie
$cookies.isKey(key) // return true or false

列出所有cookie
$cookies.keys() // return ['key', 'key', ......]
详情见官网:https://docs.geetest.com/


客户端部署:web示例


gt.js文件存放于服务端SDK中(如:static/global/gt.js)


在 main.js 中导入全局的geetest.js
import '../static/global/gt'


在 Login.vue 中使用:

1.调用初始化函数进行初始化
ajax({
    url: "API1接口(详见服务端部署)",
    type: "get",
    dataType: "json",
    success: function (data) {
        //请检测data的数据结构, 保证data.gt, data.challenge, data.success有值
        initGeetest({
            // 以下配置参数来自服务端 SDK
            gt: data.gt,
            challenge: data.challenge,
            offline: !data.success,
            new_captcha: true
        }, function (captchaObj) {
            // 这里可以调用验证实例 captchaObj 的实例方法
        })
    }
})

2.通过 ajax 方式进行二次验证
initGeetest({
    // 省略配置参数
}, function (captchaObj) {
    // 省略其他方法的调用

    // 这里调用了 onSuccess 方法,该方法介绍见下文
    captchaObj.onSuccess(function () {
        var result = captchaObj.getValidate();

        // ajax 伪代码
        ajax('/api/gt-validate', {
            geetest_challenge: result.geetest_challenge,
            geetest_validate: result.geetest_validate,
            geetest_seccode: result.geetest_seccode,

            // 其他服务端需要的数据,比如登录时的用户名和密码
        }, function (data) {
            // 根据服务端二次验证的结果进行跳转等操作
        });
    });
});
先将gt.js文件放在static/global下 main.js import Vue from 'vue' import App from './App' import router from './router' //导入element-ui模块 并且导入全局的css样式 import ElementUI from 'element-ui'; import 'element-ui/lib/theme-chalk/index.css'; Vue.use(ElementUI); //将lfHeader 注册成全局组件 import LfHeader from '@/components/Common/LfHeader' Vue.component(LfHeader.name,LfHeader); // 引入vue-cookies import VueCookies from 'vue-cookies' Vue.use(VueCookies); // 引入全局的geetest.js import '../static/global/gt' //引入项目中的全局的css样式 import '../static/global/index.css' import * as api from './restful/api' Vue.prototype.$http = api; //导入store实例 import store from './store' //全局导航守卫 router.beforeEach((to, from, next) => { if(VueCookies.isKey('access_token')){ let user = { username:VueCookies.get('username'), shop_cart_num:VueCookies.get('shop_cart_num'), access_token:VueCookies.get('access_token'), avatar:VueCookies.get('avatar'), notice_num:VueCookies.get('notice_num') }; store.dispatch('getUser',user) } next() }); Vue.config.productionTip = false; /* eslint-disable no-new */ new Vue({ el: '#app', router, store, components: { App }, template: '<App/>' }); src/store/index.js import Vue from 'vue' /* 1、导入对象 2.Vue.use() 3.创建store对象 4.挂载 */ import Vuex from 'vuex' Vue.use(Vuex); const store = new Vuex.Store({ state:{ userinfo:{},//存储用户信息 }, mutations:{ get_user(state,data){ state.userinfo = data } }, actions:{ getUser(context,data){ context.commit('get_user',data); } } }); export default store; src/router/index.js import Vue from 'vue' import Router from 'vue-router' Vue.use(Router); import Home from '@/components/Home/Home' import Course from '@/components/Course/Course' import LightCourse from '@/components/LightCourse/LightCourse' import Micro from '@/components/Micro/Micro' import CourseDetail from '@/components/Course/CourseDetail' import Login from '@/components/Login/Login' import ShopCart from '@/components/Cart/ShopCart' export default new Router({ linkActiveClass:'is-active', mode:'history', //1.创建匹配路由组件 2、配置路由信息 3.在router-link中使用 routes: [ { path:'/', redirect:{name:"Home"} }, { path:'/home', name:'Home', component:Home }, { path:'/course', name:'Course', component:Course }, { path:'/home/light-course', name:'LightCourse', component:LightCourse }, { path:'/micro', name:'Micro', component:Micro }, { path:'/course/detail/web/:courseId', name:'CourseDetail', component:CourseDetail }, { path:'/login', name:'Login', component:Login }, { path:"/purchase/shopping_cart", name:'shop_cart', component:ShopCart } ] }) src/restful/api.js import Axios from 'axios' import VueCookies from 'vue-cookies' Axios.defaults.baseURL='https://www.luffycity.com/api/v1'; const categoryListUrl = '/course_sub/category/list/'; const courseListUrl = '/courses/?sub_category='; const courseDetailUrl ='/coursedetail/?courseid='; const captchaCheckUrl = '/captcha_check/'; const loginUrl = '/account/login/'; const user_shop_cart_url = '/user/shop_cart/create/'; //请求拦截器 Axios.interceptors.request.use(function (config) { // 在发送请求之前做些什么 if(VueCookies.isKey('access_token')){ //有问题? config.headers.Authorization = VueCookies.get('access_token'); } return config; }, function (error) { // 对请求错误做些什么 return Promise.reject(error); }); export function categoryList() { return Axios.get(categoryListUrl).then(res=>res.data) } export function courseList(categoryId) { return Axios.get(`${courseListUrl}${categoryId}`).then(res=>res.data) } export function courseDetail(courseId) { return Axios.get(`${courseDetailUrl}${courseId}`).then(res=>res.data) } export function geetest(){ return Axios.get(`${captchaCheckUrl}`).then(res=>res.data) } export function login(params){ return Axios.post(`${loginUrl}`,params).then(res=>res.data) } export function shopCart(params){ return Axios.post(`${user_shop_cart_url}`,params).then(res=>res.data) } common/LfHeader.vue <template> <div> <router-link :to = '{name:nav.name}'> {{ nav.title }} </router-link> <span v-if="i === 2">New</span> </li> </ul> </div> <!-- <el-dropdown> --> <div class="nav-right" v-if='userInfo.access_token' @mouseenter = 'enterHandler' @mouseleave = 'leaveHandler'> <span class = 'el-dropdown-link'>学习中心</span> <span class="user">{{ userInfo.username }}</span> <img :src="userInfo.avatar" alt=""> <ul class="my_account" v-show = 'isShow'> <li> 我的账户 <i>></i> </li> <li> 我的订单 <i>></i> </li> <li> 我的优惠券 <i>></i> </li> <li> 我的消息<span class="msg">({{ userInfo.notice_num }})</span> <i>></i> </li> <li @click = 'shop_cart'> 购物车<span class="count">({{ userInfo.shop_cart_num}})</span> <i>></i> </li> <li> 退出 <i>></i> </li> </ul> </div> <!-- </el-dropdown> --> <div class="nav-right" v-else> <span>登录</span> | <span>注册</span> </div> </div> </el-header> </el-container> </template> <script> export default { name: 'LfHeader', data(){ return { isShow:false, navlinks:[ {id:1,title:'首页',name:"Home"}, {id:2,title:'免费课程',name:"Course"}, {id:3,title:'轻课',name:"LightCourse"}, {id:4,title:'学位课程',name:"Micro"} ] } }, methods:{ shop_cart(){ this.$router.push({ name:'shop_cart' }) }, enterHandler(){ this.isShow = true; }, leaveHandler(){ this.isShow = false; }, }, computed:{ userInfo(){ // let userInfo = { // access_token:this.$cookies.get('access_token'), // notice_num:this.$cookies.get('notice_num'), // shop_cart_num:this.$cookies.get('shop_cart_num'), // avatar:this.$cookies.get('avatar'), // username:this.$cookies.get('username') // } return this.$store.state.userinfo } } }; </script> <style lang="css" scoped> .el-header{ border-bottom: #c9c9c9; box-shadow: 0 0.5px 0.5px 0 #c9c9c9; } .header{ width: 1200px; height: 80px; line-height: 80px; margin: 0 auto; } .nav-left{ float: left; margin-top: 10px; } .nav-center{ float: left; margin-left: 100px; } .nav-center ul{ overflow: hidden; } .nav-center ul li{ float: left; margin: 0 5px; /*width: 100px;*/ padding: 0 20px; height: 80px; line-height: 80px; text-align: center; position: relative; } .nav-center ul li a{ color: #4a4a4a; width: 100%; height: 60px; display: inline-block; } .nav-center ul li a:hover{ color: #B3B3B3; } .nav-center ul li a.is-active{ color: #4a4a4a; border-bottom: 4px solid #ffc210; } .nav-center ul li span{ color: red; font-size: 12px; position:absolute; top: -12px; right: -3px; } .nav-right{ float: right; position: relative; z-index: 100; } .nav-right span{ cursor: pointer; } .nav-right .user{ margin-left: 15px; } .nav-right img{ width: 26px; height: 26px; border-radius: 50%; display: inline-block; vertical-align: middle; margin-left: 15px; } .nav-right ul{ position: absolute; width: 221px; z-index: 100; font-size: 12px; top: 80px; background: #fff; border-top: 2px solid #d0d0d0; box-shadow: 0 2px 4px 0 #e8e8e8; } .nav-right ul li{ height: 40px; color: #4a4a4a; padding-left: 30px; padding-right: 20px; font-size: 12px; display: flex; align-items: center; justify-content: space-between; cursor: pointer; transition: all .2s linear; } .nav-right ul li span.msg{ margin-left: -80px; color: red; } .nav-right ul li span.count{ margin-left: -100px; color: red; } </style> Course/CourseDetail.vue <template> <div class="wrap"> <div class="web-course-banner"> <div class="container"> <div class="title"> <img src="../../../static/images/play.png" height="67" width="67" alt=""> <h1 class="course-title">Django框架学习</h1> </div> <span class="course-text">Python语言下最强大优秀的WEB框架从入门到进阶</span> <div class="course-list"> <ul> <li class="detail-item"> 难度:初级 </li> <li class="sep"></li> <li class = detail-item>时长:32小时</li> <li class="sep"></li> <li class = detail-item>学习人数:632人</li> <li class="sep"></li> <li class = detail-item>评分 10.0</li> </ul> </div> </div> </div> <div class="course-review"> <ul class="review-head-wrap"> <li class="head-item">课程概述</li> <li class="head-item">课程章节</li> <li class="head-item">用户评价(10)</li> <li class="head-item">常见问题</li> </ul> </div> <!-- 课程详情 --> <div class="course-detail"> <div class="container"> <div class="course-detail-text"> <h3>课程概述</h3> <p> Django是Python语言中最流行、最强大的WEB框架,可快速构建稳定强大的WEB项目,大大提高开发效率,很多知名项目都是基于Django开发,如Disqus、Pinterest、Instagram、Bitbucket等, Django官方Slogan是The framework for perfectionist with deadline! 一个为完美主义者且又开发工期很紧的人设计的框架,事实确实如此,Django自身集成了丰富的WEB开发通用组件,如用户认证、分页、中间件、缓存、session等,可以避免浪费大量时间重复造轮子。人生苦短,join the course now and start to build your first web program based on Django. </p> </div> <div class="course-img"> <img src="https://www.luffycity.com/static/img/web-introduce.d075499.png" alt=""> </div> </div> </div> <div class="course-price"> <div class="container"> <span>可以根据不同的学习情况购买不一样的学习套餐哦!</span> <ul class="course-price-item" > <li @click = 'priceHandler(index)' :class = '{active:index == currentIndex}' v-for = '(price,index) in prices' :key='price.id'> <p class="price" :class = '{active:index === currentIndex}'>¥{{ price.price }}</p> <p class="time" :class = '{active:index === currentIndex}'>有效期{{ price.valid_period_name }}</p> </li> </ul> <div class="course-action"> <button class="left">购买</button> <button class="right" @click = 'addShopCart'>加入购物车</button> </div> </div> </div> </div> </template> <script> export default { name: 'CourseDetail', data(){ return { prices:[], //价格套餐 currentIndex:null } }, methods:{ //购物车按钮事件操作 addShopCart(){ //1.如果用户没有选中价格套餐,提示用户 “您没有选择要加入的套餐哦” //2.如果用户选中套餐,点击购物车按钮,(判断当前用户有登录 vue-cookie) // 2.1 如果用户未登录(未产生token) //编程式导航 跳转登录页面 if(this.currentIndex){ //用户选中套餐 if (this.$cookies.isKey('access_token')) { console.log(this.prices[this.currentIndex]) let params = { courseId:this.$route.params.courseId, validPeriodId:this.prices[this.currentIndex].valid_period } /**后端的逻辑 难点 */ this.$http.shopCart(params) .then(res=>{ if(res.error_no === 10){ this.$message(res.msg) } if(res.error_no === 0){ this.$message('购物车添加成功') } }) .catch(err=>{ console.log(err) }) }else{ this.$route.push({ name:'Login', }) } }else{ //用户未选中套餐 this.$message({ message:'您没有选择要加入的套餐哦', type:'warning', duration: 1000 }); } }, //价格套餐点击事件 priceHandler(index){ if(this.currentIndex === index){ //又点了当前的套餐 this.currentIndex = null; }else{ this.currentIndex = index; } }, //获取课程详情 包含 价格套餐 getCourseDetail(){ let course_id = this.$route.params.courseId this.$http.courseDetail(course_id) .then(res=>{ this.prices = res.data.prices; }) .catch(err=>{ console.log(err); }) } }, created(){ this.getCourseDetail() } }; </script> <style lang="css" scoped> .wrap{ width: 100%; } .web-course-banner{ width: 100%; height: 512px; background: url(https://www.luffycity.com/static/img/web-banner.1402933.png) no-repeat; background-size: 100% 100%; text-align: center; overflow: hidden; } .container{ width: 1200px; margin: 182px auto 0; text-align: left; } .container img{ vertical-align: middle; } .container h1{ display: inline-block; font-size: 48px; color: #4a4a4a; letter-spacing: .37px; margin-left: 40px; font-family: PingFangSC-Light; font-weight: 500; line-height: 1.1; position: relative; top: 10px; } .course-text{ width: 464px; display: inline-block; font-size: 22px; color: #4a4a4a; letter-spacing: .17px; line-height: 36px; margin-top: 33px; } .course-list{ width: 100%; } .course-list ul{ margin-top: 63px; display: flex; align-items: center; justify-content: flex-start; } .course-list ul li.detail-item{ font-size: 18px; color: #4a4a4a; letter-spacing: .74px; height: 26px; padding: 0 20px; } .course-list ul li.sep{ width: 2px; height: 14px; border-left: 1px solid #979797; } .course-review{ width: 100%; height: 80px; background: #fafbfc; border-top: 1px solid #e8e8e8; box-shadow: 0 1px 0 0 #e8e8e8; } .review-head-wrap{ width: 590px; margin: 0 auto; display: flex; justify-content: space-between; } .review-head-wrap .head-item{ height: 80px; line-height: 80px; font-size: 16px; color: #555; cursor: pointer; } .course-detail{ width: 100%; padding-top: 90px; } .course-detail .container{ width: 1200px; margin: 0 auto; display: flex; justify-content:space-between; } .course-detail-text{ width: 500px; text-align:left; } .course-detail-text h3{ padding: 20px 0; } .course-detail-text p{ width: 100%; height: 196px; font-size: 14px; color: #4A4A4A; letter-spacing: 1.83px; line-height: 30px; text-align: left; } .course-price{ width: 100%; background: #FAFAFA; } .course-price .container{ width: 1200px; margin: 0 auto; text-align: center; } .course-price span{ font-size: 12px; color: #9b9b9b; letter-spacing: 1.57px; display: inline-block; margin-top: 102px } .course-price ul{ /*width: 800px;*/ margin: 50px auto; display: flex; flex-wrap: wrap; justify-content:space-between; } .course-price ul li{ width: 200px; height: 112px; border: 1px solid #979797; } .course-price ul li.active{ background: #00CD23; } .course-price ul li p:first-child{ font-size: 24px; letter-spacing: 1.92px; color: #333; margin-top: 17px; } .course-price ul li p:nth-child(2){ color: #9b9b9b; font-size: 20px; letter-spacing: 1.6px; margin-top: 9px; } .course-price ul li p.active{ color: #fff; } .course-action{ width: 1000px; margin: 0 auto; padding-bottom: 80px; display: flex; justify-content: center; } .course-action button{ border:none; outline: none; cursor: pointer; display: inline-block; width: 181px; height: 51px; font-size: 14px; color: #fff; letter-spacing: 1.12px; text-align: center; background: #f5a623; border-radius: 82px; } .course-action button.left{ background: #7ed321; box-shadow: 0 2px 4px 0 #e8e8e8; color: #fff; margin-right: 48px; padding: 0 20px; } .course-action button.right{ background: #f5a623 url() no-repeat 125px 15px!important; } </style> Login/Login.vue <template> <div class="box"> <img src="https://www.luffycity.com/static/img/Loginbg.3377d0c.jpg" alt> <div class="login"> <div class="login-title"> <img src="https://www.luffycity.com/static/img/Logotitle.1ba5466.png" alt> <p>帮助有志向的年轻人通过努力学习获得体面的工作和生活!</p> </div> <div class="login_box"> <div class="title"> <span>密码登录</span> <span>短信登录</span> </div> <div class="inp"> <input v-model="username" type="text" placeholder="用户名 / 手机号码" class="user"> <input v-model="password" type="password" name class="pwd" placeholder="密码"> <div id="geetest"></div> <div class="rember"> <p> <input type="checkbox" class="no" name="a"> <span>记住密码</span> </p> <p>忘记密码</p> </div> <button class="login_btn" @click="loginHandler">登录</button> <p class="go_login"> 没有账号 <span>立即注册</span> </p> </div> </div> </div> </div> </template> <script> export default { name: "Login", data() { return { username: "", password: "", geetestObj:{} }; }, methods: { loginHandler(){ if(!this.geetestObj){ return; }else{ //登录状态 let params = { geetest_challenge: this.geetestObj.geetest_challenge, geetest_seccode: this.geetestObj.geetest_seccode, geetest_validate: this.geetestObj.geetest_validate, username:this.username, password:this.password } this.$http.login(params) .then(res=>{ if(res.error_no === 0){ //前面的记录 this.$router.go(-1) let data = res.data; //存储cookie 通过for-in循环来遍历 字典对象 for(let key in data){ this.$cookies.set(key,data[key]) } //分发actions中声明的方法 this.$store.dispatch('getUser',data); } }) .catch(err=>{ console.log(err) }) } }, // getGeetest() { this.$http .geetest() .then(res => { let data = res.data; initGeetest( { // 以下配置参数来自服务端 SDK gt: data.gt, challenge: data.challenge, offline: !data.success, new_captcha: true, width: "100%" }, (captchaObj)=> { // 这里可以调用验证实例 captchaObj 的实例方法 captchaObj.appendTo("#geetest"); // 这里调用了 onSuccess 方法,该方法介绍见下文 captchaObj.onSuccess(()=> { var result = captchaObj.getValidate(); this.geetestObj = result }); } ); }) .catch(err => { console.log(err); }); } }, created() { this.getGeetest(); } }; </script> <style lang="css" scoped> .box { width: 100%; position: relative; } .box img { width: 100%; } .box .login { position: absolute; width: 500px; height: 400px; top: 50%; left: 50%; margin-left: -250px; margin-top: -300px; } .login .login-title { width: 100%; text-align: center; } .login-title img { width: 190px; height: auto; } .login-title p { font-family: PingFangSC-Regular; font-size: 18px; color: #fff; letter-spacing: 0.29px; padding-top: 10px; padding-bottom: 50px; } .login_box { width: 400px; height: auto; background: #fff; box-shadow: 0 2px 4px 0 rgba(0, 0, 0, 0.5); border-radius: 4px; margin: 0 auto; padding-bottom: 40px; } .login_box .title { font-size: 20px; color: #9b9b9b; letter-spacing: 0.32px; border-bottom: 1px solid #e6e6e6; display: flex; justify-content: space-around; padding: 50px 60px 0 60px; margin-bottom: 20px; cursor: pointer; } .login_box .title span:nth-of-type(1) { color: #4a4a4a; border-bottom: 2px solid #84cc39; } .inp { width: 350px; margin: 0 auto; } .inp input { border: 0; outline: 0; width: 100%; height: 45px; border-radius: 4px; border: 1px solid #d9d9d9; text-indent: 20px; font-size: 14px; background: #fff !important; } .inp input.user { margin-bottom: 16px; } .inp .rember { display: flex; justify-content: space-between; align-items: center; position: relative; margin-top: 10px; } .inp .rember p:first-of-type { font-size: 12px; color: #4a4a4a; letter-spacing: 0.19px; margin-left: 22px; display: -ms-flexbox; display: flex; -ms-flex-align: center; align-items: center; /*position: relative;*/ } .inp .rember p:nth-of-type(2) { font-size: 14px; color: #9b9b9b; letter-spacing: 0.19px; cursor: pointer; } .inp .rember input { outline: 0; width: 15px; height: 45px; border-radius: 4px; border: 1px solid #d9d9d9; text-indent: 20px; font-size: 14px; background: #fff !important; } .inp .rember p span { display: inline-block; font-size: 12px; width: 100px; /*position: absolute;*/ /*left: 20px;*/ } #geetest { margin-top: 20px; } .login_btn { width: 100%; height: 45px; background: #84cc39; border-radius: 5px; font-size: 16px; color: #fff; letter-spacing: 0.26px; margin-top: 30px; } .inp .go_login { text-align: center; font-size: 14px; color: #9b9b9b; letter-spacing: 0.26px; padding-top: 20px; } .inp .go_login span { color: #84cc39; cursor: pointer; } </style>
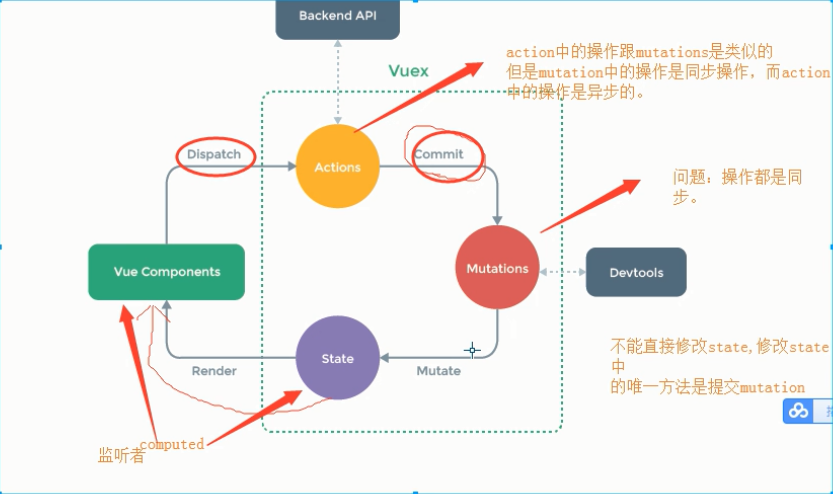
详情见官网:https://vuex.vuejs.org/zh/

下载     npm i vuex -S

使用:
main.js

import Vuex from 'vuex'
Vue.use(Vuex)
const store = new Vuex.Store({
  state:{
    num:1,
    questionList:[]
  },
  mutations:{
    setMutaNum(state,val){
      state.num+=val
    },
    setMutaAsync:function(state,val){
     state.num+=val

    },
    course_questions(state,data){
      state.questionList = data;

    }
  },
  actions:{
    setActionNum(context,val){
      //Action 提交的是 mutation,而不是直接变更状态。
      context.commit('setMutaNum',val)
    },
    setActionAsync:function(context,val){
      setTimeout(()=>{
        context.commit('setMutaAsync',val)
      },1)

     },
     course_questions(context,courseId){
       //异步  aixos 异步
       Axios.get(`course_questions/?course_id=${courseId}`)
       .then((res)=>{
            let data = res.data.data;
            context.commit('course_questions',data)
       })
       .catch((err)=>{
            console.log(err)
       })
     }
  }
})

new Vue({
  el: '#app',
  router,
  store,
  components: { App },
  template: '<App/>'
})
main.js

import Vue from 'vue'
import App from './App'
import router from './router'
//引入axios
import Axios from 'axios'
//将axios挂载到 Vue原型上
Vue.prototype.$https = Axios

//设置公共的url
Axios.defaults.baseURL = 'https://www.luffycity.com/api/v1/';

Vue.config.productionTip = false

import Home from '@/components/Home'
Vue.component(Home.name,Home)

import Vuex from 'vuex'
Vue.use(Vuex)
const store = new Vuex.Store({
  state:{
    num:1,
    questionList:[]
  },
  mutations:{
    setMutaNum(state,val){
      console.log(val)
      state.num+=val
    },
    setMutaAsync:function(state,val){
     state.num+=val

    },
    course_questions(state,data){
      state.questionList = data;

    }
  },
  actions:{
    setActionNum(context,val){
      //Action 提交的是 mutation,而不是直接变更状态。
      context.commit('setMutaNum',val)
    },
    setActionAsync:function(context,val){
      setTimeout(()=>{
        context.commit('setMutaAsync',val)
      },1)

     },
     course_questions(context,courseId){
       //异步  aixos 异步
       Axios.get(`course_questions/?course_id=${courseId}`)
       .then((res)=>{
        let data = res.data.data;
        context.commit('course_questions',data)
       })
       .catch((err)=>{
        console.log(err)
       })
     }
  }
})

/* eslint-disable no-new */
new Vue({
  el: '#app',
  router,
  store,
  components: { App },
  template: '<App/>'
})


App.vue

<template>
  <div id="app">
    <div class="header">
      <ul>
        <li v-for="(item) in navList" :key='item.id'>
          <router-link :to="{name:item.name}">{{ item.title }}</router-link>
        </li>
      </ul>
    </div>
    <router-view/>
  </div>
</template>

<script>
export default {
  name: 'App',
  data(){
    return {
      navList:[
        {id:1,title:'首页',name:"Home"},
        {id:2,title:'免费课程',name:"Course"}

      ]
    }
  }
}
</script>

<style>

</style>


index.js

import Vue from 'vue'
import Router from 'vue-router'
import Home from '@/components/Home'
import Course from '@/components/Course'
import CourseDetail from '@/components/CourseDetail'
Vue.use(Router)

export default new Router({
  routes: [
    {
      path:'/',
      redirect:'/home'
    },
    {
      path: '/home',
      name: 'Home',
      component: Home
    },
    {
      path: '/course',
      name: 'Course',
      component: Course
    },
    {
      path:'/course/detail/web/:courseId',
      name:'course.detail',
      component:CourseDetail
    }
  ]
})


Home.vue

<template>
    <div>
       我是首页
       <h1>我是父组件中 {{myNum}}</h1>
       <Son />
    </div>
</template>

<script>
import Son from './Son.vue'
    export default {
        name:'Home',
        components:{
            Son
        },
        computed:{
            myNum:function(){
                return this.$store.state.num
            }
        }

    }
</script>

<style scoped>

</style>


Son.vue

<template>
    <div>
        <h2>我是子组件 {{mySonNum}}</h2>
        <button @click="addNum">同步修改+1</button>
        <button @click="addAsyncNum">异步修改+5</button>

    </div>
</template>

<script>
    export default {
        name:'Son',
        methods:{
            addNum(){
                //不要直接修改 state中的状态
                //commit 触发 这个事件  同步
                // this.$store.commit('setNum',1)
                this.$store.dispatch('setActionNum',1)
            },
            addAsyncNum(){
                  this.$store.dispatch('setActionAsync',5)
            }
        },
         computed:{
            mySonNum:function(){
                return this.$store.state.num
            }
        }
    }
</script>

<style scoped>

</style>


Course.vue

<template>
    <div>
       <div class="categoryList">
           <span @click = 'categoryHandler(index,item.id)' v-for = '(item,index) in categoryList' :key="item.id" :class="{active:index==currentIndex}">{{ item.name }}</span>
       </div>
       <div class="course">
           <ul>
               <li v-for = '(course) in courseList' :key="course.id" @click='clickHandler(course.id)'>
                   <h3>{{course.name}}</h3>
               </li>
           </ul>
       </div>
       <Home></Home>
    </div>
</template>

<script>
    export default {
        name:'Course',
        data(){
            return {
                categoryList:[], //分类列表
                currentIndex:0,
                courseList:[],  //课程列表
                categoryId:0, //默认全部课程id
            }
        },
        methods:{
            clickHandler(courseId){
                //跳转路由 编程式导航
                this.$router.push({
                    name:'course.detail',
                    params:{
                        courseId:courseId
                    }
                })

            },
            //获取 分类列表的数据
            getCategoryList(){
                this.$https.get('course_sub/category/list/')
                .then((res)=>{
                    console.log(res);
                    var data = res.data;

                    if(data.error_no === 0){

                        this.categoryList = data.data;
                        let obj = {
                            id:0,
                            name:'全部',
                            category:0
                        }
                        this.categoryList.unshift(obj);
                        // 数组  删除任意一个指定的元素
                        //指定数组中的索引 删除指定的元素  数组.splice(起始位置,删除的个数)
                    }
                })
                .catch((err)=>{
                    console.log('获取列表失败',err)
                })
            },
            categoryHandler(index,categoryId){
                this.currentIndex = index;
                this.categoryId = categoryId;
                this.getCourseList()
            },
            getCourseList(){
                var _this = this;
                this.$https.get(`courses/?sub_category=${this.categoryId}`)
                .then(function(res){
                    var data = res.data;
                    _this.courseList = data.data;
                    console.log(_this.courseList)

                })
                .catch(err=>{
                    console.log(err);
                })
            }

        },
        created(){
            this.getCategoryList();
            this.getCourseList()
        }
    }
</script>

<style scoped>
span{
    padding: 0 20px;
}
span.active{
    color: aquamarine;
}
</style>


CourseDetail.vue

<template>
    <div>
        <p v-for = '(question) in questionList ' :key='question.id'>{{question.answer}}</p>
    </div>
</template>

<script>
    export default {
        name:"CourseDetail",
        created(){
            console.log(this.$route.params.courseId)
            this.$store.dispatch('course_questions',this.$route.params.courseId)
        },
        computed:{
            questionList(){

                return this.$store.state.questionList
            }
        }
    }
</script>

<style scoped>

</style>
main.js

import Vue from 'vue'
import App from './App'
import router from './router'
//1导入vuex
import Vuex from 'vuex'
Vue.use(Vuex)
//2.创建store实例
let store = new Vuex.Store({
  state:{
    count:1
  },
  mutations:{
    get_count(state){
      state.count++;
    }
  },
  actions:{
    //Action 函数接受一个与 store 实例具有相同方法和属性的 context 对象
    get_count(context){
      setTimeout(()=>{
        context.commit('get_count')
      },500)
    }
  }
})

Vue.config.productionTip = false
/* eslint-disable no-new */
new Vue({
  el: '#app',
  router,
  //3挂载 store实例到vue实例中  在各个组件中,都能通过this.$store
  store,
  components: { App },
  template: '<App/>'
})


Home.vue

<template>
    <div>
        我是首页
         <button @click = 'vuexHandler'>vuex</button>
        {{ getCount }}
    </div>
</template>

<script>
    export default {
        name:'Home',
        data(){
            return {
            }
        },

        methods:{
            vuexHandler(){
                  //不能直接修改state,为了实现异步的操作,我们通过dispatch分发actions中声明的方法
                this.$store.dispatch('get_count');
            }
        },
        computed:{
            //默认只有getter
            getCount(){
                return this.$store.state.count
            }
        }
    }
</script>

<style scoped>

</style>


Course.vue

<template>
    <div>
        <h2>我是组件{{getCount}}</h2>
    </div>
</template>

<script>
    export default {
        name:'Course',
        data(){
            return {
            }
        },
        created(){
        },
        computed:{
            getCount(){
                return this.$store.state.count
            }
        }
    }
</script>

<style scoped>

</style>
vuex运作流程
<!DOCTYPE html>
<html lang="zh-CN">
<head>
    <meta charset="UTF-8">
    <title>Title</title>
    <meta name="viewport" content="width=device-width, initial-scale=1">
</head>
<body>
<div id="app">
    <img :src="images[currentIndex].imgSrc" alt="">
    <br>
    <button @click='prevHandler'>上一张</button>
    <button @click='nextHandler'>下一张</button>

</div>
<script src="./vue.js"></script>
<script src="https://cdn.bootcss.com/jquery/3.3.1/jquery.min.js"></script>
<script>
    let vm = new Vue({
        el: '#app',
        data() {
            return {
                images: [
                    {id: 1, imgSrc: './images/1.jpg'},
                    {id: 2, imgSrc: './images/2.jpg'},
                    {id: 3, imgSrc: './images/3.jpg'},
                    {id: 4, imgSrc: './images/4.png'}

                ],
                currentIndex: 0
            }
        },
        methods: {
            nextHandler(e) {
                this.currentIndex++;
                //更改图片地址
                if (this.currentIndex == 4) {
                    this.currentIndex = 0;
                }
            },
            prevHandler(e) {
                this.currentIndex--;
                if (this.currentIndex == -1) {
                    this.currentIndex = 3;
                }
            }
        },
        //组件创建完成, ajax   vue的钩子函数
        created() {
            //this指向问题  能用箭头函数 不要用匿名函数
            setInterval(() => {
//                 console.log(this);
                this.currentIndex++;
                if (this.currentIndex == 4) {
                    this.currentIndex = 0;
                }
            }, 2000);

//            let _this = this;
//            setInterval( function () {
//                 console.log(_this);
//            },1000)
        }
    })
</script>
</body>
</html>
<!DOCTYPE html>
<html lang="zh-CN">
<head>
    <meta charset="UTF-8">
    <title>Title</title>
    <meta name="viewport" content="width=device-width, initial-scale=1">
    <style>
        ul li.active{
            background-color: darkcyan;
        }
    </style>
</head>
<body>
<div id="music">
    <!--@ended 播放完成 会自动调用该方法-->
    <audio :src="musicData[currentIndex].songSrc" controls autoplay @ended = 'nextHanlder'></audio>
    <ul>
        <li @click = 'songHandler(index)' v-for = '(item,index) in musicData' :key="item.id" :class = '{active:index===currentIndex}'>
            <h2>歌手:{{ item.author }}</h2>
            <p>歌名:{{ item.name }}</p>
        </li>
    </ul>
</div>
<script src="./vue.js"></script>
<script>
    var musicData = [{
        id: 1,
        name: '于荣光 - 少林英雄',
        author: '于荣光',
        songSrc: './static/于荣光 - 少林英雄.mp3'
    },
        {
            id: 2,
            name: 'Joel Adams - Please Dont Go',
            author: 'Joel Adams',
            songSrc: './static/Joel Adams - Please Dont Go.mp3'
        },
        {
            id: 3,
            name: 'MKJ - Time',
            author: 'MKJ',
            songSrc: './static/MKJ - Time.mp3'
        },
        {
            id: 4,
            name: 'Russ - Psycho (Pt. 2)',
            author: 'Russ',
            songSrc: './static/Russ - Psycho (Pt. 2).mp3'
        }
    ];

    new Vue({
        el: '#music',
        data() {
            return {
                musicData:[],
                currentIndex:0
            }

        },
        methods:{
            songHandler(i){
                this.currentIndex = i;
            },
            nextHanlder(){
                this.currentIndex++;
            }
        },

        created(){
            this.musicData = musicData
        }
    })
</script>
</body>
</html>
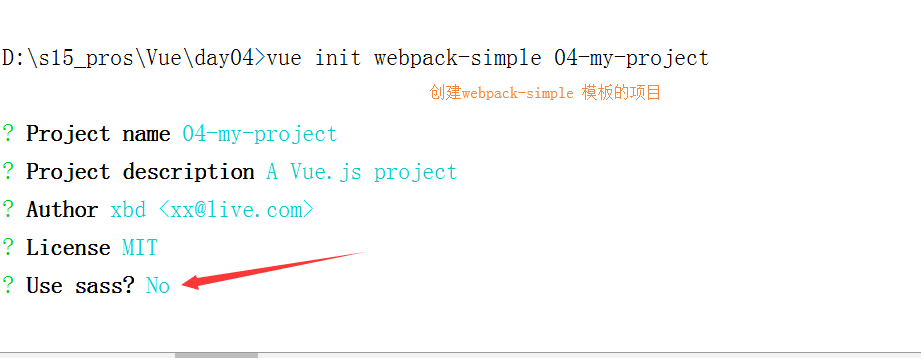
vue-cli的使用
#### 使用vue-cli
- 1.电脑上 ,linux unix 等 安装nodejs,npm 包管理器
- 2. npm install -g @vue/cli //安装 版本是 3.2.1 vue -V 查看vue版本
//拉取vue-cli 2版本 npm install -g @vue/cli-init
# vue init 的运行效果将会跟 vue-cli@2.x 相同
vue init webpack my-project //生成项目
- 先看清 你当前终端中的根目录是哪个,如果不是my-project,一定要切入到当前目录下,然后再执行 npm install
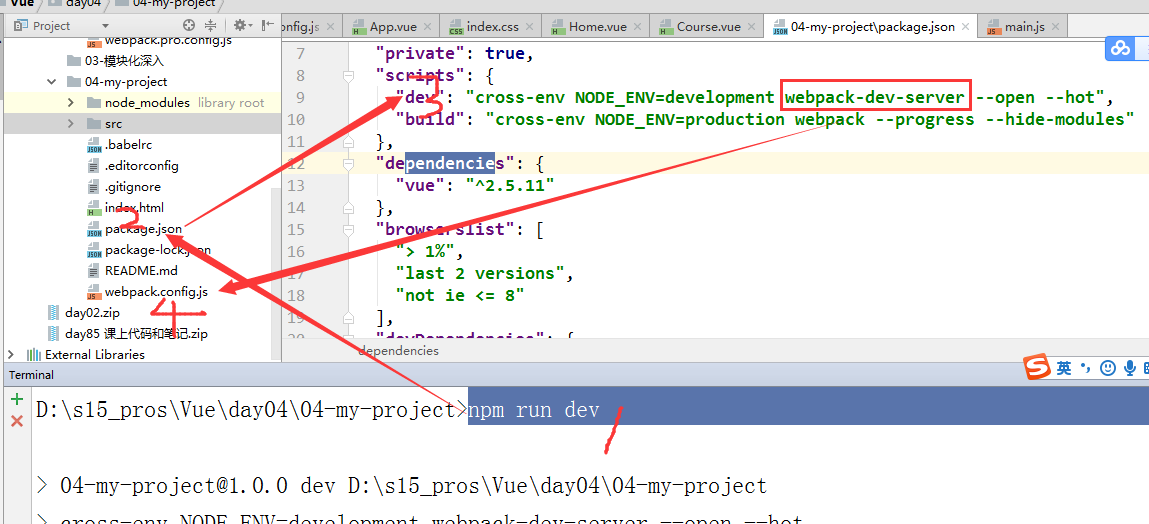
- 运行项目 npm run dev 走了package.json
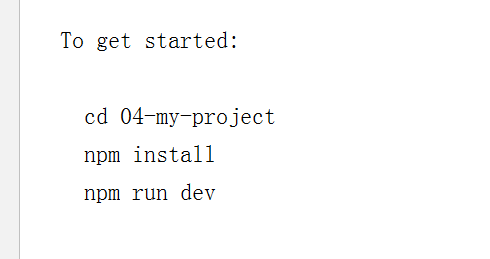
项目的执行顺序
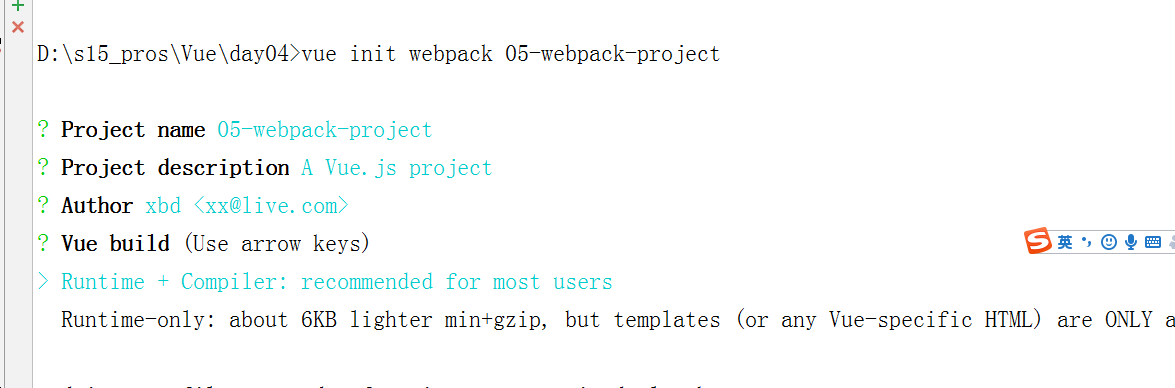
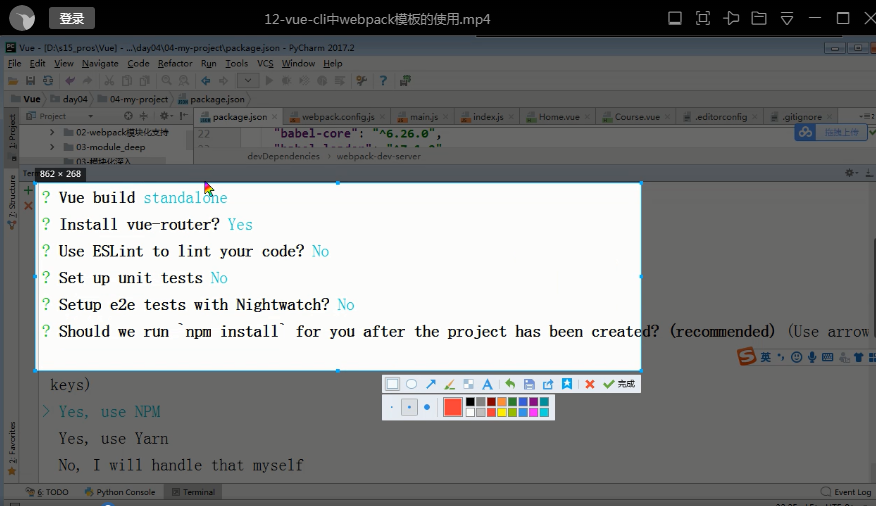
webpack模板的使用
vue init webpack 项目名

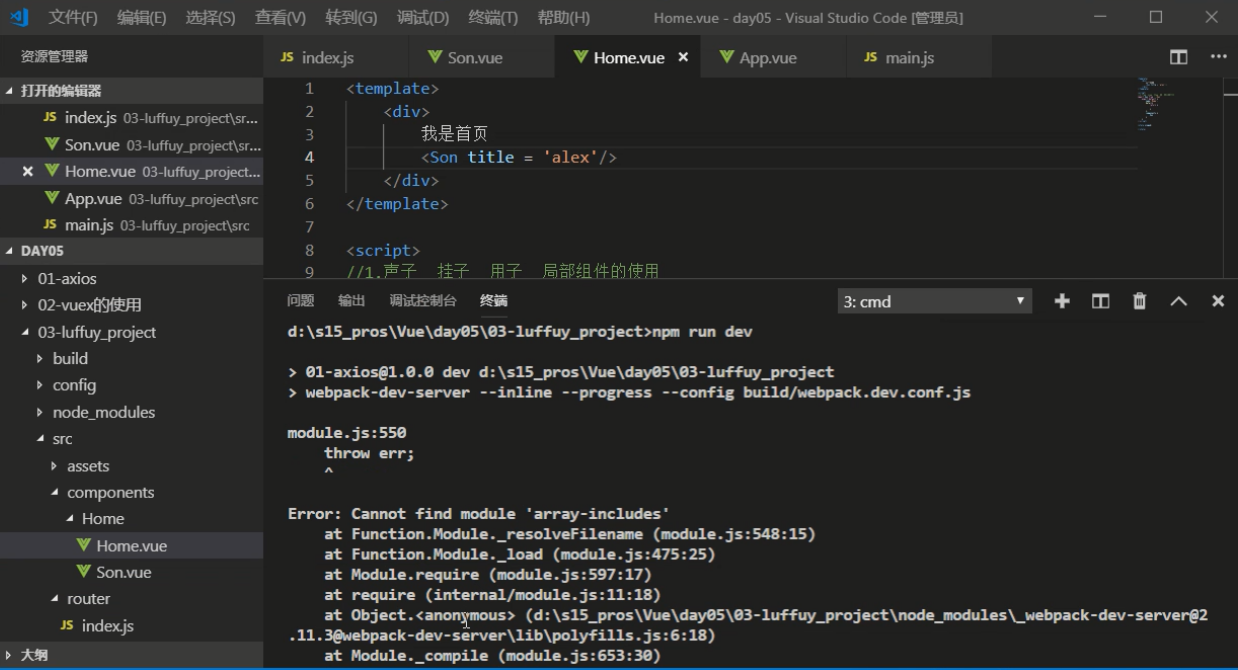
常见错误:
1.出现如下错误,将npm_modules删除,重新 npm install
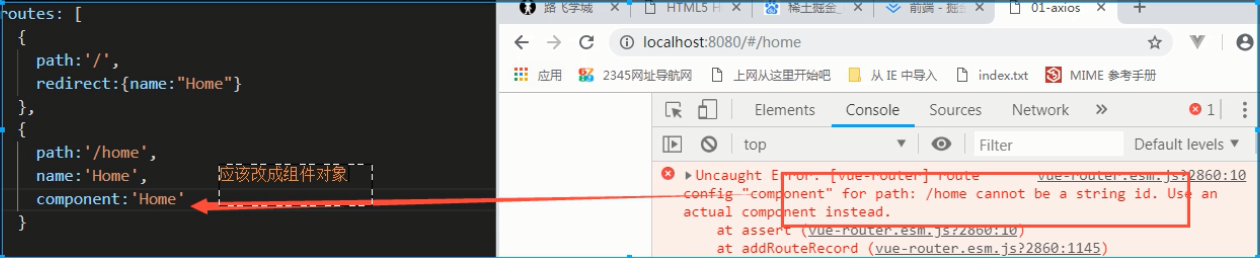
2。出现如下错误,component处不能是一个字符串
v-if和v-show
v-if 是“真正”的条件渲染,因为它会确保在切换过程中条件块内的事件监听器和子组件适当地被销毁和重建。
v-if 也是惰性的:如果在初始渲染时条件为假,则什么也不做——直到条件第一次变为真时,才会开始渲染条件块。
相比之下,v-show 就简单得多——不管初始条件是什么,元素总是会被渲染,并且只是简单地基于 CSS 进行切换。
一般来说,v-if 有更高的切换开销,而 v-show 有更高的初始渲染开销。因此,如果需要非常频繁地切换,则使用 v-show 较好;如果在运行时条件很少改变,则使用 v-if 较好。

//保存数组或者对象 格式
v-for = '(item,index) in menuList'
v-for = '(value,key) in object'
//item指的是数组中每项元素
<a href="" class='box'></a>
<img src="" alt="">
使用v-bind:class = '{}||[]||变量名||常量' 对我们的页面中标签的属性进行绑定 所有的属性都可以进行绑定,注意只要使用了v-bind 后面的字符串一定是数据属性中的值v-on v-bind v-for
  // 1.事件源 2.事件  3.事件驱动程序
vue中使用v-on:click对当前DOM绑定click事件 注意:所有的原生js的事件使用v-on都可以绑定

v-if和v-on 来对页面中DOM进行操作

v-bind:class和v-on对页面中DOM的样式切换

v-bind和v-on

在vue中它可以简写: v-bind:
:class 等价于 v-bind:class
:src 等价于v-bind:src
:id 等价于v-bind:id
v-on:click   等价于 @click = '方法名'
v-text v-html {{}}: 对页面的dom进行赋值运算 相当与js中innerText innerHTML
v-if = 'true':
//创建
var oP = document.createElement('p') ;
oDiv.appendChild(op)
v-if = 'false'
//销毁
oDiv.removeChild(op)
v-show = 'true'
oDiv.style.display = 'block'
v-show:'true'
oDid.style.display = 'none'
v-bind:class
oDiv.className += ' active'
/*
渐进式的JavaScript框架
做加法和做减法:大部分的人觉得做加法简单,做减法难
vue这个框架 将 做减法的事情都给咱们做了(难的部分)
学习简单的部分就能实现复杂的dom操作
*/组件的使用
局部组件的使用
打油诗: 1.声子 2.挂子 3.用
//1.声子
var App = {
 tempalte:`
   <div class='app'></div>`
};


new Vue({
 el:"#app",
 //3.用子
 template:<App />
 //2.挂子
 components:{
    App
 }

})
(1)父组件向子组件传递数据:通过Prop
1.在子组件自定义特性。props:['自定义的属性1','自定义属性2']

当一个值传递给一个 prop 特性的时候,它就变成了那个组件实例的一个属性,那么我们就可以像访问data中的值一样
2.要在父组件中导入的子组件内部 绑定自定义的属性 <Vheader :title = '父组件中data声明的数据属性'/> 注意:一个组件默认可以拥有任意数量的 prop,任何值都可以传递给任何 prop。
(2)如何从子组件传递数据到父组件
1.给子组件中的某个按钮绑定原声事件,。我们可以调用内建的 this.$emit('自定义的事件名','传递的数据'),来向父级组件触发一个自定义的事件.

2.在父组件中的子组件标签中 要绑定自定义的事件,
vue组件传值详情:https://www.cnblogs.com/web-record/p/10320765.html
全局组件的使用
Vue.component('全局组件的名字',{
 跟new Vue() 实例化对象中的options是一样,但是要注意:
 不管是公共组件还是局部组件 data必须是个函数 函数一定要返回 {}
})
<slot> 元素作为承载分发内容的出口过滤器的使用
局部过滤器
 //1.注册局部过滤器 在组件对象中定义
filters:{
    '过滤器的名字':function(value){
    }
}
//2.使用过滤器 使用管道符 |
{{price  | '过滤器的名字'}}
全局过滤器
// 注册全局的过滤器
//第一个参数是过滤器的名字,第二个参数是执行的操作

Vue.filter('reverse',function(value) {
    return value.split('').reverse().join('');
});

//使用跟 局部过滤器一样
计算属性computed和侦听器(watch)
侦听的是单个属性
watch:{

    数据属性的名字:function(value){

    },
    数据属性的名字2:function(value){

    }
}
侦听多个属性:计算属性 computed
{{str.split('').reverse().join('')}}
计算属性 :默认只有getter方法

data(){

  return {

    name:'alex',

    age:18

}

}

compuetd:{

      key:value

      计算属性的方法名:funtion(){

        return ${this.name}他的年龄是${this.age}岁

    }

}

var musicData = [

      {

        id:1,

        name:'于荣光 - 少林英雄',

        author:'于荣光',

        songSrc:'./static/于荣光 - 少林英雄.mp3'

      },

      {

        id:2,

        name:'Joel Adams - Please Dont Go',

        author:'Joel Adams',

        songSrc:'./static/Joel Adams - Please Dont Go.mp3'

      },

      {

        id:3,

        name:'MKJ - Time',

        author:'MKJ',

        songSrc:'./static/MKJ - Time.mp3'

      },

      {

        id:4,name:'Russ - Psycho (Pt. 2)',

        author:'Russ',

        songSrc:'./static/Russ - Psycho (Pt. 2).mp3'

      }

    ];
生命周期(钩子函数)
beforeCreate(){

    // 组件创建之前

    console.log(this.msg);

},

created(){

    // 组件创建之后

    // 使用该组件,就会触发以上的钩子函数,created中可以操作数据,发送ajax,并且可以实现vue==》页面的影响  应用:发送ajax请求

    console.log(this.msg);

    // this.msg = '嘿嘿黑';

},

beforeMount(){

    // 装载数据到DOM之前会调用

    console.log(document.getElementById('app'));

},

mounted(){

    // 这个地方可以操作DOM

    // 装载数据到DOM之后会调用 可以获取到真实存在的DOM元素,vue操作以后的DOM

    console.log(document.getElementById('app'));

},

beforeUpdate(){

    // 在更新之前,调用此钩子,应用:获取原始的DOM

    console.log(document.getElementById('app').innerHTML);

},

updated(){

    // 在更新之前,调用此钩子,应用:获取最新的DOM

    console.log(document.getElementById('app').innerHTML);

},

beforeDestroy(){

    console.log('beforeDestroy');

},

destroyed(){

    console.log('destroyed');

},

activated(){

    console.log('组件被激活了');

},

deactivated(){

    console.log('组件被停用了');

}
$属性
- $refs获取组件内的元素
- $parent:获取当前组件的父组件
- $children:获取当前组件的子组件
- $root:获取New Vue的实例化对象
- $el:获取组件对象的DOM元素
获取更新之后的dom添加事件的特殊情况
$nextTick 是在下次Dom更新循环结束之后执行的延迟回调,在修改数据之后使用$nextTick ,则可以在回调中获取更新之后的DOM
 浙公网安备 33010602011771号