1:Playbook命令
ansible-playbook <xxx.yaml> ... [options]

常见选项:
1:-C --check                         # 只检测可能会发生的改变,但不真正执行操作
2:--list-hosts                       # 列出运行任务的主机
3:--list-tags                        # 列出tag
4:--list-tasks                       # 列出task
5:--limit <host_ip or host_name>     # 只针对主机列表中的主机执行
6:-v -vv  -vvv -vvv                  # 显示过程(从一般到特别详细)

# 示例
[root@ansible-manager ~]# ansible-playbook hello.yaml -C     # 只是测试不执行

PLAY [web] ******************************************************************************************************************

TASK [Gathering Facts] ******************************************************************************************************************
ok: [10.0.0.11]
ok: [10.0.0.12]

TASK [install httpd] ********************************************************************************************************************
changed: [10.0.0.11]
changed: [10.0.0.12]

TASK [start httpd] **********************************************************************************************************************
changed: [10.0.0.12]
changed: [10.0.0.11]

PLAY RECAP *******************************************************************************************************************
10.0.0.11                  : ok=3    changed=2    unreachable=0    failed=0    skipped=0    rescued=0    ignored=0
10.0.0.12                  : ok=3    changed=2    unreachable=0    failed=0    skipped=0    rescued=0    ignored=0

[root@ansible_agent_11 ~]# rpm -qa | grep httpd
httpd-tools-2.4.6-97.el7.centos.5.x86_64


# 示例
[root@ansible-manager ~]# ansible-playbook hello.yaml   # 真实执行

PLAY [web] ******************************************************************************************************************

TASK [Gathering Facts] ******************************************************************************************************************
ok: [10.0.0.12]
ok: [10.0.0.11]

TASK [install httpd] *******************************************************************************************************************
changed: [10.0.0.12]
changed: [10.0.0.11]

TASK [start httpd] *******************************************************************************************************************
changed: [10.0.0.12]
changed: [10.0.0.11]

PLAY RECAP *******************************************************************************************************************
10.0.0.11                  : ok=3    changed=2    unreachable=0    failed=0    skipped=0    rescued=0    ignored=0
10.0.0.12                  : ok=3    changed=2    unreachable=0    failed=0    skipped=0    rescued=0    ignored=0

[root@ansible_agent_11 ~]# rpm -qa | grep httpd
httpd-tools-2.4.6-97.el7.centos.5.x86_64
httpd-2.4.6-97.el7.centos.5.x86_64

# 和上面测试没太大区别哈,只是一个真的去执行了,一个没有真的去执行


# --limit
[root@ansible-manager ~]# ansible-playbook hello.yaml --limit 10.0.0.11

PLAY [web] *******************************************************************************************************************

TASK [Gathering Facts] ******************************************************************************************************************
ok: [10.0.0.11]

TASK [install httpd] *******************************************************************************************************************
ok: [10.0.0.11]

TASK [start httpd] *******************************************************************************************************************
ok: [10.0.0.11]

PLAY RECAP *******************************************************************************************************************
10.0.0.11                  : ok=3    changed=0    unreachable=0    failed=0    skipped=0    rescued=0    ignored=0
# 这里发现即使你写了一个主机组也没用,这里限制了组内一个主机执行,那么它就只会一个主机执行
2:Playbook使用
2.1:利用 playbook 创建 nginx 用户
---
- hosts: web
  remote_user: root

  tasks:
    - name: create group
      group: name=nginx system=yes gid=2022
    - name: create user
      user: name=nginx shell=/sbin/nologin system=yes group=nginx uid=2022 home=/home/nginx create_home=no

# 执行
[root@ansible-manager ~]# ansible-playbook create_user.yaml

PLAY [web] *******************************************************************************************************************

TASK [Gathering Facts] ******************************************************************************************************************
ok: [10.0.0.11]
ok: [10.0.0.12]

TASK [create group] *******************************************************************************************************************
changed: [10.0.0.11]
changed: [10.0.0.12]

TASK [create user] *******************************************************************************************************************
changed: [10.0.0.11]
changed: [10.0.0.12]

PLAY RECAP *******************************************************************************************************************
10.0.0.11                  : ok=3    changed=2    unreachable=0    failed=0    skipped=0    rescued=0    ignored=0
10.0.0.12                  : ok=3    changed=2    unreachable=0    failed=0    skipped=0    rescued=0    ignored=0
# 这里有个建议,每次执行之前建议大家先空跑一下,也就是-C跑一下
2.2:利用 playbook 安装 nginx
---
- hosts: web
  remote_user: root
  tasks:
    - name: Install Nginx
      yum: name=nginx state=present
    - name: installing page
      copy: src=/root/index.html dest=/usr/share/nginx/html/index.html
    - name: Start Nginx
      service: name=nginx state=started enabled=yes

# 这里主要考到了  yum  copy  service三个模块的应用,一定要熟悉copy的应用哦

# 执行
[root@ansible-manager ~]# ansible-playbook install_service.yaml

PLAY [web] *******************************************************************************************************************

TASK [Gathering Facts] ******************************************************************************************************************
ok: [10.0.0.11]
ok: [10.0.0.12]

TASK [Install Nginx] *******************************************************************************************************************
ok: [10.0.0.12]
ok: [10.0.0.11]

TASK [installing page] ******************************************************************************************************************
ok: [10.0.0.11]
ok: [10.0.0.12]

TASK [Start Nginx] *******************************************************************************************************************
changed: [10.0.0.12]
changed: [10.0.0.11]

PLAY RECAP *******************************************************************************************************************
10.0.0.11                  : ok=4    changed=1    unreachable=0    failed=0    skipped=0    rescued=0    ignored=0
10.0.0.12                  : ok=4    changed=1    unreachable=0    failed=0    skipped=0    rescued=0    ignored=0
# 我这里因为前面的httpd忘记删了,所以有一些skip很正常

# 测试
[root@ansible-manager ~]# ansible web -m shell -a "curl 127.0.0.1 -s"
10.0.0.12 | CHANGED | rc=0 >>
<h1>Nginx</h1>
10.0.0.11 | CHANGED | rc=0 >>
<h1>Nginx</h1>

# 非常的好用,这个时候发现文件也都换上去了、
3:Playbook中变量使用
变量名:仅能由字母、数字和下划线组成,且只能以字母开头
3.1:变量定义
variable=value

# 示例
http_port=80
3.2:变量调用方式
通过{{ variable_name }} 调用变量,且变量名前后建议加空格,有时用"{{ variable_name }}"才生效

# 示例
{{ http_port }}
3.3:变量来源
1:ansible 的 setup facts 远程主机的所有变量都可直接调用
2:通过命令行指定变量,优先级最高
	2.1:ansible-playbook -e varname=value
3:在playbook文件中定义
# 示例
   vars:
     - http_port: 80
     - domain: www.kubernetes-devops.cn

4:在独立的变量YAML文件中定义
   - hosts: all
     vars_files:
       - vars.yml   # 这里面全是定义的变量哈
5:在 /etc/ansible/hosts 中定义
主机(普通)变量:主机组中主机单独定义,优先级高于公共变量
组(公共)变量:针对主机组中所有主机定义统一变量
6:在role中定义
3.3.1:示例:使用setup变量
使用 setup 模块中变量
本模块自动在playbook调用,不要用ansible命令调用

---
- hosts: all
  remote_user: root
  gather_facts: yes

  tasks:
    - name: Print {{ ansible_nodename }}
      shell: echo "{{ ansible_nodename }}" >> /opt/hostname

# 执行
[root@ansible-manager ~]# ansible-playbook vars.yaml

PLAY [all] *******************************************************************************************************************

TASK [Gathering Facts] *******************************************************************************************************************
ok: [10.0.0.12]
ok: [10.0.0.11]

TASK [Print ansible_agent_11] *******************************************************************************************************************
changed: [10.0.0.12]
changed: [10.0.0.11]

PLAY RECAP *******************************************************************************************************************
10.0.0.11                  : ok=2    changed=1    unreachable=0    failed=0    skipped=0    rescued=0    ignored=0
10.0.0.12                  : ok=2    changed=1    unreachable=0    failed=0    skipped=0    rescued=0    ignored=0
# 检查
[root@ansible-manager ~]# ansible all -m shell -a "cat /opt/hostname"
10.0.0.12 | CHANGED | rc=0 >>
ansible_agent_12
10.0.0.11 | CHANGED | rc=0 >>
ansible_agent_11
3.3.2:示例:在playbook 命令行中定义变量
---
- hosts: all
  remote_user: root
  gather_facts: yes

  tasks:
    - name: Print {{ name }}
      shell: echo "{{ name }}" >> /opt/name
# 这个时候是要传递的哦,接下来执行一下
[root@ansible-manager ~]# ansible-playbook -e name=layzer vars.yaml
[WARNING]: Found variable using reserved name: name

PLAY [all] *******************************************************************************************************************

TASK [Gathering Facts] *******************************************************************************************************************
ok: [10.0.0.11]
ok: [10.0.0.12]

TASK [Print layzer] *******************************************************************************************************************
changed: [10.0.0.11]
changed: [10.0.0.12]

PLAY RECAP *******************************************************************************************************************
10.0.0.11                  : ok=2    changed=1    unreachable=0    failed=0    skipped=0    rescued=0    ignored=0
10.0.0.12                  : ok=2    changed=1    unreachable=0    failed=0    skipped=0    rescued=0    ignored=0

# 检查
[root@ansible-manager ~]# ansible all -m shell -a "cat /opt/name"
10.0.0.12 | CHANGED | rc=0 >>
layzer
10.0.0.11 | CHANGED | rc=0 >>
layzer

# 解释:这里面说的很明白,就是直接使用-e 传递"变量=值"就可以了
3.3.3:示例:在playbook文件中定义变量
---
- hosts: all
  remote_user: root
  gather_facts: yes
  vars:
  - name: layzer

  tasks:
    - name: Print {{ name }}
      shell: echo "{{ name }}" >> /opt/name

# 执行
[root@ansible-manager ~]# ansible-playbook vars.yaml
[WARNING]: Found variable using reserved name: name

PLAY [all] *******************************************************************************************************************

TASK [Gathering Facts] *******************************************************************************************************************
ok: [10.0.0.11]
ok: [10.0.0.12]

TASK [Print layzer] *******************************************************************************************************************
changed: [10.0.0.11]
changed: [10.0.0.12]

PLAY RECAP *******************************************************************************************************************
10.0.0.11                  : ok=2    changed=1    unreachable=0    failed=0    skipped=0    rescued=0    ignored=0
10.0.0.12                  : ok=2    changed=1    unreachable=0    failed=0    skipped=0    rescued=0    ignored=0
# 检查
[root@ansible-manager ~]# ansible all -m shell -a "cat /opt/name"
10.0.0.12 | CHANGED | rc=0 >>
layzer
10.0.0.11 | CHANGED | rc=0 >>
layzer

# 解释:这样子操作的话就不用加上 -e 指定变量了
3.3.4:示例:使用变量文件
# 定义一个变量文件
[root@ansible-manager ~]# cat vars.yaml
---
name: layzer
age: 18
city: shanghai

# 编写playbook
[root@ansible-manager ~]# cat demo.yaml
---
- hosts: all
  remote_user: root
  gather_facts: yes
  vars_files:
    - vars.yaml
  tasks:
    - name: Print {{ name }}
      shell: echo "{{ name }},{{ age }},{{ city }}" >> /opt/name

# 执行
[root@ansible-manager ~]# ansible-playbook demo.yaml
[WARNING]: Found variable using reserved name: name

PLAY [all] *******************************************************************************************************************

TASK [Gathering Facts] *******************************************************************************************************************
ok: [10.0.0.11]
ok: [10.0.0.12]

TASK [Print layzer] *******************************************************************************************************************
changed: [10.0.0.11]
changed: [10.0.0.12]

PLAY RECAP *******************************************************************************************************************
10.0.0.11                  : ok=2    changed=1    unreachable=0    failed=0    skipped=0    rescued=0    ignored=0
10.0.0.12                  : ok=2    changed=1    unreachable=0    failed=0    skipped=0    rescued=0    ignored=0

# 检查
[root@ansible-manager ~]# ansible all -m shell -a "cat /opt/name"
10.0.0.11 | CHANGED | rc=0 >>
layzer,18,shanghai
10.0.0.12 | CHANGED | rc=0 >>
layzer,18,shanghai

# OK非常的不错,这里主要是考察 vars_files:
3.3.5:示例:主机清单文件中定义变量
3.3.5.1:主机变量
在inventory 主机清单文件中为指定的主机定义变量以便于在playbook中使用
# 示例:
[web]
10.0.0.11 name=zhangsan age=18 city=shanghai
10.0.0.12 name=lisi age=20 city=hangzhou

# 引用
[root@ansible-manager ~]# ansible 10.0.0.11 -m shell -a 'echo "{{ name }},{{ age }},{{ city }}"'
10.0.0.11 | CHANGED | rc=0 >>
zhangsan,18,shanghai
[root@ansible-manager ~]# ansible 10.0.0.12 -m shell -a 'echo "{{ name }},{{ age }},{{ city }}"'
10.0.0.12 | CHANGED | rc=0 >>
lisi,20,hangzhou

# 当然了 playbook也是可以引用的
# playbook
[root@ansible-manager ~]# cat demo.yaml
---
- hosts: 10.0.0.11
  remote_user: root

  tasks:
    - name: Print {{ name }}
      shell: echo "{{ name }},{{ age }},{{ city }}" >> /opt/name

# 执行
[root@ansible-manager ~]# ansible-playbook demo.yaml

PLAY [10.0.0.11] *******************************************************************************************************************

TASK [Gathering Facts] *******************************************************************************************************************
ok: [10.0.0.11]

TASK [Print zhangsan] *******************************************************************************************************************
changed: [10.0.0.11]

PLAY RECAP *******************************************************************************************************************
10.0.0.11                  : ok=2    changed=1    unreachable=0    failed=0    skipped=0    rescued=0    ignored=0

# 检查
[root@ansible-manager ~]# ansible 10.0.0.11 -m shell -a "cat /opt/name"
10.0.0.11 | CHANGED | rc=0 >>
zhangsan,18,shanghai
3.3.5.2:组(公共)变量
在inventory 主机清单文件中赋予给指定组内所有主机上的在playbook中可用的变量,如果和主机变是同名,优先级低于主机变量

[web]
10.0.0.11
10.0.0.12
[web:vars]
name=layzer
age=22
city=shanghai

# 执行
[root@ansible-manager ~]# ansible all -m shell -a 'echo "{{ name }},{{ age }},{{ city }}"'
10.0.0.12 | CHANGED | rc=0 >>
layzer,22,shanghai
10.0.0.11 | CHANGED | rc=0 >>
layzer,22,shanghai

# 主机变量与组变量重复的情况下
[web]
10.0.0.11 name=zhangsan age=20 city=beijing
10.0.0.12 name=lisi age=25 city=guangzhou
[web:vars]
name=layzer
age=22
city=shanghai

# 再次执行
[root@ansible-manager ~]# ansible all -m shell -a 'echo "{{ name }},{{ age }},{{ city }}"'
10.0.0.11 | CHANGED | rc=0 >>
zhangsan,20,beijing
10.0.0.12 | CHANGED | rc=0 >>
lisi,25,guangzhou

# 这个时候发现组变量不起作用了
4:Template使用
4.1:template 模板
模板是一个文本文件,可以做为生成文件的模版,并且模板文件中还可嵌套jinja语法

jinja2语言:https://jinja.palletsprojects.com/en/3.1.x/

jinja 语言使用字面量,有下面形式:
1:字符串:使用单引号或双引号
2:数字:整数,浮点数
3:列表:[item1, item2, …]
4:元组:(item1, item2, …)
5:字典:{key1:value1, key2:value2, …}
6:布尔型:true/false
7:算术运算:+, -, *, /, //, %, **
8:比较操作:==, !=, >, >=, <, <=
9:逻辑运算:and,or,not
10:流表达式:For,If,When

字面量:表达式最简单的形式就是字面量。字面量表示诸如字符串和数值的 Python 对象。如"Hello World"
双引号或单引号中间的一切都是字符串。无论何时你需要在模板中使用一个字符串(比如函数调用、过滤器或只是包含或继承一个模板的参数),如1,1.2
数值可以为整数和浮点数。如果有小数点,则为浮点数,否则为整数。在 Python 里, 1 和 1.0 是不一样的

算术运算:
Jinja 允许用计算值。支持下面的运算符
1:+:把两个对象加到一起。通常对象是素质,但是如果两者是字符串或列表,你可以用这 种方式来衔接它们。无论如何这不是首选的连接字符串的方式!连接字符串见 ~ 运算符。 {{ 1 + 1 }} 等于 2
2:-:用第一个数减去第二个数。 {{ 3 – 2 }} 等于 1
3:/:对两个数做除法。返回值会是一个浮点数。 {{ 1 / 2 }} 等于 {{ 0.5 }}
4://:对两个数做除法,返回整数商。 {{ 20 // 7 }} 等于 2
5:%:计算整数除法的余数。 {{ 11 % 7 }} 等于 4
6::用右边的数乘左边的操作数。 {{ 2 2 }} 会返回 4 。也可以用于重 复一个字符串多次。 {{ '=' 80 }} 会打印 80 个等号的横条\
7:*:取左操作数的右操作数次幂。 {{ 2**3 }} 会返回 8

比较操作符:
1:== 比较两个对象是否相等
2:!= 比较两个对象是否不等
3:如果左边大于右边,返回 true
4:= 如果左边大于等于右边,返回 true
5:< 如果左边小于右边,返回 true
6:<= 如果左边小于等于右边,返回 true

逻辑运算符:
对于 if 语句,在 for 过滤或 if 表达式中,它可以用于联合多个表达式
1:and 如果左操作数和右操作数同为真,返回 true
2:or 如果左操作数和右操作数有一个为真,返回 true
3:not 对一个表达式取反
4:(expr)表达式组
5:true / false true 永远是 true ,而 false 始终是 false

template:
template功能:可以根据和参考模块文件,动态生成相类似的配置文件
template文件必须存放于templates目录下,且命名为 .j2 结尾
yaml/yml 文件需和templates目录平级,目录结构如下示例:

[root@ansible-manager nginx]# tree ./
./
files               # 这个是写的测试文件
    index.html
nginx.yaml          # 执行playbook
templates           # 模板文件
	nginx.conf.j2


具体内容如下:
[root@ansible-manager nginx]# cat nginx.yaml
---
- hosts: web
  remote_user: root

  tasks:
   - name: Installing nginx
     yum: name=nginx state=present
   - name: Copy Config
     template: src=nginx.conf.j2 dest=/etc/nginx/nginx.conf
   - name: Copy Test Files
     copy: src=files/index.html dest=/usr/share/nginx/html/
   - name: Starting Nginx
     service: name=nginx state=started enabled=yes

[root@ansible-manager nginx]# cat templates/nginx.conf.j2
user nginx;
worker_processes {{ ansible_processor_vcpus }};
error_log /var/log/nginx/error.log;
pid /run/nginx.pid;

include /usr/share/nginx/modules/*.conf;

events {
    worker_connections 1024;
}

http {
    log_format  main  '$remote_addr - $remote_user [$time_local] "$request" '
                      '$status $body_bytes_sent "$http_referer" '
                      '"$http_user_agent" "$http_x_forwarded_for"';

    access_log  /var/log/nginx/access.log  main;

    sendfile            on;
    tcp_nopush          on;
    tcp_nodelay         on;
    keepalive_timeout   65;
    types_hash_max_size 2048;

    include             /etc/nginx/mime.types;
    default_type        application/octet-stream;

    include /etc/nginx/conf.d/*.conf;

    server {
        listen       80;
        server_name  {{ ansible_eth0['ipv4']['address'] }};
        root         /usr/share/nginx/html;
        index        index.html;

        error_page 404 /404.html;
            location = /40x.html {
        }

        error_page 500 502 503 504 /50x.html;
            location = /50x.html {
        }
    }
}

[root@ansible-manager nginx]# cat files/index.html
<h1>Hello Ansible</h1>

# 这就是一个简单的nginx的部署脚本了

# 执行
[root@ansible-manager nginx]# ansible-playbook nginx.yaml

PLAY [web] *******************************************************************************************************************

TASK [Gathering Facts] *******************************************************************************************************************
ok: [10.0.0.11]
ok: [10.0.0.12]

TASK [Installing nginx] ******************************************************************************************************************
changed: [10.0.0.12]
changed: [10.0.0.11]

TASK [Copy Config] *******************************************************************************************************************
changed: [10.0.0.12]
changed: [10.0.0.11]

TASK [Copy Test Files] *******************************************************************************************************************
changed: [10.0.0.11]
changed: [10.0.0.12]

TASK [Starting Nginx] *******************************************************************************************************************
changed: [10.0.0.12]
changed: [10.0.0.11]

PLAY RECAP *******************************************************************************************************************
10.0.0.11                  : ok=5    changed=4    unreachable=0    failed=0    skipped=0    rescued=0    ignored=0
10.0.0.12                  : ok=5    changed=4    unreachable=0    failed=0    skipped=0    rescued=0    ignored=0
# 检查
[root@ansible-manager nginx]# ansible all -m shell -a "curl -s 127.0.0.1"
10.0.0.11 | CHANGED | rc=0 >>
<h1>Hello Ansible</h1>
10.0.0.12 | CHANGED | rc=0 >>
<h1>Hello Ansible</h1>

# 非常的不错,还是那句话,记得空跑哦!
5:Playbook算数运算与流程控制:实战!
5.1:template中使用流程控制 for 和if
[root@ansible-manager nginx]# tree .
.
nginx.yaml
	templates
		conf
			nginx.conf.j2
		files
			index.html.j2
# 这里我对目录结构稍做了改进
# 第一步我们来看看for循环
# 先在nginx.yaml内定义变量,当然了也可以使用前面学过的定义方法
[root@ansible-manager nginx]# cat nginx.yaml
---
- hosts: web
  remote_user: root
  vars:
   nginx_ports:
    - 81
    - 82
    - 83

  tasks:
   - name: Installing nginx
     yum: name=nginx state=present
   - name: Copy Config
     template: src=conf/nginx.conf.j2 dest=/etc/nginx/nginx.conf
   - name: Copy Test Files
     template: src=files/index.html dest=/usr/share/nginx/html/
   - name: Starting Nginx
     service: name=nginx state=started enabled=yes

# 去模板内使用for来引用变量
[root@ansible-manager nginx]# cat templates/conf/nginx.conf.j2
......
    {% for ports in nginx_ports %}
    server {
        listen       {{ prots }};
        server_name  {{ ansible_eth0['ipv4']['address'] }};
    }
    {% endfor %}
}


# 具体的文件如下
[root@ansible-manager nginx]# cat nginx.yaml
---
- hosts: web
  remote_user: root
  vars:
   nginx_ports:
    - 81
    - 82
    - 83

  tasks:
   - name: Installing nginx
     yum: name=nginx state=present
   - name: Copy Config
     template: src=conf/nginx.conf.j2 dest=/etc/nginx/nginx.conf
   - name: Copy Test Files
     template: src=files/index.html.j2 dest=/usr/share/nginx/html/index.html
   - name: Starting Nginx
     service: name=nginx state=started enabled=yes

[root@ansible-manager nginx]# cat templates/conf/nginx.conf.j2
user nginx;
worker_processes {{ ansible_processor_vcpus+1 }};
error_log /var/log/nginx/error.log;
pid /run/nginx.pid;

include /usr/share/nginx/modules/*.conf;

events {
    worker_connections 1024;
}

http {
    log_format  main  '$remote_addr - $remote_user [$time_local] "$request" '
                      '$status $body_bytes_sent "$http_referer" '
                      '"$http_user_agent" "$http_x_forwarded_for"';

    access_log  /var/log/nginx/access.log  main;

    sendfile            on;
    tcp_nopush          on;
    tcp_nodelay         on;
    keepalive_timeout   65;
    types_hash_max_size 2048;

    include             /etc/nginx/mime.types;
    default_type        application/octet-stream;

    include /etc/nginx/conf.d/*.conf;

    {% for vhosts in nginx_ports %}
    server {
        listen       {{ vhosts }};
        server_name  {{ ansible_eth0['ipv4']['address'] }};
    }
    {% endfor %}
}

[root@ansible-manager nginx]# cat templates/files/index.html.j2
<h1>Hello {{ ansible_eth0['ipv4']['address'] }}</h1>

# 执行一下
[root@ansible-manager nginx]# ansible-playbook nginx.yaml

PLAY [web] *******************************************************************************************************************

TASK [Gathering Facts] *******************************************************************************************************************
ok: [10.0.0.11]
ok: [10.0.0.12]

TASK [Installing nginx] ******************************************************************************************************************
ok: [10.0.0.12]
ok: [10.0.0.11]

TASK [Copy Config] *******************************************************************************************************************
changed: [10.0.0.11]
changed: [10.0.0.12]

TASK [Copy Test Files] *******************************************************************************************************************
changed: [10.0.0.12]
changed: [10.0.0.11]

TASK [Starting Nginx] *******************************************************************************************************************
changed: [10.0.0.11]
changed: [10.0.0.12]

PLAY RECAP *******************************************************************************************************************
10.0.0.11                  : ok=5    changed=3    unreachable=0    failed=0    skipped=0    rescued=0    ignored=0
10.0.0.12                  : ok=5    changed=3    unreachable=0    failed=0    skipped=0    rescued=0    ignored=0

# 测试
[root@ansible-manager nginx]# ansible all -m shell -a "netstat -nplt  |grep nginx"
10.0.0.11 | CHANGED | rc=0 >>
tcp        0      0 0.0.0.0:81              0.0.0.0:*               LISTEN      75925/nginx: master
tcp        0      0 0.0.0.0:82              0.0.0.0:*               LISTEN      75925/nginx: master
tcp        0      0 0.0.0.0:83              0.0.0.0:*               LISTEN      75925/nginx: master
10.0.0.12 | CHANGED | rc=0 >>
tcp        0      0 0.0.0.0:81              0.0.0.0:*               LISTEN      53539/nginx: master
tcp        0      0 0.0.0.0:82              0.0.0.0:*               LISTEN      53539/nginx: master
tcp        0      0 0.0.0.0:83              0.0.0.0:*               LISTEN      53539/nginx: master

# 访问测试
[root@ansible-manager nginx]# ansible all -m shell -a "curl -s 127.0.0.1:81"
10.0.0.12 | CHANGED | rc=0 >>
<h1>Hello 10.0.0.12</h1>
10.0.0.11 | CHANGED | rc=0 >>
<h1>Hello 10.0.0.11</h1>
[root@ansible-manager nginx]# ansible all -m shell -a "curl -s 127.0.0.1:82"
10.0.0.12 | CHANGED | rc=0 >>
<h1>Hello 10.0.0.12</h1>
10.0.0.11 | CHANGED | rc=0 >>
<h1>Hello 10.0.0.11</h1>
[root@ansible-manager nginx]# ansible all -m shell -a "curl -s 127.0.0.1:83"
10.0.0.11 | CHANGED | rc=0 >>
<h1>Hello 10.0.0.11</h1>
10.0.0.12 | CHANGED | rc=0 >>
<h1>Hello 10.0.0.12</h1>

# OK。这里已经完美跑通了

# 再来一种

[root@ansible-manager nginx]# cat nginx.yaml
---
- hosts: web
  remote_user: root
  vars:
   nginx_vhosts:
    - listen: 8080
      server_name: "web1.kubernetes-devops.cn"
      root: "/usr/share/nginx/web1"
    - listen: 8081
      server_name: "web2.kubernetes-devops.cn"
      root: "/usr/share/nginx/web2"
    - listen: 8082
      server_name: "web3.kubernetes-devops.cn"
      root: "/usr/share/nginx/web3"

  tasks:
   - name: Installing nginx
     yum: name=nginx state=present
   - name: Copy Config
     template: src=conf/nginx.conf.j2 dest=/etc/nginx/nginx.conf
   - name: Create Dir
     file: path=/usr/share/nginx/web1 state=directory owner=nginx group=nginx
     file: path=/usr/share/nginx/web2 state=directory owner=nginx group=nginx
     file: path=/usr/share/nginx/web3 state=directory owner=nginx group=nginx
   - name: Copy Test Files
     template: src=files/index.html.j2 dest=/usr/share/nginx/html/index.html
   - name: Starting Nginx
     service: name=nginx state=started enabled=yes

# jinjia模板引用
[root@ansible-manager nginx]# cat templates/conf/nginx.conf.j2
user nginx;
worker_processes {{ ansible_processor_vcpus+1 }};
error_log /var/log/nginx/error.log;
pid /run/nginx.pid;

include /usr/share/nginx/modules/*.conf;

events {
    worker_connections 1024;
}

http {
    log_format  main  '$remote_addr - $remote_user [$time_local] "$request" '
                      '$status $body_bytes_sent "$http_referer" '
                      '"$http_user_agent" "$http_x_forwarded_for"';

    access_log  /var/log/nginx/access.log  main;

    sendfile            on;
    tcp_nopush          on;
    tcp_nodelay         on;
    keepalive_timeout   65;
    types_hash_max_size 2048;

    include             /etc/nginx/mime.types;
    default_type        application/octet-stream;

    include /etc/nginx/conf.d/*.conf;
    {% for vhosts in nginx_vhosts %}
    server {
       listen {{ vhosts.listen }};
       server_name {{ vhosts.server_name }};
       root {{ vhosts.root }};
    }
    {% endfor %}
}

# 执行
[root@ansible-manager nginx]# ansible-playbook nginx.yaml

PLAY [web] *******************************************************************************************************************

TASK [Gathering Facts] *******************************************************************************************************************
ok: [10.0.0.12]
ok: [10.0.0.11]

TASK [Installing nginx] ******************************************************************************************************************
ok: [10.0.0.12]
ok: [10.0.0.11]

TASK [Copy Config] *******************************************************************************************************************
changed: [10.0.0.11]
changed: [10.0.0.12]

TASK [Create Dir] *******************************************************************************************************************
changed: [10.0.0.11] => (item=web1)
changed: [10.0.0.12] => (item=web1)
changed: [10.0.0.12] => (item=web2)
changed: [10.0.0.11] => (item=web2)
changed: [10.0.0.12] => (item=web3)
changed: [10.0.0.11] => (item=web3)

TASK [Copy Test Files] *******************************************************************************************************************
ok: [10.0.0.12]
ok: [10.0.0.11]

TASK [Starting Nginx] *******************************************************************************************************************
ok: [10.0.0.12]
ok: [10.0.0.11]

*******************************************************************************************************************
10.0.0.11                  : ok=6    changed=2    unreachable=0    failed=0    skipped=0    rescued=0    ignored=0
10.0.0.12                  : ok=6    changed=2    unreachable=0    failed=0    skipped=0    rescued=0    ignored=0


# 查看配置文件变更
# 格式虽然不太规整,但是至少能提供正常的服务了
[root@ansible_agent_11 opt]# cat /etc/nginx/nginx.conf
......
        server {
       listen 8080;
       server_name web1.kubernetes-devops.cn;
       root /usr/share/nginx/web1;
    }
        server {
       listen 8081;
       server_name web2.kubernetes-devops.cn;
       root /usr/share/nginx/web2;
    }
        server {
       listen 8082;
       server_name web3.kubernetes-devops.cn;
       root /usr/share/nginx/web3;
    }
    }

# 测试
[root@ansible-manager nginx]# ansible all -m shell -a "netstat -nplt  |grep nginx"
10.0.0.11 | CHANGED | rc=0 >>
tcp        0      0 0.0.0.0:8080            0.0.0.0:*               LISTEN      80648/nginx: master
tcp        0      0 0.0.0.0:8081            0.0.0.0:*               LISTEN      80648/nginx: master
tcp        0      0 0.0.0.0:8082            0.0.0.0:*               LISTEN      80648/nginx: master
10.0.0.12 | CHANGED | rc=0 >>
tcp        0      0 0.0.0.0:8080            0.0.0.0:*               LISTEN      55811/nginx: master
tcp        0      0 0.0.0.0:8081            0.0.0.0:*               LISTEN      55811/nginx: master
tcp        0      0 0.0.0.0:8082            0.0.0.0:*               LISTEN      55811/nginx: master


# if判断
[root@ansible-manager nginx]# cat templates/conf/nginx.conf.j2
...
{% for vhost in nginx_vhosts %}
    server {
        listen {{ vhost.listen }};
{% if vhost.server_name == "web1.kubernetes-devops.cn" %}
        server_name web1;
{% else %}
        server_name {{ vhost.server_name }};
{% endif %}
        root  {{ vhost.root }};
    }
{% endfor %}

# 运行
[root@ansible-manager nginx]# ansible-playbook nginx.yaml

PLAY [web] *******************************************************************************************************************

TASK [Gathering Facts] *******************************************************************************************************************
ok: [10.0.0.12]
ok: [10.0.0.11]

TASK [Installing nginx] ******************************************************************************************************************
ok: [10.0.0.12]
ok: [10.0.0.11]

TASK [Copy Config] *******************************************************************************************************************
changed: [10.0.0.12]
changed: [10.0.0.11]

TASK [Create Dir] *******************************************************************************************************************
ok: [10.0.0.12] => (item=web1)
ok: [10.0.0.11] => (item=web1)
ok: [10.0.0.11] => (item=web2)
ok: [10.0.0.12] => (item=web2)
ok: [10.0.0.12] => (item=web3)
ok: [10.0.0.11] => (item=web3)

TASK [Copy Test Files] *******************************************************************************************************************
ok: [10.0.0.12]
ok: [10.0.0.11]

TASK [Starting Nginx] *******************************************************************************************************************
ok: [10.0.0.12]
ok: [10.0.0.11]

PLAY RECAP *******************************************************************************************************************
10.0.0.11                  : ok=6    changed=1    unreachable=0    failed=0    skipped=0    rescued=0    ignored=0
10.0.0.12                  : ok=6    changed=1    unreachable=0    failed=0    skipped=0    rescued=0    ignored=0
# 这个就类似于更新了一下nginx的配置文件
# 更新后如下
[root@ansible_agent_11 ~]# cat /etc/nginx/nginx.conf
......
    server {
        listen 8080;
        server_name web1;
        root  /usr/share/nginx/web1;
    }
    server {
        listen 8081;
        server_name web2.kubernetes-devops.cn;
        root  /usr/share/nginx/web2;
    }
    server {
        listen 8082;
        server_name web3.kubernetes-devops.cn;
        root  /usr/share/nginx/web3;
    }

# 解释:
{% if vhost.server_name == "web1.kubernetes-devops.cn" %}
        server_name web1;
{% else %}
        server_name {{ vhost.server_name }};
{% endif %}
# 可以看到,这里第一个是取循环里面的值,如果等于:web1.kubernetes-devops.cn 执行下面操作,如果不等于则配置另一个
# 它其实就类似于我们平时写的脚本一样可以用来判断一些东西,因为前面我们也学了比较判断嘛,所以我们还是要可以的运用起来
6:playbook使用 when
when语句,可以实现条件测试。如果需要根据变量、facts或此前任务的执行结果来做为某task执行与否的前提时要用到条件测试,通过在task后添加when子句即可使用条件测试,jinja2的语法格式

# 示例
[root@ansible-manager ~]# cat demo.yaml
---
- hosts: web
  remote_user: root

  tasks:
   - name: Judgement CentOS7
     shell: echo "CentOS 7"
     when: ansible_distribution_major_version == "7"
   - name: Judgement CentOS6
     shell: echo "CentOS 6"
     when: ansible_distribution_major_version == "6"

# 执行
[root@ansible-manager ~]# ansible-playbook demo.yaml

PLAY [web] *******************************************************************************************************************

TASK [Gathering Facts] *******************************************************************************************************************
ok: [10.0.0.12]
ok: [10.0.0.11]

TASK [Judgement CentOS7] *****************************************************************************************************************
changed: [10.0.0.12]
changed: [10.0.0.11]

TASK [Judgement CentOS6] *****************************************************************************************************************
skipping: [10.0.0.11]
skipping: [10.0.0.12]

PLAY RECAP *******************************************************************************************************************
10.0.0.11                  : ok=2    changed=1    unreachable=0    failed=0    skipped=1    rescued=0    ignored=0
10.0.0.12                  : ok=2    changed=1    unreachable=0    failed=0    skipped=1    rescued=0    ignored=0
# 这个说白就是开发语言里面的switch 就是匹配到什么执行什么task,可以这么理解,这个when支持是变量哦,当然自定义变量也是可以的哈

---
- hosts: web
  remote_user: root
  vars:
   - name: zhangsan
  tasks:
   - name: Judgement {{ name }}
     shell: echo "Yes"
     when: name == "zhangsan"
   - name: Judgement {{ name }}
     shell: echo "No"
     when: name == "lisi"

[root@ansible-manager ~]# ansible-playbook demo.yaml
[WARNING]: Found variable using reserved name: name
# 意思是你使用了保留变量名称

PLAY [web] *******************************************************************************************************************

TASK [Gathering Facts] *******************************************************************************************************************
ok: [10.0.0.12]
ok: [10.0.0.11]

TASK [Judgement zhangsan] ****************************************************************************************************************
changed: [10.0.0.11]
changed: [10.0.0.12]

TASK [Judgement zhangsan] ****************************************************************************************************************
skipping: [10.0.0.11]
skipping: [10.0.0.12]

PLAY RECAP *******************************************************************************************************************
10.0.0.11                  : ok=2    changed=1    unreachable=0    failed=0    skipped=1    rescued=0    ignored=0
10.0.0.12                  : ok=2    changed=1    unreachable=0    failed=0    skipped=1    rescued=0    ignored=0

# 我们换一下
---
- hosts: web
  remote_user: root
  vars:
   - Name: zhangsan
  tasks:
   - name: Judgement {{ Name }}
     shell: echo "Yes"
     when: Name == "zhangsan"
   - name: Judgement {{ Name }}
     shell: echo "No"
     when: Name == "lisi"

[root@ansible-manager ~]# ansible-playbook demo.yaml

PLAY [web] *******************************************************************************************************************

TASK [Gathering Facts] *******************************************************************************************************************
ok: [10.0.0.11]
ok: [10.0.0.12]

TASK [Judgement zhangsan] ****************************************************************************************************************
changed: [10.0.0.12]
changed: [10.0.0.11]

TASK [Judgement zhangsan] ****************************************************************************************************************
skipping: [10.0.0.11]
skipping: [10.0.0.12]

PLAY RECAP *******************************************************************************************************************
10.0.0.11                  : ok=2    changed=1    unreachable=0    failed=0    skipped=1    rescued=0    ignored=0
10.0.0.12                  : ok=2    changed=1    unreachable=0    failed=0    skipped=1    rescued=0    ignored=0
# 这样就没有了,并且执行了我们想执行的语句
7:playbook如何使用迭代 with_items
迭代:当有需要重复性执行的任务时,可以使用迭代机制
对迭代项的引用,固定变量名为”item“
要在task中使用with_items给定要迭代的元素列表

列表元素格式:
	字符串
	字典

# 示例如下:
---
- hosts: web
  remote_user: root

  tasks:
   - name: create users
     user: name={{ item }} state=present group=wheel
     with_items:
      - layzer1
      - layzer2
      - layzer3

# 这里其实他就代表了以下语句

---
- hosts: web
  remote_user: root

  tasks:
   - name: create user layzer1
     user: name=layzer1 state=present group=wheel
   - name: create user layzer2
     user: name=layzer2 state=present group=wheel
   - name: create users layzer3
     user: name=layzer3 state=present group=wheel


# 那么我们来执行一下demo
[root@ansible-manager ~]# ansible-playbook demo.yaml

PLAY [web] *******************************************************************************************************************

TASK [Gathering Facts] *******************************************************************************************************************
ok: [10.0.0.12]
ok: [10.0.0.11]

TASK [create users] *******************************************************************************************************************
changed: [10.0.0.12] => (item=layzer1)
changed: [10.0.0.11] => (item=layzer1)
changed: [10.0.0.11] => (item=layzer2)
changed: [10.0.0.12] => (item=layzer2)
changed: [10.0.0.12] => (item=layzer3)
changed: [10.0.0.11] => (item=layzer3)

PLAY RECAP *******************************************************************************************************************
10.0.0.11                  : ok=2    changed=1    unreachable=0    failed=0    skipped=0    rescued=0    ignored=0
10.0.0.12                  : ok=2    changed=1    unreachable=0    failed=0    skipped=0    rescued=0    ignored=0
# 测试
[root@ansible-manager ~]# ansible all -m shell -a "cat /etc/passwd | grep layzer"
10.0.0.11 | CHANGED | rc=0 >>
layzer1:x:2023:2023::/home/layzer1:/bin/bash
layzer2:x:2024:2024::/home/layzer2:/bin/bash
layzer3:x:2025:2025::/home/layzer3:/bin/bash
10.0.0.12 | CHANGED | rc=0 >>
layzer1:x:2023:2023::/home/layzer1:/bin/bash
layzer2:x:2024:2024::/home/layzer2:/bin/bash
layzer3:x:2025:2025::/home/layzer3:/bin/bash

# 发现的确是创建了三个,当然了这个参数还有很多的用处,比如传输文件,批量执行多个脚本,批量安装,启动,卸载多个服务


迭代嵌套子变量:在迭代中,还可以嵌套子变量,关联多个变量在一起使用
# 示例如下
---
- hosts: web
  remote_user: root

  tasks:
    - name: Create Group
      group: name={{ item }} state=present
      with_items:
        - nginx
        - mysql
        - apache
    - name: Create User Add Group
      user: name={{ item.name }} state=present group={{ item.group }}
      with_items:
        - { name: 'nginx', group: 'nginx' }
        - { name: 'mysql', group: 'mysql' }
        - { name: 'apache', group: 'apache' }

# 执行
[root@ansible-manager ~]# ansible-playbook demo.yaml

PLAY [web] *******************************************************************************************************************

TASK [Gathering Facts] *******************************************************************************************************************
ok: [10.0.0.11]
ok: [10.0.0.12]

TASK [Create Group] *******************************************************************************************************************
changed: [10.0.0.12] => (item=nginx)
changed: [10.0.0.11] => (item=nginx)
changed: [10.0.0.11] => (item=mysql)
changed: [10.0.0.12] => (item=mysql)
changed: [10.0.0.12] => (item=apache)
changed: [10.0.0.11] => (item=apache)

TASK [Create User Add Group] *************************************************************************************************************
changed: [10.0.0.12] => (item={u'group': u'nginx', u'name': u'nginx'})
changed: [10.0.0.11] => (item={u'group': u'nginx', u'name': u'nginx'})
changed: [10.0.0.11] => (item={u'group': u'mysql', u'name': u'mysql'})
changed: [10.0.0.12] => (item={u'group': u'mysql', u'name': u'mysql'})
changed: [10.0.0.11] => (item={u'group': u'apache', u'name': u'apache'})
changed: [10.0.0.12] => (item={u'group': u'apache', u'name': u'apache'})

PLAY RECAP *******************************************************************************************************************
10.0.0.11                  : ok=3    changed=2    unreachable=0    failed=0    skipped=0    rescued=0    ignored=0
10.0.0.12                  : ok=3    changed=2    unreachable=0    failed=0    skipped=0    rescued=0    ignored=0
# 测试
# 用户


[root@ansible-manager ~]# ansible all -m shell -a 'tail -n 3 /etc/{group,passwd}'
10.0.0.11 | CHANGED | rc=0 >>
==> /etc/group <==
nginx:x:1000:
mysql:x:1001:
apache:x:1002:

==> /etc/passwd <==
nginx:x:1000:1000::/home/nginx:/bin/bash
mysql:x:1001:1001::/home/mysql:/bin/bash
apache:x:1002:1002::/home/apache:/bin/bash
10.0.0.12 | CHANGED | rc=0 >>
==> /etc/group <==
nginx:x:1000:
mysql:x:1001:
apache:x:1002:

==> /etc/passwd <==
nginx:x:1000:1000::/home/nginx:/bin/bash
mysql:x:1001:1001::/home/mysql:/bin/bash
apache:x:1002:1002::/home/apache:/bin/bash

# 一看就知道了,没一点问题
# 那么这个时候有人问了,我想删是不是得改yaml,这个简单,我们把state改成变量就行了,如下
---
- hosts: web
  remote_user: root

  tasks:
    - name: Delete User and Group
      user: name={{ item.name }} state={{ status }} group={{ item.group }}
      with_items:
        - { name: 'nginx', group: 'nginx' }
        - { name: 'mysql', group: 'mysql' }
        - { name: 'apache', group: 'apache' }

 # 如果我们想删除了,就按照下面的操作
[root@ansible-manager ~]# ansible-playbook demo.yaml -e status=absent

PLAY [web] *******************************************************************************************************************

TASK [Gathering Facts] *******************************************************************************************************************
ok: [10.0.0.12]
ok: [10.0.0.11]

TASK [Create User Add Group] *************************************************************************************************************
changed: [10.0.0.12] => (item={u'group': u'nginx', u'name': u'nginx'})
changed: [10.0.0.11] => (item={u'group': u'nginx', u'name': u'nginx'})
changed: [10.0.0.12] => (item={u'group': u'mysql', u'name': u'mysql'})
changed: [10.0.0.11] => (item={u'group': u'mysql', u'name': u'mysql'})
changed: [10.0.0.12] => (item={u'group': u'apache', u'name': u'apache'})
changed: [10.0.0.11] => (item={u'group': u'apache', u'name': u'apache'})

PLAY RECAP *******************************************************************************************************************
10.0.0.11                  : ok=2    changed=1    unreachable=0    failed=0    skipped=0    rescued=0    ignored=0
10.0.0.12                  : ok=2    changed=1    unreachable=0    failed=0    skipped=0    rescued=0    ignored=0

# 测试,发现都没了
[root@ansible-manager ~]# ansible all -m shell -a 'tail -n 3 /etc/{group,passwd}'
10.0.0.11 | CHANGED | rc=0 >>
==> /etc/group <==
rpcuser:x:29:
nfsnobody:x:65534:
ntp:x:38:

==> /etc/passwd <==
rpcuser:x:29:29:RPC Service User:/var/lib/nfs:/sbin/nologin
nfsnobody:x:65534:65534:Anonymous NFS User:/var/lib/nfs:/sbin/nologin
ntp:x:38:38::/etc/ntp:/sbin/nologin
10.0.0.12 | CHANGED | rc=0 >>
==> /etc/group <==
rpcuser:x:29:
nfsnobody:x:65534:
ntp:x:38:

==> /etc/passwd <==
rpcuser:x:29:29:RPC Service User:/var/lib/nfs:/sbin/nologin
nfsnobody:x:65534:65534:Anonymous NFS User:/var/lib/nfs:/sbin/nologin
ntp:x:38:38::/etc/ntp:/sbin/nologin

# 总之奇快的很,不知道为什么删除用户可以直接利用user也删除group,但是创建的时候就不能直接创建group

# 示例2:
---
- hosts: web
  remote_user: root

  tasks:
    - name: Create Group
      group: name={{ item }} state={{ status }}
      with_items:
        - nginx
        - mysql
        - apache
    - name: Create User Add Group
      user: name={{ item.name }} state={{ status }} group={{ item.group }} home={{ item.home }} create_home=yes
      with_items:
        - { name: 'nginx', group: 'nginx',home: '/data/nginx' }
        - { name: 'mysql', group: 'mysql',home: '/data/mysql' }
        - { name: 'apache', group: 'apache',home: '/data/apache' }

# 运行
[root@ansible-manager ~]# ansible-playbook demo.yaml -e status=present

PLAY [web] *******************************************************************************************************************

TASK [Gathering Facts] *******************************************************************************************************************
ok: [10.0.0.11]
ok: [10.0.0.12]

TASK [Create Group] *******************************************************************************************************************
changed: [10.0.0.12] => (item=nginx)
changed: [10.0.0.11] => (item=nginx)
changed: [10.0.0.11] => (item=mysql)
changed: [10.0.0.12] => (item=mysql)
changed: [10.0.0.12] => (item=apache)
changed: [10.0.0.11] => (item=apache)

TASK [Create User Add Group] *************************************************************************************************************
changed: [10.0.0.12] => (item={u'home': u'/data/nginx', u'group': u'nginx', u'name': u'nginx'})
changed: [10.0.0.11] => (item={u'home': u'/data/nginx', u'group': u'nginx', u'name': u'nginx'})
changed: [10.0.0.12] => (item={u'home': u'/data/mysql', u'group': u'mysql', u'name': u'mysql'})
changed: [10.0.0.11] => (item={u'home': u'/data/mysql', u'group': u'mysql', u'name': u'mysql'})
changed: [10.0.0.12] => (item={u'home': u'/data/apache', u'group': u'apache', u'name': u'apache'})
changed: [10.0.0.11] => (item={u'home': u'/data/apache', u'group': u'apache', u'name': u'apache'})

PLAY RECAP *******************************************************************************************************************
10.0.0.11                  : ok=3    changed=2    unreachable=0    failed=0    skipped=0    rescued=0    ignored=0
10.0.0.12                  : ok=3    changed=2    unreachable=0    failed=0    skipped=0    rescued=0    ignored=0
# 测试
[root@ansible-manager ~]# ansible all -m shell -a 'tail -n 3 /etc/{group,passwd} && ls /data/'
10.0.0.12 | CHANGED | rc=0 >>
==> /etc/group <==
nginx:x:1000:
mysql:x:1001:
apache:x:1002:

==> /etc/passwd <==
nginx:x:1000:1000::/data/nginx:/bin/bash
mysql:x:1001:1001::/data/mysql:/bin/bash
apache:x:1002:1002::/data/apache:/bin/bash
apache
mysql
nginx
10.0.0.11 | CHANGED | rc=0 >>
==> /etc/group <==
nginx:x:1000:
mysql:x:1001:
apache:x:1002:

==> /etc/passwd <==
nginx:x:1000:1000::/data/nginx:/bin/bash
mysql:x:1001:1001::/data/mysql:/bin/bash
apache:x:1002:1002::/data/apache:/bin/bash
apache
mysql
nginx

# 完美
8:管理节点过多导致的超时问题解决方法
默认情况下,Ansible将尝试并行管理playbook中所有的机器。对于滚动更新用例,可以使用serial关键字定义Ansible一次应管理多少主机,还可以将serial关键字指定为百分比,表示每次并行执行的主机数占总数的比例

# 示例:
---
- hosts: web
  serial: 1
  gather_facts: False

  tasks:
    - name: Topic one
      command: hostname
    - name: Topic two
      command: hostname

# 百分比如下
---
- hosts: web
  serial: "50%"
  gather_facts: False

  tasks:
    - name: Topic one
      command: hostname
    - name: Topic two
      command: hostname

# 运行(第一种)
[root@ansible-manager ~]# ansible-playbook demo.yaml

PLAY [web] *******************************************************************************************************************

TASK [Topic one] *******************************************************************************************************************
changed: [10.0.0.11]

TASK [Topic two] *******************************************************************************************************************
changed: [10.0.0.11]

PLAY [web] *******************************************************************************************************************

TASK [Topic one] *******************************************************************************************************************
changed: [10.0.0.12]

TASK [Topic two] *******************************************************************************************************************
changed: [10.0.0.12]

PLAY RECAP *******************************************************************************************************************
10.0.0.11                  : ok=2    changed=2    unreachable=0    failed=0    skipped=0    rescued=0    ignored=0
10.0.0.12                  : ok=2    changed=2    unreachable=0    failed=0    skipped=0    rescued=0    ignored=0

# 运行(第二种)
[root@ansible-manager ~]# ansible-playbook demo.yaml

PLAY [web] *******************************************************************************************************************

TASK [Topic one] *******************************************************************************************************************
changed: [10.0.0.11]

TASK [Topic two] *******************************************************************************************************************
changed: [10.0.0.11]

PLAY [web] *******************************************************************************************************************

TASK [Topic one] *******************************************************************************************************************
changed: [10.0.0.12]

TASK [Topic two] *******************************************************************************************************************
changed: [10.0.0.12]

PLAY RECAP *******************************************************************************************************************
10.0.0.11                  : ok=2    changed=2    unreachable=0    failed=0    skipped=0    rescued=0    ignored=0
10.0.0.12                  : ok=2    changed=2    unreachable=0    failed=0    skipped=0    rescued=0    ignored=0 # 因为我这里主机太少了,所以是看不出效果的
9:什么是Roles
角色是ansible自1.2版本引入的新特性,用于层次性、结构化地组织playbook。roles能够根据层次型结构自动装载变量文件、tasks以及handlers等。要使用roles只需要在playbook中使用include指令即可。简单来讲,roles就是通过分别将变量、文件、任务、模板及处理器放置于单独的目录中,并可以便捷地include它们的一种机制。角色一般用于基于主机构建服务的场景中,但也可以是用于构建守护进程等场景中

运维复杂的场景:建议使用roles,代码复用度高

roles:多个角色的集合, 可以将多个的role,分别放至roles目录下的独立子目录中
roles/
mysql/
httpd/
nginx/
redis/
9.1:Ansible Roles目录编排
roles目录结构如下所示
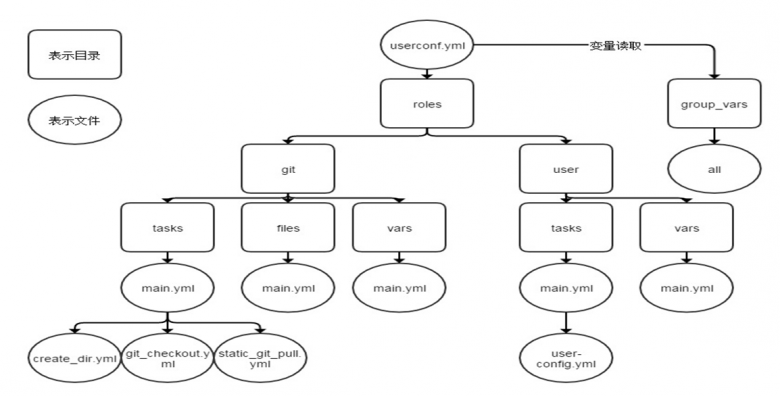
每个角色,以特定的层级目录结构进行组织

# Roles各目录作用:
0:nginx/:它是定义我们的一个项目名称
1:files/:存放由copy或script模块等调用的文件
2:templates/:template模块查找所需要模板文件的目录
3:tasks/:定义task,role的基本元素,至少应该包含一个名为main.yml的文件;其它的文件需要在此文件中通过include进行包含
4:handlers/:至少应该包含一个名为main.yml的文件;其它的文件需要在此文件中通过include进行包含
5:vars/:定义变量,至少应该包含一个名为main.yml的文件;其它的文件需要在此文件中通过include进行包含
6:meta/:定义当前角色的特殊设定及其依赖关系,至少应该包含一个名为main.yml的文件,其它文件需在此文件中通过include进行包含
7:default/:设定默认变量时使用此目录中的main.yml文件,比vars的优先级低

# 创建 role
	1:创建role的步骤
		1.1:创建以roles命名的目录
		1.2:在roles目录中分别创建以各角色名称命名的目录,如webs等
		1.3:在每个角色命名的目录中分别创建files、handlers、meta、tasks、templates和vars目录;用不到的目录可以创建为空目录,也可以不创建
		1.4:在playbook文件中,调用各角色

# 针对大型项目使用Roles进行编排
# 示例:
nginx-role.yml
roles/
└── nginx
     ├── files
     │    └── main.yml
     ├── tasks
     │    ├── groupadd.yml
     │    ├── install.yml
     │    ├── main.yml
     │    ├── restart.yml
     │    └── useradd.yml
     └── vars
          └── main.yml

# playbook调用角色
# 调用角色方法1:
---
- hosts: web
  remote_user: root
  roles:
    - nginx

# 调用角色方法2:
# 键role用于指定角色名称,后续的k/v用于传递变量给角色
---
- hosts: web
  remote_user: root
  roles:
    - { role: nginx, username: nginx }

# 调用角色方法3:
# 还可基于条件测试实现角色调用
---
- hosts: web
  remote_user: root
  roles:
    - { role: nginx, username: nginx, when: ansible_distribution_major_version == '7' }

# roles 中 tags 使用
# nginx-role.yml
---
- hosts: web
  remote_user: root
  roles:
    - { role: nginx ,tags: [ 'nginx', 'web' ] ,when: ansible_distribution_major_version == "6" }
    - { role: httpd ,tags: [ 'httpd', 'web' ]  }
    - { role: mysql ,tags: [ 'mysql', 'db' ] }
    - { role: mariadb ,tags: [ 'mariadb', 'db' ] }

ansible-playbook --tags="nginx,httpd,mysql" nginx-role.yml
10:实战案例
10.1:案例1:实现 Nginx角色
# 创建角色相关的目录
[root@ansible-manager ~]# mkdir -p /data/ansible/roles/nginx/{task,handlers,files}

# 创建角色相关的文件
[root@ansible-manager roles]# tree nginx/
nginx/
	files
		index.html
		nginx.conf
	handlers
		main.yaml
	task
		config.yaml
		group.yaml
		index.yaml
		install.yaml
		main.yaml
		service.yaml
		user.yaml

3 directories, 10 files

# 运行
[root@ansible-manager roles]# ansible-playbook role_nginx.yaml

PLAY [web] *******************************************************************************************************************

TASK [Gathering Facts] *******************************************************************************************************************
ok: [10.0.0.12]
ok: [10.0.0.11]

TASK [nginx : Create Nginx Group] *******************************************************************************************************************
changed: [10.0.0.12]
changed: [10.0.0.11]

TASK [nginx : Create Nginx User] *******************************************************************************************************************
changed: [10.0.0.12]
changed: [10.0.0.11]

TASK [nginx : Installing Nginx Package] *******************************************************************************************************************
ok: [10.0.0.11]
ok: [10.0.0.12]

TASK [nginx : Config File] *******************************************************************************************************************
changed: [10.0.0.11]
changed: [10.0.0.12]

TASK [nginx : Config Html] *******************************************************************************************************************
changed: [10.0.0.12]
changed: [10.0.0.11]

TASK [nginx : Starting Service] *******************************************************************************************************************
changed: [10.0.0.12]
changed: [10.0.0.11]

RUNNING HANDLER [nginx : restart] *******************************************************************************************************************
changed: [10.0.0.12]
changed: [10.0.0.11]

PLAY RECAP *******************************************************************************************************************
10.0.0.11                  : ok=8    changed=6    unreachable=0    failed=0    skipped=0    rescued=0    ignored=0
10.0.0.12                  : ok=8    changed=6    unreachable=0    failed=0    skipped=0    rescued=0    ignored=0
# 检查
[root@ansible-manager roles]# ansible all -m shell -a "netstat -nplt | grep 80"
10.0.0.11 | CHANGED | rc=0 >>
tcp        0      0 0.0.0.0:80              0.0.0.0:*               LISTEN      95899/nginx: master
10.0.0.12 | CHANGED | rc=0 >>
tcp        0      0 0.0.0.0:80              0.0.0.0:*               LISTEN      72519/nginx: master

[root@ansible-manager roles]# ansible all -m shell -a "curl -s 127.0.0.1"
10.0.0.12 | CHANGED | rc=0 >>
<h1>Nginx</h1>
10.0.0.11 | CHANGED | rc=0 >>
<h1>Nginx</h1>

# 完美实现 roles 部署Nginx,当然了这个时候会有人问了,那么template怎么引用进来呢?接下来就是加上template的nginx部署方案

# 目录结构如下:
[root@ansible-manager roles]# tree
.
	role_nginx.yaml
	nginx
		handlers
			main.yaml
		tasks
			config.yaml
			group.yaml
			index.yaml
			install.yaml
			main.yaml
			service.yaml
			user.yaml
		templates
			index.html.j2
			nginx.conf.j2
		vars
			main.yaml

# 具体文件内写了什么,我附在后面
10.2:案例2:实现Httpd角色
# 目录结构如下:基本上和Nginx是差不多的
httpd/
	handlers
		main.yaml
	tasks
		config.yaml
		group.yaml
		index.yaml
		install.yaml
		main.yaml
		service.yaml
		user.yaml
	templates
		httpd.conf.j2
		index.html.j2
	vars
		main.yaml

# 运行
[root@ansible-manager roles]# ansible-playbook role_httpd.yaml

PLAY [web] *******************************************************************************************************************************

TASK [Gathering Facts] *******************************************************************************************************************
ok: [10.0.0.12]
ok: [10.0.0.11]

TASK [httpd : Create Apache Group] *******************************************************************************************************************
ok: [10.0.0.12]
ok: [10.0.0.11]

TASK [httpd : Create Apache User] *******************************************************************************************************************
ok: [10.0.0.11]
ok: [10.0.0.12]

TASK [httpd : Installing Httpd Package] *******************************************************************************************************************
ok: [10.0.0.12]
ok: [10.0.0.11]

TASK [httpd : Config File] *******************************************************************************************************************
ok: [10.0.0.11]
ok: [10.0.0.12]

TASK [httpd : Config Index File] *******************************************************************************************************************
changed: [10.0.0.11]
changed: [10.0.0.12]

TASK [httpd : Starting Service] *******************************************************************************************************************
ok: [10.0.0.11]
ok: [10.0.0.12]

PLAY RECAP *******************************************************************************************************************
10.0.0.11                  : ok=7    changed=1    unreachable=0    failed=0    skipped=0    rescued=0    ignored=0
10.0.0.12                  : ok=7    changed=1    unreachable=0    failed=0    skipped=0    rescued=0    ignored=0
# 我这里skip多是因为我中间除了点错,所以我改了改

# 测试
[root@ansible-manager roles]# ansible all -m shell -a "curl 127.0.0.1 -s"
10.0.0.12 | CHANGED | rc=0 >>
<h1>Hello 10.0.0.12 Apache</h1>
10.0.0.11 | CHANGED | rc=0 >>
<h1>Hello 10.0.0.11 Apache</h1>

# 测试是好的
11:使用Tag和多角色选择
[root@ansible-manager roles]# cat role_all.yaml
---
- hosts: web
  remote_user: root

  roles:
    - { role: nginx, tags: ["nginx","web"] }
    - { role: httpd, tags: ["httpd","weh"] }
# 这里我们可以通过命令来指定tag执行指定的role

[root@ansible-manager roles]# ansible-playbook -t nginx role_all.yaml

PLAY [web] *******************************************************************************************************************

TASK [Gathering Facts] *******************************************************************************************************************
ok: [10.0.0.11]
ok: [10.0.0.12]

TASK [nginx : Create Nginx Group] *******************************************************************************************************************
ok: [10.0.0.11]
ok: [10.0.0.12]

TASK [nginx : Create Nginx User] *******************************************************************************************************************
ok: [10.0.0.12]
ok: [10.0.0.11]

TASK [nginx : Installing Nginx Package] ******************************************************************************************************************
changed: [10.0.0.11]
changed: [10.0.0.12]

TASK [nginx : Config File Or CentOS7] *******************************************************************************************************************
changed: [10.0.0.11]
changed: [10.0.0.12]

TASK [nginx : Config File Or CentOS8] *******************************************************************************************************************
skipping: [10.0.0.11]
skipping: [10.0.0.12]

TASK [nginx : Config Html] *******************************************************************************************************************
changed: [10.0.0.11]
changed: [10.0.0.12]

TASK [nginx : Starting Service] *******************************************************************************************************************
changed: [10.0.0.12]
changed: [10.0.0.11]

RUNNING HANDLER [nginx : restart] *******************************************************************************************************************
changed: [10.0.0.11]
changed: [10.0.0.12]

PLAY RECAP *******************************************************************************************************************
10.0.0.11                  : ok=8    changed=5    unreachable=0    failed=0    skipped=1    rescued=0    ignored=0
10.0.0.12                  : ok=8    changed=5    unreachable=0    failed=0    skipped=1    rescued=0    ignored=0
# 可以看到我这里指定了tag是nginx,它就执行了nginx的role

# 还可以加入when语句来判断,操作如下
---
- hosts: web
  remote_user: root

  roles:
    - { role: nginx, tags: [nginx,web], when: ansible_distribution_major_version == "8" }
    - { role: httpd, tags: [httpd,web], when: ansible_distribution_major_version == "8" }

# 执行
[root@ansible-manager roles]# ansible-playbook -t nginx role_all.yaml

PLAY [web] *******************************************************************************************************************

TASK [Gathering Facts] *******************************************************************************************************************
ok: [10.0.0.11]
ok: [10.0.0.12]

TASK [nginx : Create Nginx Group] *******************************************************************************************************************
skipping: [10.0.0.11]
skipping: [10.0.0.12]

TASK [nginx : Create Nginx User] *******************************************************************************************************************
skipping: [10.0.0.11]
skipping: [10.0.0.12]

TASK [nginx : Installing Nginx Package] *******************************************************************************************************************
skipping: [10.0.0.11]
skipping: [10.0.0.12]

TASK [nginx : Config File Or CentOS7] *******************************************************************************************************************
skipping: [10.0.0.11]
skipping: [10.0.0.12]

TASK [nginx : Config File Or CentOS8] *******************************************************************************************************************
skipping: [10.0.0.11]
skipping: [10.0.0.12]

TASK [nginx : Config Html] *******************************************************************************************************************
skipping: [10.0.0.11]
skipping: [10.0.0.12]

TASK [nginx : Starting Service] *******************************************************************************************************************
skipping: [10.0.0.11]
skipping: [10.0.0.12]

PLAY RECAP *******************************************************************************************************************
10.0.0.11                  : ok=1    changed=0    unreachable=0    failed=0    skipped=7    rescued=0    ignored=0
10.0.0.12                  : ok=1    changed=0    unreachable=0    failed=0    skipped=7    rescued=0    ignored=0
# 这里看到的重点,全是skip,就是因为我们的when条件不符合,所以没有执行

# 这里我们将nginx的判断值改为7,再次执行
[root@ansible-manager roles]# ansible-playbook -t nginx role_all.yaml

PLAY [web] *******************************************************************************************************************

TASK [Gathering Facts] *******************************************************************************************************************
ok: [10.0.0.12]
ok: [10.0.0.11]

TASK [nginx : Create Nginx Group] *******************************************************************************************************************
ok: [10.0.0.11]
ok: [10.0.0.12]

TASK [nginx : Create Nginx User] *******************************************************************************************************************
ok: [10.0.0.12]
ok: [10.0.0.11]

TASK [nginx : Installing Nginx Package] ******************************************************************************************************************
changed: [10.0.0.12]
changed: [10.0.0.11]

TASK [nginx : Config File Or CentOS7] *******************************************************************************************************************
changed: [10.0.0.12]
changed: [10.0.0.11]

TASK [nginx : Config File Or CentOS8] *******************************************************************************************************************
skipping: [10.0.0.11]
skipping: [10.0.0.12]

TASK [nginx : Config Html] *******************************************************************************************************************
changed: [10.0.0.11]
changed: [10.0.0.12]

TASK [nginx : Starting Service] ******************************************************************************************************************
changed: [10.0.0.11]
changed: [10.0.0.12]

RUNNING HANDLER [nginx : restart] *******************************************************************************************************************
changed: [10.0.0.11]
changed: [10.0.0.12]

PLAY RECAP *******************************************************************************************************************
10.0.0.11                  : ok=8    changed=5    unreachable=0    failed=0    skipped=1    rescued=0    ignored=0
10.0.0.12                  : ok=8    changed=5    unreachable=0    failed=0    skipped=1    rescued=0    ignored=0
# 测试
[root@ansible-manager roles]# ansible all -m shell -a "curl 127.0.0.1 -s"
10.0.0.12 | CHANGED | rc=0 >>
<h1>Hello 10.0.0.12</h1>
10.0.0.11 | CHANGED | rc=0 >>
<h1>Hello 10.0.0.11</h1>
# 这样我们就实现了我们想要的结果了

 浙公网安备 33010602011771号