Harbor + Dragonfly 优化镜像拉取速度
官网:https://d7y.io/zh/
Github:https://github.com/dragonflyoss/Dragonfly2
1:Dragonfly是什么
Dragonfly(蜻蜓)是一款开源的基于 P2P 的智能镜像和文件分发工具。它旨在提高大规模文件传输的效率和速率,最大限度地利用网络带宽。在应用分发、缓存分发、日志分发和镜像分发等领域被大规模使用。是由CNCF(云原生计算基金会)作为孵化级项目(阿里)。
2:Dragonfly的功能
| 功能 | 说明 |
|---|---|
| 基于 P2P 的文件分发 | 通过利用 P2P 技术进行文件传输,它能最大限度地利用每个对等节点(Peer)的带宽资源,以提高下载效率,并节省大量跨机房带宽,尤其是昂贵的跨境带宽。 |
| 非侵入式接入 | Dragonfly 可无缝支持多种容器用于分发镜像。 |
| 主机级别的限速 | 除了像许多其他下载工具针对当前下载任务的限速之外,Dragonfly 还支持针对整个机器的限速。 |
| 高度一致性 | Dragonfly 可确保所有下载的文件是一致的,即使用户不进行最终一致性校验。 |
| 隔离异常节点 | Dragonfly 会自动隔离异常节点来提高下载稳定性。 |
| 生态 | Harbor 可以基于 Dragonfly 进行镜像分发以及预热。镜像加速项目 Nydus 可以在容器运行时使用 Dragonfly 进行数据分发。 |
3:Dragonfly特性
| 特性 | 说明 |
|---|---|
| 简单 | 定义明确的面向用户的API(HTTP),对所有容器引擎都是非侵入性的 |
| 高效 | 种子对等支持,基于P2P的文件分发,节省企业带宽 |
| 智能 | 主机级限速,主机检测智能流量控制 |
| 安全 | 阻止传输加密,HTTPS连接支持 |
4:Dragonfly技术架构
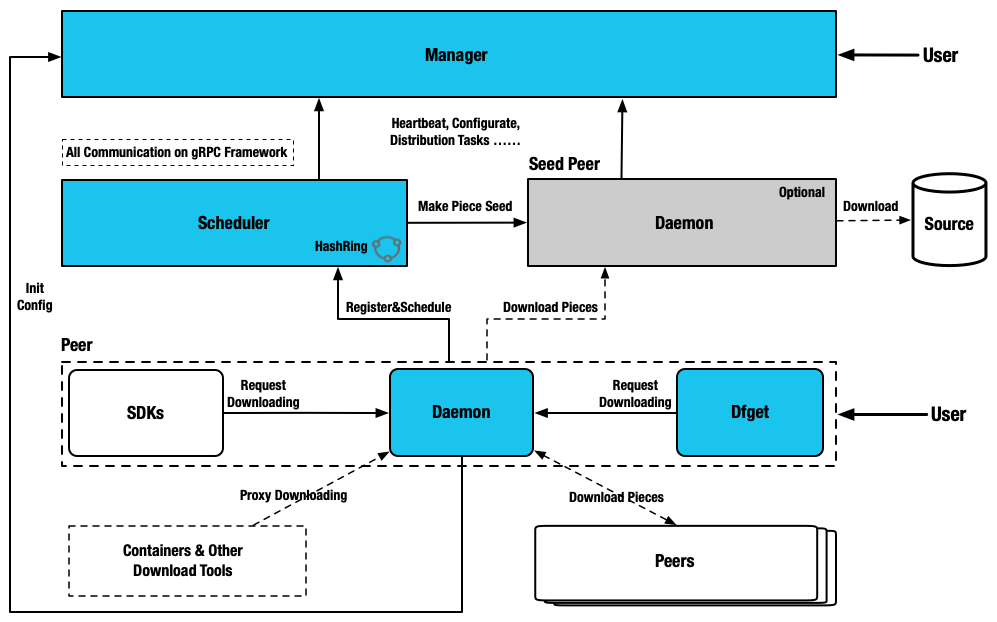
5:Dragonfly子系统功能
| Manager |
|---|
| 存储动态配置供 Seed Peer 集群、Scheduler 集群以及 Dfdaemon 消费。 |
| 维护 Seed Peer 集群和 Scheduler 集群之间关联关系。 |
| 提供统一异步任务管理,用作预热等功能。 |
| 监听各模块是否健康运行。 |
| 为 Dfdaemon 筛选最优 Scheduler 集群调度使用。 |
| 提供可视化控制台,方便用户操作管理 P2P 集群。 |
| Scheduler |
|---|
| 基于机器学习的多场景自适应智能 P2P 节点调度, 为当前下载节点选择最优父节点。 |
| 构建 P2P 下载网络的有向无环图。 |
| 根据不同特征值评估节点下载能力, 剔除异常节点。 |
| 当下载失败情况,主动通知 Dfdaemon 进行回源下载。 |
| Dfdaemon |
|---|
| 基于 GRPC 提供下载功能, 并提供多源适配能力。 |
| 开启 Seed Peer 模式可以作为 P2P 集群中回源下载节点, 也就是整个集群中下载的根节点。 |
| 为镜像仓库或者其他 HTTP 下载任务提供代理服务。 |
下载任务基于 HTTP 或 HTTPS 或其他自定义协议。 |
6:Dragonfly部署
| 主机名 | IP | 配置 |
|---|---|---|
| gcr-client | 10.0.0.11 | 1C1G |
| gcr-harbor | 10.0.0.12 | 2C4G |
| gcr-dragonfly | 10.0.0.13 | 2C4G |
| dns | 10.0.0.14 | 1C1G |
# 配置hostname
[root@localhost ~]# hostnamectl hostname gcr-client
[root@localhost ~]# hostnamectl hostname gcr-harbor
[root@localhost ~]# hostnamectl hostname gcr-dragonfly
[root@localhost ~]# hostnamectl hostname dns

# 安装Ansible
[root@gcr-client ~]# yum install -y ansible

# 配置Ansible
[root@gcr-client ~]# cat /etc/ansible/ansible.cfg
[defaults]
inventory      = /etc/ansible/hosts
host_key_checking = False

# 编写Ansible的hosts
[root@gcr-client ~]# cat /etc/ansible/hosts
[servers]
10.0.0.11
10.0.0.12
10.0.0.13
10.0.0.14

[client]
10.0.0.11

[harbors]
10.0.0.12

[dragonflys]
10.0.0.13

[dns]
10.0.0.14

# 配置节点免密
[root@gcr-client ~]# ssh-keygen
Generating public/private rsa key pair.
Enter file in which to save the key (/root/.ssh/id_rsa): Created directory '/root/.ssh'.
Enter passphrase (empty for no passphrase):
Enter same passphrase again:
Your identification has been saved in /root/.ssh/id_rsa
Your public key has been saved in /root/.ssh/id_rsa.pub
The key fingerprint is:
SHA256:RJwI9l6xBWIN1BgP9leYq4Uauoe+qFDNA8TjcHbHvF8 root@gcr-client
The key's randomart image is:
+---[RSA 3072]----+
| .. o=OO+o.o.    |
|..=..+**=+o.     |
| =.o ...*...     |
|  .+ .oo..E      |
|  . +..+S+       |
| .  ... o        |
|.    o           |
|.  .o .          |
|....oo           |
+----[SHA256]-----+

[root@gcr-client ~]# ssh-copy-id root@10.0.0.11
/usr/bin/ssh-copy-id: INFO: Source of key(s) to be installed: "/root/.ssh/id_rsa.pub"
The authenticity of host '10.0.0.11 (10.0.0.11)' can't be established.
ED25519 key fingerprint is SHA256:p1gYxjA6CQwmWH4KPkzuPoG4MRKEMMC3hUP7NK0vJS0.
This key is not known by any other names
Are you sure you want to continue connecting (yes/no/[fingerprint])? yes
/usr/bin/ssh-copy-id: INFO: attempting to log in with the new key(s), to filter out any that are already installed
/usr/bin/ssh-copy-id: INFO: 1 key(s) remain to be installed -- if you are prompted now it is to install the new keys
root@10.0.0.11's password:

Number of key(s) added: 1

Now try logging into the machine, with:   "ssh 'root@10.0.0.11'"
and check to make sure that only the key(s) you wanted were added.

[root@gcr-client ~]# ssh-copy-id root@10.0.0.12
/usr/bin/ssh-copy-id: INFO: Source of key(s) to be installed: "/root/.ssh/id_rsa.pub"
The authenticity of host '10.0.0.12 (10.0.0.12)' can't be established.
ED25519 key fingerprint is SHA256:p1gYxjA6CQwmWH4KPkzuPoG4MRKEMMC3hUP7NK0vJS0.
This host key is known by the following other names/addresses:
    ~/.ssh/known_hosts:1: 10.0.0.11
Are you sure you want to continue connecting (yes/no/[fingerprint])? yes
/usr/bin/ssh-copy-id: INFO: attempting to log in with the new key(s), to filter out any that are already installed
/usr/bin/ssh-copy-id: INFO: 1 key(s) remain to be installed -- if you are prompted now it is to install the new keys
root@10.0.0.12's password:

Number of key(s) added: 1

Now try logging into the machine, with:   "ssh 'root@10.0.0.12'"
and check to make sure that only the key(s) you wanted were added.

[root@gcr-client ~]# ssh-copy-id root@10.0.0.13
/usr/bin/ssh-copy-id: INFO: Source of key(s) to be installed: "/root/.ssh/id_rsa.pub"
The authenticity of host '10.0.0.13 (10.0.0.13)' can't be established.
ED25519 key fingerprint is SHA256:p1gYxjA6CQwmWH4KPkzuPoG4MRKEMMC3hUP7NK0vJS0.
This host key is known by the following other names/addresses:
    ~/.ssh/known_hosts:1: 10.0.0.11
    ~/.ssh/known_hosts:4: 10.0.0.12
Are you sure you want to continue connecting (yes/no/[fingerprint])? yes
/usr/bin/ssh-copy-id: INFO: attempting to log in with the new key(s), to filter out any that are already installed
/usr/bin/ssh-copy-id: INFO: 1 key(s) remain to be installed -- if you are prompted now it is to install the new keys
root@10.0.0.13's password:

Number of key(s) added: 1

Now try logging into the machine, with:   "ssh 'root@10.0.0.13'"
and check to make sure that only the key(s) you wanted were added.

[root@gcr-client ~]# ssh-copy-id root@10.0.0.14
/usr/bin/ssh-copy-id: INFO: Source of key(s) to be installed: "/root/.ssh/id_rsa.pub"
The authenticity of host '10.0.0.14 (10.0.0.14)' can't be established.
ED25519 key fingerprint is SHA256:p1gYxjA6CQwmWH4KPkzuPoG4MRKEMMC3hUP7NK0vJS0.
This host key is known by the following other names/addresses:
    ~/.ssh/known_hosts:1: 10.0.0.11
    ~/.ssh/known_hosts:4: 10.0.0.12
    ~/.ssh/known_hosts:5: 10.0.0.13
Are you sure you want to continue connecting (yes/no/[fingerprint])? yes
/usr/bin/ssh-copy-id: INFO: attempting to log in with the new key(s), to filter out any that are already installed
/usr/bin/ssh-copy-id: INFO: 1 key(s) remain to be installed -- if you are prompted now it is to install the new keys
root@10.0.0.14's password:

Number of key(s) added: 1

Now try logging into the machine, with:   "ssh 'root@10.0.0.14'"
and check to make sure that only the key(s) you wanted were added.

# 测试所有节点免密
[root@gcr-client ~]# ansible servers -m ping
10.0.0.14 | SUCCESS => {
    "ansible_facts": {
        "discovered_interpreter_python": "/usr/bin/python3"
    },
    "changed": false,
    "ping": "pong"
}
10.0.0.13 | SUCCESS => {
    "ansible_facts": {
        "discovered_interpreter_python": "/usr/bin/python3"
    },
    "changed": false,
    "ping": "pong"
}
10.0.0.12 | SUCCESS => {
    "ansible_facts": {
        "discovered_interpreter_python": "/usr/bin/python3"
    },
    "changed": false,
    "ping": "pong"
}
10.0.0.11 | SUCCESS => {
    "ansible_facts": {
        "discovered_interpreter_python": "/usr/bin/python3"
    },
    "changed": false,
    "ping": "pong"
}

# 安装DNS服务
[root@gcr-client ~]# ansible dns -m yum -a 'name=bind state=installed'
10.0.0.14 | CHANGED => {
    "ansible_facts": {
        "discovered_interpreter_python": "/usr/bin/python3"
    },
    "changed": true,
    "msg": "",
    "rc": 0,
    "results": [
        "Installed: bind-dnssec-utils-32:9.16.23-11.el9.x86_64",
        "Installed: python3-ply-3.11-14.el9.noarch",
        "Installed: bind-libs-32:9.16.23-11.el9.x86_64",
        "Installed: bind-license-32:9.16.23-11.el9.noarch",
        "Installed: bind-dnssec-doc-32:9.16.23-11.el9.noarch",
        "Installed: bind-utils-32:9.16.23-11.el9.x86_64",
        "Installed: fstrm-0.6.1-3.el9.x86_64",
        "Installed: libmaxminddb-1.5.2-3.el9.x86_64",
        "Installed: python3-setools-4.4.2-2.1.el9.x86_64",
        "Installed: python3-setuptools-53.0.0-12.el9.noarch",
        "Installed: python3-audit-3.0.7-103.el9.x86_64",
        "Installed: checkpolicy-3.5-1.el9.x86_64",
        "Installed: policycoreutils-python-utils-3.4-4.el9.noarch",
        "Installed: python3-bind-32:9.16.23-11.el9.noarch",
        "Installed: libuv-1:1.42.0-1.el9.x86_64",
        "Installed: python3-policycoreutils-3.4-4.el9.noarch",
        "Installed: bind-32:9.16.23-11.el9.x86_64",
        "Installed: python3-libsemanage-3.5-2.el9.x86_64",
        "Installed: protobuf-c-1.3.3-13.el9.x86_64"
    ]
}

# docker部署,虽说DNS节点不太需要Docker,不过无所谓,主要是不想再配置ansible文件了
[root@gcr-client ~]# ansible servers -m yum -a 'name=docker-ce state=installed'
[root@gcr-client ~]# ansible servers -m yum -a 'name=bind-utils state=installed'

# 配置DNS文件并分发到各个节点
[root@gcr-client ~]# cat resolv.conf
nameserver 10.0.0.14
nameserver 114.114.114.114
[root@gcr-client ~]# ansible servers -m copy -a 'src=resolv.conf dest=/etc/resolv.conf'

# 编写DNS服务配置并分发
[root@gcr-client ~]# cat named.conf
options {
	listen-on port 53 { any; };
	directory 	"/var/named";
	dump-file 	"/var/named/data/cache_dump.db";
	statistics-file "/var/named/data/named_stats.txt";
	memstatistics-file "/var/named/data/named_mem_stats.txt";
	secroots-file	"/var/named/data/named.secroots";
	recursing-file	"/var/named/data/named.recursing";
	allow-query     { any; };

	recursion yes;

	dnssec-validation yes;

	managed-keys-directory "/var/named/dynamic";
	geoip-directory "/usr/share/GeoIP";

	pid-file "/run/named/named.pid";
	session-keyfile "/run/named/session.key";

	include "/etc/crypto-policies/back-ends/bind.config";
};

logging {
        channel default_debug {
                file "data/named.run";
                severity dynamic;
        };
};

include "/etc/named.rfc1912.zones";
include "/etc/named.root.key";

[root@gcr-client ~]# ansible dns -m copy -a 'src=named.conf dest=/etc/named.conf'

# 分发区域配置文件
[root@gcr-client ~]# cat named.rfc1912.zones
zone "kudevops.cn" IN {
	type master;
	file "kudevops.cn.zone";
	allow-update { any; };
};

[root@gcr-client ~]# ansible dns -m copy -a 'src=named.rfc1912.zones dest=/etc/named.rfc1912.zones'

# 编写解析文件并分发到DNS服务器
[root@cdk-server named]# cat kudevops.cn.zone
$TTL 1D
@	        IN SOA	kudevops.cn. root.kudevops.cn. (
					0	 ; serial
					1D	 ; refresh
					1H	 ; retry
					1W	 ; expire
					3H ) ; minimum
	        NS	   ns.kudevops.cn.
ns          IN A    10.0.0.14
harbor      IN A    10.0.0.12
dragonfly   IN A    10.0.0.13

[root@gcr-client ~]# ansible dns -m copy -a 'src=kudevops.cn.zone dest=/var/named/kudevops.cn.zone'

# 启动DNS
[root@gcr-client ~]# ansible dns -m systemd -a 'name=named enabled=yes state=started'

# 测试DNS
[root@gcr-client ~]# ansible servers -m shell -a 'nslookup harbor.kudevops.cn'
[root@gcr-client ~]# ansible servers -m shell -a 'nslookup dragonfly.kudevops.cn'

# 启动Docker,这里我的docker是23版本,内置了compose的cli,所以我就不安装docker-compose了
[root@gcr-client ~]# ansible harbors -m systemd -a 'name=docker enabled=yes state=started'
# 部署Harbor(这里选用Docker-Compose)
[root@gcr-client ~]# wget https://github.com/goharbor/harbor/releases/download/v2.8.1/harbor-offline-installer-v2.8.1.tgz
[root@gcr-client ~]# tar xf harbor-offline-installer-v2.8.1.tgz
[root@gcr-client ~]# cd harbor/
[root@gcr-client harbor]# ls
common.sh  harbor.v2.8.2.tar.gz  harbor.yml.tmpl  install.sh  LICENSE  prepare
[root@gcr-client harbor]# cp harbor.yml.tmpl harbor.yml
[root@gcr-client harbor]# mkdir ssl
# 这里存放证书,可以
[root@gcr-client ssl]# ls
server.key  server.pem
# 配置harbor.yml
# Configuration file of Harbor

# The IP address or hostname to access admin UI and registry service.
# DO NOT use localhost or 127.0.0.1, because Harbor needs to be accessed by external clients.
hostname: registry.kudevops.cn

# http related config
http:
  # port for http, default is 80. If https enabled, this port will redirect to https port
  port: 80

# https related config
https:
  # https port for harbor, default is 443
  port: 443
  # The path of cert and key files for nginx
  certificate: /root/harbor/ssl/server.pem
  private_key: /root/harbor/ssl/server.key

# # Uncomment following will enable tls communication between all harbor components
# internal_tls:
#   # set enabled to true means internal tls is enabled
#   enabled: true
#   # put your cert and key files on dir
#   dir: /etc/harbor/tls/internal

# Uncomment external_url if you want to enable external proxy
# And when it enabled the hostname will no longer used
# external_url: https://reg.mydomain.com:8433

# The initial password of Harbor admin
# It only works in first time to install harbor
# Remember Change the admin password from UI after launching Harbor.
harbor_admin_password: Harbor12345

# Harbor DB configuration
database:
  # The password for the root user of Harbor DB. Change this before any production use.
  password: root123
  # The maximum number of connections in the idle connection pool. If it <=0, no idle connections are retained.
  max_idle_conns: 100
  # The maximum number of open connections to the database. If it <= 0, then there is no limit on the number of open connections.
  # Note: the default number of connections is 1024 for postgres of harbor.
  max_open_conns: 900
  # The maximum amount of time a connection may be reused. Expired connections may be closed lazily before reuse. If it <= 0, connections are not closed due to a connection's age.
  # The value is a duration string. A duration string is a possibly signed sequence of decimal numbers, each with optional fraction and a unit suffix, such as "300ms", "-1.5h" or "2h45m". Valid time units are "ns", "us" (or "µs"), "ms", "s", "m", "h".
  conn_max_lifetime: 5m
  # The maximum amount of time a connection may be idle. Expired connections may be closed lazily before reuse. If it <= 0, connections are not closed due to a connection's idle time.
  # The value is a duration string. A duration string is a possibly signed sequence of decimal numbers, each with optional fraction and a unit suffix, such as "300ms", "-1.5h" or "2h45m". Valid time units are "ns", "us" (or "µs"), "ms", "s", "m", "h".
  conn_max_idle_time: 0

# The default data volume
data_volume: /data

# Harbor Storage settings by default is using /data dir on local filesystem
# Uncomment storage_service setting If you want to using external storage
# storage_service:
#   # ca_bundle is the path to the custom root ca certificate, which will be injected into the truststore
#   # of registry's containers.  This is usually needed when the user hosts a internal storage with self signed certificate.
#   ca_bundle:

#   # storage backend, default is filesystem, options include filesystem, azure, gcs, s3, swift and oss
#   # for more info about this configuration please refer https://docs.docker.com/registry/configuration/
#   filesystem:
#     maxthreads: 100
#   # set disable to true when you want to disable registry redirect
#   redirect:
#     disable: false

# Trivy configuration
#
# Trivy DB contains vulnerability information from NVD, Red Hat, and many other upstream vulnerability databases.
# It is downloaded by Trivy from the GitHub release page https://github.com/aquasecurity/trivy-db/releases and cached
# in the local file system. In addition, the database contains the update timestamp so Trivy can detect whether it
# should download a newer version from the Internet or use the cached one. Currently, the database is updated every
# 12 hours and published as a new release to GitHub.
trivy:
  # ignoreUnfixed The flag to display only fixed vulnerabilities
  ignore_unfixed: false
  # skipUpdate The flag to enable or disable Trivy DB downloads from GitHub
  #
  # You might want to enable this flag in test or CI/CD environments to avoid GitHub rate limiting issues.
  # If the flag is enabled you have to download the `trivy-offline.tar.gz` archive manually, extract `trivy.db` and
  # `metadata.json` files and mount them in the `/home/scanner/.cache/trivy/db` path.
  skip_update: false
  #
  # The offline_scan option prevents Trivy from sending API requests to identify dependencies.
  # Scanning JAR files and pom.xml may require Internet access for better detection, but this option tries to avoid it.
  # For example, the offline mode will not try to resolve transitive dependencies in pom.xml when the dependency doesn't
  # exist in the local repositories. It means a number of detected vulnerabilities might be fewer in offline mode.
  # It would work if all the dependencies are in local.
  # This option doesn't affect DB download. You need to specify "skip-update" as well as "offline-scan" in an air-gapped environment.
  offline_scan: false
  #
  # Comma-separated list of what security issues to detect. Possible values are `vuln`, `config` and `secret`. Defaults to `vuln`.
  security_check: vuln
  #
  # insecure The flag to skip verifying registry certificate
  insecure: false
  # github_token The GitHub access token to download Trivy DB
  #
  # Anonymous downloads from GitHub are subject to the limit of 60 requests per hour. Normally such rate limit is enough
  # for production operations. If, for any reason, it's not enough, you could increase the rate limit to 5000
  # requests per hour by specifying the GitHub access token. For more details on GitHub rate limiting please consult
  # https://developer.github.com/v3/#rate-limiting
  #
  # You can create a GitHub token by following the instructions in
  # https://help.github.com/en/github/authenticating-to-github/creating-a-personal-access-token-for-the-command-line
  #
  # github_token: xxx

jobservice:
  # Maximum number of job workers in job service
  max_job_workers: 10
  # The jobLogger sweeper duration (ignored if `jobLogger` is `stdout`)
  logger_sweeper_duration: 1 #days

notification:
  # Maximum retry count for webhook job
  webhook_job_max_retry: 3
  # HTTP client timeout for webhook job
  webhook_job_http_client_timeout: 3 #seconds

# Log configurations
log:
  # options are debug, info, warning, error, fatal
  level: info
  # configs for logs in local storage
  local:
    # Log files are rotated log_rotate_count times before being removed. If count is 0, old versions are removed rather than rotated.
    rotate_count: 50
    # Log files are rotated only if they grow bigger than log_rotate_size bytes. If size is followed by k, the size is assumed to be in kilobytes.
    # If the M is used, the size is in megabytes, and if G is used, the size is in gigabytes. So size 100, size 100k, size 100M and size 100G
    # are all valid.
    rotate_size: 200M
    # The directory on your host that store log
    location: /var/log/harbor

  # Uncomment following lines to enable external syslog endpoint.
  # external_endpoint:
  #   # protocol used to transmit log to external endpoint, options is tcp or udp
  #   protocol: tcp
  #   # The host of external endpoint
  #   host: localhost
  #   # Port of external endpoint
  #   port: 5140

#This attribute is for migrator to detect the version of the .cfg file, DO NOT MODIFY!
_version: 2.8.0

# Uncomment external_database if using external database.
# external_database:
#   harbor:
#     host: harbor_db_host
#     port: harbor_db_port
#     db_name: harbor_db_name
#     username: harbor_db_username
#     password: harbor_db_password
#     ssl_mode: disable
#     max_idle_conns: 2
#     max_open_conns: 0
#   notary_signer:
#     host: notary_signer_db_host
#     port: notary_signer_db_port
#     db_name: notary_signer_db_name
#     username: notary_signer_db_username
#     password: notary_signer_db_password
#     ssl_mode: disable
#   notary_server:
#     host: notary_server_db_host
#     port: notary_server_db_port
#     db_name: notary_server_db_name
#     username: notary_server_db_username
#     password: notary_server_db_password
#     ssl_mode: disable

# Uncomment external_redis if using external Redis server
# external_redis:
#   # support redis, redis+sentinel
#   # host for redis: <host_redis>:<port_redis>
#   # host for redis+sentinel:
#   #  <host_sentinel1>:<port_sentinel1>,<host_sentinel2>:<port_sentinel2>,<host_sentinel3>:<port_sentinel3>
#   host: redis:6379
#   password:
#   # Redis AUTH command was extended in Redis 6, it is possible to use it in the two-arguments AUTH <username> <password> form.
#   # username:
#   # sentinel_master_set must be set to support redis+sentinel
#   #sentinel_master_set:
#   # db_index 0 is for core, it's unchangeable
#   registry_db_index: 1
#   jobservice_db_index: 2
#   trivy_db_index: 5
#   idle_timeout_seconds: 30

# Uncomment uaa for trusting the certificate of uaa instance that is hosted via self-signed cert.
# uaa:
#   ca_file: /path/to/ca

# Global proxy
# Config http proxy for components, e.g. http://my.proxy.com:3128
# Components doesn't need to connect to each others via http proxy.
# Remove component from `components` array if want disable proxy
# for it. If you want use proxy for replication, MUST enable proxy
# for core and jobservice, and set `http_proxy` and `https_proxy`.
# Add domain to the `no_proxy` field, when you want disable proxy
# for some special registry.
proxy:
  http_proxy:
  https_proxy:
  no_proxy:
  components:
    - core
    - jobservice
    - trivy

# metric:
#   enabled: false
#   port: 9090
#   path: /metrics

# Trace related config
# only can enable one trace provider(jaeger or otel) at the same time,
# and when using jaeger as provider, can only enable it with agent mode or collector mode.
# if using jaeger collector mode, uncomment endpoint and uncomment username, password if needed
# if using jaeger agetn mode uncomment agent_host and agent_port
# trace:
#   enabled: true
#   # set sample_rate to 1 if you wanna sampling 100% of trace data; set 0.5 if you wanna sampling 50% of trace data, and so forth
#   sample_rate: 1
#   # # namespace used to differenciate different harbor services
#   # namespace:
#   # # attributes is a key value dict contains user defined attributes used to initialize trace provider
#   # attributes:
#   #   application: harbor
#   # # jaeger should be 1.26 or newer.
#   # jaeger:
#   #   endpoint: http://hostname:14268/api/traces
#   #   username:
#   #   password:
#   #   agent_host: hostname
#   #   # export trace data by jaeger.thrift in compact mode
#   #   agent_port: 6831
#   # otel:
#   #   endpoint: hostname:4318
#   #   url_path: /v1/traces
#   #   compression: false
#   #   insecure: true
#   #   timeout: 10s

# Enable purge _upload directories
upload_purging:
  enabled: true
  # remove files in _upload directories which exist for a period of time, default is one week.
  age: 168h
  # the interval of the purge operations
  interval: 24h
  dryrun: false

# Cache layer configurations
# If this feature enabled, harbor will cache the resource
# `project/project_metadata/repository/artifact/manifest` in the redis
# which can especially help to improve the performance of high concurrent
# manifest pulling.
# NOTICE
# If you are deploying Harbor in HA mode, make sure that all the harbor
# instances have the same behaviour, all with caching enabled or disabled,
# otherwise it can lead to potential data inconsistency.
cache:
  # not enabled by default
  enabled: false
  # keep cache for one day by default
  expire_hours: 24
# 将harbor目录分发给harbor主机
# 不过这里面有一点需要说明,harbor的安装在使用23版本集成的docker compose命令的时候需要改改install.sh,找到DOCKER_COMPOSE这个变量,将docker-compose改成docker compose
[root@gcr-client ~]# ansible harbors -m copy -a 'src=harbor dest=/root/'
10.0.0.12 | CHANGED => {
"changed": true,
"dest": "/root/",
"src": "/root/harbor"
}
# 脚本授权(当然不授权也行)
[root@gcr-client ~]# ansible harbors -m shell -a 'chmod +x /root/harbor/install.sh'
10.0.0.12 | CHANGED | rc=0 >>
[root@gcr-client ~]# ansible harbors -m shell -a 'chmod +x /root/harbor/prepare'
10.0.0.12 | CHANGED | rc=0 >>
# 登录harbor节点开始安装harbor
[root@gcr-harbor harbor]# ./install.sh
[Step 0]: checking if docker is installed ...
Note: docker version: 24.0.2
[Step 1]: checking docker-compose is installed ...
Note: Docker Compose version v2.18.1
[Step 2]: loading Harbor images ...
Loaded image: goharbor/registry-photon:v2.8.1
Loaded image: goharbor/notary-server-photon:v2.8.1
Loaded image: goharbor/harbor-core:v2.8.1
Loaded image: goharbor/harbor-jobservice:v2.8.1
Loaded image: goharbor/harbor-exporter:v2.8.1
Loaded image: goharbor/trivy-adapter-photon:v2.8.1
Loaded image: goharbor/prepare:v2.8.1
Loaded image: goharbor/redis-photon:v2.8.1
Loaded image: goharbor/nginx-photon:v2.8.1
Loaded image: goharbor/notary-signer-photon:v2.8.1
Loaded image: goharbor/harbor-portal:v2.8.1
Loaded image: goharbor/harbor-log:v2.8.1
Loaded image: goharbor/harbor-db:v2.8.1
Loaded image: goharbor/harbor-registryctl:v2.8.1
[Step 3]: preparing environment ...
[Step 4]: preparing harbor configs ...
prepare base dir is set to /root/harbor
Generated configuration file: /config/portal/nginx.conf
Generated configuration file: /config/log/logrotate.conf
Generated configuration file: /config/log/rsyslog_docker.conf
Generated configuration file: /config/nginx/nginx.conf
Generated configuration file: /config/core/env
Generated configuration file: /config/core/app.conf
Generated configuration file: /config/registry/config.yml
Generated configuration file: /config/registryctl/env
Generated configuration file: /config/registryctl/config.yml
Generated configuration file: /config/db/env
Generated configuration file: /config/jobservice/env
Generated configuration file: /config/jobservice/config.yml
Generated and saved secret to file: /data/secret/keys/secretkey
Successfully called func: create_root_cert
Generated configuration file: /compose_location/docker-compose.yml
Clean up the input dir
Note: stopping existing Harbor instance ...
[Step 5]: starting Harbor ...
[+] Building 0.0s (0/0)
[+] Running 10/10
✔ Network harbor_harbor Created 0.1s
✔ Container harbor-log Started 0.4s
✔ Container redis Started 1.4s
✔ Container registryctl Started 1.2s
✔ Container harbor-portal Started 1.3s
✔ Container registry Started 1.0s
✔ Container harbor-db Started 1.3s
✔ Container harbor-core Started 1.6s
✔ Container nginx Started 2.3s
✔ Container harbor-jobservice Started 2.1s
✔ ----Harbor has been installed and started successfully.----
# 这里Harbor就部署完成了,接下来就是不是Dragonfly了
[root@gcr-client ~]# ansible dragonflys -m systemd -a 'name=docker enabled=yes state=started'
[root@gcr-client ~]# ansible dragonflys -m shell -a 'git clone https://github.com/dragonflyoss/Dragonfly2.git'
10.0.0.13 | CHANGED | rc=0 >>
Cloning into 'Dragonfly2'...
# 修改一下docker-compose中的redis的名称为redis_dragonfly
[root@gcr-dragonfly docker-compose]# export IP=10.0.0.13 && echo $IP
10.0.0.13
# 开始部署
[root@gcr-dragonfly docker-compose]# ./run.sh
Docker Compose version v2.18.1
[+] Building 0.0s (0/0)
[+] Running 7/7
✔ Network docker-compose_default Created 0.1s
✔ Container mysql Started 0.5s
✔ Container redis_dragonfly Started 0.5s
✔ Container manager Started 0.8s
✔ Container scheduler Started 1.2s
✔ Container seed-peer Started 1.9s
✔ Container peer Started 2.4s
wait for all service ready: 2/6,0 times check
wait for all service ready: 3/6,1 times check
wait for all service ready: 5/6,2 times check
wait for all service ready: 5/6,3 times check
wait for all service ready: 5/6,4 times check
wait for all service ready: 5/6,5 times check
wait for all service ready: 5/6,6 times check
wait for all service ready: 5/6,7 times check
wait for all service ready: 5/6,8 times check
wait for all service ready: 5/6,9 times check
wait for all service ready: 5/6,10 times check
NAME IMAGE COMMAND SERVICE CREATED STATUS PORTS
manager dragonflyoss/manager:latest "/opt/dragonfly/bin/…" manager 28 seconds ago Up 22 seconds (healthy) 0.0.0.0:8080->8080/tcp, :::8080->8080/tcp, 0.0.0.0:65003->65003/tcp, :::65003->65003/tcp
mysql mariadb:10.6 "docker-entrypoint.s…" mysql 28 seconds ago Up 27 seconds (healthy) 0.0.0.0:3306->3306/tcp, :::3306->3306/tcp
peer dragonflyoss/dfdaemon:latest "/opt/dragonfly/bin/…" dfdaemon 28 seconds ago Up 25 seconds (healthy) 0.0.0.0:65000-65002->65000-65002/tcp, :::65000-65002->65000-65002/tcp
redis_dragonfly redis:6-alpine "docker-entrypoint.s…" redis 28 seconds ago Up 27 seconds (healthy) 0.0.0.0:6379->6379/tcp, :::6379->6379/tcp
scheduler dragonflyoss/scheduler:latest "/opt/dragonfly/bin/…" scheduler 28 seconds ago Up 21 seconds (healthy) 0.0.0.0:8002->8002/tcp, :::8002->8002/tcp
seed-peer dragonflyoss/dfdaemon:latest "/opt/dragonfly/bin/…" seed-peer 28 seconds ago Up 22 seconds (health: starting) 65001/tcp, 0.0.0.0:65006-65008->65006-65008/tcp, :::65006-65008->65006-65008/tcp
# 修改docker配置
[root@gcr-client ~]# cat << EOF>> /etc/docker/daemon.json
{
"registry-mirrors": ["http://dragonfly.kudevops.cn:65001"],
"exec-opts": ["native.cgroupdriver=systemd"],
"log-driver": "json-file",
"log-opts": {
"max-size": "100m"
},
"storage-driver": "overlay2"
}
EOF
[root@gcr-client ~]# systemctl daemon-reload && systemctl restart docker
# 验证测试
[root@gcr-client ~]# docker images
REPOSITORY TAG IMAGE ID CREATED SIZE
[root@gcr-client ~]# docker pull nginx:latest
latest: Pulling from library/nginx
5b5fe70539cd: Pull complete
441a1b465367: Pull complete
3b9543f2b500: Pull complete
ca89ed5461a9: Pull complete
b0e1283145af: Pull complete
4b98867cde79: Pull complete
4a85ce26214d: Pull complete
Digest: sha256:593dac25b7733ffb7afe1a72649a43e574778bf025ad60514ef40f6b5d606247
Status: Downloaded newer image for nginx:latest
docker.io/library/nginx:latest
[root@gcr-dragonfly docker-compose]# docker compose exec dfdaemon grep "peer task done" /var/log/dragonfly/daemon/core.log
{"level":"info","ts":"2023-06-16 04:30:46.830","caller":"peer/peertask_conductor.go:1330","msg":"peer task done, cost: 15786ms","peer":"10.0.0.13-1-658fe9e7-cd79-47ac-b1f8-8e325ff5a118","task":"abbb6e4a9c8d14757f7ec9a23fd03757a4a7bfb2b500477b93fc01a6a5f234de","component":"PeerTask","trace":"b994465fb1f0cb01fa315d011fcdecb7"}
{"level":"info","ts":"2023-06-16 04:30:47.250","caller":"peer/peertask_conductor.go:1330","msg":"peer task done, cost: 16206ms","peer":"10.0.0.13-1-4fb8f958-bebc-48ea-93ea-3e6381e230e7","task":"24bf81b732c3356ca6172443622ba68f4274b729b9a6c0cb90fce958a23dc8df","component":"PeerTask","trace":"62faa453a245660d70bdff85e5912c27"}
{"level":"info","ts":"2023-06-16 04:30:54.647","caller":"peer/peertask_conductor.go:1330","msg":"peer task done, cost: 7391ms","peer":"10.0.0.13-1-02e9caf4-858e-401e-bcce-d85c2fc89117","task":"3c1b4d2e20a39997a17014905b5afd9b68a479eb651d37e16e8c47e412cdc143","component":"PeerTask","trace":"e8bd114617532b75b7d3963a466187a6"}
{"level":"info","ts":"2023-06-16 04:30:57.201","caller":"peer/peertask_conductor.go:1330","msg":"peer task done, cost: 26158ms","peer":"10.0.0.13-1-23d89454-e19a-45cd-9d09-a2f6ada36313","task":"188ec7e04b1e1214dd06b91759b221011a0c887bdd5bbbf0bec0162ef81481df","component":"PeerTask","trace":"e2173b09d5c60a230517a41e14759ea8"}
{"level":"info","ts":"2023-06-16 04:30:57.755","caller":"peer/peertask_conductor.go:1330","msg":"peer task done, cost: 3105ms","peer":"10.0.0.13-1-4d95fd81-0c94-4702-82e4-374481df2c10","task":"0b975de97dc31dd1ff8d95ce2dbb3ee8b111314b770992b19c945b8fe3fd6672","component":"PeerTask","trace":"98e5a5eb15b5ce0fb5e80e19973781bb"}
{"level":"info","ts":"2023-06-16 04:30:58.107","caller":"peer/peertask_conductor.go:1330","msg":"peer task done, cost: 27063ms","peer":"10.0.0.13-1-ac69f453-952c-41f2-8f78-d388191a6993","task":"6f5c3a64d36ff3ddf768a0bbf438d7e839e29b699f7658c4996ca24940c2f6cd","component":"PeerTask","trace":"b7e92272f2c7f4c66a3710ef9f5be9e4"}
{"level":"info","ts":"2023-06-16 04:30:58.846","caller":"peer/peertask_conductor.go:1330","msg":"peer task done, cost: 1578ms","peer":"10.0.0.13-1-20837c7e-0215-4320-82be-a28d97861be9","task":"c759329eb4cd0ad4077185fd1870c2de167ed7fef4eb21c713aa82a3b2c45eeb","component":"PeerTask","trace":"ba097cfd1eb5e882e08f5fd89e05187a"}
{"level":"info","ts":"2023-06-16 04:30:59.258","caller":"peer/peertask_conductor.go:1330","msg":"peer task done, cost: 1499ms","peer":"10.0.0.13-1-f26517cf-89d9-4a04-b77b-19b6a5093b91","task":"79555b14b766d9552d481d3fc494b3c730b707e4073426b7fe7a13a1bad8733b","component":"PeerTask","trace":"c0688d9e874f53058e8df2e91f379feb"}
# 输出以上结果就是正常的
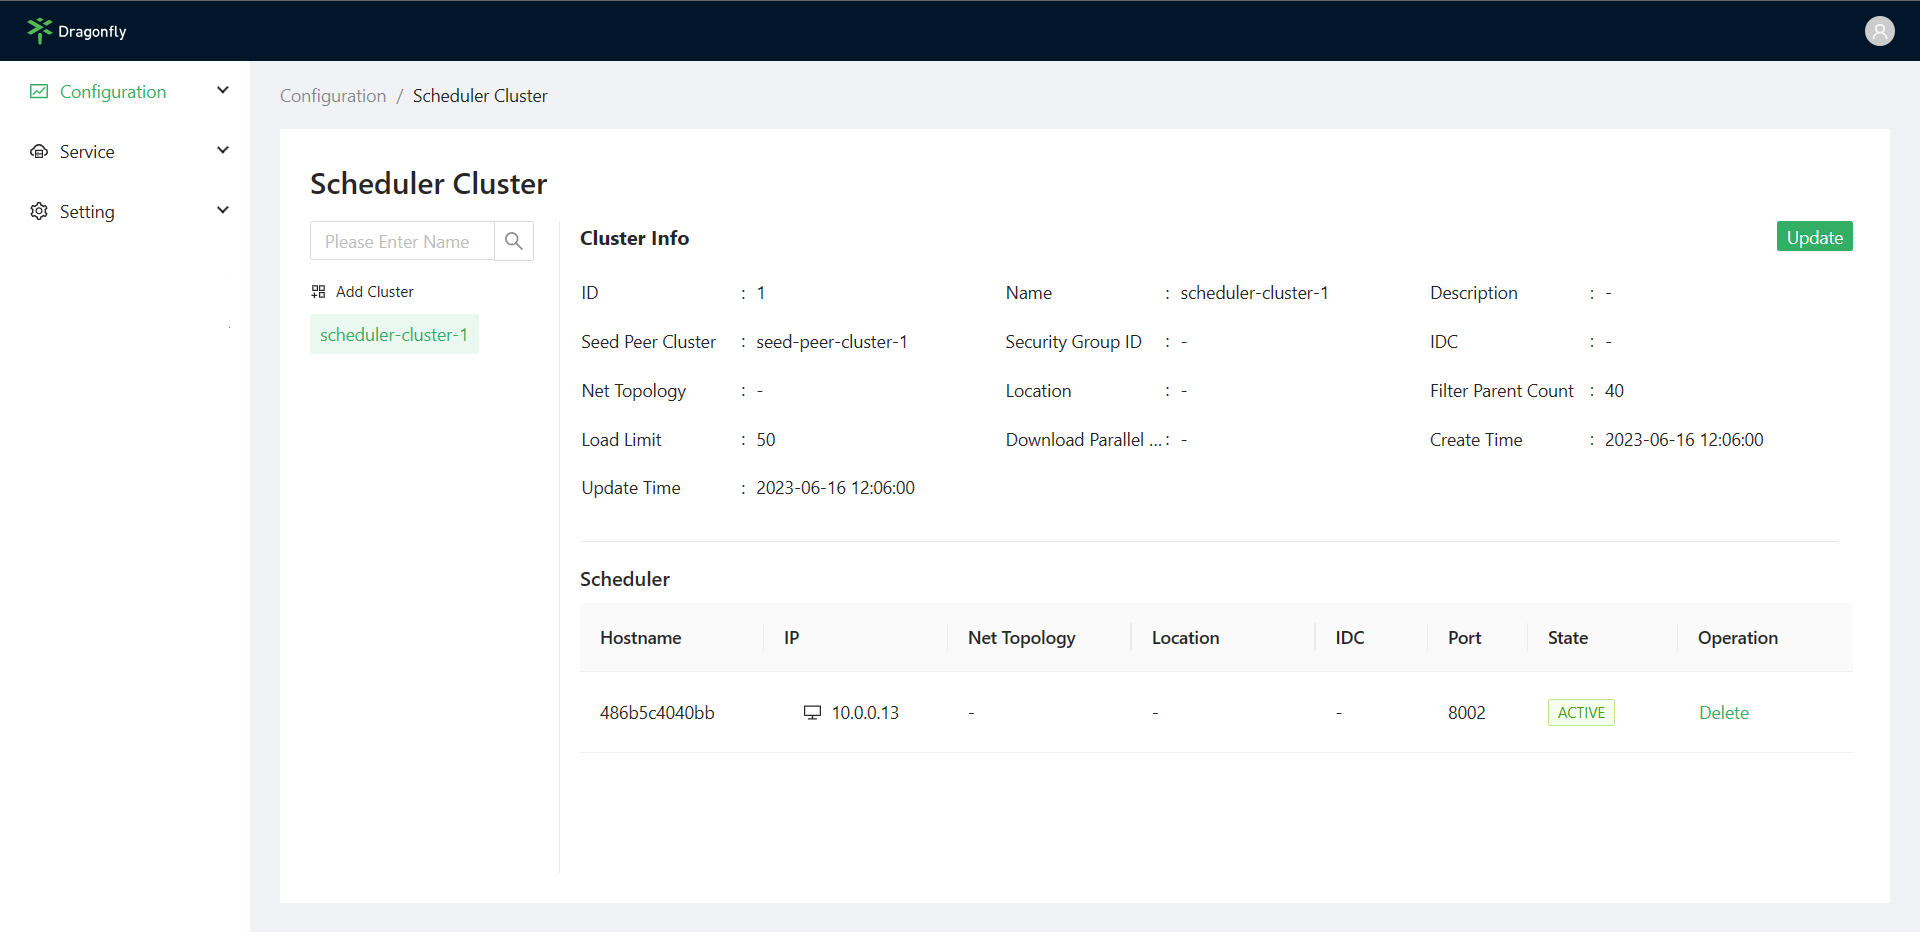
# 登录Manager控制台管理界面,在浏览器输入主机IP或者域名和8080端口访问manager控制台
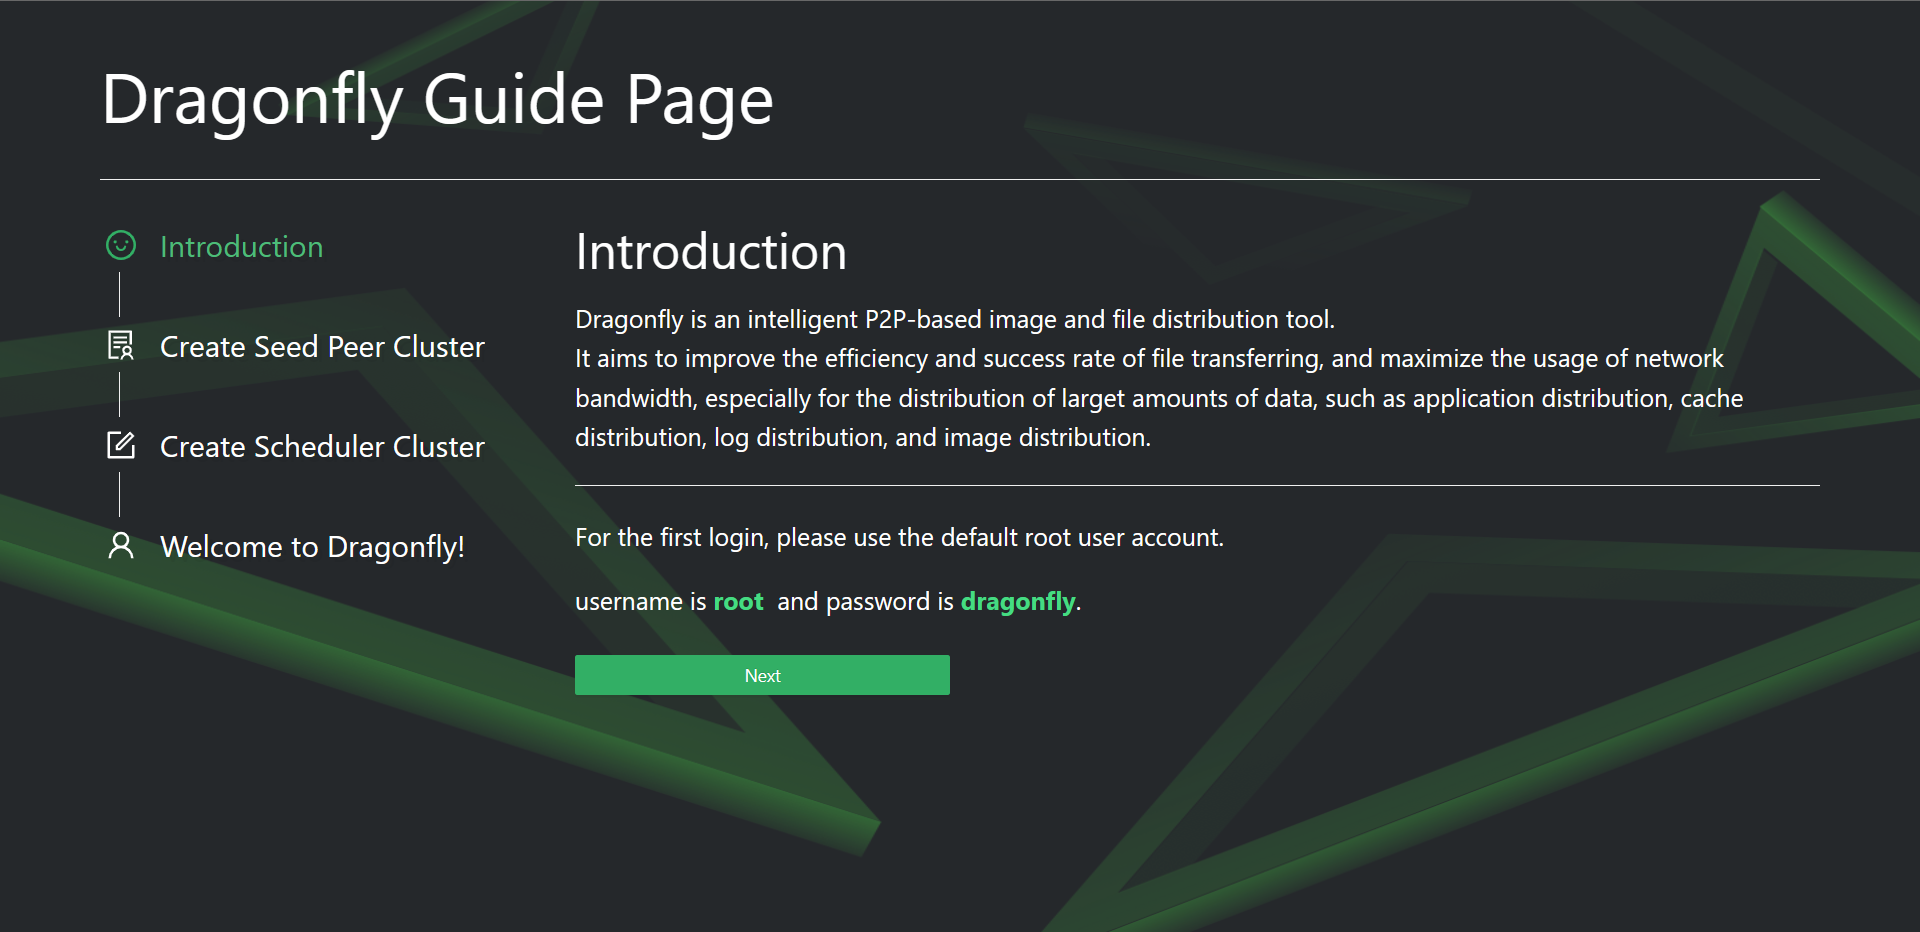
账号:root
密码:dragonfly
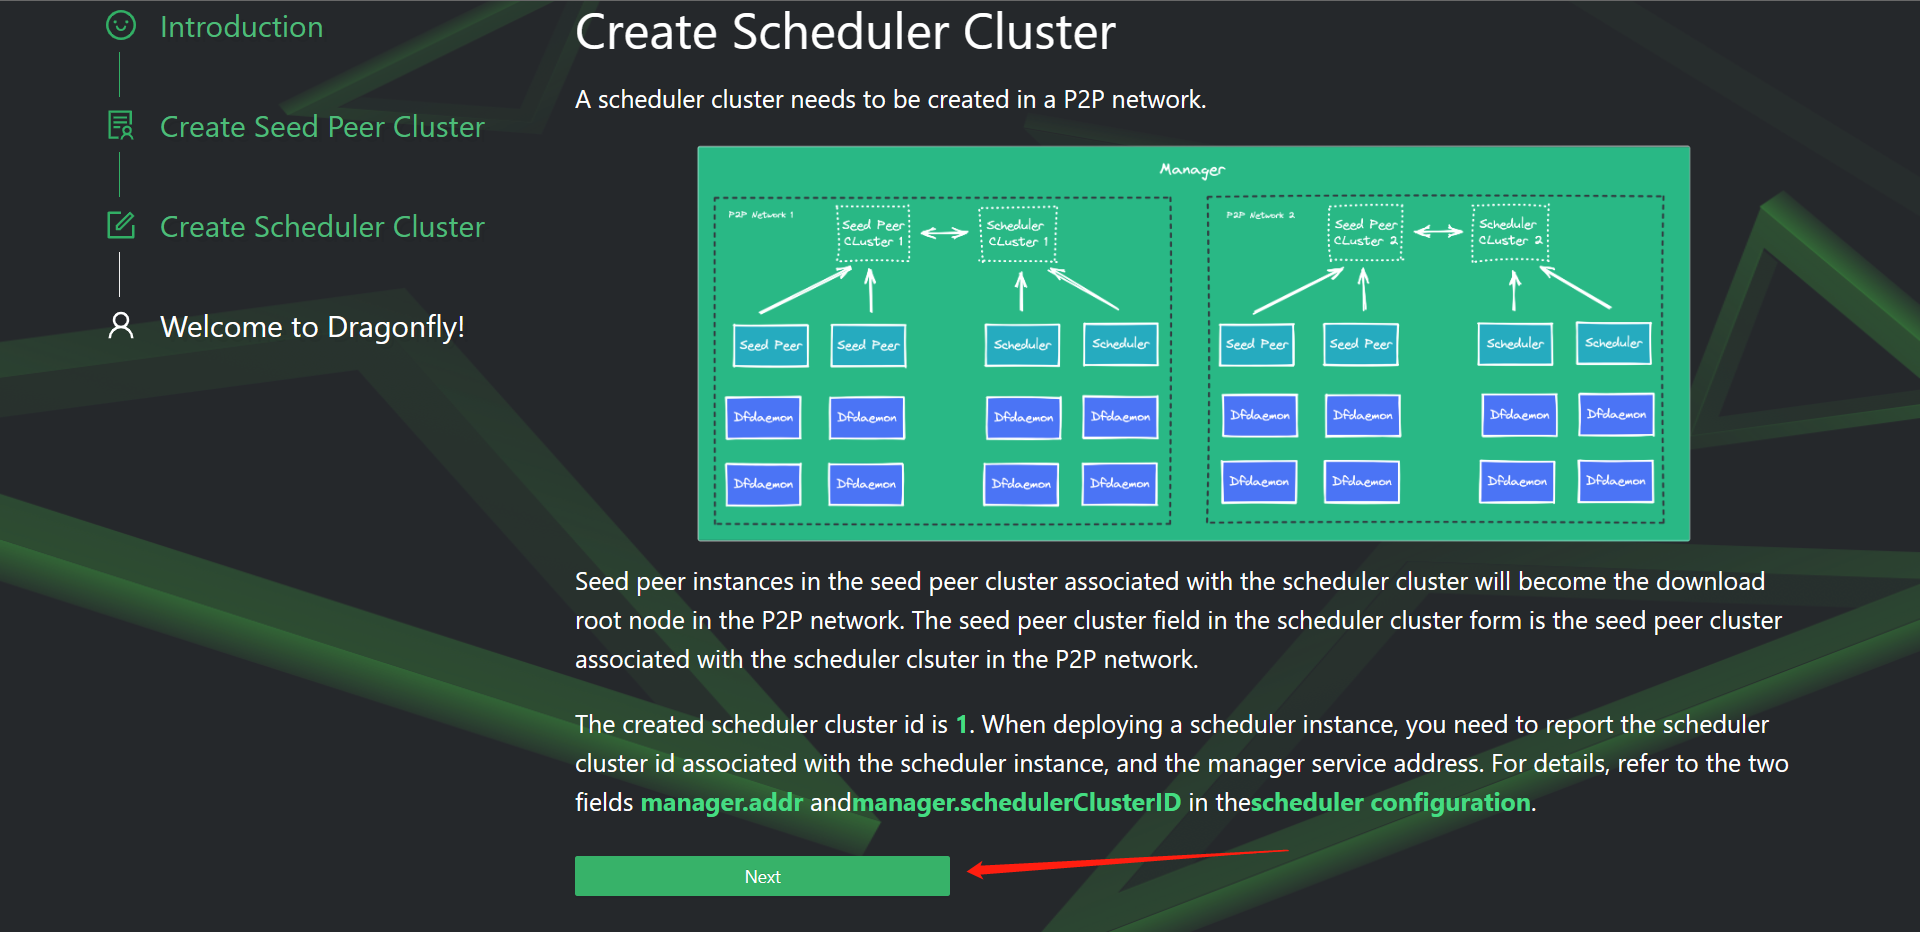
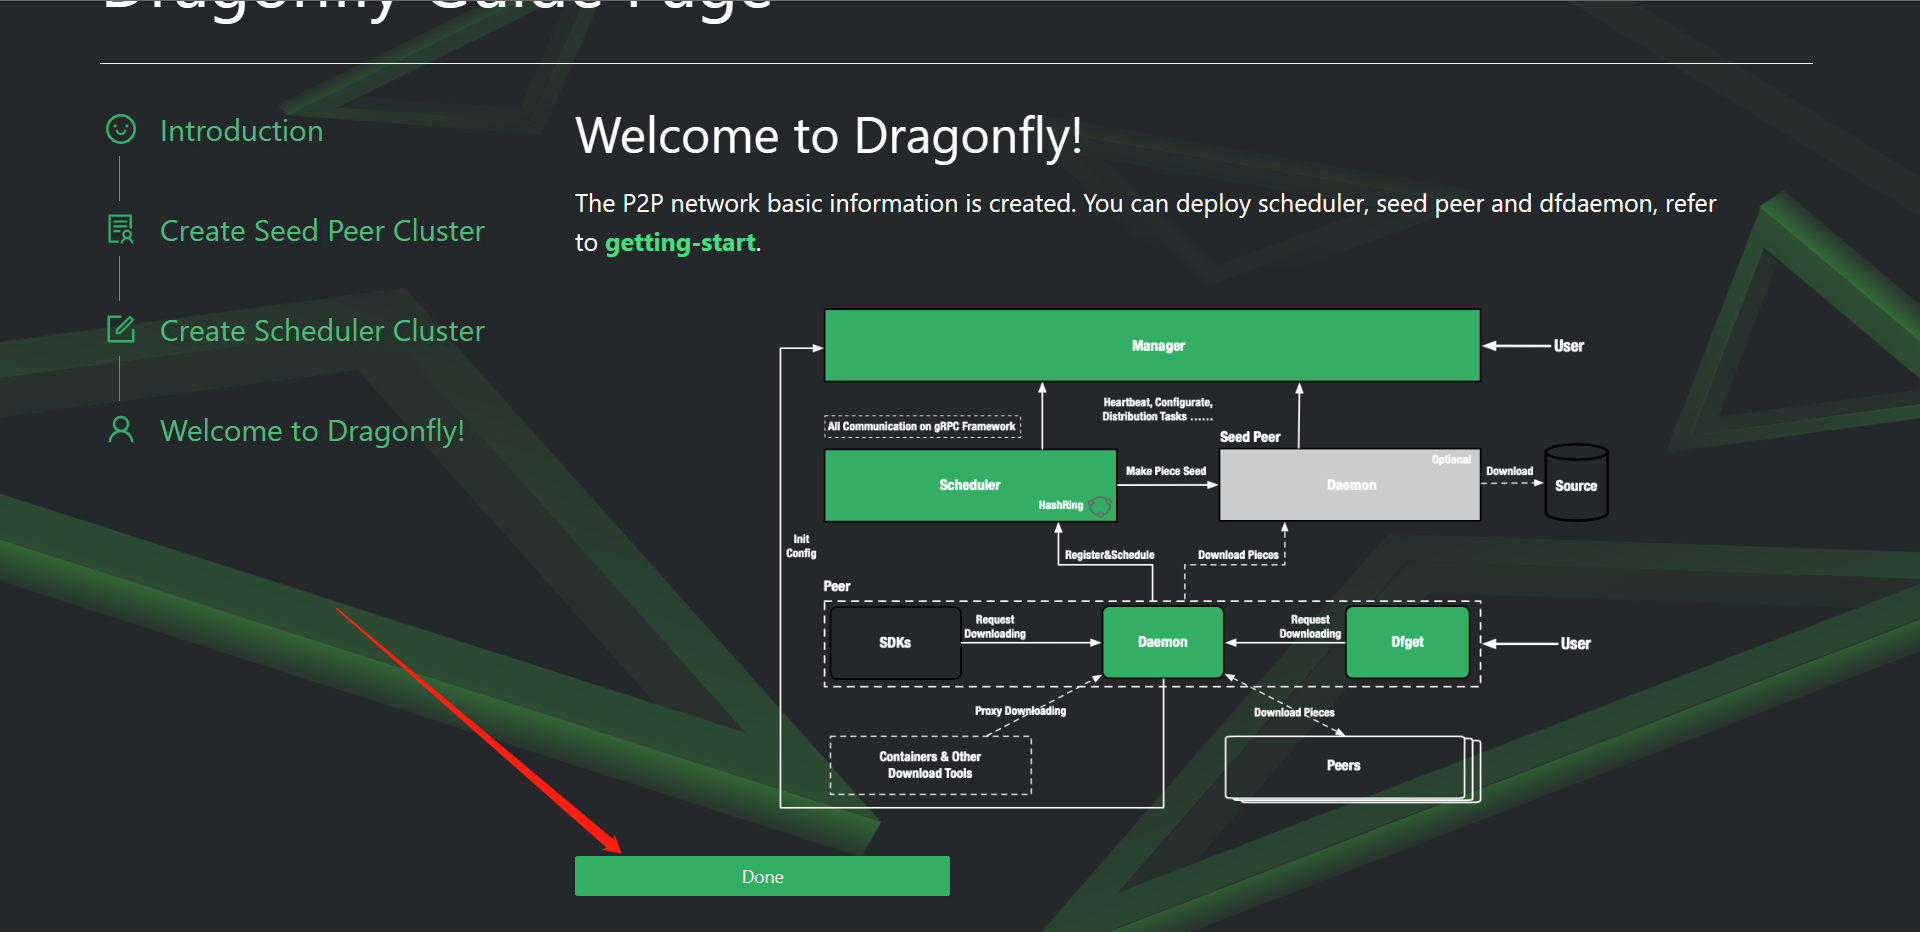
点击Next

7:Harbor配置分布式分发
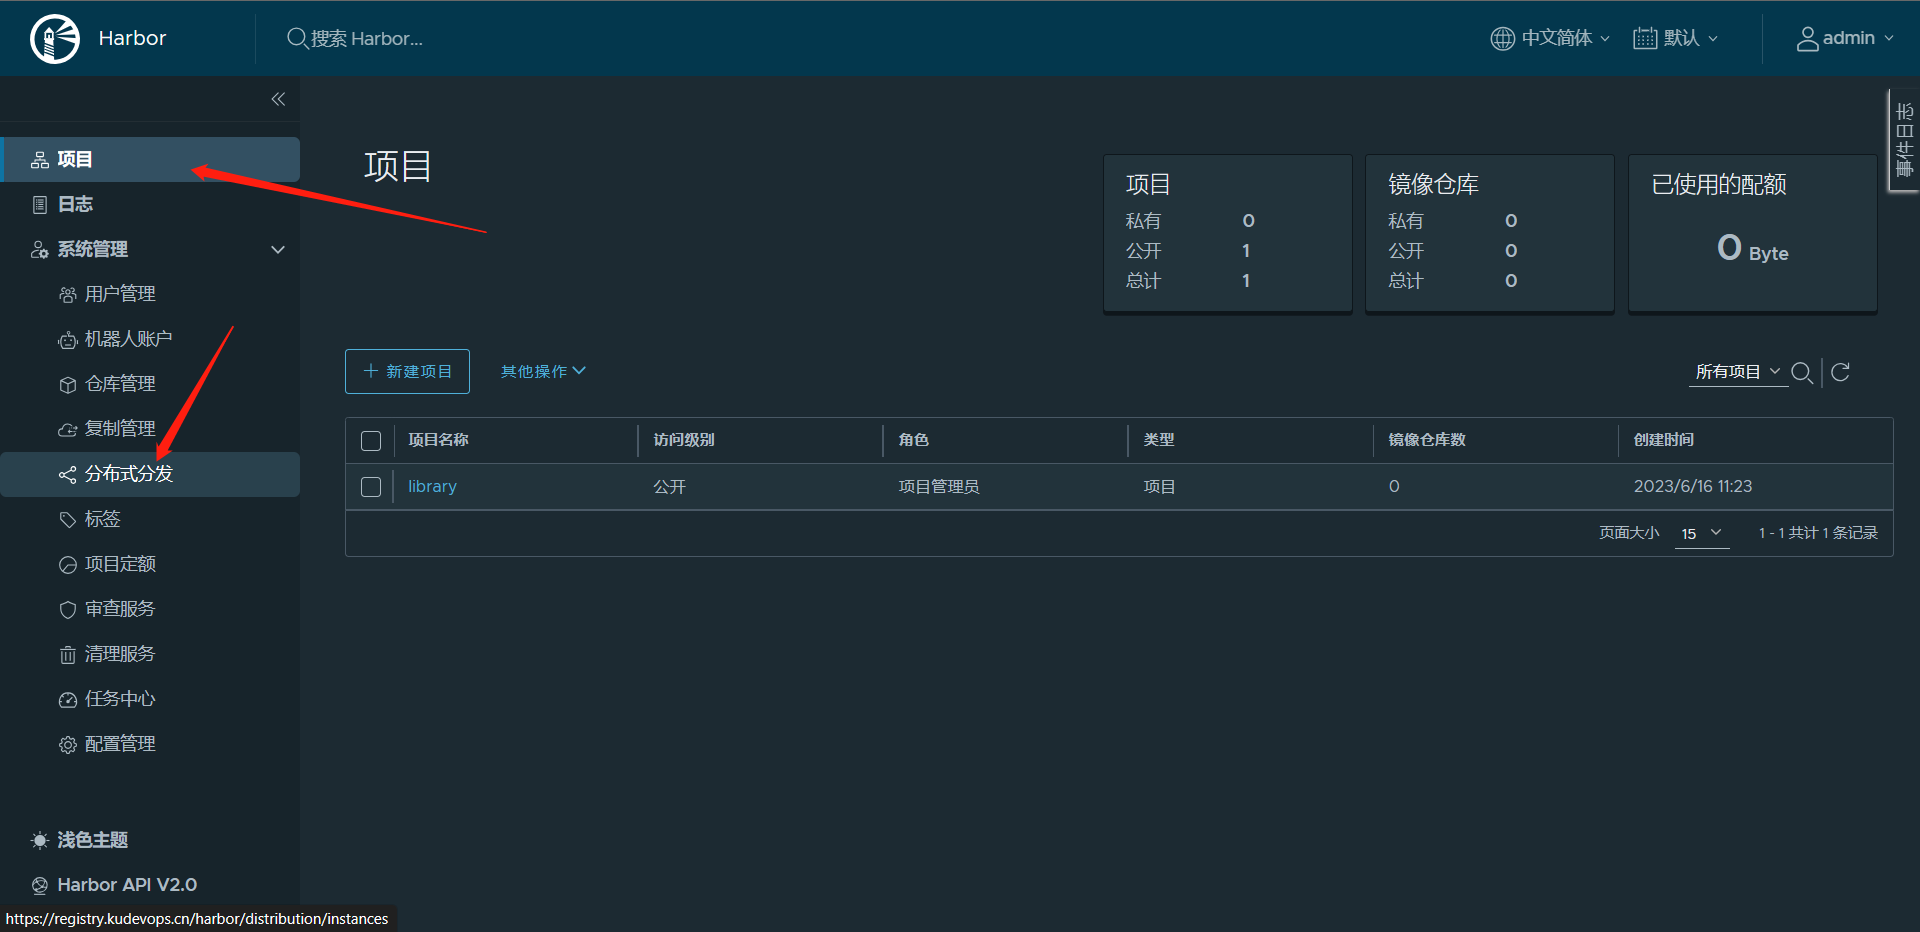

# 需要填写如下信息
1:供应商(必填):本处选择Dragonfly;
2:名称(必填):自定义一个名称即可;
3:端点(必填):http协议与Dragonfly地址及manager组件服务端口;
4:认证模式:NONE(无需身份验证)、Basic(需要 HTTP 基本身份验证模式、用户名和密码)、OAuth(OAuth 持有者令牌模式,需要持有者令牌)
5:选项:选择“启用”
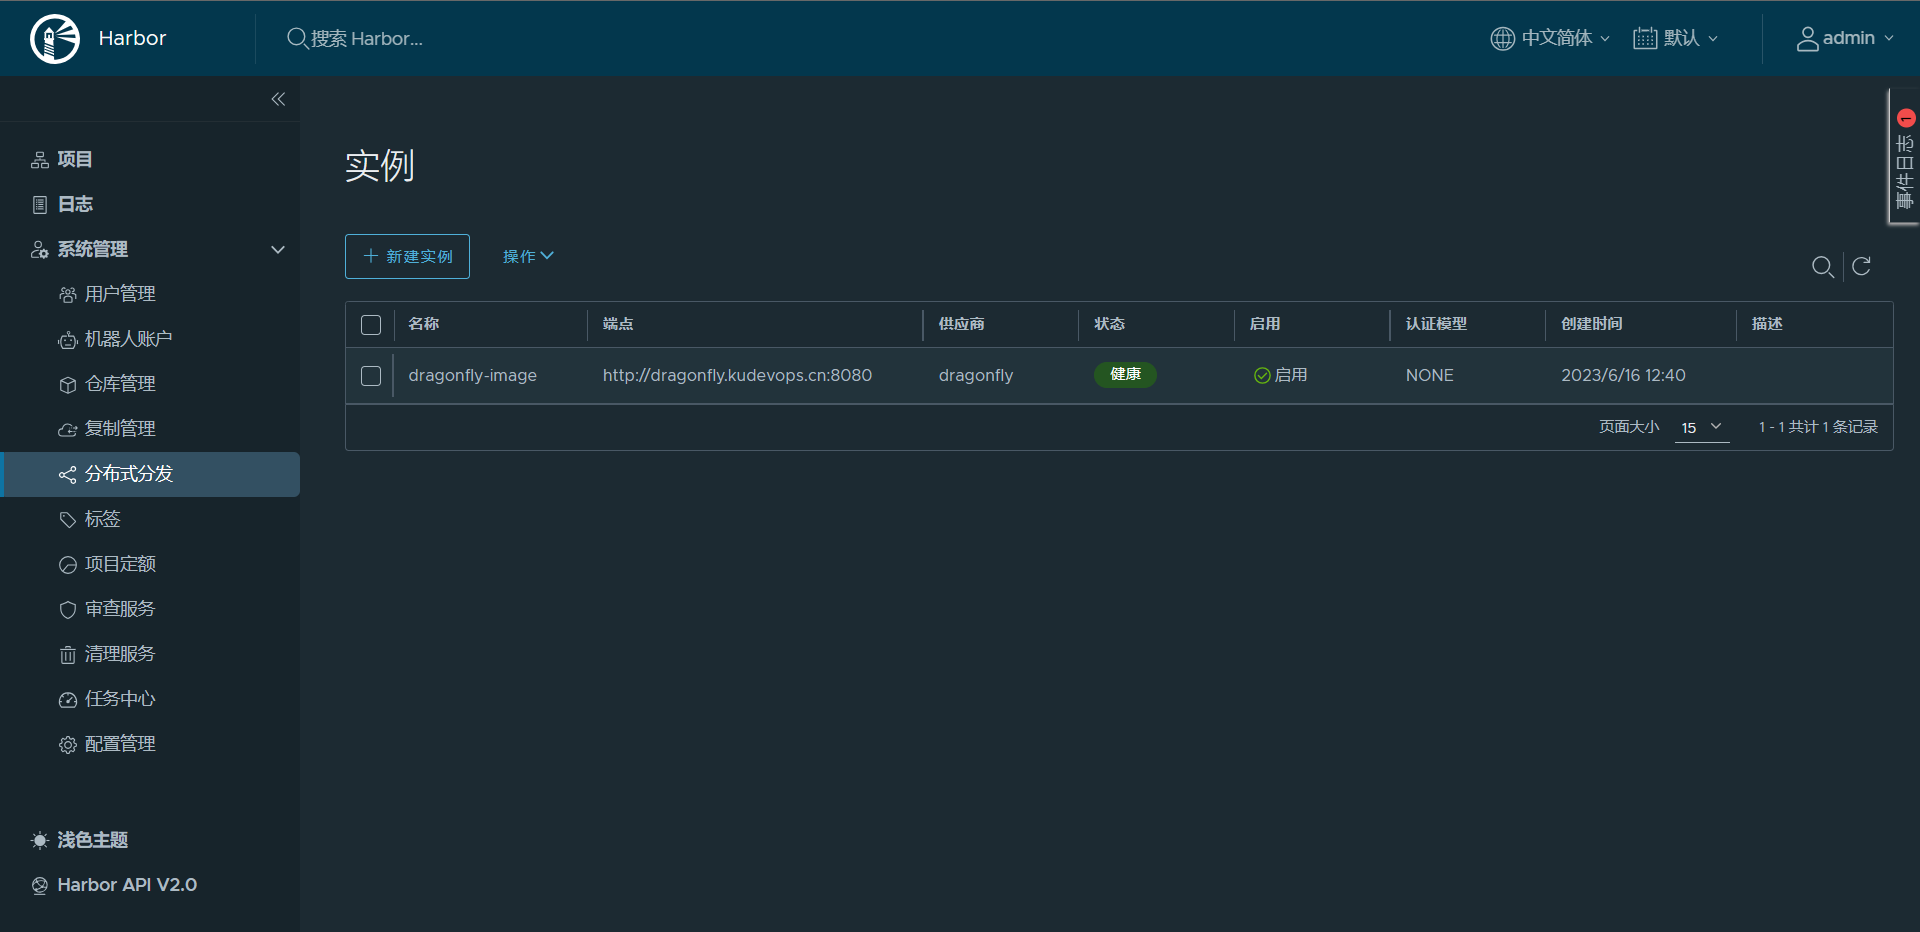
# 这样就配置完成了

 浙公网安备 33010602011771号